European ASP.NET MVC 4 and MVC 5 Hosting

BLOG about ASP.NET MVC 3, ASP.NET MVC 4, and ASP.NET MVC 5 Hosting and Its Technology - Dedicated to European Windows Hosting Customer

ASP.NET MVC 6 Hosting - HostForLIFE.eu :: Consuming Services in ASP.NET Core MVC Controller

clock June 23, 2023 12:21 by author Peter

Another interesting feature of ASP.NET Core is service consumption using Dependency Injection. I already provided the overview of Dependency Injection in my earlier articles. Moving further, in this article we will see how one can inject and consume services to controller using dependency injection.

In ASP.NET, you can access services at any stage of your HTTP pipeline through dependency injection. By default, it provides Constructor injection, but it can easily be replaced by any other container of your choice. Before moving ahead, one point is very important to understand and that is lifetime of services.
ASP.NET  Core allows you to configure four different lifetimes for your services.

  • Transient - Created on every request.
  • Scoped - Created once per request.
  • Singleton - Created first time when they are requested.
  • Instance - Created in ConfigureServices method and behaves like a Singleton.

To understand the service consumption inan easier way, we will create a sample application going step-by-step. My example service will provide GUID to the respective controller. So, let's start quickly.

Create a new project - Create a new project using ASP.NET Web Application template as shown below:


Add Service Interface - Create an interface named IGUIDService under Services folder as shown below:
public interface IGUIDService
{
    string GenerateGUID();
}

Add Service Implementation - Create a class named GUIDServiceunder Services folder and provide the implementation of IGUIDService interface as shown below:
public class GUIDService : IGUIDService
{
    public string GenerateGUID()
    {
        return ("Generated GUID is: " + Guid.NewGuid()).ToString();
    }
}

Add a Controller - Next task is to add a Controller namedGUIDController by right clicking on Controllers folder as shown below:

Add a View - Before adding a View, create a folder named under Views folder. Now add a View by right clicking on GUID folder as shown:

Update the code inside View as shown below:

Use Service in Controller - Now instantiate the service and set the data for View as shown below:
public class GUIDController : Controller
{
    private IGUIDService _guidService;

    public GUIDController(IGUIDService guidService)
    {
        _guidService = guidService;
    }
    public IActionResult Index()
    {
        ViewData["GeneratedGUID"] = _guidService.GenerateGUID();
        return View();
    }
}


Register Service - Last step is to register the service in the ConfigureServices method of Startup class as shown below:
public void ConfigureServices(IServiceCollection services)
{
    ...
    ...
    services.AddMvc();
    services.AddInstance<IGUIDService>(new GUIDService());
}

Everything is set. Now run your application and you would be able to see GUID on browser as:

Hope you got an idea on how to inject services in ASP.NET Core 1.0.


ASP.NET MVC 6 Hosting - HostForLIFE.eu :: Process Filter In MVC

clock May 31, 2023 10:10 by author Peter

Action filter in MVC allows us to manage situations in which we wish to perform an operation prior to and following the execution of a controller action. We create a custom class that inherits the FilterAttribute class and implements the IActionFilter interface for this purpose. After creating the filter, we merely assign the class name to the controller as an attribute.

In this case, the FilterAttribute class allows the class to be used as an attribute, and the IActionFilter interface contains two methods titled OnActionExecuting and OnActionExecuted. OnActionExecuting is executed before the controller method, while OnActionExecuted is summoned after the controller method has been executed. This technique is extremely useful for archiving purposes. So let's examine how we can utilize this filter.
 
Let's begin by adding the MyActionFilter.cs class. Derive this class now from the FilterAttribute and the IActionFilter interfaces. Incorporate your custom logic within the OnActionExecuting and OnActionExecuted methods.Consequently, the code will appear as shown below.  

    public class MyActionFilter : FilterAttribute, IActionFilter  
    {  
        public void OnActionExecuted(ActionExecutedContext filterContext)  
        {  
            //Fires after the method is executed  
        }  
      
        public void OnActionExecuting(ActionExecutingContext filterContext)  
        {  
            //Fires before the action is executed  
        }  
    }  


Simply, apply the class as an attribute on the controller. Add debuggers on both the methods as well as the controller method.

    public class HomeController : Controller  
    {  
        [MyActionFilter]  
        public ActionResult Index()  
        {  
            return View();  
        }  
      
        public ActionResult About()  
        {  
            ViewBag.Message = "Your application description page.";  
            return View();  
        }  
      
        public ActionResult Contact()  
        {  
            ViewBag.Message = "Your contact page.";  
            return View();  
        }  
    }  

Run the Application and debug step by step to see the order of execution of the methods. First, the OnActionExecuting will be executed, then the controller method and finally the OnActionExecuted method.

I hope you enjoyed reading it. Happy coding.


ASP.NET MVC 6 Hosting - HostForLIFE.eu :: ASP.NET Core MVC Request Life Cycle

clock May 25, 2023 12:11 by author Peter

The ASP.NET Core MVC Request Life Cycle is a sequence of events, stages or components that interact with each other to process an HTTP request and generate a response that goes back to the client. In this article, we will discuss each and every stage of ASP.NET Core MVC Request Life Cycle in detail.
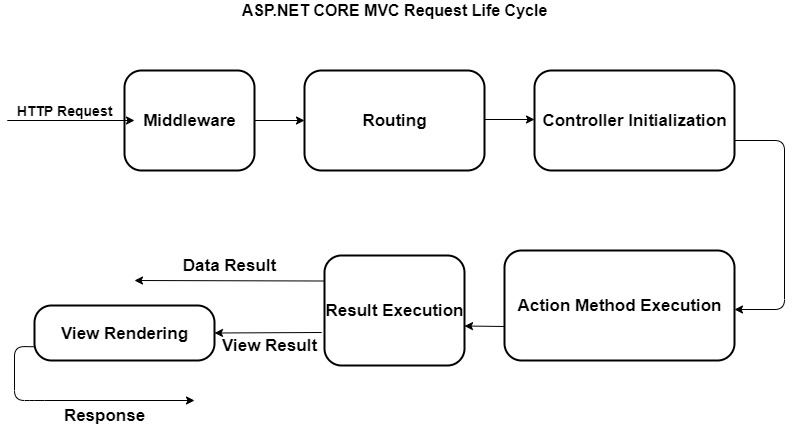

Middleware
Middleware component is the fundamental building element of the HTTP pipeline of an application. This is a collection of components that are combined to form a request pipeline that can process any incoming request.

Routing

Routing is a component of middleware that implements the MVC framework. With the aid of convention routes and attribute routes, the routing Middleware component determines how incoming requests are mapped to Controllers and action methods.


Controller Initialization

During this phase of the ASP.NET MVC Core Request Life Cycle, controller initialization and execution occur. Controllers are in charge of processing inbound requests. The controller chooses the appropriate action methods based on the supplied route templates.

Method call implementation

After the controllers have been initialized, the action methods are executed and a view containing an HTML document that will be returned to the browser is returned.

Result Execution

During this phase of the ASP.NET MVC Core Request Life Cycle, the response to the initial HTTP request is executed. The MVC view engine renders a view and returns the HTML response if an action method returns a view result. If the result is not of type view, the action method will generate its own response.

Now, we will briefly discuss each phase of Middleware

Middleware component is the fundamental building element of the HTTP pipeline of an application. These are a series of components that comprise a request pipeline to handle any incoming request. Each new request is forwarded to the initial middleware component. After processing an incoming request, the component determines whether to generate a response or pass it on to the next component. Once the request has been processed, the response is sent back via these components.

The majority of middleware components are implemented as isolated classes that generate content. Adding the ContentComponent.cs class will allow us to create a content-generating middleware component.

using System.Text;
using System.Threading.Tasks;
using Microsoft.AspNetCore.Http;
namespace WebApplication
{
  public class ContentComponent
   {
     private RequestDelegate nextComponent;
     public ContentComponent(RequestDelegate nextMiddleware) => nextComponent = nextMiddleware;
     public async Task Invoke(HttpContext httpContext)
      {
        if (httpContext.Request.Path.ToString().ToLower() == "/edit")
         {
           await httpContext.Response.WriteAsync("This is edit URL component", Encoding.UTF8);
         }
        else
         {
           await nextComponent.Invoke(httpContext);
         }
      }
   }
}

This ContentComponent middleware component is defining a constructor, and inside constructor its taking RequestDelegate object. This RequestDelegate object represents the next middleware component. ContentComponent component also defines an Invoke method. When ASP.NET Core application receives an incoming request, the Invoke method is called.

The HttpContext argument of the Invoke method provides information about the incoming HTTP request and the generated response that will be sent back to the client. The invoke method of  ContentComponent class checks whether incoming request is sent to /edit URL or not. If the request has been sent to /edit url then, in response a text message is sent.

Routing
Routing is a middleware component that implements MVC framework. In ASP.NET Core, the routing system is used to handle MVC URLs. The routing Middleware component decides how an incoming request can be mapped to Controllers and actions methods, with the help of convention routes and attribute routes. Routing bridges middleware and MVC framework by mapping incoming request to controller action methods.

In a particular application, MVC registers one or more routes using MapRoute method. MVC provides default routes that are given a name and a template to match incoming request URLs. The Controllers and action variables are placeholders that are replaced by matching segments of the URL.

These routes are passed into and consumed by routing middleware.

The MVC routing pipeline


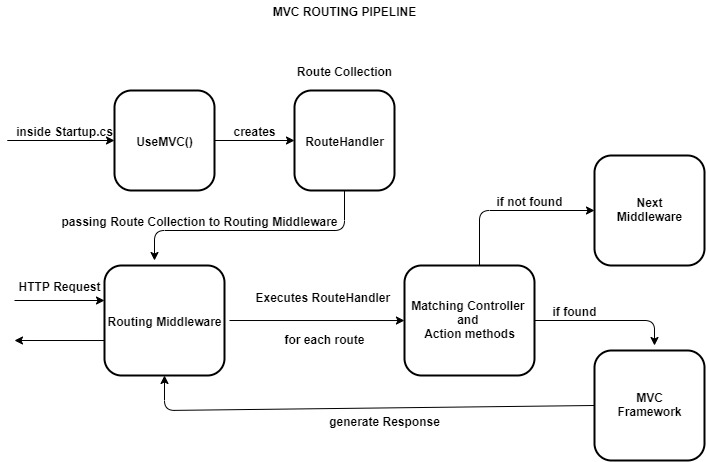
In ASP.NET Core, routing maps an incoming request to RouteHandler class, which is then passes as the collection of routes to the routing middleware. The routing middleware executes MVC RouteHandler for each route. If a matching controller and action method is found on a particular route, then the requested data is forwarded to the rest of the MVC framework which will generate a response.

There are two types of routing available in MVC which are:

Convention routing

This routing type uses application wide patterns to match a different URL to various controller action methods. Convention routes represent default possible routes that can be defined with the help of controller and action methods.

Attribute routing
This type of routing is implemented through attributes and applied directly to a specific controller or action method.

The convention routing methodology is implemented inside startup.cs file. In startup.cs, the UseMvc() method registers the routes, that are being supplied to it as a parameter inside MapRoute method.

public void Configure(IApplicationBuilder app, IHostingEnvironment env) {
 app.UseMvc(routes => {
    routes.MapRoute(
   name: "default",
   template: "{controller=Home}/{action=Index}/{id?}");
 });
}


A route attribute is defined on top of an action method inside controller class.
public class MoviesController: Controller {
  [Route(“movies / released / {year}/{month:regex(\\d{4})}”)]
    public ActionResult ByReleaseYear(int year, int month) {
     return Content(year + ”/”+month);
    }
}


Controller Initialization
At this stage, the process of initialization and execution of controllers takes place. Controllers are responsible for handling incoming requests which is done by mapping request to appropriate action method. The controller selects the appropriate action methods (to generate response) on the basis of route templates provided. A controller class inherits from controller base class. A controller class suffix class name with the Controller keyword.


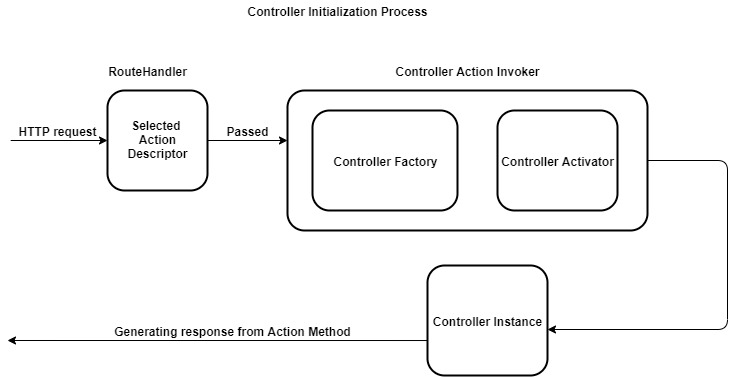
The MVC RouteHandler is responsible for selecting an action method candidate in the form of action descriptor. The RouteHandler then passes the action descriptor into a class called Controller action invoker. The class called Controller factory creates instance of a controller to be used by controller action method. The controller factory class depends on controller activator for controller instantiation.

After action method is selected, instance of controller is created to handle request. Controller instance provides several features such as action methods, action filters and action result. The activator uses the controller type info property on action descriptor to instantiate the controller by name. once the controller is created, the rest of the action method execution pipeline can run.

The controller factory is the component that is responsible for creating controller instance. The controller factory implements an interface called IControllerFactory. This interface contains two methods which are called CreateController and ReleaseController.

Action Method Execution Process

Authorization Filters
Authorization filters authorize or deny any incoming request.

Controller Creation
Instantiate Controller object.

Model Binding
Model Binding bind incoming request to Action method parameters.

Action Filters
OnActionExecuting method is always called before the action method is invoked.

Action Method Execution
Action method inside controller classes executes logic to create Action Result. Action method returns action results to generate response.

Action Filters
OnActionExecuted method called is always called after the action method has been invoked.

Authorization Filters

In ASP.NET Core MVC, there is an attribute called Authorize. Authorize is a filter, which can be applied to an action and it will be called by a MVC Core framework before and after that action or its result are executed.

These filters are used to provide security to application, including user authorization. If authorize attribute is applied to an action method, before the action is executed, the attribute will check if the current user is logged in or not. If not it will redirect the user to the login page. Authorization filters authorize or deny any incoming request.

In the below code example, Authorize Authorization filter(predefined filter) has been used over Index action method.
[Authorize]
public ViewResult Index() {
 return View();
}


The OnAuthorization method authorizes an HTTP request.
namespace WebApplication {
  public interface IAuthorizationFilter: IFilterMetadata {
   void OnAuthorization(AuthorizationFilterContext content);
}

Now I have demonstrated, how to create a custom Authorization filter. A class file called OnlyHttpsAttribute.cs has been created which defines the action filter.
using System;
  using Microsoft.AspNetCore.Http;
  using Microsoft.AspNetCore.Mvc;
  using Microsoft.AspNetCore.Mvc.Filters;
  namespace WebApplication {
   public class OnlyHttpsAttribute: IAuthorizationFilter {
    public void OnAuthorization(AuthorizationFilterContext approve) {
     if (!approve.HttpContext.Request.IsHttps) {
      approve.Result =
       new StatusCodeResult(StatusCodes.Status403Forbidden);
     }
    }
   }
}


In the below example, OnlyHttps attribute has been applied to the Home controller
using Microsoft.AspNetCore.Mvc;
using WebApplication;
namespace Controllers {
 [OnlyHttps]
 public class HomeController: Controller {
  public ViewResult Index() => View("Message",
   "this URL is working fine");
   }
}

Model Binding
Model binding maps incoming request to action method parameters. Action method parameters are inputs for an action method. Using data values acquired from HTTP request, model binding creates objects that an action method takes as an argument.

The model binders are the components which provide data values from incoming request to invoke action methods. The model binders search for these data values under three scenarios which are
    Form data values
    Routing variables
    Query strings

Each of these sources are examined in sequence until and unless an argument value is found.

Let’s consider a controller class as follows
using System.Linq;
using System.Web.Mvc;
namespace project.Controllers {
 public class CustomerController: Controller {
  public ActionResult Edit(int id) {
   return Content("id=", +id);
  }
 }
}


Now, suppose i requested an URL as /Customer/Edit/1

Here 1 is the value of id property. MVC translated that part of the URL and used it as the argument when it called the Edit method in the Customer controller class to service the request.To invoke the Edit method, MVC requires a certain type of value for the argument id, therefore model binding provide data values to invoke action methods.

Action Filters
Action filters are used to execute tasks instantly before and after action method execution is performed. In order to apply some logic to action methods, without having to add extra code to the controller class, action filters can be used either above the action method itself or above the Controller class.

Action filter implements two types of interfaces which are IActionFilter and IAsyncActionFilter.

The IActionFilter interface which defines action filter is as follows
public interface IActionFilter: IFilterMetadata {
 void OnActionExecuting(ActionExecutingContext content);
 void OnActionExecuted(ActionExecutedContext content);
}

The method OnActionExecuting is always called before the action method is invoked, and the method OnActionExecuted is always called after the action method has been invoked, whenever an action filter is applied to an action method.

Whenever an action filter is created, the data is provided using two different context classes, ActionExecutingContext and ActionExecutedContext.

Now I will demonstrate, how to create a custom action filter by deriving a class from the ActionFilterAttribute class. A class file called ActionAttribute.cs has been created which defines the action filter.
using Microsoft.AspNetCore.Mvc.Filters;
namespace WebApplication {
 public class ActionAttribute: ActionFilterAttribute {
  private Stopwatch a;
  public override void OnActionExecuting(ActionExecutingContext content) {
   a = Stopwatch.StartNew();
  }
  public override void OnActionExecuted(ActionExecutedContext content) {
   a.Stop();
   string output = "<div> calculated time is: " + $" {a.Elapsed.TotalMilliseconds} ms </div>";
   byte[] bytes = Encoding.ASCII.GetBytes(output);
   content.HttpContext.Response.Body.Write(bytes, 0, bytes.Length);
  }
 }
}

In the below example, Action attribute has been applied to the Home controller
using Microsoft.AspNetCore.Mvc;
using WebApplication;
namespace Controllers {
 [Action]
 public class HomeController: Controller {
  public ViewResult Index() => View("Message",
   "This index action is executed between action attribute");

 }
}

Action Method Execution
Action methods return objects that implements the IActionResult interface from the Microsoft.AspNetCore.Mvc namespace. The various types of response from the controller such as rendering a view or redirecting the client to another URL, all these responses are handled by IActionResult object, commonly known as action result.

When an an action result is returned by a specific action method, MVC calls its ExecuteResultAsync method, which generates response on behalf of the action method. The ActionContext argument provides context data for generating the response, including the HttpResponse object.

Controllers contain Action methods whose responsibility is to generate a response to an incoming request. An action method is any public method inside a controller that responds to incoming requests.
Public class HomeController: Controller {
 Public IActionResult Edit() {
  Return View();
 }
}


Here, Edit action method is defined inside Home controller.
using Microsoft.AspNetCore.Mvc;
using WebApplication23;
namespace WebApplication23.Controllers {
 public class HomeController: Controller {
  public ViewResult Index() => View("Form");
  };
 }
}


Here, Index method is defined inside Home controller, which is returning a view.

Result Execution

The action method returns action result. This action result is the base class for all action results in asp.net mvc. Depending on the result of an action method, it will return an instance of one of the classes that derive from action result.

Different types of action result are

TYPES HELPER METHOD DESCRIPTION
ViewResult View() Renders a view and retun HTML content
PartialViewResult PartialView() Returns partial view
ContentResult Content() Returns simple text
RedirectResult Rediect() Redirect result to URL
RedirectToRouteResult RedirectToAction() Redirect to an action method
JsonResult Json() Returns serialized json object
FileResult File() Returs a file
HttpNotFoundResult HttpNotFound() Returns not found or 404 error
EmptyResult   When action does not return values

During this stage of ASP.NET MVC Core Request Life Cycle, result i.e. the response generated to the original HTTP request, is executed. If an action method returns a view result, the MVC view engine renders a view and returns the HTML response. If result is not of view type, then action method will generate its own response.

using Microsoft.AspNetCore.Mvc;
using WebApplication23.example;
namespace WebApplication23.Controllers {
  public class HomeController: Controller {
   public ViewResult Index() => View("Form");
   public ViewResult ReceiveForm(string name, string state) => View("Details",$ "{name} lives in {state}");
}

In the above example Index action method is returning a view result, therefore the MVC view engine renders a view and returns the HTML response, which is a simple form.

In this article, we have discussed each and every stage of ASP.NET Core MVC Request Life Cycle in detail. All of the stages have been described with proper coding examples and life cycle diagrams.


ASP.NET MVC 6 Hosting - HostForLIFE.eu :: Learn About Filters In ASP.NET MVC

clock December 30, 2020 12:17 by author Peter

As part of this article, we will learn about ASP.Net MVC filters, their different types and we will create a custom log Action Filter using Visual Studio. So without wasting any time let's start.

What are ASP.Net MVC filters
In an ASP.Net MVC Web application, we have action methods defined in controllers that call from different views. For example, when the user clicks on some button on the view, a request goes to the designated controller and then the corresponding action method. Within this flow, sometimes we want to perform logic either before an action method is called or after an action method runs.
 
To fulfill the above condition ASP.Net MVC provides us filters. Filters are the custom classes that provide us with an option to add pre-action and post-action behavior to controller action methods.
 
ASP.NET MVC framework supports four different types of filters:

  • Authorization filters
  • Action filters
  • Result filters
  • Exception filters

Note
They are executed in the order listed above.
 
Authorization filters
In ASP.NET MVC web application by default, all the action methods of all the controllers can be accessible for all the users (for both authenticated and anonymous users both). For this, if we want to restrict some action methods from anonymous users or we want to allow the action methods only to an authenticated user, then you need to use the Authorization Filter in MVC.
 
The Authorization Filter provides two built-in attributes such as Authorize and AllowAnonymous. We can decorate our action methods with the Authorize attribute which allows access to the only authenticated user and we can use AllowAnonymous attribute to allow some action method to all users.
 
We can also create custom Authorization filters for this we have to implement IAuthenticationFilter interface and have overrides its OnAuthentication() and OnAuthenticationChallenge(). We are going deep into it.
 
Action filters
In the ASP.NET MVC web application, action filters are used to perform some logic before and after action methods. The output cache is one of the built-in action filters which we can use in our action methods.
    [OutputCache(Duration=100)]
    public ActionResult Index()
    {
       return View();
    }

We can also create a custom action filter either by implementing IActionFilter interface and FilterAttribute class or by deriving the ActionFilterAttribute abstract class. As part of this article, I am covering creating a custom action filter using the ActionFilterAttribute abstract class.
 
ActionFilterAttribute includes the following method to override it:
    void OnActionExecuted(ActionExecutedContext filterContext)
    void OnActionExecuting(ActionExecutingContext filterContext)
    void OnResultExecuted(ResultExecutedContext filterContext)
    void OnResultExecuting(ResultExecutingContext filterContext)

We will see this in detail below.
 
Result filters
 
In an ASP.NET MVC web application, result filters are used to perform some logic before and after a view result is executed. For example, we might want to modify a view result right before the view is rendered.
 
Exception filters
 
In the ASP.NET MVC web application, we can use an exception filter to handle errors raised by either our controller actions or controller action results. We also can use exception filters to log errors.
 
Creating a Log Action Filter
Open Visual Studio and create a new ASP.NET Web Application

Choose Empty, select “MVC” and then click the OK button.

Add a ‘Filters’ folder and create a new class LogActionFilter.cs under it:
    using System.Diagnostics;  
    using System.Web.Mvc;  
    using System.Web.Routing;  
      
    namespace FiltersMVC.Filters  
    {  
        public class LogActionFilter : ActionFilterAttribute  
      
        {  
            public override void OnActionExecuting(ActionExecutingContext filterContext)  
            {  
                Log("OnActionExecuting", filterContext.RouteData);  
            }  
      
            public override void OnActionExecuted(ActionExecutedContext filterContext)  
            {  
                Log("OnActionExecuted", filterContext.RouteData);  
            }  
      
            public override void OnResultExecuting(ResultExecutingContext filterContext)  
            {  
                Log("OnResultExecuting", filterContext.RouteData);  
            }  
      
            public override void OnResultExecuted(ResultExecutedContext filterContext)  
            {  
                Log("OnResultExecuted", filterContext.RouteData);  
            }  
      
      
            private void Log(string methodName, RouteData routeData)  
            {  
                var controllerName = routeData.Values["controller"];  
                var actionName = routeData.Values["action"];  
                var message = $"{methodName} controller:{controllerName} action:{actionName}";  
                Debug.WriteLine(message, "Action Filter Log");  
            }  
        }  
    }  


We overrides OnActionExecuting(), OnActionExecuted(), OnResultExecuting(), and OnResultExecuted() methods all are calling the Log() method. The name of the method and the current route data is passed to the Log() method. The Log() method writes a message to the Visual Studio Output window.
 
Now, add HomeController.cs under the Controllers folder.
    using FiltersMVC.Filters;  
    using System.Web.Mvc;  
      
    namespace FiltersMVC.Controllers  
    {  
        [LogActionFilter]  
        public class HomeController : Controller  
        {  
            // GET: Home  
            public ActionResult Index()  
            {  
                return View();  
            }  
        }  
    }  

After adding the above files our folder structure will look like this:


Now run the application, we can see the results in the “Output” window.


ASP.NET MVC 6 Hosting - HostForLIFE.eu :: Ajax.ActionLink and Html.ActionLink in MVC

clock December 16, 2020 08:26 by author Peter

In this article, you will learn the use of the Ajax.ActionLink helper and Html.ActionLink. I will compare both to show you how they differ. Okay, let's begin with Html.ActionLink.

Html.ActionLink
Html.ActionLink creates a hyperlink on a view page and the user clicks it to navigate to a new URL. It does not link to a view directly, rather it links to a controller's action. Here are some samples of Html.ActionLink.
 
If you want to navigate to the same controller's action method, use the one given below. Razor is smart enough to assume the first param is link text and the second param is the action method name, if it finds only two parameters.
    @Html.ActionLink("Click here", // <-- Link text  
                     "Index" // <-- Action Method Name  
                     )  

It's rendered HTML: <a href="/">Click here</a>
 
If you want to navigate to a different controller's action method, use the one given below. You can even avoid typing "null" for the route value and htmlArguments. Here also, razor will assume the first param as link text, the second param as the action method name and the third param as the controller name, if it finds three parameters.
    @Html.ActionLink("Click here", // <-- Link text  
                     "About", // <-- Action Method Name  
                     "Home", // <-- Controller Name  
                     null, // <-- Route value  
                     null // <-- htmlArguments  
                     )  


It's rendered HTML: <a href="/Home/About">Click here</a>
 
If you want to navigate to the same controller's action method then use the one given below. Here razor will assume the first param is link text, second param is an action method and the third param is the route value. We can avoid typing "null" for the htmlArgument; that works fine.
    @Html.ActionLink("Edit", // <-- Link text  
                     "Edit", // <-- Action Method Name  
                     new { id=item.CustomerID }, // <-- Route value  
                     null // <-- htmlArguments  
                    )  


It's rendered HTML: <a href="/Home/Edit/187">Edit</a>
 
If you want to navigate to the same controller's action method then use the one given below. Here razor will assume the first param is link text, second param is the action method and the third param is the route value. Instead of typing "null" or avoiding the htmlAttribute, I am using the "class" attribute with "ui-btn" as the name.
    @Html.ActionLink("Edit", // <-- Link text  
                     "Edit", // <-- Action Method Name  
                     new { id=item.CustomerID }, // <-- Route value  
                     new {@class="ui-btn"} // <-- htmlArguments  
                    )  

It's rendered HTML: <a class="ui-btn" href="/Home/Edit/187">Edit</a>
 
What if one wants rendered HTML to be as given below that is an application-specific anonymous attribute:
<a class="ui-btn" data-val="abc" href="/Home/Edit/ANTON">Edit</a>
 
If you try to do it as given below, you will get the error:

The reason is that we can't use an anonymous property/attribute having a dash in the name. Use an underscore instead of a dash and MVC will automatically replace the underscore with a dash in the rendered HTML, here it is:
    @Html.ActionLink("Edit", // <-- Link text  
                     "Edit", // <-- Action Method Name  
                     new { id=item.CustomerID }, // <-- Route arguments  
                     new {@class="ui-btn", data_val="abc"} // <-- htmlArguments  
                    )  

That's how we work around in MVC for any anonymous property.
 
Note: You can notice that Html.ActionLink takes at least two parameters as Html.ActionLink(LinkText, ActionMethod).
 
Ajax.ActionLink

Ajax.ActionLink is much like the Html.ActionLink counterpart, it also creates the hyperlink <a href="">Click here</a> but when the user clicks it and has a JavaScript enabled browser, Ajax.ActionLink sends the asynchronous request instead of navigating to the new URL. With the Ajax.ActionLink we specify what controller's action method is to be invoked and also specify what to do with the response coming back from the action method.
 
Let's create an Ajax.ActionLink helper that will send an asynchronous request to the action method and will update the DOM with the result.
 
Step 1
At first we need an Ajax.ActionLink that will send the async request, so here we go:
    <h2>Customers</h2>  
    @Ajax.ActionLink("Customer from Germany", // <-- Text to display  
                     "Germany", // <-- Action Method Name  
                     new AjaxOptions  
                     {  
                         UpdateTargetId="CustomerList", // <-- DOM element ID to update  
                         InsertionMode = InsertionMode.Replace, // <-- Replace the content of DOM element  
                         HttpMethod = "GET" // <-- HTTP method  
                     })  
    @Ajax.ActionLink("Customer from Mexico", // <-- Text to display  
                     "Mexico", // <-- Action Method Name  
                     new AjaxOptions  
                     {  
                         UpdateTargetId="CustomerList", // <-- DOM element ID to update  
                         InsertionMode = InsertionMode.Replace, // <-- Replace the content of DOM element  
                         HttpMethod = "GET" // <-- HTTP method  
                     })  
    <div id="CustomerList"></div>  
    @section scripts{  
        @Scripts.Render("~/Scripts/jquery.unobtrusive-ajax.min.js")  
    }  


In the code above, you can see that I have created two Ajax.ActionLinks, one to display the list of customers from Germany and another to display the list of customers from Mexico, all will be called asynchronously. We have not specified which controller to access, so by default it will look in the same controller. Here is the generated HTML by both Ajax.ActionLink.
<a data-ajax="true" data-ajax-method="GET" data-ajax-mode="replace" data-ajax-update="#CustomerList" href="/Home/Germany">Customer from Germany</a>
 
<a data-ajax="true" data-ajax-method="GET" data-ajax-mode="replace" data-ajax-update="#CustomerList" href="/Home/Mexico">Customer from Mexico</a>
 

The unobtrusive jQuery uses the data-ajax prefix for JavaScript to invoke action methods on the server rather than intrusively emitting inline client scripts.
 
When we will click the link it will make a GET HTTP method call and the returned result will be updated to a DOM element by Id "CustomerList".
 
Always remember to place a reference of the jquery.unobtrusive-ajax.js library file after jquery-{version}.js file references, we can use bundling also. If you don't include the jquery.unobtrusive-ajax.js or do it incorrectly, then when you click the link to the view list of countries, an async result will be opened on the new browser tab.
 
Also, ensure that the unobtrusive JavaScript is enabled in your web.config (it should be by default).
    <add key="UnobtrusiveJavaScriptEnabled" value="true" />  

Step 2
Now, let's go ahead and implement the "Germany" and "Mexico" action methods that will return a PartialView.
    NorthwindEntities db = new NorthwindEntities();  
    public PartialViewResult Germany()  
    {  
        var result = from r in db.Customers  
                        where r.Country == "Germany"  
                        select r;  
        return PartialView("_Country", result);  
    }  
    public PartialViewResult Mexico()  
    {  
        var result = from r in db.Customers  
                        where r.Country == "Mexico"  
                        select r;  
        return PartialView("_Country", result);  
    }  


So, in both of the PartialViewResult methods I have used a LINQ query that will filter records on country and then pass the results to a partial view page "_Country.cshtml". I have placed this file in the "Shared" folder so that any view can access it. Let's move on to see the partial view page "_Country.cshtml".
 
Step 3
I made this view page strongly typed by using @model and then iterated through the model data to create a nice tabular format.
    @model IEnumerable<MvcActionLink.Models.Customer>  
    <table>  
        <tr>  
            <th>  
                @Html.DisplayNameFor(model => model.ContactName)  
            </th>  
            <th>  
                @Html.DisplayNameFor(model => model.Address)  
            </th>  
        </tr>  
    @foreach (var item in Model) {  
        <tr>  
            <td>  
                @Html.DisplayFor(modelItem => item.ContactName)  
            </td>  
            <td>  
                @Html.DisplayFor(modelItem => item.Address)  
            </td>  
        </tr>  
    }  
    </table>  


Now, you all set to run the application.


ASP.NET MVC 6 Hosting - HostForLIFE.eu :: Simple Insert And Select Operation Using .NET Core MVC With ADO.NET And Entity Framework Core

clock December 2, 2020 08:53 by author Peter

In this article, I am going to show you guys how to use ADO.NET and Entity framework core in .NET Core MVC. This way you can use either both or on way to implement your application as per your requirements. I attached the project solution which you can refer to. Also, I have shown a repository pattern to complete this project.

Step 1
I have used MS SQLServer for the database.
    USE [CrudDB]  
    GO  
    /****** Object: Table [dbo].[Crud_Data] Script Date: 22-11-2020 09:33:14 ******/  
    SET ANSI_NULLS ON  
    GO  
    SET QUOTED_IDENTIFIER ON  
    GO  
    CREATE TABLE [dbo].[Crud_Data](  
    [id] [int] IDENTITY(1,1) NOT NULL,  
    [Name] [varchar](50) NULL,  
    [City] [varchar](50) NULL,  
    [InsertDate] [datetime] NULL,  
    [FatherName] [varchar](50) NULL,  
    CONSTRAINT [PK_Crud_Data] PRIMARY KEY CLUSTERED  
    (  
    [id] ASC  
    )WITH (PAD_INDEX = OFF, STATISTICS_NORECOMPUTE = OFF, IGNORE_DUP_KEY = OFF, ALLOW_ROW_LOCKS = ON, ALLOW_PAGE_LOCKS = ON, OPTIMIZE_FOR_SEQUENTIAL_KEY = OFF) ON [PRIMARY]  
    ) ON [PRIMARY]  
    GO  


Step-2
Change in the startup.cs file in the project root
    public void ConfigureServices(IServiceCollection services)  
         {  
             services.AddControllersWithViews();  
             //By changing the service reference we are switching to ado.net  to entity framwork core vice versa  
             //----Start  
             services.AddScoped<ICrudRepository, CrudRepository>();  
             //services.AddScoped<ICrudRepository, CrudContextRepository>();  
             //-----End  
             services.AddDbContext<DBAccessContext>(options => options.UseSqlServer(Configuration.GetConnectionString("MyKey")));  
         }  

Step 3
Connection string in appsettings.json:
    {  
      "Logging": {  
        "LogLevel": {  
          "Default": "Information",  
          "Microsoft": "Warning",  
          "Microsoft.Hosting.Lifetime": "Information"  
        }  
      },  
      "AllowedHosts": "*",  
      "ConnectionStrings": {  
        "MyKey": "Data Source=PRO-ACQER8AM;Initial Catalog=CrudDB;Integrated Security=True;"  
      }  
    }

Step 4
Made model to communicate with View and DB Layer.
    namespace TestDemo.Models  
    {  
        [Table("Crud_Data", Schema = "dbo")]  
        public class CrudModel  
        {  
            public int Id { get; set; }  
            [Required]  
            public string Name { get; set; }  
            [Required]  
            public string City { get; set; }  
      
            public DateTime? InsertDate { get; set; }  
               
            public string? FatherName { get; set; }  
        }  
    } 

Step 5
Controller class CrudController.cs with dependency injection use with helps to lose coupling while switching from ADO.NET to Entity framework and vice-versa.
    public class CrudController : Controller  
       {  
           private readonly ICrudRepository crudRepository;  
           public CrudController(ICrudRepository crudRepository)  
           {  
               this.crudRepository = crudRepository;  
           }  
           public IActionResult Index()  
           {  
               ViewBag.ModelList = crudRepository.GetData();  
               return View();  
           }  
           [HttpPost]  
           public IActionResult Index(CrudModel crudModel)  
           {  
               try  
               {  
                   if (ModelState.IsValid)  
                   {  
                       // ICrudRepository crudRepository = new CrudRepository();  
                       var result = crudRepository.insert(new string[] { crudModel.Name, crudModel.City, System.DateTime.Now.ToString(), crudModel.FatherName });  
                       ViewBag.ModelList = crudRepository.GetData();  
                       if (result)  
                       {  
                           ViewBag.Msg = "Succeed";  
                           ViewBag.alertType = "alert alert-success";  
                       }  
                       else  
                       {  
                           ViewBag.Msg = "Insertion failed";  
                           ViewBag.alertType = "alert alert-danger";  
                       }  
      
                   }  
               }  
               catch (Exception ex)  
               {  
                   ViewBag.Msg = "Insertion failed";  
                   ViewBag.alertType = "alert alert-danger";  
                   ModelState.AddModelError("Message", ex.Message);  
               }  
      
               return View();  
      
           }  
       }


Step 6
The project consists of class files for the DB layer and Repository folder and one partial view for showing the detail view.
    We have created an interface in the repository folder to make a service and use both the classes as a service.
    We have created the DBLayer folder and created 2 classes one consists of ado.net insert and select the method and another one for Entity framework Core DBContext.
    In Partial View, I have injected the service directly so that you no need to pass the model to communicate with a partial view. you can check the getdata() method by debugging and uncommenting the specific section over there.
    System.Data.sqlclient reference required to use ado.net, you can add this by using NuGet package manager.

DataAccessDB.cs
    public class DataAccessDB : IDataAccessDB  
       {  
           private readonly IConfiguration config;  
           string connsString = string.Empty;  
           public DataAccessDB(IConfiguration config)  
           {  
               this.config = config;  
               connsString = config.GetConnectionString("MyKey");  
           }  
           public List<CrudModel> GetData()  
           {  
               // string connsString = config.GetConnectionString("MyKey");// "Data Source=PRO-ACQER8AM;Initial Catalog=CrudDB;Integrated Security=True;";  
               List<TestDemo.Models.CrudModel> ModelList = new List<Models.CrudModel>();  
               using (SqlConnection conn = new SqlConnection(connsString))  
               {  
                   conn.Open();  
                   using (SqlCommand command = new SqlCommand($"select * from [dbo].[Crud_Data]", conn))  
                   {  
                       try  
                       {  
                           using (var result = command.ExecuteReader())  
                           {  
      
                               while (result.Read())  
                               {  
      
                                   ModelList.Add(  
                                       new Models.CrudModel { Id = (int)result.GetValue("Id"), Name = (string)result.GetValue("Name"), City = (string)result.GetValue("City"),  FatherName = (string)result.GetValue("FatherName").ToString() });  
                               }  
                           }  
                       }  
                       catch (Exception ex)  
                       {  
      
                       }  
                       finally  
                       {  
                           conn.Close();  
                       }  
      
                       return ModelList;  
                   }  
      
      
               }  
           }  


           public bool insert(string[] Param)  
           {  
      
               //   string connsString = config.GetConnectionString("MyKey");// "Data Source=PRO-ACQER8AM;Initial Catalog=CrudDB;Integrated Security=True;";  
      
               using (SqlConnection conn = new SqlConnection(connsString))  
               {  
                   conn.Open();  
                   using (SqlCommand command = new SqlCommand($"INSERT INTO [dbo].[Crud_Data] ([Name],[City],[InsertDate],FatherName) VALUES ('{Param[0]}','{Param[1]}',getdate(),'{Param[3]}')", conn))  
                   {  
                       try  
                       {  
                           var result = command.ExecuteNonQuery();  
      
                           if (result > 0)  
                           {  
                               return true;  
                           }  
                       }  
                       catch (Exception)  
                       {  
      
                       }  
                       finally  
                       {  
                           conn.Close();  
                       }  
                       return false;  
                   }  
      
      
               }  
      
           }  
       }  


 DBAccessContext.cs
    public class DBAccessContext:DbContext  
      {  
      
          public DBAccessContext(DbContextOptions<DBAccessContext> options):base(options)  
          {   
          }  
      
          public DbSet<CrudModel> Crud_Data { get; set; }  
      
      }  


CrudRepository.cs
    public class CrudRepository : ICrudRepository  
    {  
        private readonly IConfiguration configuration;  
        private readonly DataAccessDB DB;  
      
        public CrudRepository(IConfiguration configuration)  
        {  
            this.configuration = configuration;  
            this.DB = new DataAccessDB(configuration);   
        }  
        public List<CrudModel> GetData()  
        {  
            return DB.GetData();  
        }  
      
        public bool insert(string[] Param)  
        {  
      
            return DB.insert(Param);  
      
        }  
      
      
    }  

 CrudContextRepository.cs
    public class CrudContextRepository : ICrudRepository  
       {  
           private readonly DBAccessContext dBAccessContext;  
           private readonly IConfiguration configuration;  
      
           public CrudContextRepository(DBAccessContext dBAccessContext,IConfiguration configuration)  
           {  
               this.dBAccessContext = dBAccessContext;  
               this.configuration = configuration;  
           }  
           public  List<CrudModel> GetData()  
           {  
              return dBAccessContext.Crud_Data.ToList();  
           }  
      
           public bool insert(string[] Param)  
           {  
               var model = new CrudModel()  
               {  
                   Name = Param[0],  
                   City = Param[1],  
                   InsertDate = System.DateTime.Now,  
                   FatherName= Param[3]  
      
               };  
               
            dBAccessContext.Crud_Data.Add(model);  
              var result= dBAccessContext.SaveChanges();  
      
               if (result>0)  
               {  
                   return true;  
               }       
               return false;  
           }  
       }  

 ICrudRepository.cs
    public interface ICrudRepository  
      {  
          bool insert(string[] Param);  
          List<TestDemo.Models.CrudModel> GetData();  
      
      }  


 Index.cshtml under View/Crud/
    @model TestDemo.Models.CrudModel  
      
    <partial name="_ValidationScriptsPartial" />  
    <style>  
        .bg-secondary {  
            background-color: #f4f5f7 !important;  
        }  
    </style>  
      
    <h1>Welcome to Crud</h1>  
      
    <form id="Form1" method="post" asp-action="Index" asp-controller="Crud" >  
        @if (ViewBag.Msg != null)  
        {  
      
            <div class="@ViewBag.alertType" role="alert">  
                <div asp-validation-summary="All">@ViewBag.Msg</div>  
            </div>  
            @*<script>  
                    $(function () {  
      
                        $.notify({  
                            title: "<strong>Message:</strong> ",  
                            message: "@ViewBag.Msg"  
                        });  
                    });  
      
                </script>*@  
      
            ViewBag.Msg = null;  
        }  
      
        <div class="card">  
            <div class="card-body">  
                <div class="form-group">  
                    <label asp-for="Name">Name</label>  
                    <input asp-for="Name" class="form-control">  
                    <span asp-validation-for="Name" class="text-danger"></span>  
                </div>  
                <div class="form-group">  
                    <label asp-for="City">City</label>  
                    <input asp-for="City" class="form-control" />  
                    <span asp-validation-for="City" class="text-danger"></span>  
                </div>  
                <div class="form-group">  
                    <label asp-for="FatherName">Father Name</label>  
                    <input asp-for="FatherName" class="form-control" />  
                    <span asp-validation-for="FatherName" class="text-danger"></span>  
                </div>  
            </div>  
            <div class="card-footer">  
                <button type="submit" class="btn btn-primary">Submit</button>  
            </div>  
        </div>  
      
        @{ if (ViewBag.ModelList != null)  
            { <div class="card">  
                    <div class="card-body">  
                        <partial name="_ListPartial" model="@ViewBag.ModelList" />  
                    </div>  
                </div>  
            }}  
      
        @*@await Html.PartialAsync("_ListPartial", Model)*@  
      
        @*@(await Html.RenderComponentAsync<TestDemo.Components.Component>(RenderMode.ServerPrerendered,null))*@  
      
    </form> 


ASP.NET 5 Hosting Available NOW!

clock November 24, 2020 08:08 by author Scott

HostForLIFE.eu is a popular online Windows and ASP.NET based hosting service provider catering to those people who face such issues. The company has managed to build a strong client base in a very short period of time. It is known for offering ultra-fast, fully-managed and secured services in the competitive market.

.NET 5 is the next version of .NET Core and the future of the .NET platform. With .NET 5 you have everything you need to build rich, interactive front end web UI and powerful backend services. .NET 5 contains great performance improvements in the
runtime and libraries and for the gRPC components. These improvements, when applied to ASP.NET Core, result in some significant wins in throughput (RPS) and latency.

HostForLIFE.eu hosts its servers in top rate data centers that's located in Amsterdam (NL), London (UK), Washington, D.C. (US), Paris (France), Frankfurt (Germany), Chennai (India), Milan (Italy), Toronto (Canada) and São Paulo (Brazil) to ensure 99.9% network period. All data center feature redundancies in network connectivity, power, HVAC, security, and fire suppression. HostForLIFE.eu proudly announces available ASP.NET 5 feature for new customers and existing customers. 

HostForLIFE.eu is a popular online Windows based hosting service provider catering to those people who face such issues. The company has managed to build a strong client base in a very short period of time. It is known for offering ultra-fast, fully-managed and secured services in the competitive market. Their powerful servers are especially optimized and ensure ASP.NET 5 performance. They have best data centers on three continent, unique account isolation for security, and 24/7 proactive uptime monitoring.

Further information and the full range of features ASP.NET 5 Hosting can be viewed here
https://hostforlife.eu/European-ASPNET-5-Hosting.


ASP.NET MVC 6 Hosting - HostForLIFE.eu :: Display A Document From SQL Server To A Web Page In ASP.NET MVC

clock October 27, 2020 10:19 by author Peter

In this blog post, I'll discuss a useful yet easy to implement document viewer API. Using that you can display a source file (e.g. Word, Presentation, Diagram, PSD) from your server to your browser without downloading it.
 

Some Use-Cases
    Display a Word resume to a user in a web browser
    Render a Visio Diagram on the web page
    View a Presentation or a Slide online without downloading it

Implementation
 
Now as the use-cases are clear, we will dive into the API implementation. It'll be an ASP.NET MVC application. We'll pull data/documents from the database and save it to a stream. You have to specify the file format in order to render it correctly. The source document will be then rendered to HTML. Eventually, our controller will return this stream to the View/browser.  
    public ActionResult Index()  
    {  
         License lic = new License();  
         lic.SetLicense(@"D:/GD Licenses/Conholdate.Total.NET.lic");  
         MemoryStream outputStream = new MemoryStream();  
         //specify just the file name if you are pulling the data from database   
         string fileName = "sample.pdf";  
      
         FileType fileType = FileType.FromExtension(Path.GetExtension(fileName));  
      
         using (Viewer viewer = new Viewer(() => GetSourceFileStream(fileName), () => new LoadOptions(fileType)))  
         {  
               HtmlViewOptions Options = HtmlViewOptions.ForEmbeddedResources(  
                    (pageNumber) => outputStream,  
                    (pageNumber, pageStream) => { });  
               viewer.View(Options);  
         }
         outputStream.Position = 0;  
         return File(outputStream, "text/html");  
                   
    }  
    private Stream GetSourceFileStream(string fileName) =>  
                new MemoryStream(GetSourceFileBytesFromDb(fileName));  
      
    //TODO: If you want to pull the data from the DB  
    private byte[] GetSourceFileBytesFromDb(string fileName) =>  
                System.IO.File.ReadAllBytes(fileName);  


Have a look at this image/screenshot. We displayed a PDF from Server to Browser.


ASP.NET MVC 6 Hosting - HostForLIFE.eu :: ViewBag, ViewData And TempData In MVC

clock October 23, 2020 09:44 by author Peter

ViewBag, ViewData, and TempData all are objects in ASP.NET MVC and these are used to pass the data in various scenarios.

The following are the scenarios where we can use these objects.
    Pass the data from Controller to View.
    Pass the data from one action to another action in the same Controller.
    Pass the data in between Controllers.
    Pass the data between consecutive requests.

ViewBag
ViewBag is a dynamic object to pass the data from Controller to View. And, this will pass the data as a property of object ViewBag. And we have no need to typecast to read the data or for null checking. The scope of ViewBag is permitted to the current request and the value of ViewBag will become null while redirecting.
 
Ex Controller
    Public ActionResult Index()  
    {  
        ViewBag.Title = “Welcome”;  
        return View();  
    }  

View
    <h2>@ViewBag.Title</h2>  

ViewData
ViewData is a dictionary object to pass the data from Controller to View where data is passed in the form of key-value pair. And typecasting is required to read the data in View if the data is complex and we need to ensure null check to avoid null exceptions. The scope of ViewData is similar to ViewBag and it is restricted to the current request and the value of ViewData will become null while redirecting.
 
Ex
Controller:

    Public ActionResult Index()  
    {  
        ViewData[”Title”] = “Welcome”;  
        return View();  
    }  


View
    <h2>@ViewData[“Title”]</h2>  

TempData
TempData is a dictionary object to pass the data from one action to other action in the same Controller or different Controllers. Usually, TempData object will be stored in a session object. Tempdata is also required to typecast and for null checking before reading data from it. TempData scope is limited to the next request and if we want Tempdata to be available even further, we should use Keep and peek.
 
Ex - Controller
    Public ActionResult Index()  
    {  
        TempData[”Data”] = “I am from Index action”;  
        return View();  
    }  

    Public string Get()  
    {  
        return TempData[”Data”] ;  
    }  

To summarize, ViewBag and ViewData are used to pass the data from Controller action to View and TempData is used to pass the data from action to another action or one Controller to another Controller.
 
Hope you have understood the concept of ViewBag, ViewData, and TempData.


ASP.NET MVC 6 Hosting - HostForLIFE.eu :: How to Adding Robots.txt to your ASP.NET MVC Applications?

clock September 23, 2020 08:49 by author Peter

One of the things I always forgot to add to my web applications is the Robots.txt file that Search Engines use to see what they should index. This file and sitemaps help make your site easier to navigate by the bots and allow them to understand what's legal and what you'd rather not have the revealed in their engines. I usually add any administrative pages or account pages even though they're protected by security, no need for the login page to be index if they sniff the link.

So how do you add Robots.txt to your MVC application? Glad you asked, here is a little code to get you started.

Sample Code

1.  Select the controller you would like to use for the robots.txt output.  I chose the HomeController in my application as I use it for most “top level” generic links like about us, contact us, index, etc.

2. Now, create a method called Robots to handle the request.
#region -- Robots() Method --
public ActionResult Robots()
{
    Response.ContentType = "text/plain";
    return View();
}
#endregion


3. Add the Robots.cshtml view to your Controller’s View directory.  Here is the code I have in my view, yours will vary.
@{
    Layout = null;
}
# robots.txt for @this.Request.Url.Host
User-agent: *
Disallow: /Administration/
Disallow: /Account/


4. Load up the class you are using to control your routes, if you are in an Area, this could your AreaRegistration class.  If you are at the top like I am and using the standard MVC template, this is probably the Global.asax.cs file.  Add your route to this file, mine looks like this.

routes.MapRoute("Robots.txt",

                "robots.txt",

                new { controller = "Home", action = "Robots" });


5. Compile and test.

If you've got an internet facing site, the chances are you will have a bot find you're request this page. you might as well give them the benefit of the doubt and allow them to understand where you want them to go. additionally you may save yourself some error log when this page is requested and no controller is found.

Just like something in ASP.NET, there are many ways to solve this riddle, if you use a different approach, please feel free to share it in the comments.

HostForLIFE.eu ASP.NET MVC 6 Hosting
HostForLIFE.eu is European Windows Hosting Provider which focuses on Windows Platform only. We deliver on-demand hosting solutions including Shared hosting, Reseller Hosting, Cloud Hosting, Dedicated Servers, and IT as a Service for companies of all sizes. We have customers from around the globe, spread across every continent. We serve the hosting needs of the business and professional, government and nonprofit, entertainment and personal use market segments.


About HostForLIFE.eu

HostForLIFE.eu is European Windows Hosting Provider which focuses on Windows Platform only. We deliver on-demand hosting solutions including Shared hosting, Reseller Hosting, Cloud Hosting, Dedicated Servers, and IT as a Service for companies of all sizes.

We have offered the latest Windows 2016 Hosting, ASP.NET Core 2.2.1 Hosting, ASP.NET MVC 6 Hosting and SQL 2017 Hosting.


Tag cloud

Sign in