European ASP.NET MVC 4 and MVC 5 Hosting

BLOG about ASP.NET MVC 3, ASP.NET MVC 4, and ASP.NET MVC 5 Hosting and Its Technology - Dedicated to European Windows Hosting Customer

European ASP.NET MVC 5 Hosting :: Upgrade ASP .NET MVC 5 default layout to bootstrap 3

clock December 20, 2013 06:58 by author Patrick

If you have started developing web applications with ASP .NET MVC 5 you might have noticed that it comes with bootstrap version 2 and the latest version 3. In order to upgrade the default template for version 3, you can use these files as a reference.

Right click solution -> Manage NuGet packages Updates -> Update bootstrap to version 3 >

***Views/Shared/_Layout.cshtml***

<!DOCTYPE html>
<html>
<head>
    <meta charset="utf-8" />
    <meta name="viewport" content="width=device-width, initial-scale=1.0">
    <title>@ViewBag.Title - My ASP.NET Application</title>
    @Styles.Render("~/Content/css")
    @Scripts.Render("~/bundles/modernizr")
</head>
<body>
    <div class="navbar navbar-default navbar-static-top">
        <div class="container">
            <div class="navbar-header">
                <button type="button" class="navbar-toggle" data-toggle="collapse" data-target=".navbar-collapse">
                    <span class="icon-bar"></span>
                    <span class="icon-bar"></span>
                    <span class="icon-bar"></span>
                </button>
                @Html.ActionLink("Application name", "Index", "Home", null, new { @class = "navbar-brand" })
            </div>
                           @Html.Partial("_LoginPartial")
            <div class="navbar-collapse collapse">
                <ul class="nav navbar-nav">
                    <li class="active">@Html.ActionLink("Home", "Index", "Home")</li>
                    <li>@Html.ActionLink("About", "About", "Home")</li>
                    <li>@Html.ActionLink("Contact", "Contact", "Home")</li>
                    <li class="dropdown">
                        <a href="#" class="dropdown-toggle" data-toggle="dropdown">Dropdown <b class="caret"></b></a>
                        <ul class="dropdown-menu">
                            <li><a href="#">Action</a></li>
                            <li><a href="#">Another action</a></li>
                            <li><a href="#">Something else here</a></li>
                            <li class="divider"></li>
                            <li class="dropdown-header">Nav header</li>
                            <li><a href="#">Separated link</a></li>
                            <li><a href="#">One more separated link</a></li>
                        </ul>
                    </li>
                </ul>
            </div><!--/.nav-collapse -->
        </div>
    </div>
    <div class="container">
        @RenderBody()
        <hr />
        <footer>
            <p>&copy; @DateTime.Now.Year - My ASP.NET Application</p>
        </footer>
    </div>
    @Scripts.Render("~/bundles/jquery")
    @Scripts.Render("~/bundles/bootstrap")
    @RenderSection("scripts", required: false)
</body>
</html>


***Views/Shared/_LoginPartial.cshtml***

@using Microsoft.AspNet.Identity
@if (Request.IsAuthenticated)
{
    using (Html.BeginForm("LogOff", "Account", FormMethod.Post, new { id = "logoutForm", @class = "navbar-form pull-right" }))
    {
    @Html.AntiForgeryToken()
    <ul class="nav navbar-nav navbar-right">
        <li>
            @Html.ActionLink("Hello " + User.Identity.GetUserName() + "!", "Manage", "Account", routeValues: null, htmlAttributes: new { title = "Manage" })
        </li>
        <li><a href="javascript:document.getElementById('logoutForm').submit()">Log off</a></li>
    </ul>
    }
}
else
{
    <ul class="nav navbar-nav navbar-right">
        <li>@Html.ActionLink("Register", "Register", "Account", routeValues: null, htmlAttributes: new { id
= "registerLink" })</li>
        <li>@Html.ActionLink("Log in", "Login", "Account", routeValues: null, htmlAttributes: new { id =
"loginLink" })</li>
    </ul>
}


European ASP.NET MVC 5 Hosting :: Introducing ASP.Net SignalR in MVC 5

clock December 17, 2013 05:29 by author Patrick

In this article I am using the ASP.NET SignalR library in the latest MVC 5 project template. Now, what is this real-time functionality? It is used to access the server code and push the content to the connected clients instantly instead of the server waiting for the client's request.

Prerequisites

Using Visual Studio 2013. There are some prerequisites to develop the application:

  • Visual Studio 2010 SP1 or Visual Studio 2012.
  • ASP.NET and Web Tools 2012.2

Let's create an application for SignalR development using the following sections:

  • MVC 5 Application
  • Code Execution

MVC 5 Application

Step 1: Open Visual Studio 2013 and create a New Project.

Step 2: Select MVC project template.

Step 3: Open the Package Manager Console.

And write the following command:

install-package Microsoft.AspNet.SignalR

Step 4: You can see in your Solution Explorer that the SignalR was successfully added to your application.

Step 5: Add a new folder named Hubs in your application and add a class in it.

Give the name of your class ChatHub as shown below:

Step 6: Add the following code in the class:

using Microsoft.AspNet.SignalR;
namespace SignalRDemo.Hubs
{
    public class ChatHub : Hub
    {
        public void  LetsChat(string Cl_Name, string Cl_Message)
        {
            Clients.All.NewMessage(Cl_Name, Cl_Message);
        }
    }
}
Step 7: Open the Global.asax file and modify the Applicatio_Start() method as shown below:
public class MvcApplication : System.Web.HttpApplication
{
    protected void Application_Start()
    {
        RouteTable.Routes.MapHubs();
        AreaRegistration.RegisterAllAreas();
        FilterConfig.RegisterGlobalFilters(GlobalFilters.Filters);
        RouteConfig.RegisterRoutes(RouteTable.Routes);
        BundleConfig.RegisterBundles(BundleTable.Bundles);
    }
}

Step 8:
Open your HomeController.cs file and modify it as shown below:
public ActionResult Contact()
{
    ViewBag.Message = "Your contact page."
    return View();
}
public ActionResult Chat()
{
    ViewBag.Message = "Your chat page";
    return View();
}

Step 9: Generate the view for the Chat method as shown in the following parts:

Select Home folder and right-click to add Scaffold

(m8)

Select MVC 5 View in the Add Scaffold wizard

Do as directed in the following image:

Step 10: Add the following code in the Chat.cshtml file:
@{
    ViewBag.Title = "Chat";
}
<hgroup>
    <h2>@ViewBag.Title.</h2>
    <h3>@ViewBag.Message</h3>
</hgroup>
<div class="container">
    <input type="text" id="TxtMessage" />
    <input type="button" id="BtnSend" value="Send" />
    <input type="hidden" id="UserName" />
    <ul id="Chats"></ul>
</div>
@section scripts {
    <script src="~/Scripts/jquery.signalR-1.1.3.js"></script>
    <script src="~/signalr/Hubs"></script>
    <script
        $(function () {
            var chat = $.connection.chatHub;
            chat.client.NewMessage=function(Cl_Name, Cl_Message) {
                $('#Chats').append('<li><strong>' + htmlEncode(Cl_Name)
                    + '</strong>: ' + htmlEncode(Cl_Message) + '</li>');
            };
            $('#UserName').val(prompt('Please Enter Your Name:', ''));
            $('#TxtMessage').focus();
            $.connection.hub.start().done(function () {
                $('#BtnSend').click(function () {
                    chat.server.LetsChat($('#UserName').val(), $('#TxtMessage').val())
                    $('#TxtMessage').val('').focus()
                });
            });
        });
        function htmlEncode(value) {
            var encodedValue = $('<div />').text(value).html();
            return encodedValue;
        }
    </script>
}

Code Execution

Save all your application and debug the application. Use the following procedure.

Step 1: Debug your application. Open /Home/Chat in your browser like: http://localhost:12345/Home/Chat
Step 2: Enter your name in the prompt
Step 3: Enter message and send
Step 4: Copy the browser URL and open more browsers, paste the URL in the address bar and do the same thing as above.


European ASP.NET MVC 5 Hosting :: Getting Started With Areas in MVC 5

clock December 12, 2013 09:51 by author Patrick

MVC (Model, View, Controller) is a design pattern to separate the data logic from the business and presentation logic. We can also design the structure physically, where we can keap the logic in the controllers and views to exemplify the relationships.

It is also possible that we can have large projects that use MVC, then we need to split the application into smaller units called areas that isolate the larger MVC application into smaller functional groupings. A MVC application could contain several MVC structures (areas).  

How to creating a simple application for defining the area in MVC 5. MVC 5 is the latest version of MVC used in Visual Studio 2013?

You need to have the following to complete this article:

  • MVC 5
  • Visual Studio 2013

In that context, we'll follow the sections given below:MVC 5 application:

  • Adding Controller for Area
  • Adding Views for Area
  • Area Registration
  • Application Execution
  • MVC 5 Application

Use the following procedure to create a Web application based on a MVC 5 template.

Step 1: Open Visual Studio 2013.
Step 2: Create an ASP.NET Web Application with MVC 5 project template.

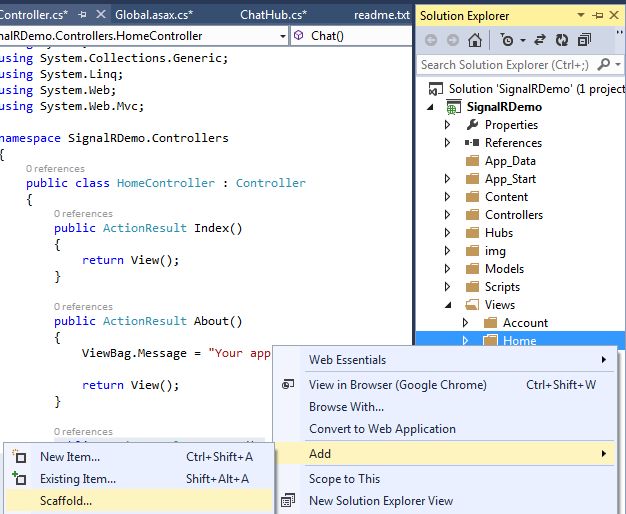
Step 3: In Solution Explorer, right-click on the project and click "Add" to add an area as shown below:

Step 4: Enter the name for the area, such as "News".

Step 5: Similarly add an another area named "Article".

Now from the steps above you have added two areas for your application named News and Article.

Adding Controller for Area

We have successfully added an area, now we'll add controllers for each of our areas using the following procedure.

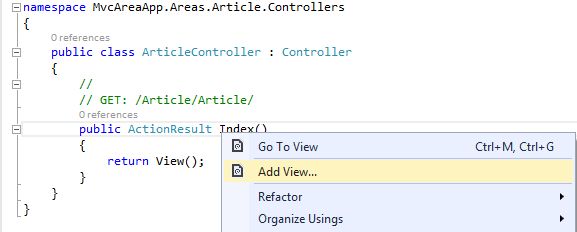
Step 1: Right-click on the Controller in your Article area to add a controller.

Step 2: Select "MVC 5 Empty Controller".

Step 3: Enter the name as "ArticleController" .

Step 4: Similarly add the controller for "News".

Now your Area folder should be as in the following screenshot:

Adding Views for Area

We have successfully added a controller for our area, now to add a view for the area using the following procedure.

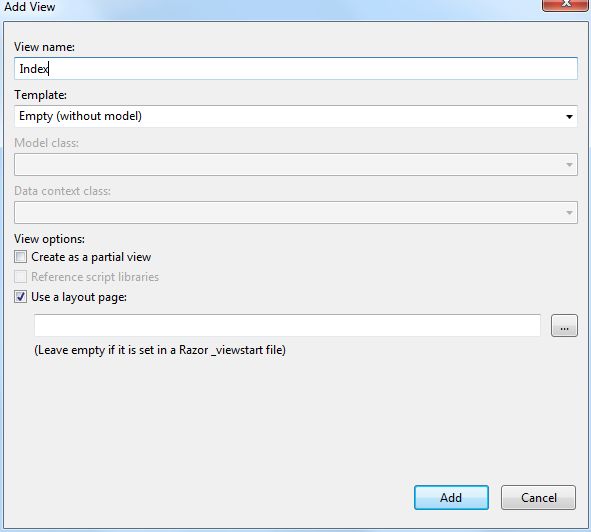
Step 1: Right-click on the "News" folder in the View to add a View for the News Area.

Step 2: Enter the view name as defined in the NewsController.

Step 3: Generate some content in the View of News as in the following screenshot:

Step 4: You can also add a view as shown in the following screenshot:

Step 5: Generate some content for the Article view.

Area Registration

Step 1: Open the "Global.asax" file.

Step 2: Add the following code in your Application_Start() method:

AreaRegistration.RegisterAllAreas();

Application Execution

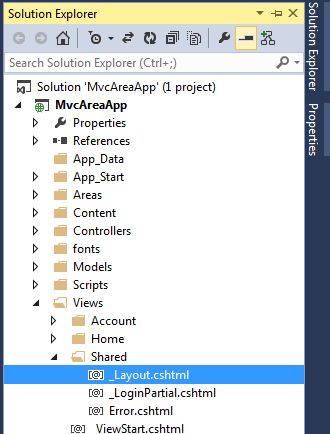
Step 1: Open the project view Layout file.

Step 2: Modify the <ul> in the layout file as shown in the following code:

<ul class="nav navbar-nav">
<li>@Html.ActionLink("Home", "Index", "Home")</li>
<li>@Html.ActionLink("About", "About", "Home")</li>
<li>@Html.ActionLink("Contact", "Contact", "Home")</li>
<li>@Html.ActionLink("Article", "Index", "Article", new {area= "Article" }, null)</li>
<li>@Html.ActionLink("News", "Index", "News", new { area = "News" }, null)</li>
</ul>

Step 3: Debug the application, and finish!


Press Release :: European HostForLIFE.eu Proudly Launches ASP.NET MVC 5 Hosting

clock August 28, 2013 11:05 by author Ronny

European Windows and ASP.NET hosting specialist, HostForLIFE.eu, has announced the availability of new hosting plans that are optimized for the latest update of the Microsoft ASP.NET Model View Controller (MVC) technology. The MVC web application framework facilitates the development of dynamic, data-driven websites.

The latest update to Microsoft’s popular MVC (Model-View-Controller) technology,  ASP.NET MVC 5 adds sophisticated features like single page applications, mobile optimization, adaptive rendering, and more. Here are some new features of ASP.NET MVC 5:

- ASP.NET Identity
- Bootstrap in the MVC template
- Authentication Filters
- Filter overrides

HostForLIFE.eu is Microsoft’s number one Recommended Windows and ASP.NET Spotlight Hosting Partner in Europe for its support of Microsoft technologies that include WebMatrix, WebDeploy, Visual Studio 2012, ASP.NET 4.5, ASP.NET MVC 4.0, Silverlight 5, and Visual Studio Lightswitch.

HostForLIFE.eu hosts its servers in top class data centers that is located in Amsterdam to guarantee 99.9% network uptime. All data center feature redundancies in network connectivity, power, HVAC, security, and fire suppression.

In addition to shared web hosting, shared cloud hosting, and cloud server hosting, HostForLIFE.eu offers reseller hosting packages and specialized hosting for Microsoft SharePoint 2010 and 2013. All hosting plans from HostForLIFE.eu include 24×7 support and 30 days money back guarantee.

For more information about this new product, please visit http://www.HostForLIFE.eu

About HostForLIFE.eu:

HostForLIFE.eu is Microsoft No #1 Recommended Windows and ASP.NET Hosting in European Continent. HostForLIFE.eu service is ranked the highest top #1 spot in several European countries, such as: Germany, Italy, Netherlands, France, Belgium, United Kingdom, Sweden, Finland, Switzerland and many top European countries.

HostForLIFE.eu number one goal is constant uptime. HostForLIFE.eu data center uses cutting edge technology, processes, and equipment. HostForLIFE.eu has one of the best up time reputations in the industry.

HostForLIFE.eu second goal is providing excellent customer service. HostForLIFE.eu technical management structure is headed by professionals who have been in the industry since it's inception. HostForLIFE.eu has customers from around the globe, spread across every continent. HostForLIFE.eu serve the hosting needs of the business and professional, government and nonprofit, entertainment and personal use market segments.


About HostForLIFE.eu

HostForLIFE.eu is European Windows Hosting Provider which focuses on Windows Platform only. We deliver on-demand hosting solutions including Shared hosting, Reseller Hosting, Cloud Hosting, Dedicated Servers, and IT as a Service for companies of all sizes.

We have offered the latest Windows 2016 Hosting, ASP.NET Core 2.2.1 Hosting, ASP.NET MVC 6 Hosting and SQL 2017 Hosting.


Tag cloud

Sign in