In this tutorial, I will tell you about selecting, inserting, updating and deleting data in mvc using entity framework. I will be using tables tblDepartment and tblEmployee for this tutorial.

Step 1
First you must run the sql script to create and populate these tables, here is the example:
Create table tblDepartment
(
Id int primary key identity,
Name nvarchar(50)
)
Insert into tblDepartment values('IT')
Insert into tblDepartment values('HR')
Insert into tblDepartment values('Payroll')
Create table tblEmployee
(
EmployeeId int Primary Key Identity(1,1),
Name nvarchar(50),
Gender nvarchar(10),
City nvarchar(50),
DepartmentId int
)
Alter table tblEmployee
add foreign key (DepartmentId)
references tblDepartment(Id)
Insert into tblEmployee values('Mark','Male','London',1)
Insert into tblEmployee values('John','Male','Chennai',3)
Insert into tblEmployee values('Mary','Female','New York',3)
Insert into tblEmployee values('Mike','Male','Sydeny',2)
Insert into tblEmployee values('Scott','Male','London',1)
Insert into tblEmployee values('Pam','Female','Falls Church',2)
Insert into tblEmployee values('Todd','Male','Sydney',1)
Insert into tblEmployee values('Ben','Male','New Delhi',2)
Insert into tblEmployee values('Sara','Female','London',1)
Step 2
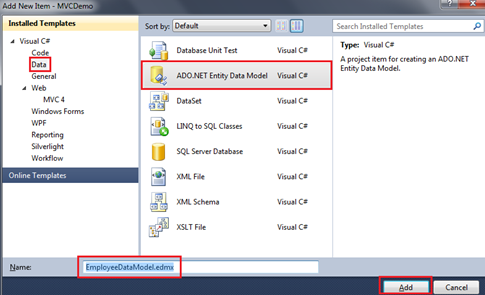
Create a new asp.net mvc 4 web application. Then Right click on the "Models" folder and add "ADO.NET Entity Data Model". Set Name = EmployeeDataModel.edmx.
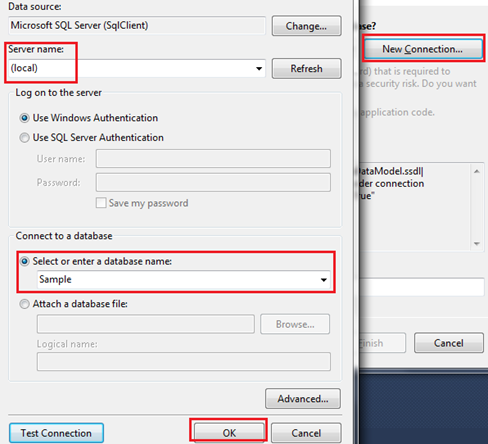
On the subsequent screen, select "Generate from database" option and click "Next". On "Choose your data connection screen", click on "New Connection" button. Specify the sql server name. In my case, I have sql server installed on my local machine. So I have set "Server Name=(local)". From "Select or enter a database name" dropdownlist, select the Database name and click "OK". Then Click "Next".
Step 3
On "Choose your database objects" screen, expand "Tables" and select "tblDepartment" and "tblEmployee" tables. Set "Model Namespace=Models" and click "Finish".

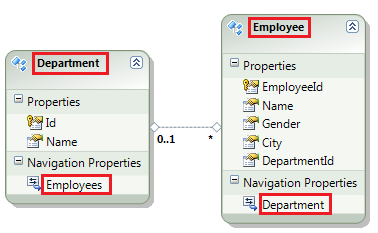
At this point we should have tblDepartment and tblEmployee entities generated.
a) Change tblDepartment to Department
b) Change tblEmployee to Employee
c) Change tblEmployees nvigation property to Employees
d) Change tblDepartment nvigation property to Department
Step 4
Right click on the "Controllers" folder and select Add - Controller. Then, Set:
Name = EmployeeController
Template = MVC controller with read/write actions and views, using Entity Framework
Model class = Employee(MVCDemo.Models)
Data Context Class = EmployeeContext(MVCDemo.Models)
Views = Razor
Finally click "Add".
At this point you should have the following files automatically added.
1. EmployeeController.cs file in "Controllers" folder
2. Index, Create, Edit, Detail and Delete views in "Employee" folder.
On Create and Edit views, please delete the following scripts section. We will discuss these in a later video session.
@section Scripts {
@Scripts.Render("~/bundles/jqueryval")
}
At this point, if you run the application by pressing CTRL + F5, you will get an error stating - The resource cannot be found. This is because, by default, the application goes to "HOME" controller and "Index" action.
To fix this,
1. Open "RouteConfig.cs" file from "App_Start" folder
2. Set Controller = "Employee"
Run the application again. Notice that, all the employees are listed on the index view. We can also create a new employee, edit an employee, view their full details and delete an employee as well.
Free ASP.NET MVC Hosting
Try our Free ASP.NET MVC Hosting today and your account will be setup soon! You can also take advantage of our Windows & ASP.NET Hosting support with Unlimited Domain, Unlimited Bandwidth, Unlimited Disk Space, etc.
