European ASP.NET MVC 4 and MVC 5 Hosting

BLOG about ASP.NET MVC 3, ASP.NET MVC 4, and ASP.NET MVC 5 Hosting and Its Technology - Dedicated to European Windows Hosting Customer

European ASP.NET Core Hosting - HostForLIFE.eu :: How to Use Sessions and HttpContext in ASP.NET 5 and MVC6

clock February 24, 2017 06:56 by author Scott

If you’ve started work on a new ASP.NET 5, MVC 6 application you may have noticed that Sessions don’t quite work the way they did before. Here’s how to get up and running the new way.

Remove DNX Core Reference

Many simple ASP.NET components aren’t supported by the DNX Core Runtime. These usually surface with weird build errors. It’s much easier to just remove it from your project.json file. If it’s already not there, beautiful you don’t need to do anything

"frameworks": {
    "dnx451": { },
    "dnxcore50": { } // <-- Remove this line
},

Add Session NuGet Package

Add the Microsoft.AspNet.Session NuGet package to your project.

VERSION WARNING: If you’re using ASP.NET 5 before RTM, make sure the beta version is the same across your whole project. Just look at your references and make sure they all end with beta8 (or whichever version you’re using).

Update startup.cs

Now that we have the Session nuget package installed, we can add sessions to the OWIN pipline.

Open up startup.cs and add the AddSession() and AddCaching() lines to the ConfigureServices(IServiceCollection services)

// Add MVC services to the services container.
services.AddMvc();
services.AddCaching(); // Adds a default in-memory implementation of IDistributedCache
services.AddSession();

Next, we’ll tell OWIN to use a Memory Cache to store the session data. Add the UseSession() call below.

// IMPORTANT: This session call MUST go before UseMvc()
app.UseSession();

// Add MVC to the request pipeline.
app.UseMvc(routes =>
{
    routes.MapRoute(
        name: "default",
        template: "{controller}/{action}/{id?}",
        defaults: new { controller = "Home", action = "Index" });

    // Uncomment the following line to add a route for porting Web API 2 controllers.
    // routes.MapWebApiRoute("DefaultApi", "api/{controller}/{id?}");
});

Where’s the Session variable gone?

Relax it’s still there, just not where you think it is. You can now find the session object by using HttpContext.Session. HttpContext is just the current HttpContext exposed to you by the Controller class.

If you’re not in a controller, you can still access the HttpContext by injecting IHttpContextAccessor.

Let’s go ahead and add sessions to our Home Controller:

public class HomeController : Controller
{
    public IActionResult Index()
    {
        HttpContext.Session.SetString("Test", "Ben Rules!");
        return View();
    }

    public IActionResult About()
    {
        ViewBag.Message = HttpContext.Session.GetString("Test");

        return View();
    }
}

You’ll see the Index() and About() methods making use of the Session object. It’s pretty easy here, just use one of the Set() methods to store your data and one of the Get() methods to retrieve it.

Just for fun, let’s inject the context into a random class:

public class SomeOtherClass
{
    private readonly IHttpContextAccessor _httpContextAccessor;
    private ISession _session => _httpContextAccessor.HttpContext.Session;

    public SomeOtherClass(IHttpContextAccessor httpContextAccessor)
    {
        _httpContextAccessor = httpContextAccessor;
    }

    public void TestSet()
    {
        _session.SetString("Test", "Ben Rules!");
    }

    public void TestGet()
    {
        var message = _session.GetString("Test");
    }
}

Let’s break this down.

Firstly I’m setting up a private variable to hold the HttpContextAccessor. This is the way you get the HttpContext now.

Next I’m adding a convenience variable as a shortcut directly to the session. Notice the =>? That means we’re using an expression body, aka a shortcut to writing a one liner method that returns something.

Moving to the contructor you can see that I’m injecting the IHttpContextAccessor and assigning it to my private variable. If you’re not sure about this whole dependency injection thing, don’t worry, it’s not hard to get the hang of (especially constructor injection like I’m using here) and it will improve your code by forcing you to write it in a modular way.

But wait a minute, how do I store a complex object?

How do I store a complex object?

I’ve got you covered here too. Here’s a quick JSON storage extension to let you store complex objects nice and simple.

public static class SessionExtensions
{
    public static void SetObjectAsJson(this ISession session, string key, object value)
    {
        session.SetString(key, JsonConvert.SerializeObject(value));
    }

    public static T GetObjectFromJson<T>(this ISession session, string key)
    {
        var value = session.GetString(key);

        return value == null ? default(T) : JsonConvert.DeserializeObject<T>(value);
    }
}

Now you can store your complex objects like so:

var myComplexObject = new MyClass();
HttpContext.Session.SetObjectAsJson("Test", myComplexObject);

and retrieve them just as easily:

var myComplexObject = HttpContext.Session.GetObjectFromJson<MyClass>("Test");

Use a Redis or SQL Server Cache instead

Instead of using services.AddCaching() which implements the default in-memory cache, you can use either of the following.

Firstly, install either one of these nuget packages:

  • Microsoft.Framework.Caching.SqlServer
  • Microsoft.Framework.Caching.Redis

Secondly, add the appropriate code snippet below:

// Microsoft SQL Server implementation of IDistributedCache.
// Note that this would require setting up the session state database.
services.AddSqlServerCache(o =>
{
                o.ConnectionString = "Server=.;Database=ASPNET5SessionState;Trusted_Connection=True;";
                o.SchemaName = "dbo";
                o.TableName = "Sessions";
});


// Redis implementation of IDistributedCache.
// This will override any previously registered IDistributedCache service.
services.AddSingleton<IDistributedCache, RedisCache>();


European ASP.NET MVC 6 Hosting - HostForLIFE.eu :: Angular 2 Contact Form Component for ASP.NET MVC 6

clock February 16, 2017 07:20 by author Scott

In this post, I will show you simple tutorial about how to create a simple contact form using Angular 2 and ASP.NET MVC 6. Ok, let’s get started.

The Component

Contact.cshtml

We’ll start off with a simple contact form. I’m asking the user for his name, e-mail address, a subject and of course the message itself. 
You’ll notice that I’m also using a bit of Bootstrap css classes. You however can of course use anything you want to style the contact form.

<div>
    <form #f="ngForm" (ngSubmit)="onSubmit(contact)">
        <div>
            <div class="form-group required">
                <label for="name">Name</label>
                <input type="text" [(ngModel)]="contact.Name" name="contact.Name" required="Please enter your name" class="form-control text-input" id="name" placeholder="Name"/>
            </div>
            <div class="form-group required">
                <label for="email">E-mail</label>
                <input type="email" [(ngModel)]="contact.Email" name="contact.Email" required="Please enter your e-mail address" class="form-control text-input" id="email" placeholder="E-mail"/>
            </div>
        </div>
        <div>
            <div class="form-group required">
                <label for="subject">Subject</label>
                <input type="text" [(ngModel)]="contact.Subject" name="contact.Subject" required="A subject is needed" class="form-control text-input" id="subject" placeholder="Subject"/>
            </div>
        </div>
        <div>
            <div class="form-group required">
                <label for="message">Message</label>
                <textarea type="text" [(ngModel)]="contact.Message" name="contact.Message" required="A message is needed" class="form-control" id="message" placeholder="Message..."></textarea>
            </div>
        </div>
        <div>
            <div>
                <button type="submit" class="btn btn-success">Send</button>
            </div>
        </div>
    </form>
</div>

Contact.ts

This the most important part of this post. I’ve written the code in Typescript. 
Due to an issue I couldn’t seem to resolve between MVC6 and Angular 2 I was forced to the URLSearchParams from Angular to send my data to the server. I hope to update this one day so I only have to send the complete object to the server.

import {Component} from '@angular/core';
import {Http, Headers, URLSearchParams} from '@angular/http';

@Component({
    selector: 'contact',
    templateUrl: '/angular/contact'
})

export class ContactFormComponent {
    http = undefined;
    contact = { Name: undefined, Subject: undefined, Email: undefined, Message: undefined };
    loading = true;

    constructor(http: Http) {
        this.http = http;
        this.loading = false;
    }

    onSubmit() {
        this.loading = true;
        let headers = new Headers({ 'Content-Type': 'application/x-www-form-urlencoded' });
        var params = new URLSearchParams();
        params.set('Name', this.contact.Name);
        params.set('Subject', this.contact.Subject);
        params.set('Message', this.contact.Message);
        params.set('Email', this.contact.Email);
        this.http.post('/contact/send', params.toString(), { headers: headers }).subscribe(this.messageSend());
    }

    messageSend() {
        this.contact = { Name: undefined, Subject: undefined, Email: undefined, Message: undefined };
        this.loading = false;
    }
}

This was the biggest part, now what’s left is the connection on the server itself.

Start.cs

First we’ll setup the routes. This is very easy. I’ve set up a rout to go to the contact form itself and one for sending the information to the server.

public class Startup
{
                public void ConfigureServices(IServiceCollection services)
                {
                                //I'm using MVC... So I'm adding MVC.
                                services.AddMvc();
                }

                public void Configure(IApplicationBuilder app)
                {
                                //I have some static files, like images and css in my wwwroot folder. So I need to add these.
                                app.UseStaticFiles();
                                app.UseMvc(m =>
                                {
                                                //Route to open the page with the form.
                                                m.MapRoute("contact", "contact", new { controller = "Contact", action = "Contact" });
                                                //Route to post the data
                                                m.MapRoute("contact-send", "contact/send", new { controller = "Contact", action = "SendContact" });
                                });
                }

                // Entry point for the application.
                public static void Main(string[] args) => WebApplication.Run<Startup>(args);
}

ContactVm.cs

This is going to be the ViewModel. I use this to map the JSON request to a nice and easy model we can use on our controller.

public class ContactVm
{
                [Required]
                [DataType(DataType.Text)]
                public string Name { get; set; }
                [Required]
                [DataType(DataType.EmailAddress)]
                public string Email { get; set; }
                [Required]
                [DataType(DataType.Text)]
                public string Subject { get; set; }
                [Required]
                [DataType(DataType.MultilineText)]
                public string Message { get; set; }
}

ContactController.cs

The last part is our controller itself where the data is being received on the server. Nothing special here, I’m just using the above viewmodel as a parameter.

public class ContactController : Controller
{
                public ContactController() { }

                public IActionResult Contact()
                {
                                return View();
                }             

                [HttpPost]
                public void SendContact(ContactVm contact)
                {
                                //Do something with the contact form...
                }
}

By using the above code you’ll be able create a contact form in Angular 2 and make it interact with and MVC 6 server-side.
Keep in mind the both frameworks are still in development and can contain errors.


European ASP.NET MVC 6 Hosting - HostForLIFE.eu :: Use AngularJS with MVC 6 Web API

clock February 10, 2017 08:46 by author Scott

This post will walk you through the step-by-step procedure on building a simple ASP.NET 5 application using AngularJS with Web API.

Before we dig further let’s talk about a quick overview of AngularJS and Web API in MVC 6.

Introducing AngularJS

AngularJS is a client-side MVC framework written in JavaScript. It runs in a web browser and greatly helps us (developers) to write modern, single-page, AJAX-style web applications. It is a general purpose framework, but it shines when used to write CRUD (Create Read Update Delete) type web applications.

Introducing Web API

ASP.NET Web API is a framework that makes it easy to build HTTP services that reach a broad range of clients, including browsers and mobile devices. ASP.NET Web API is an ideal platform for building RESTful applications on the .NET Framework. In ASP.NET 5, Web API is now part of MVC 6. Read more here

Creating an ASP.NET 5 Project

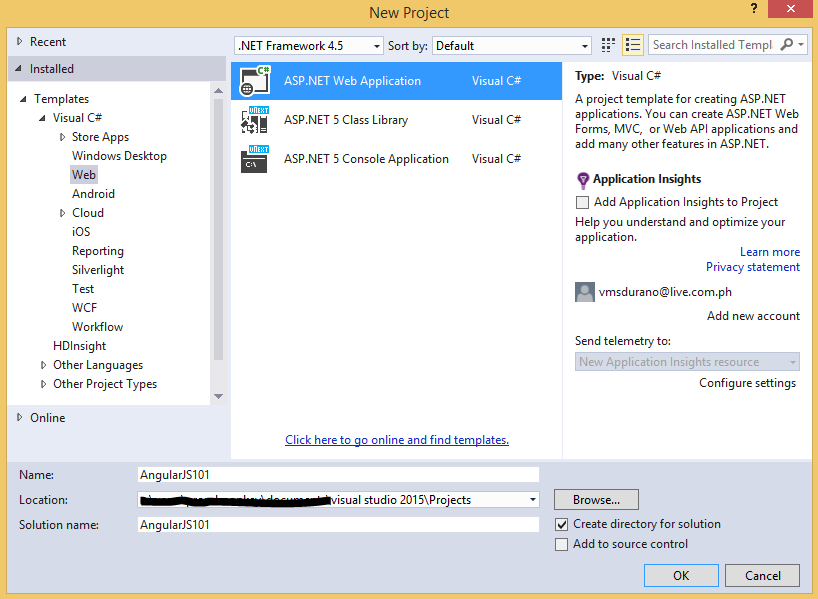
To start, fire up Visual Studio 2015 and create a new ASP.NET 5 project by selecting File > New Project. In the dialog, under Templates > Visual C#, select ASP.NET Web Application as shown in the figure below: 

Name your project to whatever you like and then click OK. For this example I named the project as “AngularJS101”. Now after that you should be able to see the “New ASP.NET Project” dialog:

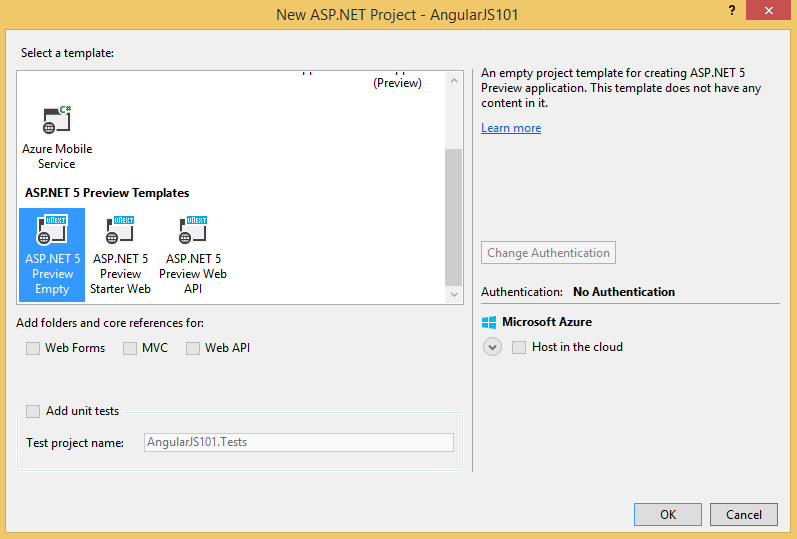
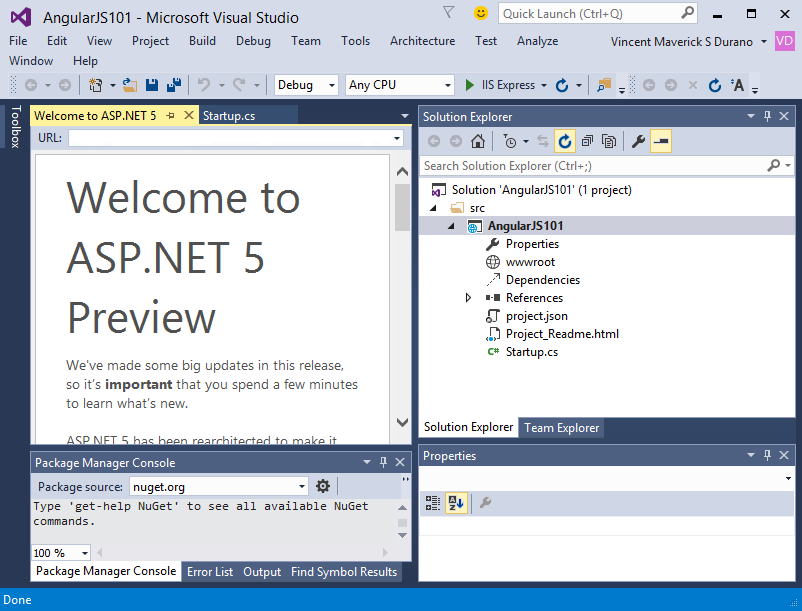
Now select ASP.NET 5 Preview Empty template from the dialog above. Then click OK to let Visual Studio generate the necessary files and templates needed for you. You should be able to see something like below:

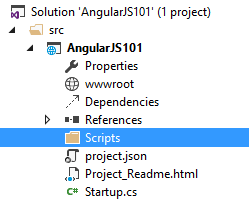
Adding the Scripts folder

The next thing to do is to create a new folder called “Scripts”. This folder will contain all the JavaScript files needed in our application:

Getting the Required Packages

ASP.NET 5 now supports three main package managers: NuGet, NPM and Bower.

Package Manager

A package manager enables you to easily gather all resources that you need for building an application. In other words you can make use of package manager to automatically download all the resources and their dependencies instead of manually downloading project dependencies such as jQuery, Bootstrap and AngularJS in the web.

NuGet

NuGet manages .NET packages such as Entity Framework, ASP.NET MVC and so on. You typically specify the NuGet packages that your application requires within project.json file.

NPM

NPM is one of the newly supported package manager in ASP.NET 5. This package manager was originally created for managing packages for the open-source NodeJS framework. The package.json is the file that manages your project’s NPM packages.

Bower

Bower is another supported package manager in ASP.NET 5. It was created by Twitter that is designed to support front-end development. You can use Bower to manage client-side resources such as jQuery, AngularJS and Bootstrap.

For this example we need to use NPM to install the resources we need in our application such as Grunt and the Grunt plugins. To do this just right click in your Project (in this case AngularJS101) and select Add > New Item. In the dialog select NPM configuration file as shown in the figure below:

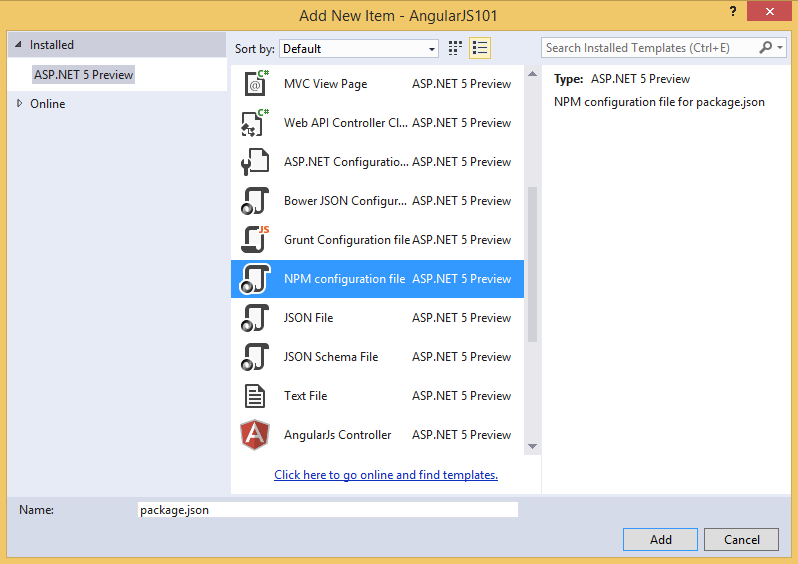
Click Add to generate the file for you. Now open package.json file and modify it by adding the following dependencies:

{
    "version": "1.0.0",
    "name": "AngularJS101",
    "private": true,
    "devDependencies": {
        "grunt": "0.4.5",
        "grunt-contrib-uglify": "0.9.1",
        "grunt-contrib-watch": "0.6.1"
    }
}

Notice that you get Intellisense support while you edit the file. A matching list of NPM package names and versions shows as you type.

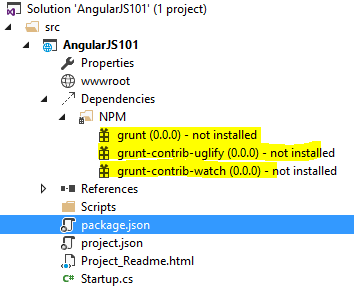
In package.json file, from the code above, we have added three (3) dependencies named grunt, grunt-contrib-uglify and grunt-contrib-watch NPM packages that are required in our application.

Now save the package.json file and you should be able to see a new folder under Dependencies named NPM as shown in the following:

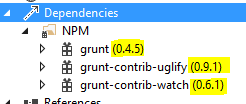
Right click on the NPM folder and select Restore Packages to download all the packages required. Note that this may take a bit to finish the download so just be patient and wait ;). After that the grunt, grunt-contrib-uglify and grunt-contrib-watch NPM packages should now be installed as shown in the following:

Configuring Grunt

Grunt is an open-source tool that enables you to build client-side resources for your project. For example, you can use Grunt to compile your LESS or Saas files into CSS. Adding to that, Grunt can also be used to minify CSS and JavaScript files.

In this example, we will use Grunt to combine and minify JavaScript files. We will configure Grunt so that it will take all the JavaScript files from the Scripts folder that we created earlier, combine and minify the files, and finally save the results to a file named app.js within the wwwroot folder.

Now right click on your project and select Add > New Item. Select Grunt Configuration file from the dialog as shown in the figure below:

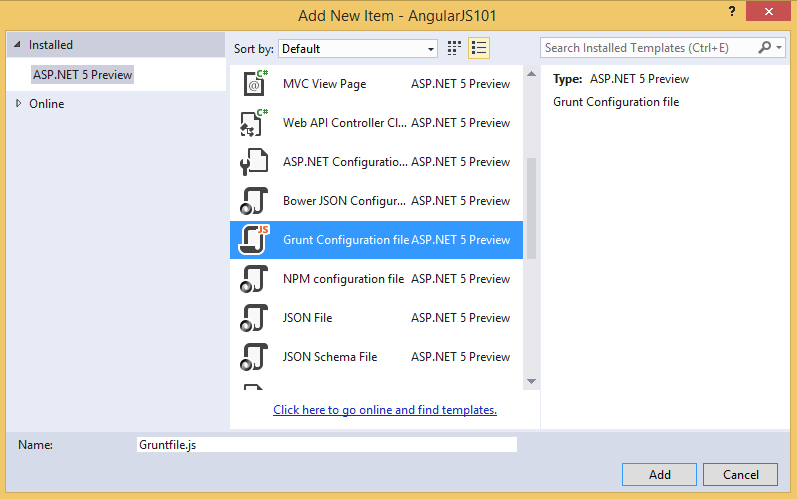
Then click Add to generate the file and then modify the code within the Gruntfile.js file so it will look like this:

module.exports = function (grunt) { 
    grunt.loadNpmTasks('grunt-contrib-uglify');
    grunt.loadNpmTasks('grunt-contrib-watch');

    grunt.initConfig({
        uglify: {
            my_target: {
                files: { 'wwwroot/app.js': ['Scripts/app.js', 'Scripts/**/*.js'] }
            }
        },

        watch: {
            scripts: {
                files: ['Scripts/**/*.js'],
                tasks: ['uglify']
            }
        }
    });

    grunt.registerTask('default', ['uglify', 'watch']);
};

The code above contains three sections. The first one is used to load each of the Grunt plugins that we need from the NPM packages that we configured earlier. The initConfig() is responsible for configuring the plugins. The Uglify plugin is configured so that it combines and minifies all the files from the Scripts folder and generate the result in a file named app.js within wwwroot folder. The last section contains the definitions for your tasks. In this case we define a single ‘default’ task that runs ‘uglify’ and then watches for changes in our JavaScript file.

Now save the file and let’s run the Grunt file using Visual Studio Task Runner Explorer. To do this, go to View > Other Windows > Task Runner Explorer in Visual Studio main menu. In the Task Runner Explorer make sure to hit the refresh button to load the tasks for our application. You should see something like this:

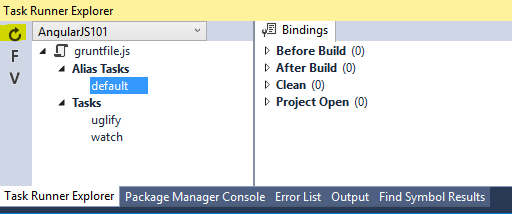
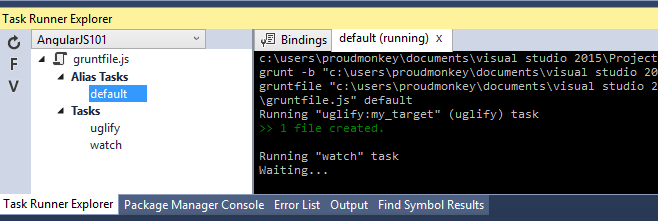
Now right click on the default task and select Run. You should be able to see the following output:

Configuring ASP.NET MVC

There are two main files that we need to modify to enable MVC in our ASP.NET 5 application.

First, we need to modify the project.json file to in include MVC 6 under dependencies:

    "webroot": "wwwroot",
    "version": "1.0.0-*",
    "dependencies": {
        "Microsoft.AspNet.Server.IIS": "1.0.0-beta3",
        "Microsoft.AspNet.Mvc": "6.0.0-beta3"
    },
    "frameworks": {
        "aspnet50": { },
        "aspnetcore50": { }
    },

Make sure to save the file to restore the packages required. The project.json file is used by the NuGet package manager to determine the packages required in your application. In this case we’ve added Microsoft.AspNet.Mvc.

Now the last thing is to modify the Startup.cs file to add the MVC framework in the application pipeline. Your Startup.cs file should now look like this:

using System; 
using Microsoft.AspNet.Builder; 
using Microsoft.AspNet.Http; 
using Microsoft.Framework.DependencyInjection;

namespace AngularJS101 
{
    public class Startup
    {
        public void ConfigureServices(IServiceCollection services){
            services.AddMvc();
        }

        public void Configure(IApplicationBuilder app){
            app.UseMvc();
        }
    }
}

The ConfigureServices() method is used to register MVC with the ASP.NET 5 built-in Dependency Injection Framework (DI). The Configure() method is used to register MVC with OWIN.

Adding Models

The next step is to create a model that we can use to pass data from the server to the browser/client. Now create a folder named “Models” under the root of your project. Within the “Models” folder, create a class named “DOTAHero” and add the following code below:

using System;

namespace AngularJS101.Models 
{
    public class DOTAHero
    {
        public int ID { get; set; }
        public string Name { get; set; }
        public string Type { get; set; }
    }
}

Create another class called “HeroManager” and add the following code below:

using System.Collections.Generic; 
using System.Linq;

namespace AngularJS101.Models 
{
    public class HeroManager
    {
        readonly List<DOTAHero> _heroes = new List<DOTAHero>() {
            new DOTAHero { ID = 1, Name = "Bristleback", Type="Strength"},
            new DOTAHero { ID = 2, Name ="Abbadon", Type="Strength"},
            new DOTAHero { ID = 3, Name ="Spectre", Type="Agility"},
            new DOTAHero { ID = 4, Name ="Juggernaut", Type="Agility"},
            new DOTAHero { ID = 5, Name ="Lion", Type="Intelligence"},
            new DOTAHero { ID = 6, Name ="Zues", Type="Intelligence"},
            new DOTAHero { ID = 7, Name ="Trent", Type="Strength"},
        };
        public IEnumerable<DOTAHero> GetAll { get { return _heroes; } }

        public List<DOTAHero> GetHeroesByType(string type) {
            return _heroes.Where(o => o.Type.ToLower().Equals(type.ToLower())).ToList();
        }

 public DOTAHero GetHeroByID(int Id) {
            return _heroes.Find(o => o.ID == Id);
        }
    }
}

The HeroManager class contains a readonly property that contains a list of heroes. For simplicity, the data is obviously static. In real scenario you may need to get the data in a storage medium such as database or any files that stores your data. It also contains a GetAll property that returns all the heroes and a GetHeroesByType() method that returns a list of heroes based on the hero type, and finally a GetHeroByID() method that returns a hero based on their ID.

Adding Web API Controller

For this particular example, we will be using Web API for passing data to the browser/client.

Unlike previous versions of ASP.NET, MVC and Web API controllers used the same controller base class. Since Web API is now part of MVC 6 then we can start creating Web API controllers because we already pulled the required NuGet packages for MVC 6 and configured MVC 6 in startup.cs.

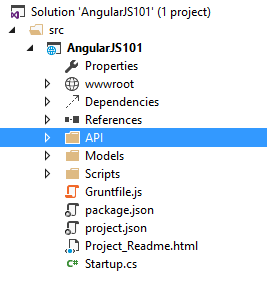
Now add an “API” folder under the root of the project:

Then add a Web API controller by right-clicking the API folder and selecting Add > New Item. Select Web API Controller Class and name the controller as “HeroesController” as shown in the figure below:

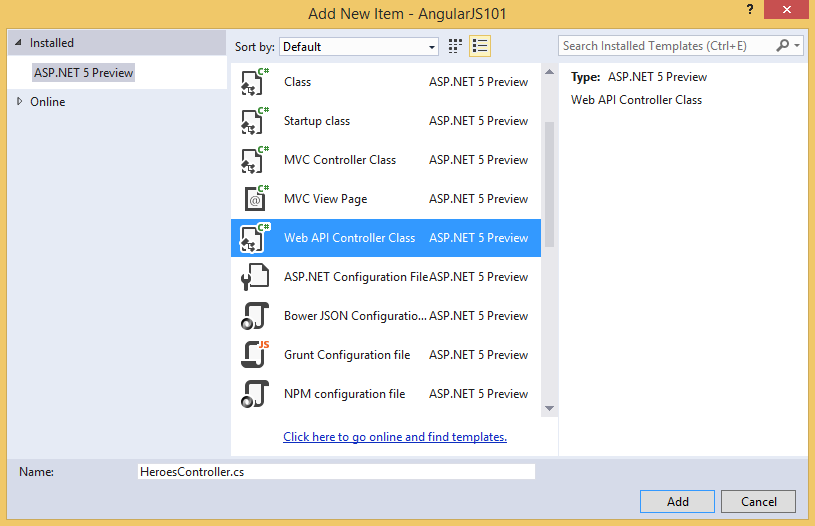
Click Add to generate the file for you. Now modify your HeroesController class so it will look like this:

using System.Collections.Generic; 
using Microsoft.AspNet.Mvc; 
using AngularJS101.Models;

namespace AngularJS101.API.Controllers 
{
    [Route("api/[controller]")]
    public class HeroesController : Controller
    {
        // GET: api/values
        [HttpGet]
        public IEnumerable<DOTAHero> Get()
        {
            HeroManager HM = new HeroManager();
            return HM.GetAll;
        }

        // GET api/values/7
        [HttpGet("{id}")]
        public DOTAHero Get(int id)
        {
            HeroManager HM = new HeroManager();
            return HM.GetHeroByID(id);
        }

    }
}

At this point we will only be focusing on GET methods to retrieve data. The first GET method returns all the heroes available by calling the GetAll property found in HeroManager class. The second GET method returns a specific hero data based on the ID.

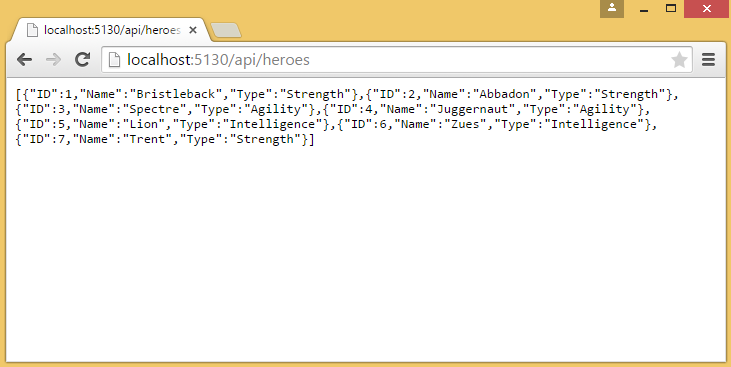
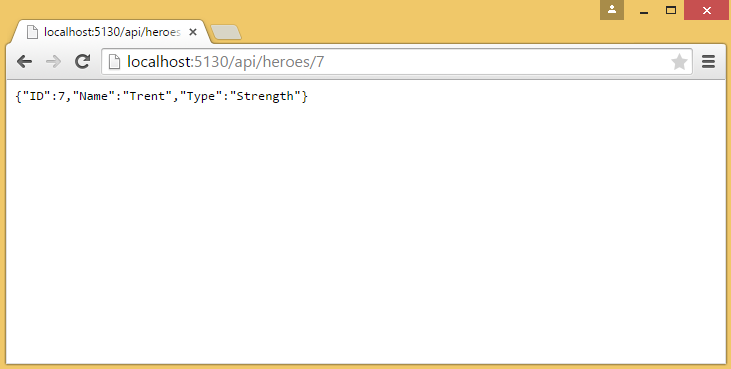
You can test whether the actions are working by running your application in the browser and appending the /api/heroes in the URL. Here are the outputs for both GET actions:

Route: /api/heroes

Route: /api/heroes/7

Creating an AngularJS Application

Visual Studio 2015 includes templates for creating AngularJS modules, controllers, directives and factories. For this example we will be displaying the list of heroes using an AngularJS template.

Adding an AngularJS Module

To get started lets create an AngularJS module by right-clicking on the Scripts folder and selecting Add > New Item. Select AngularJS Module as shown in the figure below.

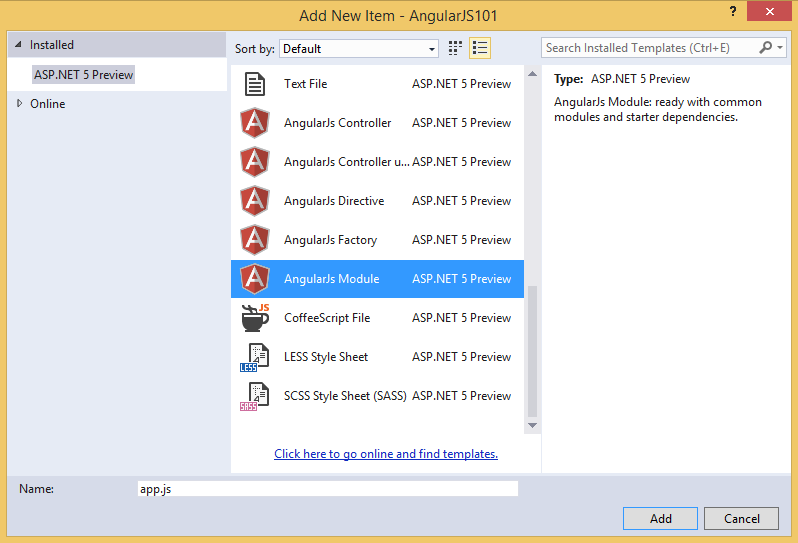
Click Add to generate the file and copy the following code for our AngularJS module:

(function () {
    'use strict';

    angular.module('heroesApp', [
        'heroesService'      
    ]);
})();

The code above defines a new AngularJS module named “heroesApp”. The heroesApp has a dependency on another AngularJS module named “heroesService” which we will create later in the next step.

Adding an AngularJS Controller

The next thing to do is to create a client-side AngularJS Controller. Create a new folder called “Controllers” under the Script folder as in the following:


Click Add and copy the following code below within your heroesController.js file:

(function () {
    'use strict';

    angular
        .module('heroesApp')
        .controller('heroesController', heroesController);

    heroesController.$inject = ['$scope','Heroes'];

    function heroesController($scope, Heroes) {
        $scope.Heroes = Heroes.query();
    }
})();

The code above depends on the Heroes service that supplies the list of heroes. The Heroes service is passed to the controller using dependency injection (DI). The $inject() method call enables DI to work. The Heroes service is passed as the second parameter to the heroesController() function.

Adding the Heroes Service

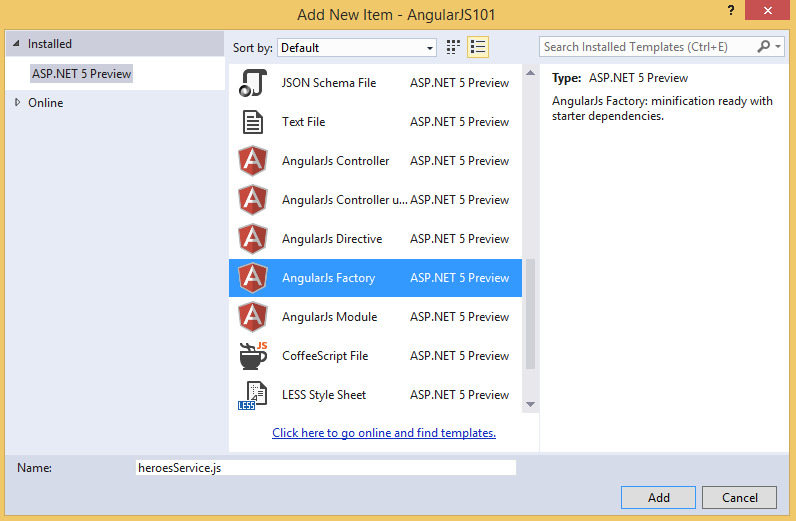
We will use an AngularJS Heroes service to interact with our data via Web API. Now add a new folder called “Services” within the Script folder. Right click on the Services folder and select Add > New Item. From the dialog select AngularJS Factory and name it as “heroesService.js” as in the following:

Now click Add and then replace the generated default code with the following:

(function () {
    'use strict';

    var heroesService = angular.module('heroesService', ['ngResource']);
    heroesService.factory('Heroes', ['$resource',
        function ($resource) {
            return $resource('/api/heroes', {}, {
                query: { method: 'GET', params: {}, isArray: true}
            });
        }
    ]);
})();

The code above basically returns a list of heroes from the Web API action. The $resource object performs an AJAX request using a RESTful pattern. The heroesService is associated with the /api/heroes route on the server. This means that when you perform a query against the service from your client-side code, the Web API HeroesController is invoked to return a list of heroes.

Adding an AngularJS Template

Let’s add an AngularJS template for displaying the list of heroes. To do this we will need an HTML page to render in the browser. In the wwwroot folder add a new HTML page and name it as “index” for simplicity. Your application structure should now look like this:

The wwwroot folder is a special folder in your application. The purpose is that the wwwroor folder should contain all contents of your website such as HTML files and images needed for your website.

You should not place any of your source code within the wwwroot folder. Instead source codes such as MVC controllers’ source, model classes and unminified JavaScript and LESS files should be placed outside of the wwwroot folder.

Now replace the content of index.html with the following:

<!DOCTYPE html>  
<html ng-app="heroesApp"> 
<head> 
    <meta charset="utf-8" />
    <title>DOTA 2 Heroes</title>
    <script src="//ajax.googleapis.com/ajax/libs/angularjs/1.3.15/angular.js"></script>
    <script src="//ajax.googleapis.com/ajax/libs/angularjs/1.3.15/angular-resource.js"></script>
    <script src="app.js"></script>
</head> 
<body ng-cloak> 
    <div ng-controller="heroesController">
        <h1>DOTA Heroes</h1>
        <table>
            <thead>
                <tr>
                    <th>ID</th>
                    <th>Name</th>
                    <th>Type</th>
                </tr>
            </thead>
            <tbody>
                <tr ng-repeat="hero in Heroes">
                    <td>{{hero.ID}}</td>
                    <td>{{hero.Name}}</td>
                    <td>{{hero.Type}}</td>
                </tr>
            </tbody>
        </table>
    </div>
</body> 
</html> 

There are several things to point out from the markup above: 
The html element is embedded with the ng-app directive. This directive associates the heroesApp with the HTML file.

In the script section, you will notice that I use Google CDN for referencing AngularJS and related libraries. Besides being lazy, it’s my intent to use CDN for referencing standard libraries such as jQuery, AngularJS and Bootstrap to boost application performance. If you don’t want to use CDN then you can always install AngularJS packages using Bower.

The body element is embedded with the ng-cloak directive. This directive hides an AngularJS template until the data has been loaded in the page. 
The div element within the body block is embedded with the ng-controller directive. This directive associates the heroesController and renders the data within the div element.

Finally, the ng-repeat directive is added to the tr element of the table. This will create row for each data that retrieved from the server.

Output

Here’s the output below when running the page and navigating to index.html:

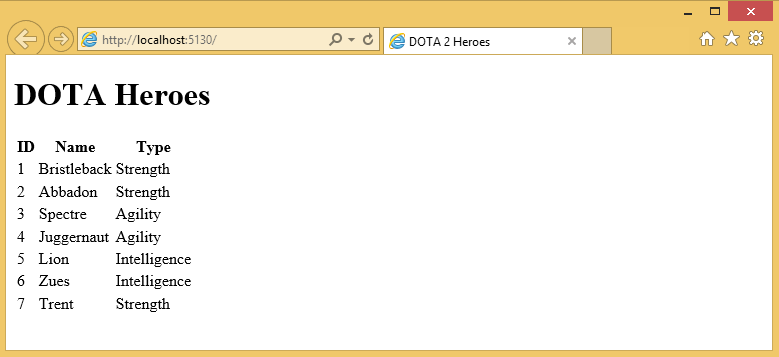
That’s it! It is more fun to play DOTA!


ASP.NET MVC 6 Hosting - HostForLIFE.eu :: Database Image Bank In ASP.NET MVC

clock February 2, 2017 08:41 by author Peter

The goal is to use a database to store images and use MVC to call those images, using custom routes. The premises are,
The URL must be something like this: “imagebank/sample-file” or “imagebank/32403404303“.
The MVC Controller/Action will get the image by an ID “sample-file” or “32403404303” and find out on some cache and/or database to display the image. If it exists in cache, get from cache if not get from database. So in HTML, we can call the image like this.

    <img src="~/imagebank/sample-file" />   

If you want to use another URL, for instance “foo/sample-file”, you can change the image bank route name in web.config.
If you do not want to display the image and just download the file, use - “imagebank/sample-file/download“.

So, let's get started!

The image bank route configuration

App_Start\RouteConfig.cs
public class RouteConfig 
    { 
        public static void RegisterRoutes(RouteCollection routes) 
        { 
            routes.IgnoreRoute("{resource}.axd/{*pathInfo}"); 
 
            routes.MapRoute( 
                name: "ImageBank", 
                url: GetImageBankRoute() + "/{fileId}/{action}", 
                defaults: new { controller = "ImageBank", action = "Index" } 
            ); 
 
            routes.MapRoute( 
                name: "Default", 
                url: "{controller}/{action}/{id}", 
                defaults: new { controller = "Home", action = "Index", id = UrlParameter.Optional } 
            ); 
        } 
 
        private static string GetImageBankRoute() 
        { 
            var key = "imagebank:routeName"; 
            var config = ConfigurationManager.AppSettings.AllKeys.Contains(key) ? ConfigurationManager.AppSettings.Get(key) : ""; 
 
            return config ?? "imagebank"; 
        } 
    } 


The Image Bank Controller

Controllers\ImageBankController.cs 
public class ImageBankController : Controller 
    { 
        public ImageBankController() 
        { 
            Cache = new Cache(); 
            Repository = new Repository(); 
        } 
         
        public ActionResult Index(string fileId, bool download = false) 
        { 
            var defaultImageNotFound = "pixel.gif"; 
            var defaultImageNotFoundPath = $"~/content/img/{defaultImageNotFound}"; 
            var defaultImageContentType = "image/gif"; 
 
            var cacheKey = string.Format("imagebankfile_{0}", fileId); 
            Models.ImageFile model = null; 
 
            if (Cache.NotExists(cacheKey)) 
            { 
                model = Repository.GetFile(fileId); 
 
                if (model == null) 
                { 
                    if (download) 
                    { 
                        return File(Server.MapPath(defaultImageNotFoundPath), defaultImageContentType, defaultImageNotFound); 
                    } 
 
                    return File(Server.MapPath(defaultImageNotFoundPath), defaultImageContentType); 
                } 
                 
                Cache.Insert(cacheKey, "Default", model); 
            } 
            else 
            { 
                model = Cache.Get(cacheKey) as Models.ImageFile; 
            } 
 
            if (download) 
            { 
                return File(model.Body, model.ContentType, string.Concat(fileId, model.Extension)); 
            } 
 
            return File(model.Body, model.ContentType); 
        } 
 
        public ActionResult Download(string fileId) 
        { 
            return Index(fileId, true); 
        } 
 
        private Repository Repository { get; set; } 
 
        private Cache Cache { get; set; } 
    } 


The above code has two actions - one for displaying the image and the other for downloading it.

The database repository

Repository.cs
public class Repository 
    { 
        public static Models.ImageFile GetFile(string fileId) 
        { 
            //Just an example, use you own data repository and/or database 
            SqlConnection connection = new SqlConnection(ConfigurationManager.ConnectionStrings["ImageBankDatabase"].ConnectionString); 
 
            try 
            { 
                connection.Open(); 
                var sql = @"SELECT *  
                            FROM    dbo.ImageBankFile  
                            WHERE   FileId = @fileId  
                                    OR ISNULL(AliasId, FileId) = @fileId"; 
 
                var command = new SqlCommand(sql, connection); 
                command.Parameters.Add("@fileId", SqlDbType.VarChar).Value = fileId; 
                command.CommandType = CommandType.Text; 
                var ada = new SqlDataAdapter(command); 
                var dts = new DataSet(); 
                ada.Fill(dts); 
 
                var model = new Models.ImageFile(); 
                model.Extension = dts.Tables[0].Rows[0]["Extension"] as string; 
                model.ContentType = dts.Tables[0].Rows[0]["ContentType"] as string; 
                model.Body = dts.Tables[0].Rows[0]["FileBody"] as byte[]; 
 
                return model; 
            } 
            catch  
            { 
 
            } 
            finally 
            { 
                if (connection != null) 
                { 
                    connection.Close(); 
                    connection.Dispose(); 
                    connection = null; 
                } 
            } 
 
            return null; 
        } 
    } 


The repository is very simple. This code is just for demonstration. You can implement your own code. 

The image bank model class

Models\ImageFile.cs
public class ImageFile 
    { 
        public byte[] Body { get; set; } 
 
        public string ContentType { get; set; } 
 
        public string Extension { get; set; } 
    }  

Create table script

USE [ImageBankDatabase] 
GO 
 
/****** Object:  Table [dbo].[ImageBankFile]    Script Date: 11/16/2016 12:36:56 ******/ 
SET ANSI_NULLS ON 
GO 
 
SET QUOTED_IDENTIFIER ON 
GO 
 
SET ANSI_PADDING ON 
GO 
 
CREATE TABLE [dbo].[ImageBankFile]( 
    [FileId] [nvarchar](50) NOT NULL, 
    [AliasId] [nvarchar](100) NULL, 
    [FileBody] [varbinary](max) NULL, 
    [Extension] [nvarchar](5) NULL, 
    [ContentType] [nvarchar](50) NULL, 
 CONSTRAINT [PK_ImageBankFile] PRIMARY KEY CLUSTERED  

    [FileId] ASC 
)WITH (PAD_INDEX  = OFF, STATISTICS_NORECOMPUTE  = OFF, IGNORE_DUP_KEY = OFF, ALLOW_ROW_LOCKS  = ON, ALLOW_PAGE_LOCKS  = ON) ON [PRIMARY] 
) ON [PRIMARY] 
 
GO 
 
SET ANSI_PADDING OFF 
GO  

The Cache provider class

Cache.cs

public class Cache 
    { 
        public Cache() 
        { 
            _config = ConfigurationManager.GetSection("system.web/caching/outputCacheSettings") as OutputCacheSettingsSection; 
        } 
         
        private OutputCacheSettingsSection _config; 
         
        private OutputCacheProfile GetProfile(string profile) 
        { 
            return !string.IsNullOrEmpty(profile) ? _config.OutputCacheProfiles[profile] : new OutputCacheProfile("default"); 
        } 
         
        private object GetFromCache(string id) 
        { 
            if (string.IsNullOrEmpty(id)) throw new NullReferenceException("id is null"); 
            if (System.Web.HttpRuntime.Cache != null) 
            { 
                lock (this) 
                { 
                    return System.Web.HttpRuntime.Cache[id]; 
                } 
            } 
 
            return null; 
        } 
         
        public Cache Insert(string id, string profile, object obj) 
        { 
            if (System.Web.HttpRuntime.Cache != null) 
            { 
                if (string.IsNullOrEmpty(id)) 
                { 
                    throw new ArgumentNullException("id", "id is null"); 
                } 
 
                if (string.IsNullOrEmpty(profile)) 
                { 
                    throw new ArgumentNullException("profile", string.Format("profile is null for id {0}", id)); 
                } 
 
                var objProfile = GetProfile(profile); 
                if (objProfile == null) 
                { 
                    throw new NullReferenceException(string.Format("profile is null for id {0} and profile {1}", id, profile)); 
                } 
 
                lock (this) 
                { 
                    System.Web.HttpRuntime.Cache.Insert(id, obj, null, DateTime.Now.AddSeconds(objProfile.Duration), TimeSpan.Zero); 
                } 
            } 
 
            return this; 
        } 
         
        public bool NotExists(string id) 
        { 
            return GetFromCache(id) == null; 
        } 
         
        public Cache Remove(string id) 
        { 
            if (System.Web.HttpRuntime.Cache != null) 
            { 
                lock (this) 
                { 
                    System.Web.HttpRuntime.Cache.Remove(id); 
                } 
            } 
 
            return this; 
        } 
         
        public object Get(string id) 
        { 
            return GetFromCache(id); 
        } 
    } 

HostForLIFE.eu ASP.NET MVC 6 Hosting
HostForLIFE.eu is European Windows Hosting Provider which focuses on Windows Platform only. We deliver on-demand hosting solutions including Shared hosting, Reseller Hosting, Cloud Hosting, Dedicated Servers, and IT as a Service for companies of all sizes. We have customers from around the globe, spread across every continent. We serve the hosting needs of the business and professional, government and nonprofit, entertainment and personal use market segments.


About HostForLIFE.eu

HostForLIFE.eu is European Windows Hosting Provider which focuses on Windows Platform only. We deliver on-demand hosting solutions including Shared hosting, Reseller Hosting, Cloud Hosting, Dedicated Servers, and IT as a Service for companies of all sizes.

We have offered the latest Windows 2016 Hosting, ASP.NET Core 2.2.1 Hosting, ASP.NET MVC 6 Hosting and SQL 2017 Hosting.


Tag cloud

Sign in