European ASP.NET MVC 4 and MVC 5 Hosting

BLOG about ASP.NET MVC 3, ASP.NET MVC 4, and ASP.NET MVC 5 Hosting and Its Technology - Dedicated to European Windows Hosting Customer

ASP.NET MVC Hosting - HostForLIFE.eu :: Using Ajax in MVC Application

clock June 21, 2016 00:16 by author Anthony

In asp.net web form application, if we need ajax service, we will need to create wcf services on server side to serve ajax calls, while in MVC web application, no wcf is needed, a controller will do.

Here are two examples (GET and POST) of how to use ajax in mvc application

Http Get example: ajax consumer in view

<script type="text/javascript">
  var user = {
                'id': 1
            };
    $.get(
                'home/getUser',
                user,
                function (data) {
                    alert(data.name);
                }
    );
</script>


Http Get example: ajax server in home controller

public class HomeController : Controller
{
    // data GET service
     public JsonResult getUser(int id)
     {
            User user = db.Users.where(u=>u.id==id)
            return Json(user,JsonRequestBehavior.AllowGet);     }
}

A few points:


Controller must return JsonResult rather than ActionResult as a normal controller does as we would want the data to be returnd as json data, and it does not have a ‘d’ wrapper

JsonRequestBehavior.AllowGet must be set in Json()call, otherwise you will get:

500 internal server error with message like

This request has been blocked because sensitive information could be disclosed to third party web sites when this is used in a GET request. To allow GET requests, set JsonRequestBehavior to AllowGet

You only need to set this parameter for GET and returning JSON array to avoid JSON hijacking, no need for POST requests.
Http POST example: ajax consumer in view


<script type="text/javascript">
var user={
            'name':’TheUser’,
            'age':30
        };
 $.post(
            'home/SaveUser',
            user,
            function (data) {
                if (data === true) {
                   alert('User is saved');
                }
                else {

                    alert('Failed to save the user');
                }
            },
            'json'
        );
</script>


Http POST example: ajax server in home controller

public class HomeController : Controller
{
    // data POST service
  [AcceptVerbs(HttpVerbs.Post)]
   public JsonResult SaveUser (string name, int age)
   {
        return Json(true);    }
}

A few points:

Have to decorate the controller with ‘POST’

Datatype in $.post in example is set to json, but it is not necessary to be so, if you just pass data in fields rather than in complex object. When it is not set to json it will use application/x-www-form-urlencoded as a way to pass data in standard post.


Summary:
In asp.net MVC you can use controller as ajax server without having to use wcf, compared with wcf, no configuration is needed


HostForLIFE.eu ASP.NET MVC Hosting
HostForLIFE.eu is European Windows Hosting Provider which focuses on Windows Platform only. We deliver on-demand hosting solutions including Shared hosting, Reseller Hosting, Cloud Hosting, Dedicated Servers, and IT as a Service for companies of all sizes. We have customers from around the globe, spread across every continent. We serve the hosting needs of the business and professional, government and nonprofit, entertainment and personal use market segments.


ASP.NET MVC Hosting - HostForLIFE.eu :: Configuring ELMAH In ASP.NET MVC

clock June 13, 2016 21:35 by author Anthony

In this article, I will integrate and setup ELMAH to asp.net MVC project. I will finish whole article in 5 different steps. ELMAH stands for Error Logging Modules and Handlers providing application wide error logging facilities. ELMAH is pluggable and easy to implement without changing single line of code. ELMAH work as interceptor of unhandled dotnet exceptions, that display over yellow screen of death. As per Author you can dynamically add ELMAH on running asp.net application without recompile or re-deploy whole application.You can download ELMAH binaries from google code or if you are using nuget then visit ELMAH nuget page.

Install

The best way to install any module to Asp.net MVC project is to use Nuget package Console. You can visit ELMAH nuget page for get latest version command.

Configure

After installing ELMAH , it will automatically update Web.Config file. If it's not so you can add following code to Web.Config file.

<configuration>
<configSections>
    <sectionGroup name="elmah">
      <section name="security" requirePermission="false" type="Elmah.SecuritySectionHandler, Elmah" />
      <section name="errorLog" requirePermission="false" type="Elmah.ErrorLogSectionHandler, Elmah" />
      <section name="errorMail" requirePermission="false" type="Elmah.ErrorMailSectionHandler, Elmah" />
      <section name="errorFilter" requirePermission="false" type="Elmah.ErrorFilterSectionHandler, Elmah" />
    </sectionGroup>
</configSections>

<system.web>   
    <httpModules>
      <add name="ErrorLog" type="Elmah.ErrorLogModule, Elmah" />
      <add name="ErrorMail" type="Elmah.ErrorMailModule, Elmah" />
      <add name="ErrorFilter" type="Elmah.ErrorFilterModule, Elmah" />
    </httpModules>
</system.web>

<system.webServer>
<modules>
      <add name="ErrorLog" type="Elmah.ErrorLogModule, Elmah" preCondition="managedHandler" />
      <add name="ErrorMail" type="Elmah.ErrorMailModule, Elmah" preCondition="managedHandler" />
      <add name="ErrorFilter" type="Elmah.ErrorFilterModule, Elmah" preCondition="managedHandler" />
</modules>
</system.webServer>
<elmah>
    <security allowRemoteAccess="false" />
    <errorLog type="Elmah.SqlErrorLog, Elmah" connectionStringName="YourConnectionStringName" />
</elmah>
    <location path="elmah.axd" inheritInChildApplications="false">
    <system.web>
      <httpHandlers>
        <add verb="POST,GET,HEAD" path="elmah.axd" type="Elmah.ErrorLogPageFactory, Elmah" />
      </httpHandlers>
      <!--
      <authorization>
        <allow roles="admin" />
        <deny users="*" /> 
      </authorization>
      --> 
    </system.web>
    <system.webServer>
      <handlers>
        <add name="ELMAH" verb="POST,GET,HEAD" path="elmah.axd" type="Elmah.ErrorLogPageFactory, Elmah" preCondition="integratedMode" />
      </handlers>
    </system.webServer>
  </location>
</configuration>
Usage Now, It's time to use and test elmah for application. Generate exception in Home Controller
public ActionResult Index()
{
   throw new Exception("This is test Exception");
          
   return View();
}


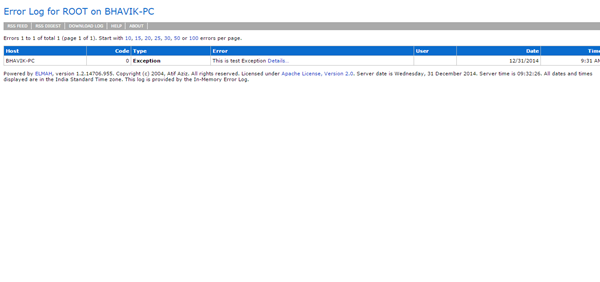
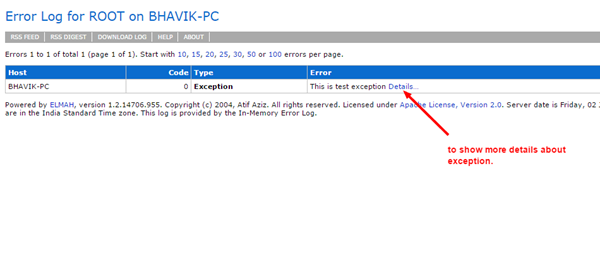
after generating exception check your elmah like http://www.example.com/elmah.axd
Here is our output

integrate-elmah-in-aspnet-mvc

integrate elmah in asp. net mvc

Security

In addition ELMAH provides seamless security feature to prevent unauthorized access. Please read our next article to make your elmah secure.

Filtering

ELMAH identify and store exceptions in different category, you can make or edit ELMAH error screen with different filters which we will discuss in our next ELMAH series.

Notification

You can setup ELMAH email notification when any exception occurs. To unable notification option you must include below code

Add ErrorMail module
<httpModules>
    <add name="ErrorMail" type="Elmah.ErrorMailModule, Elmah"/>
</httpModules>


Add SMTP Setting
<system.net>
    <mailSettings>
        <smtp deliveryMethod="network">
            <network host="..." port="25" userName="..." password="..." />
        </smtp>
    </mailSettings>
</system.net>
 

or
<elmah>
<errorMail from="..." to="..."  async="true" smtpServer="..." smtpPort="25" userName="..." password="..." />
</elmah>


HostForLIFE.eu ASP.NET MVC Hosting
HostForLIFE.eu is European Windows Hosting Provider which focuses on Windows Platform only. We deliver on-demand hosting solutions including Shared hosting, Reseller Hosting, Cloud Hosting, Dedicated Servers, and IT as a Service for companies of all sizes. We have customers from around the globe, spread across every continent. We serve the hosting needs of the business and professional, government and nonprofit, entertainment and personal use market segments.


ASP.NET MVC Hosting - HostForLIFE.eu :: How To Make Simple Application In ASP.NET MVC Using Select2?

clock June 6, 2016 23:46 by author Anthony

In this tutorial, I will show you how to make simple application in ASP.NET MVC using Select2. The infinite scrolling feature has also been implemented with server side options population. Select2 is very useful for dropdown lists with large datasets.

Why Select2 :

  • Using this jQuery plugin for dropdown lists, you can implement features such as option grouping, searching, infinite scrolling, tagging, remote data sets and other highly used features.
  • To use select2 in web projects, you just have to include JavaScript and CSS files of Select2 in your website.
  • Current version of select2 is 4.0.0. You can easily include these files by installation of NuGet package ‘Select2.js’ from NuGet package manager.

Steps of Implementation:
1. Create a blank ASP.NET MVC project, and install NuGet packages Select2.js, jQuery and jQuery Unobtrusive.
2. Add one controller with the name ‘HomeController’ and add view for default method ‘Index’.
3. Create new class in Models folder ‘IndexViewModel.cs as shown below:

public class IndexViewModel
{
   [Required(ErrorMessage="Please select any option")]
   public string OptionId { get; set; }
}

4. Bind ‘Index.cshtml’ view with IndexViewModelClass as model, by adding the following line in Index view:

@model Select2InMvcProject.Models.IndexViewModel

5. In ‘Index.cshtml’, include the css and js files below:

<link href="~/Content/css/select2.css" rel="stylesheet" />
<script src="~/Scripts/jquery-2.1.4.js"></script>
<script src="~/Scripts/select2.js"></script>
<script src="~/Scripts/jquery.validate.js"></script>
<script src="~/Scripts/jquery.validate.unobtrusive.js"></script>


6. Write the following code in the Index view for creation of select list:

@using (Html.BeginForm())
{
   <br /><br />
   @Html.DropDownListFor(n => n.OptionId, Enumerable.Empty<SelectListItem>(), new { @id = "txtOptionId", @style = "width:300px;" })
//Created selectlist with empty enumerable of SelectListItem and given //id as “txtOptionId”
   @Html.ValidationMessageFor(n => n.OptionId)
//Adds span of validation error message
   <br /><br />
<button type="submit">Submit</button>
   <br /><br />
}


7. For applying Select2 to the dropdown list created above, fetching data from server side and for infinite scroll, use the jQuery code below in Index view:

<script type="text/javascript">
   $(document).ready(function () {
       var pageSize = 20;
       var optionListUrl = '@Url.Action("GetOptionList", "Home")';
//Method which is to be called for populating options in dropdown //dynamically
       $('#txtOptionId').select2(
       {
           ajax: {
               delay: 150,
               url: optionListUrl,
               dataType: 'json',
               data: function (params) {
                   params.page = params.page || 1;
                   return {
                       searchTerm: params.term,
                       pageSize: pageSize,
                       pageNumber: params.page
                   };
               },
               processResults: function (data, params) {
                   params.page = params.page || 1;
                  return {
                       results: data.Results,
                       pagination: {
                           more: (params.page * pageSize) < data.Total
                       }
                   };
               }
           },
           placeholder: "-- Select --",
           minimumInputLength: 0,
           allowClear: true,
   });
});
</script>


8. Create new class in Models folder with name ‘Select2OptionModel’ and add the two classes below:

public class Select2OptionModel
{
       public string id { get; set; }
       public string text { get; set; }
}
public class Select2PagedResult
{
       public int Total { get; set; }
       public List<Select2OptionModel> Results { get; set; }
}


9. Create one new folder with name ‘Repository’ in the solution, and add new class in that folder with name ‘Select2Repository. The functions in this class are mentioned below:

public class Select2Repository
   {
       IQueryable<Select2OptionModel> AllOptionsList;
public Select2Repository()
{
           AllOptionsList = GetSelect2Options();
}
IQueryable<Select2OptionModel> GetSelect2Options()
                  {
                                     string cacheKey = "Select2Options";
                                     //check cache
                                     if (HttpContext.Current.Cache[cacheKey] != null)
                                     {
return (IQueryable<Select2OptionModel>)HttpContext.Current.Cache[cacheKey];
                                     }
                                     var optionList = new List<Select2OptionModel>();
                                     var optionText = "Option Number ";
                                     for (int i = 1; i < 1000; i++)
                                     {
                                     optionList.Add(new Select2OptionModel
                                     {
                                               id = i.ToString(),
                                               text = optionText + i
                                     });
                                   }
                                   var result = optionList.AsQueryable();
                                     //cache results
                                     HttpContext.Current.Cache[cacheKey] = result;
                                     return result;}
 
List<Select2OptionModel> GetPagedListOptions(string searchTerm, int pageSize, int pageNumber, out int totalSearchRecords)
                  {
                                     var allSearchedResults = GetAllSearchResults(searchTerm);
                                     totalSearchRecords = allSearchedResults.Count;
return allSearchedResults.Skip((pageNumber - 1) * pageSize).Take(pageSize).ToList();
                  }
                  List<Select2OptionModel> GetAllSearchResults(string searchTerm)
                  {

                                     var resultList = new List<Select2OptionModel>();
                                      if (!string.IsNullOrEmpty(searchTerm))
resultList = AllOptionsList.Where(n => n.text.ToLower().Contains(searchTerm.ToLower())).ToList();
                                     else
                                     resultList = AllOptionsList.ToList();
                                     return resultList;
                  }
                  public Select2PagedResult GetSelect2PagedResult(string searchTerm, int pageSize, int pageNumber)
                  {
                                     var select2pagedResult = new Select2PagedResult();
                                     var totalResults = 0;
                                     select2pagedResult.Results = GetPagedListOptions(searchTerm,
pageSize, pageNumber, out totalResults);
                                     select2pagedResult.Total = totalResults;
                                     return select2pagedResult;
}
}

10.  In HomeController class, create new method as shown below:

public JsonResult GetOptionList(string searchTerm, int pageSize, int pageNumber)
{
     var select2Repository = new Select2Repository();
     var result = select2Repository.GetSelect2PagedResult(searchTerm, pageSize, pageNumber);
     return Json(result, JsonRequestBehavior.AllowGet);
}

11. Once you are done with coding, you can build and run the project. The output will be shown as below:

dropdown1.png

dropdown2.png


HostForLIFE.eu ASP.NET MVC Hosting
HostForLIFE.eu is European Windows Hosting Provider which focuses on Windows Platform only. We deliver on-demand hosting solutions including Shared hosting, Reseller Hosting, Cloud Hosting, Dedicated Servers, and IT as a Service for companies of all sizes. We have customers from around the globe, spread across every continent. We serve the hosting needs of the business and professional, government and nonprofit, entertainment and personal use market segments.


HostForLIFE.eu Proudly Launches ASP.NET Core 1.0 RC2 Hosting

clock June 4, 2016 01:07 by author Peter

HostForLIFE.eu was established to cater to an underserved market in the hosting industry; web hosting for customers who want excellent service. HostForLIFE.eu - a cheap, constant uptime, excellent customer service, quality, and also reliable hosting provider in advanced Windows and ASP.NET technology. HostForLIFE.eu proudly announces the availability of the ASP.NET Core 1.0 RC2 hosting in their entire servers environment.

ASP.NET is Microsoft's dynamic website technology, enabling developers to create data-driven websites using the .NET platform and the latest version is 5 with lots of awesome features. ASP.NET Core 1.0 RC2 is a lean .NET stack for building modern web apps. Microsoft built it from the ground up to provide an optimized development framework for apps that are either deployed to the cloud or run on-premises. It consists of modular components with minimal overhead.

A key change that occurred between RC1 and RC2 is the introduction of the .NET command-line interface.  This tool replaces the dnvm, dnx, and dnu utilities with a single tool that handles the responsibilities of these tools. In RC1 an ASP.NET application was a class library that contained a Startup.cs class. When the DNX toolchain run your application ASP.NET hosting libraries would find and execute the Startup.cs, booting your web application. Whilst the spirit of this way of running an ASP.NET Core application still exists in RC2, it is somewhat different. As of RC2 an ASP.NET Core application is a .NET Core Console application that calls into ASP.NET specific libraries. What this means for ASP.NET Core apps is that the code that used to live in the ASP.NET Hosting libraries and automatically run your startup.cs now lives inside a Program.cs.

HostForLIFE.eu hosts its servers in top class data centers that is located in Amsterdam (NL), London (UK), Paris (FR), Frankfurt(DE) and Seattle (US) to guarantee 99.9% network uptime. All data center feature redundancies in network connectivity, power, HVAC, security, and fire suppression. All hosting plans from HostForLIFE.eu include 24×7 support and 30 days money back guarantee. The customers can start hosting their ASP.NET Core 1.0 RC2 site on their environment from as just low €3.00/month only.

HostForLIFE.eu is a popular online ASP.NET based hosting service provider catering to those people who face such issues. The company has managed to build a strong client base in a very short period of time. It is known for offering ultra-fast, fully-managed and secured services in the competitive market.

HostForLIFE.eu offers the latest European ASP.NET Core 1.0 RC2 hosting installation to all their new and existing customers. The customers can simply deploy their ASP.NET Core 1.0 RC2 website via their world-class Control Panel or conventional FTP tool. HostForLIFE.eu is happy to be offering the most up to date Microsoft services and always had a great appreciation for the products that Microsoft offers.

Further information and the full range of features ASP.NET Core 1.0 RC2 Hosting can be viewed here http://hostforlife.eu


About HostForLIFE.eu

HostForLIFE.eu is European Windows Hosting Provider which focuses on Windows Platform only. We deliver on-demand hosting solutions including Shared hosting, Reseller Hosting, Cloud Hosting, Dedicated Servers, and IT as a Service for companies of all sizes.

We have offered the latest Windows 2016 Hosting, ASP.NET Core 2.2.1 Hosting, ASP.NET MVC 6 Hosting and SQL 2017 Hosting.


Tag cloud

Sign in