European ASP.NET MVC 4 and MVC 5 Hosting

BLOG about ASP.NET MVC 3, ASP.NET MVC 4, and ASP.NET MVC 5 Hosting and Its Technology - Dedicated to European Windows Hosting Customer

ASP.NET MVC Hosting - HostForLIFE.eu :: Using Ajax in MVC Application

clock June 21, 2016 00:16 by author Anthony

In asp.net web form application, if we need ajax service, we will need to create wcf services on server side to serve ajax calls, while in MVC web application, no wcf is needed, a controller will do.

Here are two examples (GET and POST) of how to use ajax in mvc application

Http Get example: ajax consumer in view

<script type="text/javascript">
  var user = {
                'id': 1
            };
    $.get(
                'home/getUser',
                user,
                function (data) {
                    alert(data.name);
                }
    );
</script>


Http Get example: ajax server in home controller

public class HomeController : Controller
{
    // data GET service
     public JsonResult getUser(int id)
     {
            User user = db.Users.where(u=>u.id==id)
            return Json(user,JsonRequestBehavior.AllowGet);     }
}

A few points:


Controller must return JsonResult rather than ActionResult as a normal controller does as we would want the data to be returnd as json data, and it does not have a ‘d’ wrapper

JsonRequestBehavior.AllowGet must be set in Json()call, otherwise you will get:

500 internal server error with message like

This request has been blocked because sensitive information could be disclosed to third party web sites when this is used in a GET request. To allow GET requests, set JsonRequestBehavior to AllowGet

You only need to set this parameter for GET and returning JSON array to avoid JSON hijacking, no need for POST requests.
Http POST example: ajax consumer in view


<script type="text/javascript">
var user={
            'name':’TheUser’,
            'age':30
        };
 $.post(
            'home/SaveUser',
            user,
            function (data) {
                if (data === true) {
                   alert('User is saved');
                }
                else {

                    alert('Failed to save the user');
                }
            },
            'json'
        );
</script>


Http POST example: ajax server in home controller

public class HomeController : Controller
{
    // data POST service
  [AcceptVerbs(HttpVerbs.Post)]
   public JsonResult SaveUser (string name, int age)
   {
        return Json(true);    }
}

A few points:

Have to decorate the controller with ‘POST’

Datatype in $.post in example is set to json, but it is not necessary to be so, if you just pass data in fields rather than in complex object. When it is not set to json it will use application/x-www-form-urlencoded as a way to pass data in standard post.


Summary:
In asp.net MVC you can use controller as ajax server without having to use wcf, compared with wcf, no configuration is needed


HostForLIFE.eu ASP.NET MVC Hosting
HostForLIFE.eu is European Windows Hosting Provider which focuses on Windows Platform only. We deliver on-demand hosting solutions including Shared hosting, Reseller Hosting, Cloud Hosting, Dedicated Servers, and IT as a Service for companies of all sizes. We have customers from around the globe, spread across every continent. We serve the hosting needs of the business and professional, government and nonprofit, entertainment and personal use market segments.


ASP.NET MVC Hosting - HostForLIFE.eu :: Configuring ELMAH In ASP.NET MVC

clock June 13, 2016 21:35 by author Anthony

In this article, I will integrate and setup ELMAH to asp.net MVC project. I will finish whole article in 5 different steps. ELMAH stands for Error Logging Modules and Handlers providing application wide error logging facilities. ELMAH is pluggable and easy to implement without changing single line of code. ELMAH work as interceptor of unhandled dotnet exceptions, that display over yellow screen of death. As per Author you can dynamically add ELMAH on running asp.net application without recompile or re-deploy whole application.You can download ELMAH binaries from google code or if you are using nuget then visit ELMAH nuget page.

Install

The best way to install any module to Asp.net MVC project is to use Nuget package Console. You can visit ELMAH nuget page for get latest version command.

Configure

After installing ELMAH , it will automatically update Web.Config file. If it's not so you can add following code to Web.Config file.

<configuration>
<configSections>
    <sectionGroup name="elmah">
      <section name="security" requirePermission="false" type="Elmah.SecuritySectionHandler, Elmah" />
      <section name="errorLog" requirePermission="false" type="Elmah.ErrorLogSectionHandler, Elmah" />
      <section name="errorMail" requirePermission="false" type="Elmah.ErrorMailSectionHandler, Elmah" />
      <section name="errorFilter" requirePermission="false" type="Elmah.ErrorFilterSectionHandler, Elmah" />
    </sectionGroup>
</configSections>

<system.web>   
    <httpModules>
      <add name="ErrorLog" type="Elmah.ErrorLogModule, Elmah" />
      <add name="ErrorMail" type="Elmah.ErrorMailModule, Elmah" />
      <add name="ErrorFilter" type="Elmah.ErrorFilterModule, Elmah" />
    </httpModules>
</system.web>

<system.webServer>
<modules>
      <add name="ErrorLog" type="Elmah.ErrorLogModule, Elmah" preCondition="managedHandler" />
      <add name="ErrorMail" type="Elmah.ErrorMailModule, Elmah" preCondition="managedHandler" />
      <add name="ErrorFilter" type="Elmah.ErrorFilterModule, Elmah" preCondition="managedHandler" />
</modules>
</system.webServer>
<elmah>
    <security allowRemoteAccess="false" />
    <errorLog type="Elmah.SqlErrorLog, Elmah" connectionStringName="YourConnectionStringName" />
</elmah>
    <location path="elmah.axd" inheritInChildApplications="false">
    <system.web>
      <httpHandlers>
        <add verb="POST,GET,HEAD" path="elmah.axd" type="Elmah.ErrorLogPageFactory, Elmah" />
      </httpHandlers>
      <!--
      <authorization>
        <allow roles="admin" />
        <deny users="*" /> 
      </authorization>
      --> 
    </system.web>
    <system.webServer>
      <handlers>
        <add name="ELMAH" verb="POST,GET,HEAD" path="elmah.axd" type="Elmah.ErrorLogPageFactory, Elmah" preCondition="integratedMode" />
      </handlers>
    </system.webServer>
  </location>
</configuration>
Usage Now, It's time to use and test elmah for application. Generate exception in Home Controller
public ActionResult Index()
{
   throw new Exception("This is test Exception");
          
   return View();
}


after generating exception check your elmah like http://www.example.com/elmah.axd
Here is our output

integrate-elmah-in-aspnet-mvc

integrate elmah in asp. net mvc

Security

In addition ELMAH provides seamless security feature to prevent unauthorized access. Please read our next article to make your elmah secure.

Filtering

ELMAH identify and store exceptions in different category, you can make or edit ELMAH error screen with different filters which we will discuss in our next ELMAH series.

Notification

You can setup ELMAH email notification when any exception occurs. To unable notification option you must include below code

Add ErrorMail module
<httpModules>
    <add name="ErrorMail" type="Elmah.ErrorMailModule, Elmah"/>
</httpModules>


Add SMTP Setting
<system.net>
    <mailSettings>
        <smtp deliveryMethod="network">
            <network host="..." port="25" userName="..." password="..." />
        </smtp>
    </mailSettings>
</system.net>
 

or
<elmah>
<errorMail from="..." to="..."  async="true" smtpServer="..." smtpPort="25" userName="..." password="..." />
</elmah>


HostForLIFE.eu ASP.NET MVC Hosting
HostForLIFE.eu is European Windows Hosting Provider which focuses on Windows Platform only. We deliver on-demand hosting solutions including Shared hosting, Reseller Hosting, Cloud Hosting, Dedicated Servers, and IT as a Service for companies of all sizes. We have customers from around the globe, spread across every continent. We serve the hosting needs of the business and professional, government and nonprofit, entertainment and personal use market segments.


ASP.NET MVC Hosting - HostForLIFE.eu :: How To Make Simple Application In ASP.NET MVC Using Select2?

clock June 6, 2016 23:46 by author Anthony

In this tutorial, I will show you how to make simple application in ASP.NET MVC using Select2. The infinite scrolling feature has also been implemented with server side options population. Select2 is very useful for dropdown lists with large datasets.

Why Select2 :

  • Using this jQuery plugin for dropdown lists, you can implement features such as option grouping, searching, infinite scrolling, tagging, remote data sets and other highly used features.
  • To use select2 in web projects, you just have to include JavaScript and CSS files of Select2 in your website.
  • Current version of select2 is 4.0.0. You can easily include these files by installation of NuGet package ‘Select2.js’ from NuGet package manager.

Steps of Implementation:
1. Create a blank ASP.NET MVC project, and install NuGet packages Select2.js, jQuery and jQuery Unobtrusive.
2. Add one controller with the name ‘HomeController’ and add view for default method ‘Index’.
3. Create new class in Models folder ‘IndexViewModel.cs as shown below:

public class IndexViewModel
{
   [Required(ErrorMessage="Please select any option")]
   public string OptionId { get; set; }
}

4. Bind ‘Index.cshtml’ view with IndexViewModelClass as model, by adding the following line in Index view:

@model Select2InMvcProject.Models.IndexViewModel

5. In ‘Index.cshtml’, include the css and js files below:

<link href="~/Content/css/select2.css" rel="stylesheet" />
<script src="~/Scripts/jquery-2.1.4.js"></script>
<script src="~/Scripts/select2.js"></script>
<script src="~/Scripts/jquery.validate.js"></script>
<script src="~/Scripts/jquery.validate.unobtrusive.js"></script>


6. Write the following code in the Index view for creation of select list:

@using (Html.BeginForm())
{
   <br /><br />
   @Html.DropDownListFor(n => n.OptionId, Enumerable.Empty<SelectListItem>(), new { @id = "txtOptionId", @style = "width:300px;" })
//Created selectlist with empty enumerable of SelectListItem and given //id as “txtOptionId”
   @Html.ValidationMessageFor(n => n.OptionId)
//Adds span of validation error message
   <br /><br />
<button type="submit">Submit</button>
   <br /><br />
}


7. For applying Select2 to the dropdown list created above, fetching data from server side and for infinite scroll, use the jQuery code below in Index view:

<script type="text/javascript">
   $(document).ready(function () {
       var pageSize = 20;
       var optionListUrl = '@Url.Action("GetOptionList", "Home")';
//Method which is to be called for populating options in dropdown //dynamically
       $('#txtOptionId').select2(
       {
           ajax: {
               delay: 150,
               url: optionListUrl,
               dataType: 'json',
               data: function (params) {
                   params.page = params.page || 1;
                   return {
                       searchTerm: params.term,
                       pageSize: pageSize,
                       pageNumber: params.page
                   };
               },
               processResults: function (data, params) {
                   params.page = params.page || 1;
                  return {
                       results: data.Results,
                       pagination: {
                           more: (params.page * pageSize) < data.Total
                       }
                   };
               }
           },
           placeholder: "-- Select --",
           minimumInputLength: 0,
           allowClear: true,
   });
});
</script>


8. Create new class in Models folder with name ‘Select2OptionModel’ and add the two classes below:

public class Select2OptionModel
{
       public string id { get; set; }
       public string text { get; set; }
}
public class Select2PagedResult
{
       public int Total { get; set; }
       public List<Select2OptionModel> Results { get; set; }
}


9. Create one new folder with name ‘Repository’ in the solution, and add new class in that folder with name ‘Select2Repository. The functions in this class are mentioned below:

public class Select2Repository
   {
       IQueryable<Select2OptionModel> AllOptionsList;
public Select2Repository()
{
           AllOptionsList = GetSelect2Options();
}
IQueryable<Select2OptionModel> GetSelect2Options()
                  {
                                     string cacheKey = "Select2Options";
                                     //check cache
                                     if (HttpContext.Current.Cache[cacheKey] != null)
                                     {
return (IQueryable<Select2OptionModel>)HttpContext.Current.Cache[cacheKey];
                                     }
                                     var optionList = new List<Select2OptionModel>();
                                     var optionText = "Option Number ";
                                     for (int i = 1; i < 1000; i++)
                                     {
                                     optionList.Add(new Select2OptionModel
                                     {
                                               id = i.ToString(),
                                               text = optionText + i
                                     });
                                   }
                                   var result = optionList.AsQueryable();
                                     //cache results
                                     HttpContext.Current.Cache[cacheKey] = result;
                                     return result;}
 
List<Select2OptionModel> GetPagedListOptions(string searchTerm, int pageSize, int pageNumber, out int totalSearchRecords)
                  {
                                     var allSearchedResults = GetAllSearchResults(searchTerm);
                                     totalSearchRecords = allSearchedResults.Count;
return allSearchedResults.Skip((pageNumber - 1) * pageSize).Take(pageSize).ToList();
                  }
                  List<Select2OptionModel> GetAllSearchResults(string searchTerm)
                  {

                                     var resultList = new List<Select2OptionModel>();
                                      if (!string.IsNullOrEmpty(searchTerm))
resultList = AllOptionsList.Where(n => n.text.ToLower().Contains(searchTerm.ToLower())).ToList();
                                     else
                                     resultList = AllOptionsList.ToList();
                                     return resultList;
                  }
                  public Select2PagedResult GetSelect2PagedResult(string searchTerm, int pageSize, int pageNumber)
                  {
                                     var select2pagedResult = new Select2PagedResult();
                                     var totalResults = 0;
                                     select2pagedResult.Results = GetPagedListOptions(searchTerm,
pageSize, pageNumber, out totalResults);
                                     select2pagedResult.Total = totalResults;
                                     return select2pagedResult;
}
}

10.  In HomeController class, create new method as shown below:

public JsonResult GetOptionList(string searchTerm, int pageSize, int pageNumber)
{
     var select2Repository = new Select2Repository();
     var result = select2Repository.GetSelect2PagedResult(searchTerm, pageSize, pageNumber);
     return Json(result, JsonRequestBehavior.AllowGet);
}

11. Once you are done with coding, you can build and run the project. The output will be shown as below:

dropdown1.png

dropdown2.png


HostForLIFE.eu ASP.NET MVC Hosting
HostForLIFE.eu is European Windows Hosting Provider which focuses on Windows Platform only. We deliver on-demand hosting solutions including Shared hosting, Reseller Hosting, Cloud Hosting, Dedicated Servers, and IT as a Service for companies of all sizes. We have customers from around the globe, spread across every continent. We serve the hosting needs of the business and professional, government and nonprofit, entertainment and personal use market segments.


European Cloud ASP.NET MVC Hosting - Spain :: Pipeline in ASP.NET MVC

clock April 22, 2014 09:49 by author Scott

In this article, I will write simple tutorial about detail pipeline of ASP.NET MVC.

Routing

Routing is the first step in ASP.NET MVC pipeline. typically, it is a pattern matching system that matches the incoming request to the registered URL patterns in the Route Table.

The UrlRoutingModule(System.Web.Routing.UrlRoutingModule) is a class which matches an incoming HTTP request to a registered route pattern in the RouteTable(System.Web.Routing.RouteTable).

When ASP.NET MVC application starts at first time, it registers one or more patterns to the RouteTable to tell the routing system what to do with any requests that match these patterns. An application has only one RouteTable and this is setup in the Application_Start event of Global.asax of the application.

public class RouteConfig
   {
   public static void RegisterRoutes(RouteCollection routes)
   {
   routes.IgnoreRoute("{resource}.axd/{*pathInfo}"); 

   routes.MapRoute(
   name: "Default",
   url: "{controller}/{action}/{id}",
   defaults: new { controller = "Home", action = "Index", id = UrlParameter.Optional }
   );
   }
   }


protected void Application_Start()
{
   //Other code is removed for clarity
   RouteConfig.RegisterRoutes(RouteTable.Routes);
}

When the UrlRoutingModule finds a matching route within RouteCollection (RouteTable.Routes), it retrieves the IRouteHandler(System.Web.Mvc.IRouteHandler) instance(default is System.Web.MvcRouteHandler) for that route. From the route handler, the module gets an IHttpHandler(System.Web.IHttpHandler) instance(default is System.Web.MvcHandler).

public interface IrouteHandler
{
   IHttpHandler GetHttpHandler(RequestContext requestContext);
}

Controller Initialization

The MvcHandler initiates the real processing inside ASP.NET MVC pipeline by using ProcessRequest method. This method uses the IControllerFactory instance (default is System.Web.Mvc.DefaultControllerFactory) to create corresponding controller.

protected internal virtual void ProcessRequest(HttpContextBase httpContext)
{
   SecurityUtil.ProcessInApplicationTrust(delegate {
   IController controller;
   IControllerFactory factory;
   this.ProcessRequestInit(httpContext, out controller, out factory);
   try
   {
   controller.Execute(this.RequestContext);
   }
   finally
   {
   factory.ReleaseController(controller);
   }
   });
}

Action Execution

1. When the controller is initialized, the controller calls its own InvokeAction() method by passing the details of the chosen action method. This is handled by the IActionInvoker.

public virtual bool InvokeAction(ControllerContext controllerContext, string actionName)

2. After chosen of appropriate action method, model binders(default is System.Web.Mvc.DefaultModelBinder) retrieves the data from incoming HTTP request and do the data type conversion, data validation such as required or date format etc. and also take care of input values mapping to that action method parameters.

3. Authentication Filter was introduced with ASP.NET MVC5 that run prior to authorization filter. It is used to authenticate a user. Authentication filter process user credentials in the request and provide a corresponding principal. Prior to ASP.NET MVC5, you use authorization filter for authentication and authorization to a user.

By default, Authenticate attribute is used to perform Authentication. You can easily create your own custom authentication filter by implementing IAuthenticationFilter.

4. Authorization filter allow you to perform authorization process for an authenticated user. For example, Role based authorization for users to access resources.

By default, Authorize attribute is used to perform authorization. You can also make your own custom authorization filter by implementing IAuthorizationFilter.

5. Action filters are executed before(OnActionExecuting) and after(OnActionExecuted) an action is executed. IActionFilter interface provides you two methods OnActionExecuting and OnActionExecuted methods which will be executed before and after an action gets executed respectively. You can also make your own custom ActionFilters filter by implementing IActionFilter.

6. When action is executed, it process the user inputs with the help of model (Business Model or Data Model) and prepare Action Result.

Result Execution

1. Result filters are executed before(OnResultnExecuting) and after(OnResultExecuted) the ActionResult is executed. IResultFilter interface provides you two methods OnResultExecuting and OnResultExecuted methods which will be executed before and after an ActionResult gets executed respectively. You can also make your own custom ResultFilters filter by implementing IResultFilter.

2. Action Result is prepared by performing operations on user inputs with the help of BAL or DAL. The Action Result type can be ViewResult, PartialViewResult, RedirectToRouteResult, RedirectResult, ContentResult, JsonResult, FileResult and EmptyResult.

3. Various Result type provided by the ASP.NET MVC can be categorized into two category- ViewResult type and NonViewResult type. The Result type which renders and returns an HTML page to the browser, falls into ViewResult category and other result type which returns only data either in text format, binary format or a JSON format, falls into NonViewResult category.

View Initialization and Rendering

1. ViewResult type i.e. view and partial view are represented by IView(System.Web.Mvc.IView) interface and rendered by the appropriate View Engine.

public interface Iview
{
  
void Render(ViewContext viewContext, TextWriter writer);
}

2. This process is handled by IViewEngine(System.Web.Mvc.IViewEngine) interface of the view engine. By default ASP.NET MVC provides WebForm and Razor view engines. You can also create your custom engine by using IViewEngine interface and can registered your custom view engine in to your Asp.Net MVC application as shown below:

protected void Application_Start()
{
  
//Remove All View Engine including Webform and Razor
   ViewEngines.Engines.Clear();
   //Register Your Custom View Engine
   ViewEngines.Engines.Add(new CustomViewEngine());
   //Other code is removed for clarity
}

3. Html Helpers are used to write input fields, create links based on the routes, AJAX-enabled forms, links and much more. Html Helpers are extension methods of the HtmlHelper class and can be further extended very easily. In more complex scenario, it might render a form with client side validation with the help of JavaScript or jQuery.


European ASP.NET MVC 4 Hosting - Amsterdam :: Tips to Enable and Disable Client Side Validation in MVC

clock August 5, 2013 10:38 by author Scott

In this article, I would like to demonstrate various ways for enabling or disabling the client side validation in ASP.NET MVC  3/4.

Enable Client-Side Validation in MVC

For enabling client side validation, we required to include the jQuery min, validate & unobtrusive scripts in our view or layout page in the following order.

<script src="@Url.Content("~/Scripts/jquery-1.6.1.min.js")" type="text/javascript"></script>
<script src="@Url.Content("~/Scripts/jquery.validate.js")" type="text/javascript"></script>
<script src="@Url.Content("~/Scripts/jquery.validate.unobtrusive.js")" type="text/javascript"></script>

The order of included files as shown above, is fixed since below javascript library depends on top javascript library.

Enabling and Disabling Client-Side Validation at Application Level

We can enable and disable the client-side validation by setting the values of ClientValidationEnabled & UnobtrusiveJavaScriptEnabled keys true or false. This setting will be applied to application level.

<appSettings>
<add key="ClientValidationEnabled" value="true"/>
<add key="UnobtrusiveJavaScriptEnabled" value="true"/>
</appSettings>

For client-side validation, the values of above both the keys must be true. When we create new project using Visual Studio in MVC3 or MVC4, by default the values of both the keys are set to true.

We can also enable the client-side validation programmatically. For this we need to do code with in the Application_Start() event of the Global.asax, as shown below.

protected void Application_Start()
{
//Enable or Disable Client Side Validation at Application Level
HtmlHelper.ClientValidationEnabled = true;
HtmlHelper.UnobtrusiveJavaScriptEnabled = true;
}

Enabling and Disabling Client-Side Validation for Specific View

We can also enable or disable client-side validation for a specific view. For this we required to enable or disable client side validation inside a Razor code block as shown below. This option will overrides the application level settings for that specific view.

@model MvcApp.Models.Appointment
@{
ViewBag.Title = "Make A Booking";
HtmlHelper.ClientValidationEnabled = false;
}
...


European ASP.NET MVC 4 Hosting - Amsterdam :: Using Dependency Injection with AutoFac in the ASP.NET Web API

clock March 26, 2013 11:07 by author Scott

This post is going to tell you exactly how to use the same in DI container in your MVC Controllers and your Web Api controllers, so you can share the same set of services. Of course after you have seen this, it will be immediately clear how to use different containers in both, if you like to do so. The example will be implemented using the Repository pattern, AutoFac, Entity Framework 5 and the EF powertools.

Setting things up

Fire up Visual Studio 2012 RC and start a new MVC 4 empty project:

Call it anything you like. After Visual Studio is done creating your project layout, we’re going to implement the Repository pattern. In a production application you’ll probably want to split your solution into multiple projects, but for now we’re going to do everything in one. First, make sure you have installed the Entity Framework powertools using the Visual Studio extension manager:

After this, use NuGet to add EF 5.0 support to your MVC project:

If you don’t see the PreRelease version, make sure to set the combobox in the top of the screen to “Include Prerelease”. There is one last thing left to do to complete the setup and that’s adding a DI container to our project. You can of course use anything you like, but I’m going with AutoFac. If you want to find out why you should use AutoFac too you can read this. In short, AutoFac combines a full feature set with great performance, is easy to configure and has great support. You can use NuGet to add AutoFac to your project:

Make sure you get the “MVC 4 RC Integration” package. This will provide you with easy integration and will also install the basic AutoFac DLL’s. That’s it, now we’ve got everything we need (assuming you already have a database).

Creating the repository

Create the following interface:

01           using System;
02           using System.Collections.Generic;
03           using System.Linq;
04           using System.Text;
05           using System.Threading.Tasks;
06          
07           namespace Adventureworks.DAL.Repository
08           {
09               public interface IRepository<in TKey,TEntity>    {
10                   void Add(TEntity entity);
11                   void Delete(TEntity entity);
12                   void Update(TEntity entity);
13                   IEnumerable<TEntity> GetAll();
14                   TEntity GetById(TKey id);
15               }
16           }

Now let’s implement it using EF 5.0 and the powertools. I really like the Code only feature of the new Entity Framework release, totally removing the .edmx file. But until recently you couldn’t reverse engineer code only from an existing database. Luckily the EF powertools fix this for us. Right click your Web Project and go the “Entity Framework” menu and select “Reverse engineer Code first”:

Select the database of your choosing and let the tooling do it’s magical stuff. After all is said and done, you will have Entity classes, a DBContext and a file containing the code for configuring the DbContext. Create a class which implements the IRepository interface like this:

1              using System;
2              using System.Collections.Generic;
3              using System.Data.Entity.Infrastructure;
4              using System.Linq;
5              using System.Text;
6              using System.Threading.Tasks;
7              using Adventureworks.Domain;
8             
9              namespace Adventureworks.DAL.Repository.EntityFramework
10           {
11               public class EntityFrameworkProductRepository : IRepository<int,Product>
12               {
13          
14                   public void Add(Product entity)
15                   {
16                       PerformAction((context) =>
17                           {
18                               context.Product.Add(entity);
19                               context.SaveChanges();
20                           });
21          
22                   }
23          
24                   public void Delete(Product entity)
25                   {
26                       PerformAction((context) =>
27                           {
28                               context.Product.Attach(entity);
29                               context.Product.Remove(entity);
30                               context.SaveChanges();
31                           });
32                   }
33          
34                   public void Update(Product entity)
35                   {
36                       PerformAction((context) =>
37                           {
38                              context.Product.Attach(entity);
39                              context.Entry(entity).State = System.Data.EntityState.Modified;
40                              context.SaveChanges();
41                           });
42                   }
43          
44                   public IEnumerable<Product> GetAll()
45                   {
46                       return Read((context) =>
47                           {
48                               return context.Product.AsNoTracking().ToArray();
49                           });
50          
51                   }
52          
53                   public Product GetById(int id)
54                   {
55                       return Read((context) =>
56                           {
57                               Product p = context.Product.AsNoTracking().SingleOrDefault((pr) => pr.ProductID ==
id);
58                               if (p == null)
59                               {
60                                   throw new ArgumentException("Invalid id: " + id);
61                               }
62                               return p;
63                           });
64                   }
65          
66                   private void PerformAction(Action<AdventureWorks2012Entities> toPerform)
67                   {
68                       using (AdventureWorks2012Entities ents = new AdventureWorks2012Entities())
69                       {
70                           ConfigureDbContext(ents);
71                           toPerform(ents);
72                       }
73                   }
74          
75                   private T Read<T>(Func<AdventureWorks2012Entities, T> toPerform)
76                   {
77                       using (AdventureWorks2012Entities ents = new AdventureWorks2012Entities())
78                       {
79                           ConfigureDbContext(ents);
80                           return toPerform(ents);
81                       }
82                   }
83          
84                   private void ConfigureDbContext(AdventureWorks2012Entities ents)
85                   {
86                       ents.Configuration.AutoDetectChangesEnabled = false;
87                       ents.Configuration.LazyLoadingEnabled = false;
88                       ents.Configuration.ProxyCreationEnabled = false;
89                       ents.Configuration.ValidateOnSaveEnabled = true;
90          
91                   }
92          
93               }
94           }

There are a couple of things going on here. Starting on line 66 I’ve created three helper methods which set up the DbContext correctly and dispose it. These methods are used by calling them and supplying a Lambda which uses the DbContext. Let’s take a look at the GetAll method on line 44. You can see that I don’t use change tracking. Change tracking is something you get as a bonus when using the EF, I like to abstract this away with my Repository implementation. It’s also completely useless in a web application since all state is gone after each request and it has a lot of overhead. “But how do you update if you don’t have any change tracking?” you ask?, well take a look at the Update method on line 34. Just set the whole entity as “Modified” and the EF will perform an update for you.

Creating a Web API Controller

Now let’s create a Web API controller to perform some CRUD functionality:

Implement it like this:

1              using System;
2              using System.Collections.Generic;
3              using System.Linq;
4              using System.Net;
5              using System.Net.Http;
6              using System.Web.Http;
7              using Adventureworks.DAL.Repository;
8              using Adventureworks.Domain;
9             
10           namespace Adventureworks.Web.Controllers
11           {
12               public class ProductController : ApiController
13               {
14          
15                   private IRepository<int, Product> _productRepository;
16          
17                   public ProductController(IRepository<int,Product> repository)
18                   {
19                       _productRepository = repository;
20                   }
21          
22                   public IEnumerable<Product> Get()
23                   {
24                       return _productRepository.GetAll();
25                   }
26          
27                   public Product Get(int id)
28                   {
29                       try
30                       {
31                           return _productRepository.GetById(id);
32                       }
33                       catch (ArgumentException ex)
34                       {
35                           throw new HttpResponseException(new HttpResponseMessage(HttpStatusCode.NotFound){ Content = new StringContent(ex.Message)});
36                       }
37                   }
38          
39                   // POST api/product
40                   public HttpResponseMessage Post(Product product)
41                   {
42                      ValidateProduct();
43                      _productRepository.Add(product);
44                      return new HttpResponseMessage(HttpStatusCode.Created) { Content = new StringContent(Url.Route("DefaultApi",
45                          new{controller="Product",id=product.ProductID}))};
46                   }
47          
48                   // PUT api/product/5
49                   public HttpResponseMessage Put(Product product)
50                   {
51                       ValidateProduct();
52                       _productRepository.Update(product);
53                       return new HttpResponseMessage(HttpStatusCode.NoContent);
54                   }
55          
56                   // DELETE api/product/5
57                   public HttpResponseMessage Delete(Product product)
58                   {
59                       _productRepository.Delete(product);
60                       return new HttpResponseMessage(HttpStatusCode.NoContent);
61                   }
62          
63                   private void ValidateProduct()
64                   {
65                       if (!ModelState.IsValid)
66                       {
67                           throw new HttpResponseException(new HttpResponseMessage(HttpStatusCode.BadRequest));
68                       }
69                   }
70               }
71           }

Let’s go to line 65 first. This is a helper method which uses the built in Model Binding feature to validate the incoming product. This means that you can just decorate your Product class with attributes or implement IValidatable object to implement data validation. Keeping up with the spirit of rest, this method will generate a BadRequest statuscode when the incoming product is invalid. Now jump up to the constructor. The controller only works with an IRepository interface to perform the crud functionality, it never knows anything about the Entity Framework. This is the key advantage of DI, as we can now mock the repository and unittest our controller. Now jump to line 42; The Post method. A post in REST means an insert. It’s also in the spirit of REST that you use the HTTP statuscodes to signal what’s going on. When you create new content, you should provide the caller with an url to the new content. Similar to the Post method, you can see that the other methods also use statuscodes to indicate if everything went well or not.

Wiring everything up

Last thing left to do is to configure our container and integrate it with MVC. Here’s my Global.asax:

1              using System;
2              using System.Collections.Generic;
3              using System.Linq;
4              using System.Web;
5              using System.Web.Http;
6              using System.Web.Mvc;
7              using System.Web.Routing;
8              using Adventureworks.DAL.Repository.EntityFramework;
9              using Adventureworks.Web.Services;
10           using Autofac;
11           using Autofac.Integration.Mvc;
12           using Autofac.Integration.WebApi;
13          
14           namespace Adventureworks.Web
15           {
16               // Note: For instructions on enabling IIS6 or IIS7 classic mode,
17               // visit http://go.microsoft.com/?LinkId=9394801
18               public class MvcApplication : System.Web.HttpApplication
19               {
20                   protected void Application_Start()
21                   {
22                       AreaRegistration.RegisterAllAreas();
23          
24                       FilterConfig.RegisterGlobalFilters(GlobalFilters.Filters);
25                       RouteConfig.RegisterRoutes(RouteTable.Routes);
26          
27                       var builder = new ContainerBuilder();
28                       builder.RegisterControllers(typeof(MvcApplication).Assembly);
29                       builder.RegisterApiControllers(typeof(MvcApplication).Assembly);
30                       builder.RegisterType<EntityFrameworkProductRepository>().AsImplementedInterfaces().InstancePerApiRequest().InstancePerHttpRequest();
31                       var container = builder.Build();
32          
33                       DependencyResolver.SetResolver(new AutofacDependencyResolver(container));
34                       GlobalConfiguration.Configuration.DependencyResolver = new AutofacWebApiDependencyResolver(container);
35                   }
36               }
37           }

First up are lines 28-32. This is the configuring of the AutoFac container. You register all the controllers for MVC and the Web API with two lines of code. This is done on lines 29 and 30. On line 31 I am registering the EntityFrameworkProductRepository in a per request scope, for MVC controllers and Web API controllers. On line 32 the container is built. On line 35 the container is registered for MVC controllers. On line 36 it’s registered for API controllers. This is what bites people the most. To use DI with MVC, you need a class which implements IDependencyResolver. To use DI with the ASP.NET Web API, you also need a class which implements IDependencyResolver. But these interfaces aren’t the same and they live in different namespaces. The dependency resolvers are also registered differently as you can see on lines 35 and 36. Luckily, AutoFac’s MVC integration package which we installed earlier, contains dependency resolvers for use to use, otherwise we had to implement these ourselves. That’s all! Now go out and test your REST service with your favorite tool.


European ASP.NET MVC 4 Hosting - Amsterdam :: How to Integrate Facebook Login button in ASP.NET MVC 4 application

clock March 15, 2013 07:06 by author Scott

This article demonstrates how to integrate login button on the web page in order to obtain access token that we'll need for further tutorials.

Visual Studio project setup

Firstly, let's get started by opening visual studio and creating new ASP.NET Mvc 4 Web Application. Name it FacebookLoginButton and make sure .NET Framework 4 is selected. Click on OK. Another window should now pop up asking for a type of tempalte you'd like to install in your app. Select An Empty ASP.NET MVC Project.

Once you've got your project created, right click on Controllers folder and Add Controller. Make sure controller name is set to HomeController.

What we need now is a view associated with home controller index method. To add a view, open newly created HomeController and look for a line where it returns View() ActionResult. View() should be highligted in red. Right click on it and select Add View.

Make sure you compile your project before editing anything. There is some problem with VS 2010 and MVC 4 Razor engine. When you try to edit .cshtml file without rebuilding your solution first, VisualStudio will crash.

Import and configure facebook javascript framework

Time for a little bit of javascript-ing. Buuu. Right click on Scripts and create new Javascript file. Name it Facebook.js. Paste in following content:

function InitialiseFacebook(appId) { 

    window.fbAsyncInit = function () {
        FB.init({
            appId: appId,
            status: true,
            cookie: true,
            xfbml: true
        }); 

        FB.Event.subscribe('auth.login', function (response) {
            var credentials = { uid: response.authResponse.userID, accessToken: response.authResponse.accessToken };
            SubmitLogin(credentials);
        }); 

        FB.getLoginStatus(function (response) {
            if (response.status === 'connected') {
                alert("user is logged into fb");
            }
            else if (response.status === 'not_authorized') { alert("user is not authorised"); }
            else { alert("user is not conntected to facebook");  } 

        }); 

        function SubmitLogin(credentials) {
            $.ajax({
                url: "/account/facebooklogin",
                type: "POST",
                data: credentials,
                error: function () {
                    alert("error logging in to your facebook account.");
                },
                success: function () {
                    window.location.reload();
                }
            });
        } 

    }; 

    (function (d) {
        var js, id = 'facebook-jssdk', ref = d.getElementsByTagName('script')[0];
        if (d.getElementById(id)) {
            return;
        }
        js = d.createElement('script');
        js.id = id;
        js.async = true;
        js.src = "//connect.facebook.net/en_US/all.js";
        ref.parentNode.insertBefore(js, ref);
    } (document)); 

}

This javascript will ensure that we're subscribed to login event on which we'll submit fb access token to our controller and save it in session. Also, on each window load, we'll check for fb login status and alert user accordingly.

Sign up for an app

Now, go to developers.facebook.com and create a new app. Make sure all app's urls point to the actual address of the app. If you're running the app from Visual Studio, its address will be http://localhost:[PORT NUMBER].

Login model and controller

Next, we need to add account controller that will save facebook response in session. Before we add it, let's create a model for an object that we'll pass to account controller. Right click on Models folder and add FacebookLoginModel.cs (Class).

namespace FacebookLoginButton.Models
{
    public class FacebookLoginModel
    {
        public string uid { get; set; }
        public string accessToken { get; set; }
    }
}

Once we've got our model, we can add AccountController.cs.

using System.Web.Mvc;
using FacebookLoginButton.Models; 

namespace FacebookLoginButton.Controllers
{
    public class AccountController : Controller
    {
        [HttpPost]
        public JsonResult FacebookLogin(FacebookLoginModel model)
        {
            Session["uid"] = model.uid;
            Session["accessToken"] = model.accessToken; 

            return Json(new {success = true});
        } 

    }
}

Login button configuration

To enable facebook framework, make sure you've got following lines added to your Views -> Shared -> Layout.cshtml file. Following lines should be added just before body closing tag.

<div id="fb-root"></div>
    <script src="@Url.Content("~/Scripts/jquery-1.6.2.min.js")" type="text/javascript"></script>
    <script src="@Url.Content("~/Scripts/Facebook.js")"
type="text/javascript"></script>
    <script type="text/javascript">
        $(function () {
            InitialiseFacebook(@System.Configuration.ConfigurationManager.AppSettings["FacebookAppId"]);
        });
    </script>

Finally, modify Views -> Home -> Index.cshtml by pasting in following code:

@{
    ViewBag.Title = "Part 1 - Facebook Login Button";    Layout = "~/Views/Shared/_Layout.cshtml";


<h2>Part 1 - Facebook Login Button</h2> 

<fb:login-button autologoutlink="true" perms="read_friendlists, create_event, email, publish_stream"></fb:login-button> 

<p>Facebook Access Token: @Session["accessToken"]</p>
<p>Facebook User Id: @Session["uid"]</p> 

<p>If you're not getting javascript prompts on each window load, make sure facebook app id in web config is correct.</p>

That's it. Feel free to download comleted solution attached to this post.

Done. Great job


European ASP.NET MVC 4 Hosting - Amsterdam :: Simple Wizard Form in ASP.NET MVC 4

clock February 21, 2013 05:53 by author Scott

For small MVC sample application I’m fiddling with on my spare time, I wanted to be able to split my form up in smaller parts, much like the ASP.NET Wizard Control that is available to you when you are using Web Forms.

Basically I wanted a pretty simple Wizard, where I break up the input fields in a form in two or more steps, and display a summary at the end. I wanted the users to be able to step through the wizard without filling in required fields (just so they can get a grasp of the amount of info they would need to fill in), but of course they should be stopped when trying to submit it if anything is missing. I also wanted to avoid going to the server to retrieve a partial view for the summary.

The model I will use is pretty straight forward. It contains some fields for the user to fill inn, that I will split up in “Personal Details”, “Address” and “Contact Details”:

public class SimpleWizardFormModel : IValidatableObject
{
    [Required]
    [Display(Name = "First Name")]
    public string FirstName { get; set; }

    [Required]
    [Display(Name = "Last Name")]
    public string LastName { get; set; }

    [Display(Name = "Street Address")]
    public string Address { get; set; }

    [Required]
    [Display(Name = "Postal Code")]
    public string PostalCode { get; set; }

    [Required]
    [Display(Name = "City")]
    public string City { get; set; }

    [Display(Name = "Home Phone")]
    public string Phone { get; set; }

    [Display(Name = "Mobile Phone")]
    public string Mobile { get; set; }

    [Display(Name = "I'm at least 18 years old?")]
    public bool HasTurned18 { get; set; }

    public IEnumerable<ValidationResult> Validate(ValidationContext validationContext)
    {
        if (!HasTurned18)
            yield return new ValidationResult("You must be 18 or older.", new[] { "HasTurned18" });
    }
}

The view isn’t very complicated either:

@model SimpleWizardFormModel
@section head
{
    <style type="text/css">
        .wizard-step { display: none; }
        .wizard-confirmation { display: none; }
        .wizard-nav {  }
        .wizard-nav input[type="button"] { width: 100px; }
    </style>
}
@section script
{
    <script type="text/javascript">
        //*SNIP*
    </script>
}
<h2>Simple Wizard Form</h2>
@using (Html.BeginForm())
{
    <fieldset>
        <legend></legend>
        <div class="wizard-step">
            <h4>Personal Details</h4>
            <ol>
                <li>
                    @Html.LabelFor(m => m.FirstName)
                    @Html.TextBoxFor(m => m.FirstName)
                    @Html.ValidationMessageFor(m => m.FirstName)
                </li>
                <li>
                    @Html.LabelFor(m => m.LastName)
                    @Html.TextBoxFor(m => m.LastName)
                    @Html.ValidationMessageFor(m => m.LastName)
                </li>
                <li>
                    @Html.LabelFor(m => m.HasTurned18)
                    @Html.CheckBoxFor(m => m.HasTurned18)
                    @Html.ValidationMessageFor(m => m.HasTurned18)
                </li>
            </ol>
        </div>
        <div class="wizard-step">
            @**SNIP**@
        </div>
        <div class="wizard-step wizard-confirmation">
            <h4>Confirm</h4>
            <div id="field-summary"></div>
            <div id="validation-summary">
                <span class="message-error">Please correct the following errors;</span>
                @Html.ValidationSummary(true)
            </div>
        </div>
        <div class="wizard-nav">
            <input type="button" id="wizard-prev" value="<< Previous" />
            <input type="button" id="wizard-next" value="Next >>" />
            <input type="button" id="wizard-submit" value="Submit" />
        </div>
    </fieldset>
}

I’ve cut out the javascript as I will get back to that later, as well as a couple of the wizard steps since they are look just like step 1 (just with other input fields). Inside my Layout.cshtml-file I’m importing jquery, jquery.validate, jquery.validate.unobtrusive, and rendering the “head”-section (in the head-tag) and “script”-section (just before body-close-tag) seen above.

The most important “feature” of the view are the divs which have been given the “wizard-step”-class. These contains the various input fields and will become the (as the class name suggests) steps in the wizard that is presented to the user. Initially all these divs are hidden from the user (note the display –> none in the css styles), and the javascript will take care of showing the div that represents the current wizard step to the user.

And now the stuff which actually performs some work, the javascript:

function DisplayStep() {
    var selectedStep = null;
    var firstInputError = $("input.input-validation-error:first"); // check for any invalid input fields
    if (firstInputError.length) {
        selectedStep = $(".wizard-confirmation");
        if (selectedStep && selectedStep.length) { // the confirmation step should be initialized and selected if it exists present
            UpdateConfirmation();
        }
        else {
            selectedStep = firstInputError.closest(".wizard-step"); // the first step with invalid fields should be displayed
        }
    }
    if (!selectedStep || !selectedStep.length) {
        selectedStep = $(".wizard-step:first"); // display first step if no step has invalid fields
    }

    $(".wizard-step:visible").hide(); // hide the step that currently is visible
    selectedStep.fadeIn(); // fade in the step that should become visible

    // enable/disable the prev/next/submit buttons
    if (selectedStep.prev().hasClass("wizard-step")) {
        $("#wizard-prev").show();
    }
    else {
        $("#wizard-prev").hide();
    }
    if (selectedStep.next().hasClass("wizard-step")) {
        $("#wizard-submit").hide();
        $("#wizard-next").show();
    }
    else {
        $("#wizard-next").hide();
        $("#wizard-submit").show();
    }
}

The first method in my javascript, called “DisplayStep”, takes care of displaying the correct wizard step (typically this means the first step) when the view is loaded. if the view is loaded after submitting it to the server and server validation errors are found however, it will show the confirmation step if there is one, and if not it will show the first step which contains erroneous input. Once the correct step to show is found, it will decide where this step is located in relation to the other steps and show or hide the “previous”, “next” and “submit” buttons.

function PrevStep() {
    var currentStep = $(".wizard-step:visible"); // get current step

    if (currentStep.prev().hasClass("wizard-step")) { // is there a previous
step?


        currentStep.hide().prev().fadeIn();  // hide current step and display previous step

        $("#wizard-submit").hide(); // disable wizard-submit button
        $("#wizard-next").show(); // enable wizard-next button

        if (!currentStep.prev().prev().hasClass("wizard-step")) { // disable wizard-prev button?
            $("#wizard-prev").hide();
        }
    }
}

The “PrevStep” method is pretty straight forward. It just finds the current step, hides it, shows the previous one, and shows/hides the buttons. No validation is performed before navigation to the previous step, but if desired, this could be done just like in the “NextStep” shown below.

function NextStep() {
    var currentStep = $(".wizard-step:visible"); // get current step

    var validator = $("form").validate(); // get validator
    var valid = true;
    currentStep.find("input:not(:blank)").each(function () { // ignore empty fields, i.e. allow the user to step through without filling in required fields
        if (!validator.element(this)) { // validate every input element inside this step
            valid = false;
        }
    });
    if (!valid)
        return; // exit if invalid

    if (currentStep.next().hasClass("wizard-step")) { // is there a next step?

        if (currentStep.next().hasClass("wizard-confirmation")) { // is the next step the confirmation?
            UpdateConfirmation();
        }

        currentStep.hide().next().fadeIn();  // hide current step and display next step

        $("#wizard-prev").show(); // enable wizard-prev button
        if (!currentStep.next().next().hasClass("wizard-step")) { // disable wizard-next button and enable wizard-submit?
            $("#wizard-next").hide();
            $("#wizard-submit").show();
        }
    }
}

The “NextStep” is a little more complicated. In addition to performing pretty much the same tasks as the “PrevStep” (only the opposite), it validates all input fields in the current step, and if there are any errors, you won’t be allowed to go to the next step. It only validates none empty fields however, i.e. the required rule if applicable for a given field isn’t evaluated. This is done because I wanted the user to be able to step through the entire form to see how much needs to be filled in (you can easily change this by changing the part of the script where the input fields are found). If the next step has been given the “wizard-confirmation”-class a call is also made to setup/update the confirmation (the specifics of this function will be explained further down).

function Submit() {
    if ($("form").valid()) { // validate all fields, including blank required
fields

        $("form").submit();
    }
    else {
        DisplayStep(); // validation failed, redisplay correct step
    }
}

The last function related to navigation is “Submit”. This function validates the entire form (including required fields), and submits the form if all is good, or calls “DisplayStep” to show the confirmation step (if there is one), or the first step with errors on it (in cases where there are no confirmation step).

function UpdateConfirmation() {
    UpdateValidationSummary();
    var fieldList = $("<ol/>");
    $(".wizard-step:not(.wizard-confirmation)").find("input").each(function () {
        var input = this;
        var value;
        switch (input.type) {
        case "hidden":
            return;
        case "checkbox":
            value = input.checked;
            break;
        default:
            value = input.value;
        }
        var name = $('label[for="' + input.name + '"]').text();
        fieldList.append("<li><label>" + name + "</label><span>" + value + "&nbsp;</span></li>");
    });
    $("#field-summary").children().remove();
    $("#field-summary").append(fieldList);
}

function UpdateValidationSummary() {
    var validationSummary = $("#validation-summary");
    if (!validationSummary.find(".validation-summary-errors").length) { // check if validation errors container already exists, and if not create it
        $('<div class="validation-summary-errors"><ul></ul></div>').appendTo(validationSummary);
    }
    var errorList = $(".validation-summary-errors ul");
    errorList.find("li.field-error").remove(); // remove any field errors that might have been added earlier, leaving any server errors intact
    $('.field-validation-error').each(function () {
        var element = this;
        $('<li class="field-error">' + element.innerText + '</li>').appendTo(errorList); // add the current field errors
    });
    if (errorList.find("li").length) {
        $("#validation-summary span").show();
    }
    else {
        $("#validation-summary span").hide();
    }
}

The “UpdateConfirmation” function (and the “UpdateValidationSummary”-function called by this function) takes care of setting up / displaying the confirmation step. The “UpdateValidationSummary” function finds all input errors (if any) and adds them to the server validation error list (creating this list if it doesn’t already exist). The “UpdateConfirmation” function, in addition to calling “UpdateValidationSummary”, finds all input fields and associated labels and created a list with them that is displayed to the user.

$(function () {
    // attach click handlers to the nav buttons
    $("#wizard-prev").click(function () { PrevStep(); });
    $("#wizard-next").click(function () { NextStep(); });
    $("#wizard-submit").click(function () { Submit(); });

    // display the first step (or the confirmation if returned from server with errors)
    DisplayStep();
});

Last part of the javascript is where we hook up handlers for the navigation buttons and calls the function to display the first (or correct) step when the view is first loaded.

That was all the code needed, not to bad if I say so myself.

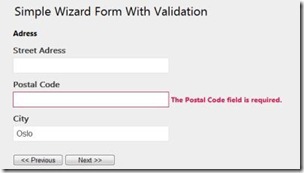
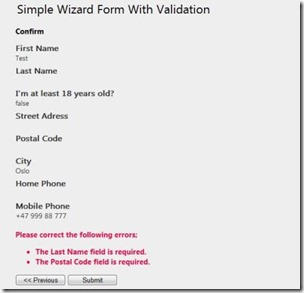
A couple of screens to show how it looks in action (first picture shows one of the steps, while the second picture shows the confirmation step):


As I said in the beginning, this wizard is pretty basic, but it works pretty good.


European ASP.NET MVC 4 Hosting - Amsterdam :: Optimization Performance MVC 4 with Bundling and Minification

clock February 12, 2013 04:37 by author Scott

MVC4 and .Net Framework 4.5 offer bundling and minification techniques that reduce the number of request to the server and size of requested CSS and JavaScript library, which improve page loading time.

What is Bundle?

A bundle is a logical group of files that is loaded with a single HTTP request. You can create style and script bundle for css and javascripts respectively by calling BundleCollection class Add() method with in BundleConfig.cs file.

Creating Style Bundle

bundles.Add(new StyleBundle("~/Content/css").Include("~/Content/site.min.css",
"~/Content/mystyle.min.css"));

Creating Script Bundle

bundles.Add(new ScriptBundle("~/bundles/jqueryval").Include(
 "~/Scripts/jquery-1.7.1.min.js",
 "~/Scripts/jquery.validate.min.js",
 "~/Scripts/jquery.validate.unobtrusive.min.js"));

Above both the bundles are defined with in BundleConfig class as shown below:

public class BundleConfig
{
 public static void RegisterBundles(BundleCollection bundles)
 {
 bundles.Add(new StyleBundle("~/Content/css").Include("~/Content/site.min.css",
 "~/Content/mystyle.min.css"));

bundles.Add(new ScriptBundle("~/bundles/jqueryval").Include(
 "~/Scripts/jquery-1.7.1.min.js",
 "~/Scripts/jquery.validate.min.js",
 "~/Scripts/jquery.validate.unobtrusive.min.js"));
 }
}

Creating Bundle using the "*" Wildcard Character

"*" wildcard character is used to combines the files that are in the same directory and have same prefix or suffix with its name. Suppose you want to add all the scripts files that exist with in "~/Script" directory and have "jquery" as prefix then you can create bundle like below:

bundles.Add(new ScriptBundle("~/bundles/jqueryval").Include("~/Scripts/jquery*.js"));

You can also add all the css that exist with in "~/Content" directory and have ".css" extension(as suffix) like below:

bundles.Add(new StyleBundle("~/Content/css").Include("~/Content/*.css"));

Registering Bundle

All bundles are registered with in Application_Start event of Global.asax file of you web application.

protected void Application_Start()
{
 BundleConfig.RegisterBundles(BundleTable.Bundles);
 // Other Code is removed for clarity
}

Minification

Minification is technique for removing unnecessary characters (like white space, newline, tab) and comments from the JavaScript and CSS files to reduce the size which cause improved load times of a webpage. There are so many tools for minifying the js and css files. JSMin and YUI Compressor are two most popular tools for minifying the js and css files.

You can also add WebEssentials2012.vsix extension to your VS2012 for minifying the js and css files. This is a great extension for VS2012 for playing with js and css.

Minification with VS2012 and WebEssentials 2012 extension

I would like to share how can you make minify version of you css file using WebEssentials extension and VS2012. This minify version will updated automatically if you will make change in original css file.

Performance Optimization with Bundling and Minification

I have done a performance test on a MVC4 application with & without bundling and minification. I have noticed the below result.

Without Bundling and Minification

I have the below css and js files on the layout page and run the application in chrome browser and test no of request and loding time using chrome developer tools as shown below.

<link href="~/Content/Site.css" rel="stylesheet"/>
<link href="~/Content/MyStyle.css" rel="stylesheet"/>
<script src="~/Scripts/jquery-1.7.1.js"></script>
<script src="~/Scripts/jquery-ui-1.8.20.js"></script>
<script src="~/Scripts/jquery.validate.js"></script>
<script src="~/Scripts/jquery.validate.unobtrusive.js"></script>

In this test, I have seen, There are 7 request, total data size is 3.96KB and loading time is approximate 296ms.

With Bundling and Minification

I have run the above application with Bundling and Minification of css and js files and test no of request and loding time using chrome developer tools as shown below.

@Styles.Render("~/Content/css")
@Scripts.Render("~/bundles/jquery")

In this test, I have seen, There are only 3 request, total data size is 2.67KB and loading time is approximate 80ms. In this way by using bundling and minification you have reduced the total no of request, size and loading time.

Enabling Bundling and Minification in debug mode

Bundling and minification doesn't work in debug mode. So to enable this featues you need to add below line of code with in Application_Start event of Global.asax.

protected void Application_Start()
{
 BundleConfig.RegisterBundles(BundleTable.Bundles);
 //Enabling Bundling and Minification
 BundleTable.EnableOptimizations = true;
 // Other Code is removed for clarity
}

Busting Browser's Cache by Bundling

As you know browsers cache resources based on URLs. When a web page requests a resource, the browser first checks its cache to see if there is a resource with the matched URL. If yes, then it simply uses the cached copy instead of fetching a new one from server. Hence whenever you change the content of css and js files will not reflect on the browser. For this you need to force the browser for refreshing/reloading.

But bundles automatically takes care of this problem by adding a hashcode to each bundle as a query parameter to the URL as shown below. Whenever you change the content of css and js files then a new has code will be generated and rendered to the page automatically. In this way, the browser will see a different url and will fetch the new copy of css and js.

I hope you will enjoy the tips while performance optimization of your MVC4 application.


European ASP.NET MVC 4 Hosting - Amsterdam :: jQuery UI Datepicker in MVC 4 Issue

clock January 29, 2013 08:02 by author Scott

I believe some of you will find this issue. If you create a MVC 4 application using "Internet" template, you will find the "BundleConfig.cs" file in the "App_Start" folder; open it.

You will notice there is a total of 6 bundles (jQuery and CSS) being processed. Now, open the "_Layout.cshtml" file and look at this image:

You will notice only three bundles are added by default. We have to add 2 more to enable the use of Datepicker.

Note to use the same ordering.

Now, on the view page use as follows:

Now if you run the application you will see your Datepicker working.

Hope this helps. Thanks.


About HostForLIFE.eu

HostForLIFE.eu is European Windows Hosting Provider which focuses on Windows Platform only. We deliver on-demand hosting solutions including Shared hosting, Reseller Hosting, Cloud Hosting, Dedicated Servers, and IT as a Service for companies of all sizes.

We have offered the latest Windows 2016 Hosting, ASP.NET Core 2.2.1 Hosting, ASP.NET MVC 6 Hosting and SQL 2017 Hosting.


Tag cloud

Sign in