European ASP.NET MVC 4 and MVC 5 Hosting

BLOG about ASP.NET MVC 3, ASP.NET MVC 4, and ASP.NET MVC 5 Hosting and Its Technology - Dedicated to European Windows Hosting Customer

European ASP.NET MVC Hosting - HostForLIFE.eu :: Custom Model Binders in ASP.NET MVC

clock December 22, 2016 06:31 by author Scott

In ASP.NET MVC, our system is built such that the interactions with the user are handled through Actions on our Controllers. We select our actions based on the route the user is using, which is a fancy way of saying that we base it on a pattern found in the URL they’re using. If we were on a page editing an object and we clicked the save button we would be sending the data to a URL somewhat like this one.

Notice that in our route that we have specified the name of the object that we’re trying to save. There is a default Model Binder for this in MVC that will take the form data that we’re sending and bind it to a CLR objects for us to use in our action. The standard Edit action on a controller looks like this.

[HttpPost]
public ActionResult Edit(int id, FormCollection collection)
{
    try
    {
        // TODO: Add update logic here
 
        return RedirectToAction("Index");
    }
    catch
    {
        return View();
    }
}

If we were to flesh some of this out the way it’s set up here, we would have code that looked a bit like this.

[HttpPost]
public ActionResult Edit(int id, FormCollection collection)
{
    try
    {
        Profile profile = _profileRepository.GetProfileById(id);

        profile.FavoriteColor = collection["favorite_color"];
        profile.FavoriteBoardGame = collection["FavoriteBoardGame"];

        _profileRepository.Add(profile);

        return RedirectToAction("Index");
    }
    catch
    {
        return View();
    }
}

What is bad about this is that we are accessing the FormCollection object which is messy and brittle. Once we start testing this code it means that we are going to be repeating code similar to this elsewhere. In our tests we will need to create objects using these magic strings. What this means is that we are now making our code brittle. If we change the string that is required for this we will have to go through our code correcting them. We will also have to find them in our tests or our tests will fail. This is bad. What we should do instead is have these only appear on one place, our model binder. Then all the code we test is using CLR objects that get compile-time checking. To create our Custom Model Binder this is all we need to do is write some code like this.

public class ProfileModelBinder : IModelBinder
{
    ProfileRepository _profileRepository = new ProfileRepository();

    public object BindModel(ControllerContext controllerContext,
        ModelBindingContext bindingContext)
    {
        int id = (int)controllerContext.RouteData.Values["Id"];
        Profile profile = _profileRepository.GetProfileById(id);

        profile.FavoriteColor = bindingContext
            .ValueProvider
            .GetValue("favorite_color")
            .ToString();


        profile.FavoriteBoardGame = bindingContext
            .ValueProvider
            .GetValue("FavoriteBoardGame")
            .ToString();

        return profile;
    }
}

Notice that we are using the form collection here, but it is limited to this one location. When we test we will just have to pass in the Profile object to our action, which means that we don’t have to worry about these magic strings as much, and we’re also not getting into the situation where our code becomes so brittle that our tests inhibit change. The last thing we need to do is tell MVC that when it is supposed to create a Profile object that it is supposed to use this model binder. To do this, we just need to Add our binder to the collection of binders in the Application_Start method of our GLobal.ascx.cs file. It’s done like this. We say that this binder is for objects of type Profile and give it a binder to use.

ModelBinders.Binders.Add(typeof (Profile), new ProfileModelBinder());

Now we have a model binder that should let us keep the messy code out of our controllers. Now our controller action looks like this.

[HttpPost]
public ActionResult Edit(Profile profile)
{
    try
    {
        _profileRepository.Add(profile);

        return RedirectToAction("Index");
    }
    catch
    {
        return View();
    }
}

That looks a lot cleaner to me, and if there were other things I needed to do during that action, I could do them without all of the ugly binding logic.


ASP.NET MVC Hosting - HostForLIFE.eu :: Using Ajax in MVC Application

clock June 21, 2016 00:16 by author Anthony

In asp.net web form application, if we need ajax service, we will need to create wcf services on server side to serve ajax calls, while in MVC web application, no wcf is needed, a controller will do.

Here are two examples (GET and POST) of how to use ajax in mvc application

Http Get example: ajax consumer in view

<script type="text/javascript">
  var user = {
                'id': 1
            };
    $.get(
                'home/getUser',
                user,
                function (data) {
                    alert(data.name);
                }
    );
</script>


Http Get example: ajax server in home controller

public class HomeController : Controller
{
    // data GET service
     public JsonResult getUser(int id)
     {
            User user = db.Users.where(u=>u.id==id)
            return Json(user,JsonRequestBehavior.AllowGet);     }
}

A few points:


Controller must return JsonResult rather than ActionResult as a normal controller does as we would want the data to be returnd as json data, and it does not have a ‘d’ wrapper

JsonRequestBehavior.AllowGet must be set in Json()call, otherwise you will get:

500 internal server error with message like

This request has been blocked because sensitive information could be disclosed to third party web sites when this is used in a GET request. To allow GET requests, set JsonRequestBehavior to AllowGet

You only need to set this parameter for GET and returning JSON array to avoid JSON hijacking, no need for POST requests.
Http POST example: ajax consumer in view


<script type="text/javascript">
var user={
            'name':’TheUser’,
            'age':30
        };
 $.post(
            'home/SaveUser',
            user,
            function (data) {
                if (data === true) {
                   alert('User is saved');
                }
                else {

                    alert('Failed to save the user');
                }
            },
            'json'
        );
</script>


Http POST example: ajax server in home controller

public class HomeController : Controller
{
    // data POST service
  [AcceptVerbs(HttpVerbs.Post)]
   public JsonResult SaveUser (string name, int age)
   {
        return Json(true);    }
}

A few points:

Have to decorate the controller with ‘POST’

Datatype in $.post in example is set to json, but it is not necessary to be so, if you just pass data in fields rather than in complex object. When it is not set to json it will use application/x-www-form-urlencoded as a way to pass data in standard post.


Summary:
In asp.net MVC you can use controller as ajax server without having to use wcf, compared with wcf, no configuration is needed


HostForLIFE.eu ASP.NET MVC Hosting
HostForLIFE.eu is European Windows Hosting Provider which focuses on Windows Platform only. We deliver on-demand hosting solutions including Shared hosting, Reseller Hosting, Cloud Hosting, Dedicated Servers, and IT as a Service for companies of all sizes. We have customers from around the globe, spread across every continent. We serve the hosting needs of the business and professional, government and nonprofit, entertainment and personal use market segments.


ASP.NET MVC Hosting - HostForLIFE.eu :: Configuring ELMAH In ASP.NET MVC

clock June 13, 2016 21:35 by author Anthony

In this article, I will integrate and setup ELMAH to asp.net MVC project. I will finish whole article in 5 different steps. ELMAH stands for Error Logging Modules and Handlers providing application wide error logging facilities. ELMAH is pluggable and easy to implement without changing single line of code. ELMAH work as interceptor of unhandled dotnet exceptions, that display over yellow screen of death. As per Author you can dynamically add ELMAH on running asp.net application without recompile or re-deploy whole application.You can download ELMAH binaries from google code or if you are using nuget then visit ELMAH nuget page.

Install

The best way to install any module to Asp.net MVC project is to use Nuget package Console. You can visit ELMAH nuget page for get latest version command.

Configure

After installing ELMAH , it will automatically update Web.Config file. If it's not so you can add following code to Web.Config file.

<configuration>
<configSections>
    <sectionGroup name="elmah">
      <section name="security" requirePermission="false" type="Elmah.SecuritySectionHandler, Elmah" />
      <section name="errorLog" requirePermission="false" type="Elmah.ErrorLogSectionHandler, Elmah" />
      <section name="errorMail" requirePermission="false" type="Elmah.ErrorMailSectionHandler, Elmah" />
      <section name="errorFilter" requirePermission="false" type="Elmah.ErrorFilterSectionHandler, Elmah" />
    </sectionGroup>
</configSections>

<system.web>   
    <httpModules>
      <add name="ErrorLog" type="Elmah.ErrorLogModule, Elmah" />
      <add name="ErrorMail" type="Elmah.ErrorMailModule, Elmah" />
      <add name="ErrorFilter" type="Elmah.ErrorFilterModule, Elmah" />
    </httpModules>
</system.web>

<system.webServer>
<modules>
      <add name="ErrorLog" type="Elmah.ErrorLogModule, Elmah" preCondition="managedHandler" />
      <add name="ErrorMail" type="Elmah.ErrorMailModule, Elmah" preCondition="managedHandler" />
      <add name="ErrorFilter" type="Elmah.ErrorFilterModule, Elmah" preCondition="managedHandler" />
</modules>
</system.webServer>
<elmah>
    <security allowRemoteAccess="false" />
    <errorLog type="Elmah.SqlErrorLog, Elmah" connectionStringName="YourConnectionStringName" />
</elmah>
    <location path="elmah.axd" inheritInChildApplications="false">
    <system.web>
      <httpHandlers>
        <add verb="POST,GET,HEAD" path="elmah.axd" type="Elmah.ErrorLogPageFactory, Elmah" />
      </httpHandlers>
      <!--
      <authorization>
        <allow roles="admin" />
        <deny users="*" /> 
      </authorization>
      --> 
    </system.web>
    <system.webServer>
      <handlers>
        <add name="ELMAH" verb="POST,GET,HEAD" path="elmah.axd" type="Elmah.ErrorLogPageFactory, Elmah" preCondition="integratedMode" />
      </handlers>
    </system.webServer>
  </location>
</configuration>
Usage Now, It's time to use and test elmah for application. Generate exception in Home Controller
public ActionResult Index()
{
   throw new Exception("This is test Exception");
          
   return View();
}


after generating exception check your elmah like http://www.example.com/elmah.axd
Here is our output

integrate-elmah-in-aspnet-mvc

integrate elmah in asp. net mvc

Security

In addition ELMAH provides seamless security feature to prevent unauthorized access. Please read our next article to make your elmah secure.

Filtering

ELMAH identify and store exceptions in different category, you can make or edit ELMAH error screen with different filters which we will discuss in our next ELMAH series.

Notification

You can setup ELMAH email notification when any exception occurs. To unable notification option you must include below code

Add ErrorMail module
<httpModules>
    <add name="ErrorMail" type="Elmah.ErrorMailModule, Elmah"/>
</httpModules>


Add SMTP Setting
<system.net>
    <mailSettings>
        <smtp deliveryMethod="network">
            <network host="..." port="25" userName="..." password="..." />
        </smtp>
    </mailSettings>
</system.net>
 

or
<elmah>
<errorMail from="..." to="..."  async="true" smtpServer="..." smtpPort="25" userName="..." password="..." />
</elmah>


HostForLIFE.eu ASP.NET MVC Hosting
HostForLIFE.eu is European Windows Hosting Provider which focuses on Windows Platform only. We deliver on-demand hosting solutions including Shared hosting, Reseller Hosting, Cloud Hosting, Dedicated Servers, and IT as a Service for companies of all sizes. We have customers from around the globe, spread across every continent. We serve the hosting needs of the business and professional, government and nonprofit, entertainment and personal use market segments.


ASP.NET MVC Hosting - HostForLIFE.eu :: How To Make Simple Application In ASP.NET MVC Using Select2?

clock June 6, 2016 23:46 by author Anthony

In this tutorial, I will show you how to make simple application in ASP.NET MVC using Select2. The infinite scrolling feature has also been implemented with server side options population. Select2 is very useful for dropdown lists with large datasets.

Why Select2 :

  • Using this jQuery plugin for dropdown lists, you can implement features such as option grouping, searching, infinite scrolling, tagging, remote data sets and other highly used features.
  • To use select2 in web projects, you just have to include JavaScript and CSS files of Select2 in your website.
  • Current version of select2 is 4.0.0. You can easily include these files by installation of NuGet package ‘Select2.js’ from NuGet package manager.

Steps of Implementation:
1. Create a blank ASP.NET MVC project, and install NuGet packages Select2.js, jQuery and jQuery Unobtrusive.
2. Add one controller with the name ‘HomeController’ and add view for default method ‘Index’.
3. Create new class in Models folder ‘IndexViewModel.cs as shown below:

public class IndexViewModel
{
   [Required(ErrorMessage="Please select any option")]
   public string OptionId { get; set; }
}

4. Bind ‘Index.cshtml’ view with IndexViewModelClass as model, by adding the following line in Index view:

@model Select2InMvcProject.Models.IndexViewModel

5. In ‘Index.cshtml’, include the css and js files below:

<link href="~/Content/css/select2.css" rel="stylesheet" />
<script src="~/Scripts/jquery-2.1.4.js"></script>
<script src="~/Scripts/select2.js"></script>
<script src="~/Scripts/jquery.validate.js"></script>
<script src="~/Scripts/jquery.validate.unobtrusive.js"></script>


6. Write the following code in the Index view for creation of select list:

@using (Html.BeginForm())
{
   <br /><br />
   @Html.DropDownListFor(n => n.OptionId, Enumerable.Empty<SelectListItem>(), new { @id = "txtOptionId", @style = "width:300px;" })
//Created selectlist with empty enumerable of SelectListItem and given //id as “txtOptionId”
   @Html.ValidationMessageFor(n => n.OptionId)
//Adds span of validation error message
   <br /><br />
<button type="submit">Submit</button>
   <br /><br />
}


7. For applying Select2 to the dropdown list created above, fetching data from server side and for infinite scroll, use the jQuery code below in Index view:

<script type="text/javascript">
   $(document).ready(function () {
       var pageSize = 20;
       var optionListUrl = '@Url.Action("GetOptionList", "Home")';
//Method which is to be called for populating options in dropdown //dynamically
       $('#txtOptionId').select2(
       {
           ajax: {
               delay: 150,
               url: optionListUrl,
               dataType: 'json',
               data: function (params) {
                   params.page = params.page || 1;
                   return {
                       searchTerm: params.term,
                       pageSize: pageSize,
                       pageNumber: params.page
                   };
               },
               processResults: function (data, params) {
                   params.page = params.page || 1;
                  return {
                       results: data.Results,
                       pagination: {
                           more: (params.page * pageSize) < data.Total
                       }
                   };
               }
           },
           placeholder: "-- Select --",
           minimumInputLength: 0,
           allowClear: true,
   });
});
</script>


8. Create new class in Models folder with name ‘Select2OptionModel’ and add the two classes below:

public class Select2OptionModel
{
       public string id { get; set; }
       public string text { get; set; }
}
public class Select2PagedResult
{
       public int Total { get; set; }
       public List<Select2OptionModel> Results { get; set; }
}


9. Create one new folder with name ‘Repository’ in the solution, and add new class in that folder with name ‘Select2Repository. The functions in this class are mentioned below:

public class Select2Repository
   {
       IQueryable<Select2OptionModel> AllOptionsList;
public Select2Repository()
{
           AllOptionsList = GetSelect2Options();
}
IQueryable<Select2OptionModel> GetSelect2Options()
                  {
                                     string cacheKey = "Select2Options";
                                     //check cache
                                     if (HttpContext.Current.Cache[cacheKey] != null)
                                     {
return (IQueryable<Select2OptionModel>)HttpContext.Current.Cache[cacheKey];
                                     }
                                     var optionList = new List<Select2OptionModel>();
                                     var optionText = "Option Number ";
                                     for (int i = 1; i < 1000; i++)
                                     {
                                     optionList.Add(new Select2OptionModel
                                     {
                                               id = i.ToString(),
                                               text = optionText + i
                                     });
                                   }
                                   var result = optionList.AsQueryable();
                                     //cache results
                                     HttpContext.Current.Cache[cacheKey] = result;
                                     return result;}
 
List<Select2OptionModel> GetPagedListOptions(string searchTerm, int pageSize, int pageNumber, out int totalSearchRecords)
                  {
                                     var allSearchedResults = GetAllSearchResults(searchTerm);
                                     totalSearchRecords = allSearchedResults.Count;
return allSearchedResults.Skip((pageNumber - 1) * pageSize).Take(pageSize).ToList();
                  }
                  List<Select2OptionModel> GetAllSearchResults(string searchTerm)
                  {

                                     var resultList = new List<Select2OptionModel>();
                                      if (!string.IsNullOrEmpty(searchTerm))
resultList = AllOptionsList.Where(n => n.text.ToLower().Contains(searchTerm.ToLower())).ToList();
                                     else
                                     resultList = AllOptionsList.ToList();
                                     return resultList;
                  }
                  public Select2PagedResult GetSelect2PagedResult(string searchTerm, int pageSize, int pageNumber)
                  {
                                     var select2pagedResult = new Select2PagedResult();
                                     var totalResults = 0;
                                     select2pagedResult.Results = GetPagedListOptions(searchTerm,
pageSize, pageNumber, out totalResults);
                                     select2pagedResult.Total = totalResults;
                                     return select2pagedResult;
}
}

10.  In HomeController class, create new method as shown below:

public JsonResult GetOptionList(string searchTerm, int pageSize, int pageNumber)
{
     var select2Repository = new Select2Repository();
     var result = select2Repository.GetSelect2PagedResult(searchTerm, pageSize, pageNumber);
     return Json(result, JsonRequestBehavior.AllowGet);
}

11. Once you are done with coding, you can build and run the project. The output will be shown as below:

dropdown1.png

dropdown2.png


HostForLIFE.eu ASP.NET MVC Hosting
HostForLIFE.eu is European Windows Hosting Provider which focuses on Windows Platform only. We deliver on-demand hosting solutions including Shared hosting, Reseller Hosting, Cloud Hosting, Dedicated Servers, and IT as a Service for companies of all sizes. We have customers from around the globe, spread across every continent. We serve the hosting needs of the business and professional, government and nonprofit, entertainment and personal use market segments.


European ASP.NET MVC 5 Hosting - UK :: Creating Custom Scaffold Templates in ASP.NET MVC

clock November 27, 2015 18:59 by author Scott

Microsoft provides a powerful scaffolding engine for models in ASP.NET MVC applications that use Entity Framework. Scaffolding relieves web developers from the mundane task of writing the create, read, update, and delete (CRUD) code over and over again. The scaffolding engine uses T4 templates to generate basic controllers and views for models. However, scaffolded code is just a starting point, since it often needs to be customized to meet specific business requirements or satisfy specific design patterns.

In this blog post, I’ll provide a walkthrough on how to create project-specific custom scaffold templates for ASP.NET MVC. This can be a huge time-saver in applications with a large number of controllers and views. I will use Visual Studio 2013, ASP.NET MVC 5, Entity Framework 6, and C#.

SETUP

To get started, create a new ASP.NET MVC web application and add a simple Product model with the properties shown below and build the project.

namespace CustomScaffoldingDemo.Models
{
    public class Product
    {
        public int Id { get; set; }
        public string Name { get; set; }
        public decimal Price { get; set; }
        public bool IsDeleted { get; set; }
        public DateTime CreatedDate { get; set; }
        public DateTime UpdatedDate { get; set; }
    }
}

SCAFFOLDING CONTROLLER AND VIEWS

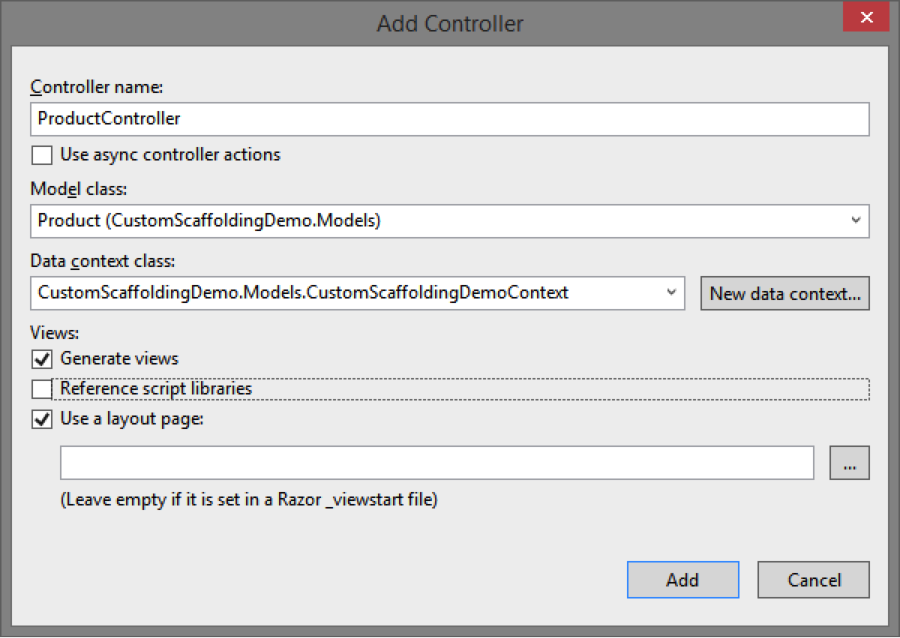
First, let’s use default templates to scaffold a controller and CRUD views for the Product model so we can review the results. To do so, right-click the Controllers folder in Solution Explorer and click Add New Scaffolded Item. In the Add Scaffold dialog, choose the MVC 5 Controller with views, using Entity Framework. On the Add Controller dialog, create a new data context and choose appropriate options that serve as parameters for the scaffolding engine. Then hit the Add button.
The scaffolding engine will use the default T4 templates to generate code for the controller and five views and add them to the appropriate folders. At this point you have full CRUD functionality for the Product model and can run the application.
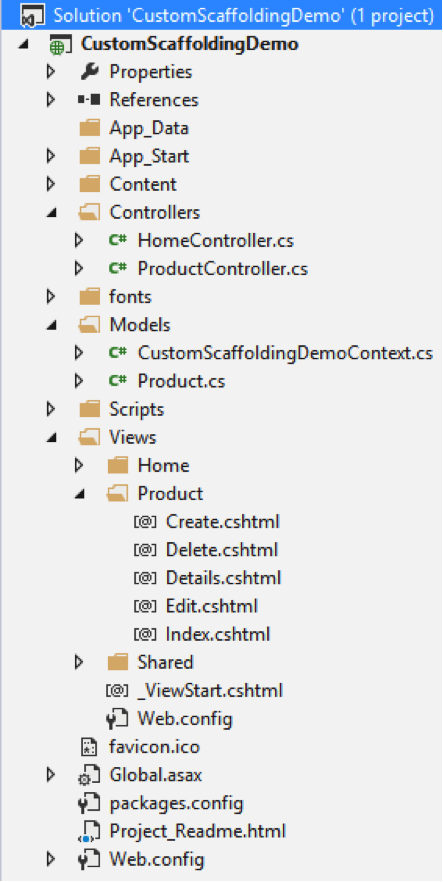
As you review the generated code, you may notice that the scaffolding engine is intelligent enough to treat the Product ID properly by not scaffolding the editor for this property on the Create or Edit forms. You may also realize that the default templates do not meet the functional specification or your desired design patterns. For example, you may want to achieve the following:

–  Created Date and Updated Date properties should be set automatically by the system on create or update action respectively, and thus should not be editable on the Create and Edit views.
–  Products should be soft-deleted, so the Delete action of the Product controller must be changed to set the IsDeleted property and updating the Product instead of deleting it from the database. Index action should only return Products with IsDeleted set to false.
–  None of the views should display the IsDeleted property.
–  Views should use @ViewBag.Title as the page header instead of the view name. 
–  You may be using a Unit of Work pattern, so all calls to save changes to the database may need to be tweaked. 

You can manually make changes to the generated code, which has several drawbacks, including:

–  Typically, you would want most, if not all, controllers and views to be consistent across all models in your application. Making similar manual changes to controllers and views for all models is not an efficient approach.
–  When you make changes to a model, you will either have to scaffold these files again and lose your manual changes or manually update all views to match the updated model.

The best way to avoid manual changes and enforce consistency is to customize the scaffold templates.

CUSTOMIZING SCAFFOLD TEMPLATES

The original T4 templates used by the scaffolding engine are located in this folder: %programfiles%\Microsoft Visual Studio 12.0\Common7\IDE\Extensions\Microsoft\Web\Mvc\Scaffolding\Templates.

While you can directly edit these templates, this will affect scaffolding for all future projects, which is not recommended. Instead, you can create project-specific copies of these templates so you can customize them. To do so, copy these templates into your MVC project’s CodeTemplates folder, following the same sub-folder structure. You only need to copy either C# or VB.NET templates, based on your project. The template filenames include the language they use. The convention is that the scaffolding engine uses the templates in the CodeTemplates project folder, if one exists, instead of the global templates.
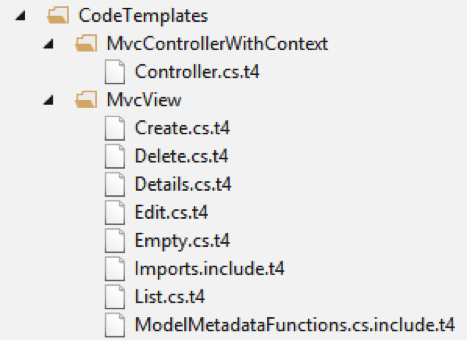
Now you can modify these custom scaffold templates, which would affect scaffolded code only for this project. T4 templates are simply text files and can be edited directly in Visual Studio. Unfortunately, Visual Studio 2013 does not include a good T4 editor—there’s no syntax highlighting or IntelliSense. Fortunately, there are some third party add-on products that provide this functionality. Below is a screenshot of how the templates look in Visual Studio 2013. You can see I modified the header on line 26 to use @ViewBag.Title instead of the view name. 

&lt;#@ template language="C#" HostSpecific="True" #&gt;
&lt;#@ output extension=".cshtml" #&gt;
&lt;#@ include file="Imports.include.t4" #&gt;
@model &lt;#= ViewDataTypeName #&gt;
&lt;#
// The following chained if-statement outputs the file header code and
// markup for a partial view, a view using a layout page, or a regular view.
if(IsPartialView) {
#&gt; 

&lt;#
} else if(IsLayoutPageSelected) {
#&gt; 

@{
    ViewBag.Title = "&lt;#= ViewName#&gt;";
&lt;#
if (!String.IsNullOrEmpty(LayoutPageFile)) {
#&gt;
    Layout = "&lt;#= LayoutPageFile#&gt;";
&lt;#
}
#&g
t;
}

@ViewBag.Title

To learn more about scaffolding check out this walkthrough from Microsoft. To learn more about T4 templates in general, start by reading this MSDN article


European ASP.NET MVC 5 Hosting - UK :: How to Use Post Redirect and Get Pattern

clock August 15, 2014 05:44 by author Onit

Note: This post has been updated to work with MVC 2 RTM. You can Use POCO,  but the workflow is what you should be mostly concerned about. 

The ASP.NET MVC pattern tends to lead itself into a more simplified and "true" HTTP experience by re-introducing  patterns that have been lost, or at least, not followed in many years. One such pattern is the Post, Redirect, Get (PRG) pattern in which it is "to help avoid duplicate form submissions and allow web applications to behave more intuitively with browser bookmarks and the reload button".

A normal ASP.NET Web Form Lifecycle has the following pattern

  1. HTTP GET of "Create.aspx"
  2. HTTP POST of "Create.aspx"
  3. Validation Fails, "Create.aspx" is Re-Rendered
  4. HTTP POST of "Create.aspx"
  5. Item is created, "Create.aspx" is Re-Rendered with confirmation message

The major problems with this Postback pattern, is that hitting the Refresh button of your browser in steps 3 or 5 will re-post your submitted data. Step 5 is more of a problem as it could possibly re-submit that created information. Granted, there are steps that you can take to approach this problem, but this is how default ASP.NET Web Forms are treated.

Taking this same approach within ASP.NET MVC, can be achieved in the same manner by rendering a your "Create" view from your POST action. For example:

  1. HTTP GET of "/products/create", "Create" view is rendered
  2. HTTP POST to "/products/submit"
  3. Validation Fails, "Create" view is rendered
  4. HTTP POST to "/products/submit"
  5. Item is created, "Confirm" view is rendered

As you'll notice, the same problems we had with ASP.NET Web Forms exists with ASP.NET MVC. The really nice option, is that ASP.NET MVC gives you a lot more "freedom" of how the workflow is processed. If we strictly follow the PRG pattern within ASP.NET MVC, it would look something like

HTTP GET of "/products/create", "Create" view is rendered
HTTP POST to "/products/submit"
Validation Fails, redirect to "/products/create", "Create" view is rendered
HTTP POST to "/products/submit"
Item is created, redirect to "/products/confirm", "Confirm" view is rendered

As you'll notice, where we previously could have had issues in step 3 or 5 before, we no longer have issues. If a user presses the Refresh button in either of those steps, they'll not get the lovely "Would you like to resubmit the form data" confirmation as featured below - instead, the page just reloads.

To implement this, you'll need 1 controller, 3 action methods, and 2 views. Follow the steps below to achieve this pattern:

When you implement your Create action, you have to keep in mind that validation may fail and you may need to re-display the form. TempData is best suited for this scenario, and is implemented as such.


Next you'll implement your Submit action. This will perform some validation of the user input data, and if successful will save the info and redirect to the Confirm action. If it is not successful, we'll store the form data into the TempData and redirect to the action Create. This way we mimic maintaining the view's state even if it fails.


Something very interesting to note in the above example, is that even though I've pulled all values out of the form into local variables, should either Price or Quantity fail in parsing and I set the TempData to the local variables...I would have lost the user input. So, it's always a smart idea to retrieve the data from the form directly into the TempData. Finally, the Confirm action needs to be implemented.

public ActionResult Confirm()
  {
      return View();
  }

Now, it's time to create our views:

~/Views/Products/Create.aspx

~/Views/Products/Confirm.aspx


And that's it. As you can see from the Create view, when writing our textboxes, we give them a default value from the ViewData.


European ASP.NET MVC 3 Hosting - Amsterdam :: Validate complex Types (Objects & Lists) in Ajax Form using jQuery and JSON on Client Side and Server Side in ASP.NET MVC 3

clock May 25, 2012 06:47 by author Scott

This blog post shows how to validate models containing complex types such as Objects and Lists in ASP.NET MVC 3.

In a first step we modify the properties of the model (
Models/ValidationModel.cs) and add some complex types:

public
class ValidUserNameAttribue : ValidationAttribute
{

  public override bool IsValid(object value)
  {
    return (value != null &amp;&amp; value.ToString() == "Bob");
  }
}


public
class User
{

  [Required]
  [StringLength(8, MinimumLength = 3)]
  [ValidUserNameAttribue(ErrorMessage = "User name != 'Bob'")]
  [Display(Name = "User name")]
  public string UserName { get; set; }

  [Required]
  [StringLength(8, MinimumLength = 3)]
  [Display(Name = "Display name")]
  public string DisplayName { get; set; }
}


public
class ValidationModel
{

  public User User { get; set; }

  public List Users { get; set; }
}


In a second step we modify the form (
Views\Home\Partial\_Form.cshtml) to add input element for the new model properties:

@model MVC3_Ajax_Form_jQuery_Validation.Models.ValidationModel


@DateTime.Now: Partial/_Form.cshtml rendered

<
hr/>

@using (Html.BeginForm("Form", "Home"))

{

  <h1><em>User</em> object</h1>

  <p>
    @Html.LabelFor(m => m.User.UserName):
    @Html.EditorFor(m => m.User.UserName)
    @Html.ValidationMessageFor(m => m.User.UserName)
  </p>

  <p>
    @Html.LabelFor(m => m.User.DisplayName):
    @Html.EditorFor(m => m.User.DisplayName)
    @Html.ValidationMessageFor(m => m.User.DisplayName)
  </p>

  <h1>List of <em>User</em> objects</h1>

  for (var i = 0; i <= 1; i++)
  {
    <h2>User @i</h2>

    <p>
      @Html.LabelFor(m => m.Users[i].UserName):
      @Html.EditorFor(m => m.Users[i].UserName)
      @Html.ValidationMessageFor(m => m.Users[i].UserName)
    </p>

    <p>
      @Html.LabelFor(m => m.Users[i].DisplayName):
      @Html.EditorFor(m => m.Users[i].DisplayName)
      @Html.ValidationMessageFor(m => m.Users[i].DisplayName)
    </p>
  }

  <input type="submit" value="Submit" />
}


In a last step we adapt the “success-view” (
Views\Home\Partial\_Success.cshtml) that is shown after the data have been successfully validated on the server side:

@model MVC3_Ajax_Form_jQuery_Validation.Models.ValidationModel


<
p><strong>Model is valid :)</strong></p>

<
p>
  Model.User.Username: '@Model.User.UserName'<br />
  Model.User.DisplayName: '@Model.User.DisplayName'<br />
  Model.Users[0].Username: '@Model.Users[0].UserName'<br />
  Model.Users[0].DisplayName: '@Model.Users[0].DisplayName'<br />
  Model.Users[1].Username: '@Model.Users[1].UserName'<br />
  Model.Users[1].DisplayName: '@Model.Users[1].DisplayName'
</
p>

As you can see in the source code above, there is no magic; model binding and validation of complex objects and lists work out of the box in ASP.NET MVC 3.


European ASP.NET MVC 3 Hosting - Amsterdam :: How to Set up Custom Error Pages to Handle Errors in “non-AJAX” Requests and jQuery AJAX Requests

clock March 22, 2012 06:56 by author Scott

In this blog post I will show how to set up custom error pages in ASP.NET MVC 3 applications to create user-friendly error messages instead of the (yellow) IIS default error pages for both “normal” (non-AJAX) requests and jQuery AJAX requests.

In this showcase we will implement custom error pages to handle the HTTP error codes 404 (“Not Found”) and 500 (“Internal server error”) which I think are the most common errors that could occur in web applications. In a first step we will set up the custom error pages to handle errors occurring in “normal” non-AJAX requests and in a second step we add a little JavaScript jQuery code that handles jQuery AJAX errors.


We start with a new (empty) ASP.NET MVC 3 project and activate custom errors in the Web.config by adding the following lines under <system.web>:


<customErrors
mode="On" defaultRedirect="/Error">
  <error redirect="/Error/NotFound" statusCode="404"/>
  <error redirect="/Error/InternalServerError" statusCode="500"/>
</customErrors>


Note: You can set
mode=”Off” to disable custom errors which could be helpful while developing or debugging. Setting mode=”RemoteOnly” activates custom errors only for remote clients, i.e. disables custom errors when accessing via http://localhost/[...]. In this example setting mode=”On” is fine since we want to test our custom errors. You can find more information about the <customErrors> element here.

In a next step we
remove the following line in Global.asax.cs file:

filters.Add(new HandleErrorAttribute());


and add a new
ErrorController (Controllers/ErrorController.cs):

public
class ErrorController : Controller
{

  public ActionResult Index()
  {
    return InternalServerError();
  }

  public ActionResult NotFound()
  {
    Response.TrySkipIisCustomErrors = true;
    Response.StatusCode = (int)HttpStatusCode.NotFound;
    return View("NotFound");
  }

  public ActionResult InternalServerError()
  {
    Response.TrySkipIisCustomErrors = true;
    Response.StatusCode = (int)HttpStatusCode.InternalServerError;
    return View("InternalServerError");
  }
}


In a last step we add the
ErrorController‘s views (Views/Error/NotFound.cshtml and Views/Error/InternalServerError.cshtml) that defines the (error) pages the end user will see in case of an error. The views include a partial view defined in Views/Shared/Error/NotFoundInfo.cshtml respectively Views/Shared/Error/InternalServerErrorInfo.cshtml that contains the concrete error messages. As we will see below using these partial views enables us to reuse the same error messages to handle AJAX errors.

Views/Error/NotFound.cshtml:


@{

  ViewBag.Title = "Not found";
}

@{

  Html.RenderPartial("Error/NotFoundInfo");
}


Views/Shared/Error/NotFoundInfo.cshtml:

The URL you have requested was not found.


Views/Error/InternalServerError.cshtml:

@{
  ViewBag.Title = "Internal server error";
}
@{
  Html.RenderPartial("Error/InternalServerErrorInfo");
}

Views/Shared/Error/InternalServerErrorInfo.cshtml:

An internal Server error occured.

To handle errors occurring in (jQuery) AJAX calls we will use jQuery UI to show a dialog containing the error messages. In order to include jQuery UI we need to add two lines to Views/Shared/_Layout.cshtml:

<link href="@Url.Content("~/Content/themes/base/jquery.ui.all.css")" rel="stylesheet" type="text/css" />

<script src="@Url.Content("~/Scripts/jquery-ui-1.8.11.min.js")" type="text/javascript"></script>

Moreover we add the following jQuery JavaScript code (defining the global AJAX error handling) and the Razor snippet (defining the dialog containers) to Views/Shared/_Layout.cshtml:

<
script type="text/javascript">
  $(function () {
    // Initialize dialogs ...
    var dialogOptions = {
      autoOpen: false,
      draggable: false,
      modal: true,
      resizable: false,
      title: "Error",
      closeOnEscape: false,
      open: function () { $(".ui-dialog-titlebar-close").hide(); }, // Hide close button
      buttons: [{
        text: "Close",
        click: function () { $(this).dialog("close"); }
      }]
    };
    $("#InternalServerErrorDialog").dialog(dialogOptions);
    $("#NotFoundInfoDialog").dialog(dialogOptions);

    // Set up AJAX error handling ...
    $(document).ajaxError(function (event, jqXHR, ajaxSettings, thrownError)
{

      if (jqXHR.status == 404) {
        $("#NotFoundInfoDialog").dialog("open");
      } else if (jqXHR.status == 500) {
        $("#InternalServerErrorDialog").dialog("open");
      } else {
        alert("Something unexpected happend :( ...");
      }
    });
  });
</
script>

<div id="NotFoundInfoDialog">
  @{ Html.RenderPartial("Error/NotFoundInfo"); }
</div>
<div id="InternalServerErrorDialog">
  @{ Html.RenderPartial("Error/InternalServerErrorInfo"); }
</div>

As you can see in the Razor snippet above we reuse the error texts defined in the partial views saved in Views/Shared/Error/.


To test our custom errors we define the HomeController (Controllers/HomeController.cs) as follows:

  public class HomeController : Controller
  {
  public ActionResult Index()
  {
    return View();
  }
  public ActionResult Error500()
  {
    throw new Exception();
  }
}

and the corresponding view Views/Home/Index.cshtml:

@{
  ViewBag.Title = "ViewPage1";
}

<script type="text/javascript">
  $function () {
    $("a.ajax").click(function (event) {
      event.preventDefault();
      $.ajax({
      url: $(this).attr('href'),
    });
  });
});
</script>

<ul>
  <li>@Html.ActionLink("Error 404 (Not Found)", "Error404")</li>
  <li>@Html.ActionLink("Error 404 (Not Found) [AJAX]", "Error404", new { },
new { Class = "ajax" })</li>

  <li>@Html.ActionLink("Error 500 (Internal Server Error)", "Error500")</li>
  <li>@Html.ActionLink("Error 500 (Internal Server Error) [AJAX]", "Error500", new { }, new { Class = "ajax" })</li>
</ul>

To test the custom errors you can launch the project and click one of the four links defined in the view above. The “AJAX links” should open a dialog containing the error message and the “non-AJAX” links should redirect to a new page showing the same error message.

Summarized this blog post shows how to set up custom errors that handle errors occurring in both AJAX requests and “non-AJAX” requests. Depending on the project, one could customize the example code shown above to handle other HTTP errors as well or to show more customized error messages or dialogs.


European ASP.NET MVC 3 Hosting :: Areas in ASP.NET MVC3

clock March 15, 2012 08:11 by author Scott

Description

Normally in a MVC3 application we have generally 3 sections.


Model, Controller, View.


Now in a real-world project in our Application there may be many modules.


So separating each of the modules in our MVC3 application is highly recommendable.


In ASP.Net MVC3 we have features called "area" where we can separate into different modules.


For e.g. ADMIN, CUSTOMER, PRODUCT etc.


Now I will show you an example of how to create the "AREA" in MVC3.


Step 1:

Now first create an ASP.Net MVC3 application.


Step 2:

Now right-click the project and "add" a new area with the name "Admin"; that means in our project there are an "admin" module. See the following picture:


Step 3:

After adding the "admin" area you will see that a separate "Areas" folder will be created. Under this folder controller, model and views, shared folders will be generated.


Now under the "Controller" folder add a new controller named "admin controller".


Now from the "admincontroller" create a new view named "index" from the "index" method.


After that copy the "_layout.cshtml" from the main project and paste it under the "Areas" Shared folder.


Now the whole structure will look like the following once.


Step 4:


Now add a new action link for "Admin" under the _layout.cshtml" like the following picture:


<li>@Html.ActionLink("Admin", "Index", "Admin")</li>

So the admin link will be created and when we click the "admin" link it will redirect to the "admin" part of our project which is under the "Areas".

Step 5:


Now go to the "AdminAreaRegistration" file (just the following picture) and modify the existing code like below:


public override void RegisterArea(AreaRegistrationContext context)
{
context.MapRoute(
"Admin_default",
"Admin/{controller}/{action}/{id}",
new { controller = "Admin", action = "Index", id = UrlParameter.Optional }
);

I have added here only Controller Name "Admin"( controller = "Admin") extra under the new {} section.


Now run the application it will look like the following picture:


See here "Admin" link has come.


Now after clicking the admin link it will show like the following picture:


See the url routing. It calls our "Admin " Areas part.


So by this way we can group our project modules into our ASP.Net MVC3 application.


Conclusion


So in this article we have learned what is the purpose of use of "Area" features in ASP.Net MVC3 and how to implement them.


About HostForLIFE.eu

HostForLIFE.eu is European Windows Hosting Provider which focuses on Windows Platform only. We deliver on-demand hosting solutions including Shared hosting, Reseller Hosting, Cloud Hosting, Dedicated Servers, and IT as a Service for companies of all sizes.

We have offered the latest Windows 2016 Hosting, ASP.NET Core 2.2.1 Hosting, ASP.NET MVC 6 Hosting and SQL 2017 Hosting.


Tag cloud

Sign in