European ASP.NET MVC 4 and MVC 5 Hosting

BLOG about ASP.NET MVC 3, ASP.NET MVC 4, and ASP.NET MVC 5 Hosting and Its Technology - Dedicated to European Windows Hosting Customer

European ASP.NET MVC 5 Hosting - UK :: Creating Custom Scaffold Templates in ASP.NET MVC

clock November 27, 2015 18:59 by author Scott

Microsoft provides a powerful scaffolding engine for models in ASP.NET MVC applications that use Entity Framework. Scaffolding relieves web developers from the mundane task of writing the create, read, update, and delete (CRUD) code over and over again. The scaffolding engine uses T4 templates to generate basic controllers and views for models. However, scaffolded code is just a starting point, since it often needs to be customized to meet specific business requirements or satisfy specific design patterns.

In this blog post, I’ll provide a walkthrough on how to create project-specific custom scaffold templates for ASP.NET MVC. This can be a huge time-saver in applications with a large number of controllers and views. I will use Visual Studio 2013, ASP.NET MVC 5, Entity Framework 6, and C#.

SETUP

To get started, create a new ASP.NET MVC web application and add a simple Product model with the properties shown below and build the project.

namespace CustomScaffoldingDemo.Models
{
    public class Product
    {
        public int Id { get; set; }
        public string Name { get; set; }
        public decimal Price { get; set; }
        public bool IsDeleted { get; set; }
        public DateTime CreatedDate { get; set; }
        public DateTime UpdatedDate { get; set; }
    }
}

SCAFFOLDING CONTROLLER AND VIEWS

First, let’s use default templates to scaffold a controller and CRUD views for the Product model so we can review the results. To do so, right-click the Controllers folder in Solution Explorer and click Add New Scaffolded Item. In the Add Scaffold dialog, choose the MVC 5 Controller with views, using Entity Framework. On the Add Controller dialog, create a new data context and choose appropriate options that serve as parameters for the scaffolding engine. Then hit the Add button.
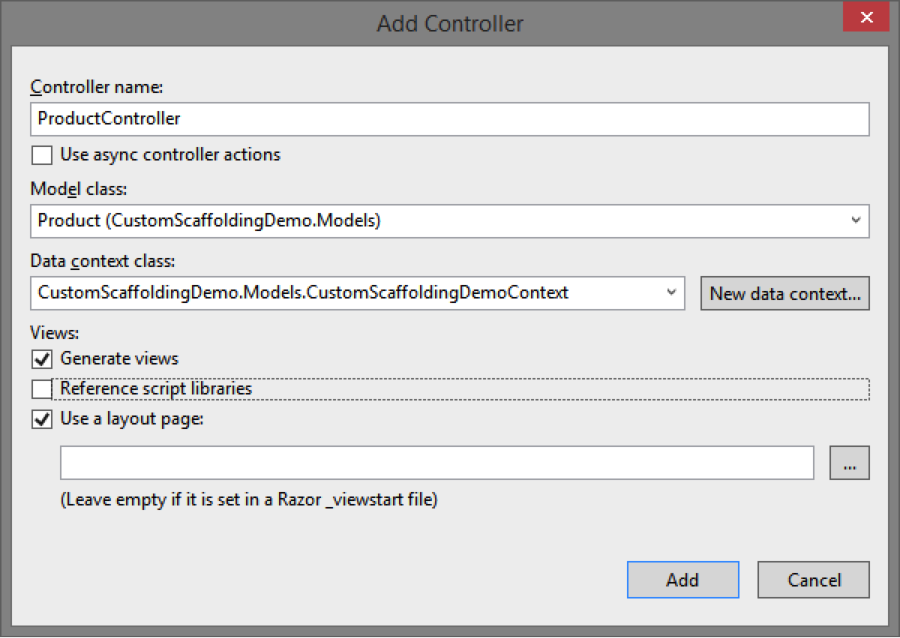
The scaffolding engine will use the default T4 templates to generate code for the controller and five views and add them to the appropriate folders. At this point you have full CRUD functionality for the Product model and can run the application.
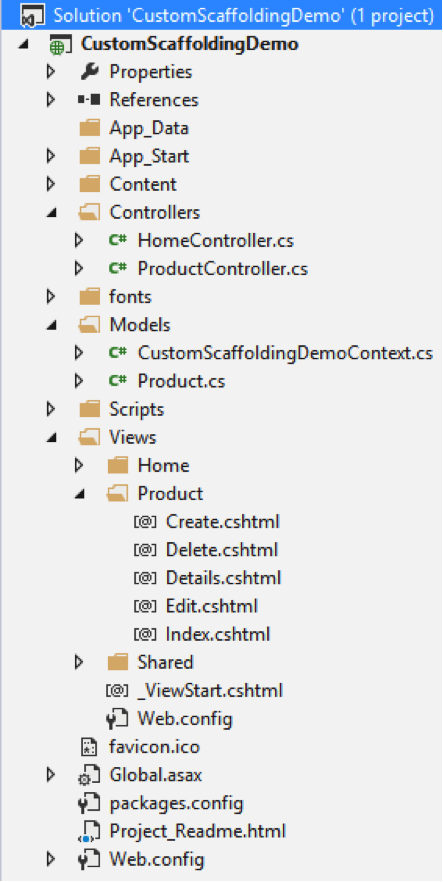
As you review the generated code, you may notice that the scaffolding engine is intelligent enough to treat the Product ID properly by not scaffolding the editor for this property on the Create or Edit forms. You may also realize that the default templates do not meet the functional specification or your desired design patterns. For example, you may want to achieve the following:

–  Created Date and Updated Date properties should be set automatically by the system on create or update action respectively, and thus should not be editable on the Create and Edit views.
–  Products should be soft-deleted, so the Delete action of the Product controller must be changed to set the IsDeleted property and updating the Product instead of deleting it from the database. Index action should only return Products with IsDeleted set to false.
–  None of the views should display the IsDeleted property.
–  Views should use @ViewBag.Title as the page header instead of the view name. 
–  You may be using a Unit of Work pattern, so all calls to save changes to the database may need to be tweaked. 

You can manually make changes to the generated code, which has several drawbacks, including:

–  Typically, you would want most, if not all, controllers and views to be consistent across all models in your application. Making similar manual changes to controllers and views for all models is not an efficient approach.
–  When you make changes to a model, you will either have to scaffold these files again and lose your manual changes or manually update all views to match the updated model.

The best way to avoid manual changes and enforce consistency is to customize the scaffold templates.

CUSTOMIZING SCAFFOLD TEMPLATES

The original T4 templates used by the scaffolding engine are located in this folder: %programfiles%\Microsoft Visual Studio 12.0\Common7\IDE\Extensions\Microsoft\Web\Mvc\Scaffolding\Templates.

While you can directly edit these templates, this will affect scaffolding for all future projects, which is not recommended. Instead, you can create project-specific copies of these templates so you can customize them. To do so, copy these templates into your MVC project’s CodeTemplates folder, following the same sub-folder structure. You only need to copy either C# or VB.NET templates, based on your project. The template filenames include the language they use. The convention is that the scaffolding engine uses the templates in the CodeTemplates project folder, if one exists, instead of the global templates.
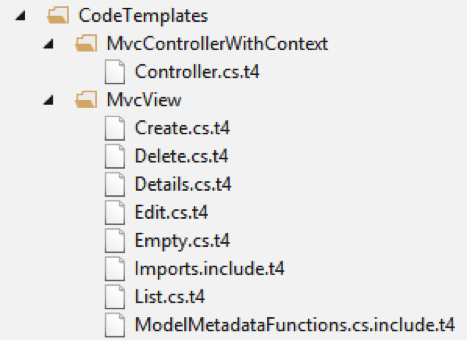
Now you can modify these custom scaffold templates, which would affect scaffolded code only for this project. T4 templates are simply text files and can be edited directly in Visual Studio. Unfortunately, Visual Studio 2013 does not include a good T4 editor—there’s no syntax highlighting or IntelliSense. Fortunately, there are some third party add-on products that provide this functionality. Below is a screenshot of how the templates look in Visual Studio 2013. You can see I modified the header on line 26 to use @ViewBag.Title instead of the view name. 

<#@ template language="C#" HostSpecific="True" #>
<#@ output extension=".cshtml" #>
<#@ include file="Imports.include.t4" #>
@model <#= ViewDataTypeName #>
<#
// The following chained if-statement outputs the file header code and
// markup for a partial view, a view using a layout page, or a regular view.
if(IsPartialView) {
#> 

<#
} else if(IsLayoutPageSelected) {
#> 

@{
    ViewBag.Title = "<#= ViewName#>";
<#
if (!String.IsNullOrEmpty(LayoutPageFile)) {
#>
    Layout = "<#= LayoutPageFile#>";
<#
}
#&g
t;
}

@ViewBag.Title

To learn more about scaffolding check out this walkthrough from Microsoft. To learn more about T4 templates in general, start by reading this MSDN article


European ASP.NET MVC 5 Hosting :: How to Use AngularJS in ASP.NET MVC

clock November 12, 2015 20:18 by author Scott

In this short tutorial, I will show how to use AngularJS in ASP.NET MVC. I hope that you enjoy this short tutorial and this is helpful.

Application Inception

While Angular is a framework for the modern Single Page App, I have found that a lot of our MVC applications call for a collection of these “ng-apps”. In this instance they typically don’t include the client side routing.

Please See Sample Application

The image to the right is the file structure for a sample airplane scheduling app. There are three sections:

  Home (simple js) - A simple calendar showing flights
  Details (angular) - Information about a single flight
  Manage (angular) - A place for settings, pilots, etc...

Bundle Configuration

While asset bundling is a great feature of ASP.Net, it is easy to get carried away. When I came on there were a lot of projects that just included all the js files for the entire application in a single ScriptBundle. This was one of the first places I set my sights.

I decided that a lot of the services would be shared, so they could go in their own Angular module and in their own ASP Bundle. Then each mini-app could get it’s own module and bundle. Lets take a look at theBundleConfiguration.cs file.

using System.Web.Optimization;

namespace Jobney.App.Web
{
    public class BundleConfig
    {
        public static void RegisterBundles(BundleCollection bundles)
        {
            bundles.Add(new ScriptBundle("~/bundles/js-base").Include(
                        "~/Scripts/libs/jquery-{version}.js",
                        "~/Scripts/libs/bootstrap.js",
                        "~/Scripts/libs/select2.js",
                        "~/Scripts/libs/bootstrap-datepicker.js",
                        "~/Scripts/libs/respond.js",
                        "~/Scripts/libs/lodash.js",
                        "~/Scripts/endless.js"
                        ));

            bundles.Add(new ScriptBundle("~/bundles/ng-base").Include(
                        "~/Scripts/libs/angular/angular.js",
                        "~/Scripts/libs/angular/ui-router.js",
                        "~/Scripts/libs/angular/ui-bootstrap-custom-0.9.0.js",
                        "~/Scripts/libs/angular/ui-bootstrap-custom-tpls-0.9.0.js",
                        "~/Scripts/libs/angular/angular-animate.js",
                        "~/Scripts/libs/angular/toaster.js"
                        ));

            bundles.Add(new ScriptBundle("~/bundles/ng-shared-services")
                .IncludeDirectory("~/Scripts/apps/shared/", "*.js"));

            bundles.Add(new ScriptBundle("~/bundles/ng-manage-app")
                .IncludeDirectory("~/Scripts/apps/manage/","*.js"));

            bundles.Add(new ScriptBundle("~/bundles/ng-tripinfo-app")
                .Include(
                    "~/Scripts/libs/jquery-ui.js",
                    "~/Scripts/libs/angular/sortable.js",
                    "~/Scripts/libs/angular/select2.js",
                    "~/Scripts/libs/angular/ngAutocomplete.js"
                )
                .IncludeDirectory("~/Scripts/apps/tripinfo/", "*.js"));

            bundles.Add(new StyleBundle("~/Content/css/base").Include(
                      "~/Content/css/bootstrap.css",
                      "~/Content/css/datepicker3.css",
                      "~/Content/css/select2.css",
                      "~/Content/css/toaster.css",
                      "~/Content/css/select2-bootstrap.css",
                      "~/Content/css/font-awesome.css"
                    ));
            bundles.Add(new StyleBundle("~/Content/css/custom").Include(
                      "~/Content/css/endless.css",
                      "~/Content/css/endless-skin.css",
                      "~/Content/css/site.css"));
        }
    }
}

Then using the bundles, say in the manage app, it would look like this:

@model Jobney.Casm.Web.Models.ManageDataBootstrapper
<div data-ng-app="Jobney.Casm.ManageApp" data-ng-controller="ManageAppCtrl">
    <ul class="tab-bar grey-tab">
        <!-- content here -->
    </ul>

    <div data-ui-view></div>
</div>

@section scripts
{
    <!-- Start ng-base -->
    @Scripts.Render("~/bundles/ng-base")

    <!-- Start ng-shared-services -->
    @Html.Partial("_SharedServices")

    <!-- Start ng-manage-app -->
    @Html.Partial("_ManageAppSetup", Model)
}

Services Need Data And Data Needs Urls

As an ASP.Net MVC developer, you are probably used to letting the routing engine create urls for you when you need them. And why not? Who knows what crazy routing constraints the client/pm/other developers decided needed to be in your application. And with Razor helpers, this is pretty easy. Angular shouldn’t have to try hard to figure out those rules. So how do we combine these two worlds?

@section scripts
{
    app.constant('RouteConfig', {
        base: '@Url.Content("~/")',
        project: {
            all: '@Url.Action("All", "Project")',
            details: '@Url.Action("Details", "Project")',
            post: '@Url.Action("Post", "Project")'
        },
        vendor: {
            category: '@Url.Action("GetByCategory", "Vendor")',
            details: '@Url.Action("GetById", "Vendor")',
            getProductRating: '@Url.Action("GetByProduct", "Rating")'
        },
        resolve: function (url) {
            return this.base + url;
        }
    });
}

Such http. Many calls.

In the manage app we are going to need some data. When the situation calls for it, I don’t mind sending that data down with the app. I think I took this idea from John Papa or one of those PluralSight authors. Basically, I just use JSON.Net to serialize my dataset on the page. Let’s take a look at it.

@model Jobney.Casm.Web.Models.ManageDataBootstrapper

<script>
    (function () {
        'use strict';

        var app = angular.module('Jobney.Casm.ManageApp', [
            'ui.router',
            'ui.bootstrap',
            'Jobney.Casm.SharedServices'
        ]);

        app.factory('BootstrappedData', [function() {
            var service = {};

            service.pilots = @Html.Raw(Model.Pilots);
            service.passengers = @Html.Raw(Model.Passengers);
            service.airplanes = @Html.Raw(Model.Airplanes);
            service.settings = @Html.Raw(Model.Settings);

            return service;
        }]);       

    })();
</script>

@Scripts.Render("~/bundles/ng-manage-app")


European ASP.NET MVC Hosting - UK :: Tips Using BindAttribute in ASP.NET MVC

clock March 3, 2015 06:21 by author Scott

The Bind attribute is used to protect against over-posting. Represents an attribute that is used to provide details about how model binding to a parameter should occur.

Let’s take an example of Employee Controller which creates the records for employee basic information.

This code adds the Employee entity created by the ASP.NET MVC model binder to the Employees entity set and then saves the changes to the database.

The ValidateAntiForgeryToken attribute helps prevent cross-site request forgery attacks.

EmployeeController.cs –> Create

[HttpPost]
[ValidateAntiForgeryToken]
public ActionResult Create(
   [Bind(Include = "FirstName, LastName, JoiningDate")]
   Employee employee)
{
   try
   {
      if (ModelState.IsValid)
      {
         db.Employees.Add(employee);
         db.SaveChanges();
         return RedirectToAction("Index");
      }
   }
   catch (DataException ex)
   {
      //Log the error
      ModelState.AddModelError("", "Unable to save. Try again.");
   }
   return View(employee);
}

Employee.cs

public class Employee
   {
      public int ID { get; set; }
      public string LastName { get; set; }
      public string FirstName { get; set; }
      public DateTime JoiningDate { get; set; }
      public string City { get; set; }

    }

For example, suppose the Employee entity includes a City property that you don’t want this web page to update. Even if you don’t have a City field on the web page, a hacker could use a tool such as fiddler, or write some JavaScript, to post a City form value. Without the Bind attribute limiting the fields that the model binder uses when it creates an Employee instance, the model binder would pick up that City form value and use it to update the Employee entity instance. Then whatever value the hacker specified for the City form field would be updated in your database.

It’s a security best practice to use the Include parameter with the Bind attribute to whitelist fields. It’s also possible to use the Exclude parameter to blacklist fields you want to exclude. The reason Include is more secure is that when you add a new property to the entity, the new field is not automatically protected by an Exclude list.

Another alternative approach, and one preferred by many, is to use only view models with model binding. The view model contains only the properties you want to bind. Once the MVC model binder has finished, you copy the view model properties to the entity instance.


European ASP.NET MVC 5 Hosting - UK :: How to Use jQuery DatePicker for MVC

clock December 11, 2014 08:38 by author Scott

For those of you using ASP.NET MVC and hoping to receive a little guidance on how to implement a jQuery UI DatePicker widget on a date input field, as well as the appropriate way to pass dates from the view back to the controller,  the following article is just for you.

The first gotcha was to download the entire jQuery UI (Combined Library) package from Nuget.  Downloading the older jQuery UI DatePicker package has some incompatibilities with the jQuery core framework that the bootstrap template needs to function correctly.

The next step is to extend the model you are using to support a datetime field you’d like to manage with the jQuery UI DatePicker. Take a look at the DateOfBirth field in the code below.

public class RegisterViewModel
{
    [Required]
    [Display(Name = "User name")]
    public string UserName { get; set; } 

    [Required]
    [Display(Name = "Email Address")]
    public string EmailAddress { get; set; } 

    [Required]
    [Display(Name = "Date of Birth")]
    public DateTime DateOfBirth { get; set; }

Extending the view to support this datetime field is pretty straight forward razor coding. The one thing to notice in this piece of code is the “datefield” css class used in the TextBoxFor method. We’ll be using the class later on to allow for easier jQuery UI DatePicker widget initialization. It also allows for more reusability across your applications.

<div class="form-group">
    @Html.LabelFor(m => m.DateOfBirth, new { @class = "col-md-2 control-label" })
    <div class="col-md-10">
        @Html.TextBoxFor(m => m.DateOfBirth, new { @class = "form-control datefield" })
    </div>
</div>

The code to initialize any jQuery UI DatePicker widgets is only 3 lines of code. We utilize the “datefield” css class here as a generic selector so all input fields with this class will transform into jQuery UI DatePicker widgets.

$(function () {
    $(".datefield").datepicker();
});

The final touch is to include all required .js and .css files necessary to a common layout which provides this codes use throughout your web application.  If you are concerned about page load times you can cherry pick where you’d like these includes to go.

    <div class="container body-content">
        @RenderBody()
        <hr />
        <footer>
            <p>&copy; @DateTime.Now.Year - My ASP.NET Application</p>

        </footer>
    </div> 

    @Scripts.Render("~/bundles/jquery")
    @Scripts.Render("~/bundles/bootstrap") 

    <link href="~/Content/themes/base/jquery.ui.core.css" rel="stylesheet" />
    <link href="~/Content/themes/base/jquery.ui.datepicker.css" rel="stylesheet" />
    <link href="~/Content/themes/base/jquery.ui.theme.css" rel="stylesheet" />
    <script src="~/Scripts/jquery-ui-1.10.4.js"></script>
    <script src="~/Scripts/Common/DatePickerReady.js"></script> 

    @RenderSection("scripts", required: false)
</body>
</html>

The nice thing about this approach is that ASP.NET MVC5 takes care of all the model binding for you since the jQuery UI DateTime picker sets the input field as a valid date value that native model binding understands. By the time you get to your controller you’ll have your datetime value set.

// POST: /Account/Register
[HttpPost]
[AllowAnonymous]
[ValidateAntiForgeryToken]
public async Task<ActionResult> Register(RegisterViewModel model)
{
    if (ModelState.IsValid)
    {
        var user = new ApplicationUser() { UserName = model.UserName };
        var result = await UserManager.CreateAsync(user, model.Password);
        if (result.Succeeded)
        {
            await SignInAsync(user, isPersistent: false);
            var message = new EmailMessage();
            message.ToEmail = model.EmailAddress;
            message.Subject = "Insurance Website Registration";
            message.IsHtml = false;
            message.Body =
                String.Format("You have succesfully registered for Vanderbuilt Insurance with the following" +
                              "username: {0}", model.UserName); 

            var status = EmailService.SendEmailMessage(message); 

            return RedirectToAction("Index", "Home");
        }
        else
        {
            AddErrors(result);
        }
    } 

    // If we got this far, something failed, redisplay form
    return View(model);
}


European ASP.NET MVC Hosting - Greece :: How to Remove IIS Header Bloat in ASP.NET MVC

clock June 26, 2014 09:30 by author Scott

Hi All, how do you do? In this post I will share little bit about how to remove IIS Header Bloat on IIS. This is default ASP.NET project’s response to a request for a page:

Cache-Control:private

Content-Encoding:gzip

Content-Length:3256

Content-Type:text/html; charset=utf-8

Date:Thu, 26 Jun 2014 09:07:59 GMT

Server:Microsoft-IIS/8.0

Vary:Accept-Encoding

X-AspNet-Version:4.0.30319

X-AspNetMvc-Version:4.0

X-Powered-By:ASP.NET

The first thing you need to do is remove X-AspNetMvc-Version header. How? Please just open your Global.asax.cs file to Application_Start, and add this code at the top

MvcHandler.DisableMvcResponseHeader = true;

Then, you can also eliminate the “Server” header by adding a handler to PreSendRequestHeaders event like this:

        protected void Application_PreSendRequestHeaders(object sender, EventArgs e)
        {
            HttpApplication app = sender as HttpApplication;
            if (app != null &&
                app.Context != null)
            {
                app.Context.Response.Headers.Remove("Server");
            }
        }

Then, remove the “X-AspNet-Version" header by adding a config key to Web.Config. Here is the key to add (under <system.web>):

    <httpRuntime enableVersionHeader="false" />

The last is remove the X-Powered-By by adding another confing key to Web.Config (under<system.webserver>):

    <httpProtocol>

      <customHeaders>

        <remove name="X-Powered-By" />

      </customHeaders>

    </httpProtocol>

After doing all of this, we end up with a nice and clean response:

Cache-Control:private

Content-Encoding:gzip

Content-Length:3256

Content-Type:text/html; charset=utf-8
Date:Wed, 26 Jun 2014 09:17:09 GMTServer:Microsoft-IIS/8.0

Vary:Accept-Encoding


About HostForLIFE.eu

HostForLIFE.eu is European Windows Hosting Provider which focuses on Windows Platform only. We deliver on-demand hosting solutions including Shared hosting, Reseller Hosting, Cloud Hosting, Dedicated Servers, and IT as a Service for companies of all sizes.

We have offered the latest Windows 2016 Hosting, ASP.NET Core 2.2.1 Hosting, ASP.NET MVC 6 Hosting and SQL 2017 Hosting.


Tag cloud

Sign in