European ASP.NET MVC 4 and MVC 5 Hosting

BLOG about ASP.NET MVC 3, ASP.NET MVC 4, and ASP.NET MVC 5 Hosting and Its Technology - Dedicated to European Windows Hosting Customer

European ASP.NET MVC 5 Hosting - UK :: Creating Custom Scaffold Templates in ASP.NET MVC

clock November 27, 2015 18:59 by author Scott

Microsoft provides a powerful scaffolding engine for models in ASP.NET MVC applications that use Entity Framework. Scaffolding relieves web developers from the mundane task of writing the create, read, update, and delete (CRUD) code over and over again. The scaffolding engine uses T4 templates to generate basic controllers and views for models. However, scaffolded code is just a starting point, since it often needs to be customized to meet specific business requirements or satisfy specific design patterns.

In this blog post, I’ll provide a walkthrough on how to create project-specific custom scaffold templates for ASP.NET MVC. This can be a huge time-saver in applications with a large number of controllers and views. I will use Visual Studio 2013, ASP.NET MVC 5, Entity Framework 6, and C#.

SETUP

To get started, create a new ASP.NET MVC web application and add a simple Product model with the properties shown below and build the project.

namespace CustomScaffoldingDemo.Models
{
    public class Product
    {
        public int Id { get; set; }
        public string Name { get; set; }
        public decimal Price { get; set; }
        public bool IsDeleted { get; set; }
        public DateTime CreatedDate { get; set; }
        public DateTime UpdatedDate { get; set; }
    }
}

SCAFFOLDING CONTROLLER AND VIEWS

First, let’s use default templates to scaffold a controller and CRUD views for the Product model so we can review the results. To do so, right-click the Controllers folder in Solution Explorer and click Add New Scaffolded Item. In the Add Scaffold dialog, choose the MVC 5 Controller with views, using Entity Framework. On the Add Controller dialog, create a new data context and choose appropriate options that serve as parameters for the scaffolding engine. Then hit the Add button.
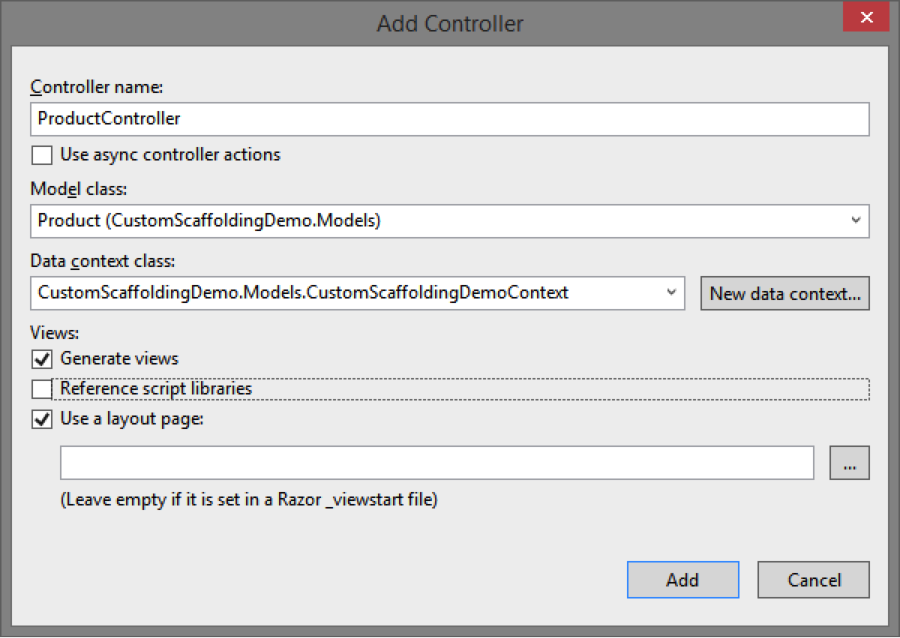
The scaffolding engine will use the default T4 templates to generate code for the controller and five views and add them to the appropriate folders. At this point you have full CRUD functionality for the Product model and can run the application.
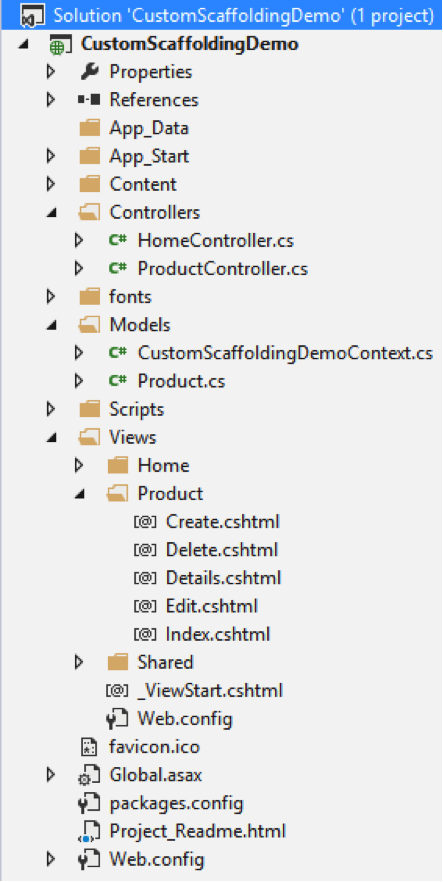
As you review the generated code, you may notice that the scaffolding engine is intelligent enough to treat the Product ID properly by not scaffolding the editor for this property on the Create or Edit forms. You may also realize that the default templates do not meet the functional specification or your desired design patterns. For example, you may want to achieve the following:

–  Created Date and Updated Date properties should be set automatically by the system on create or update action respectively, and thus should not be editable on the Create and Edit views.
–  Products should be soft-deleted, so the Delete action of the Product controller must be changed to set the IsDeleted property and updating the Product instead of deleting it from the database. Index action should only return Products with IsDeleted set to false.
–  None of the views should display the IsDeleted property.
–  Views should use @ViewBag.Title as the page header instead of the view name. 
–  You may be using a Unit of Work pattern, so all calls to save changes to the database may need to be tweaked. 

You can manually make changes to the generated code, which has several drawbacks, including:

–  Typically, you would want most, if not all, controllers and views to be consistent across all models in your application. Making similar manual changes to controllers and views for all models is not an efficient approach.
–  When you make changes to a model, you will either have to scaffold these files again and lose your manual changes or manually update all views to match the updated model.

The best way to avoid manual changes and enforce consistency is to customize the scaffold templates.

CUSTOMIZING SCAFFOLD TEMPLATES

The original T4 templates used by the scaffolding engine are located in this folder: %programfiles%\Microsoft Visual Studio 12.0\Common7\IDE\Extensions\Microsoft\Web\Mvc\Scaffolding\Templates.

While you can directly edit these templates, this will affect scaffolding for all future projects, which is not recommended. Instead, you can create project-specific copies of these templates so you can customize them. To do so, copy these templates into your MVC project’s CodeTemplates folder, following the same sub-folder structure. You only need to copy either C# or VB.NET templates, based on your project. The template filenames include the language they use. The convention is that the scaffolding engine uses the templates in the CodeTemplates project folder, if one exists, instead of the global templates.
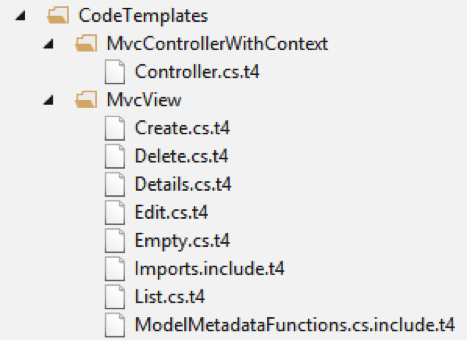
Now you can modify these custom scaffold templates, which would affect scaffolded code only for this project. T4 templates are simply text files and can be edited directly in Visual Studio. Unfortunately, Visual Studio 2013 does not include a good T4 editor—there’s no syntax highlighting or IntelliSense. Fortunately, there are some third party add-on products that provide this functionality. Below is a screenshot of how the templates look in Visual Studio 2013. You can see I modified the header on line 26 to use @ViewBag.Title instead of the view name. 

<#@ template language="C#" HostSpecific="True" #>
<#@ output extension=".cshtml" #>
<#@ include file="Imports.include.t4" #>
@model <#= ViewDataTypeName #>
<#
// The following chained if-statement outputs the file header code and
// markup for a partial view, a view using a layout page, or a regular view.
if(IsPartialView) {
#> 

<#
} else if(IsLayoutPageSelected) {
#> 

@{
    ViewBag.Title = "<#= ViewName#>";
<#
if (!String.IsNullOrEmpty(LayoutPageFile)) {
#>
    Layout = "<#= LayoutPageFile#>";
<#
}
#&g
t;
}

@ViewBag.Title

To learn more about scaffolding check out this walkthrough from Microsoft. To learn more about T4 templates in general, start by reading this MSDN article


European ASP.NET MVC Hosting - UK :: Tips Using BindAttribute in ASP.NET MVC

clock March 3, 2015 06:21 by author Scott

The Bind attribute is used to protect against over-posting. Represents an attribute that is used to provide details about how model binding to a parameter should occur.

Let’s take an example of Employee Controller which creates the records for employee basic information.

This code adds the Employee entity created by the ASP.NET MVC model binder to the Employees entity set and then saves the changes to the database.

The ValidateAntiForgeryToken attribute helps prevent cross-site request forgery attacks.

EmployeeController.cs –> Create

[HttpPost]
[ValidateAntiForgeryToken]
public ActionResult Create(
   [Bind(Include = "FirstName, LastName, JoiningDate")]
   Employee employee)
{
   try
   {
      if (ModelState.IsValid)
      {
         db.Employees.Add(employee);
         db.SaveChanges();
         return RedirectToAction("Index");
      }
   }
   catch (DataException ex)
   {
      //Log the error
      ModelState.AddModelError("", "Unable to save. Try again.");
   }
   return View(employee);
}

Employee.cs

public class Employee
   {
      public int ID { get; set; }
      public string LastName { get; set; }
      public string FirstName { get; set; }
      public DateTime JoiningDate { get; set; }
      public string City { get; set; }

    }

For example, suppose the Employee entity includes a City property that you don’t want this web page to update. Even if you don’t have a City field on the web page, a hacker could use a tool such as fiddler, or write some JavaScript, to post a City form value. Without the Bind attribute limiting the fields that the model binder uses when it creates an Employee instance, the model binder would pick up that City form value and use it to update the Employee entity instance. Then whatever value the hacker specified for the City form field would be updated in your database.

It’s a security best practice to use the Include parameter with the Bind attribute to whitelist fields. It’s also possible to use the Exclude parameter to blacklist fields you want to exclude. The reason Include is more secure is that when you add a new property to the entity, the new field is not automatically protected by an Exclude list.

Another alternative approach, and one preferred by many, is to use only view models with model binding. The view model contains only the properties you want to bind. Once the MVC model binder has finished, you copy the view model properties to the entity instance.


European ASP.NET MVC Hosting - Germany :: The Difference Between ASP.NET MVC and Web API

clock July 16, 2014 08:05 by author Scott

In this article, I will explain the differences between ASP.NET MVC and ASP.NET Web API.

Overview of MVC

Model View Controller (MVC) divides an application into the three parts, Model, View and Controller. ASP.NET has many options for creating Web applications using the ASP.NET Web forms. MVC framework Combines the ASP.NET features such as Master pages, Membership based authentication. MVC exists in the "System.Web.MVC" assembly.

The components that are included by the MVC:

  • Models: Models are the objects used to retrieve and store the model state in the database.  Let's see an example. There is an "item" object that fetches the data from the database and performs an operation and then stores the updated data into the database. If an application only reads the dataset and sends it to the view then the application does not have any associated class and physical layer model
  • View: View components show the User Interface (UI) of the applications that is created by the data model. For example the view of the Items table shows the drop down list and textboxes that depend on the current state of the "item"  object.
  • Controllers: In MVC, controllers are also called the components. These components manage the user interaction and chooses a view for displaying the UI. The main work of the controller is that it manages the query string values and transfers these values to the models.

The Models retrieve the information and store the updated information in the database. Views are used for only displaying the information, and the controllers are used for managing and responding to the user inputs and their interaction.

Overview of the Web API

The ASP.NET Web API allows for displaying the data in various formats, such as XML and JSON. It is a framework that uses the HTTP services and makes it easy to provide the response to the client request. The response depends on the request of the clients. The web API builds the HTTP services and manages the request using the HTTP protocols. The Web API is an open source and it can be hosted in the application or on the IIS .The request may be GET, POST, DELETE or PUT. We can say that the Web API:

  • Is an HTTP service.
  • Is designed for reaching the broad range of clients.
  • Uses the HTTP application.

Difference between MVC and Web API

There are many differences between MVC and Web API, including:

  • We can use the MVC for developing  the Web application that replies as both data and views but the Web API is used for generating the HTTP services that replies only as data.
  • In the Web API the request performs tracing with the actions depending on the HTTP services but the MVC request performs tracing with the action name.
  • The Web API returns the data in various formats, such as JSON, XML and other format based on the accept header of the request. But the MVC returns the data in the JSON format by using JSONResult.
  • The Web API supports content negotiation, self hosting. All these are not supported by the MVC.
  • The Web API includes the various features of the MVC, such as routing, model binding but these features are different and are defined in the "System.Web.Http" assembly. And the MVC features are defined in the " System.Web.Mvc" assembly.
  • The Web API helps the creation of RESTful services over the .Net Framework but the MVC does not support.

When we combined the MVC with Web API:

When we do the self hosting on the application, in it we combine both the MVC controller and the API in a single project and it helps for managing the AJAX requests and returns the response in XML, JSON and other Formats.

We combined the MVC and Web API for enabling the authorization for an application. In it we create two filters, one for the Web API and another for MVC.


About HostForLIFE.eu

HostForLIFE.eu is European Windows Hosting Provider which focuses on Windows Platform only. We deliver on-demand hosting solutions including Shared hosting, Reseller Hosting, Cloud Hosting, Dedicated Servers, and IT as a Service for companies of all sizes.

We have offered the latest Windows 2016 Hosting, ASP.NET Core 2.2.1 Hosting, ASP.NET MVC 6 Hosting and SQL 2017 Hosting.


Tag cloud

Sign in