European ASP.NET MVC 4 and MVC 5 Hosting

BLOG about ASP.NET MVC 3, ASP.NET MVC 4, and ASP.NET MVC 5 Hosting and Its Technology - Dedicated to European Windows Hosting Customer

HostForLIFE.eu Proudly Launches DotNetNuke 7.3.4 Hosting

clock December 23, 2014 07:32 by author Peter

European leading web hosting provider, HostForLIFE.eu announced support for DotNetNuke 7.3.4 hosting plan due to high demand of DotNetNuke CMS users in Europe.

HostForLIFE.eu proudly launches the support of DotNetNuke 7.3.4 on all our newest Windows Server  environment. HostForLIFE.eu DotNetNuke 7.3.4 Hosting plan starts from just as low as €3.00/month only and this plan has supported ASP.NET 5, ASP.NET MVC 5/6 and SQL Server 2012/2014.

DotNetNuke 7.3.4, as well known in the web industry and familiar among .NET developers, is a Web Content Management System (WCMS) based on Microsoft .NET platform. It is an excellent open source software that you can use to manage your website without having much technical knowledge.

HostForLIFE.eu clients are specialized in providing supports for DotNetNuke for many years. We are glad to provide support for European DotNetNuke 7.3.4 hosting users with advices and troubleshooting for our clients website when necessary.

DNN 7.3.4 is a smaller maintenance release than normal and is focused on addressing the most serious platform issues. DNN 7.3.4 addresses a number of platform issues and should be the last release before DNN 7.4.0. DNN 7.3.4 added ability to save localized lists to resource file, added method to remove all subscriptions from a ContentItem, fixed issue where AUM was not correctly handling 301 redirects, Fixed issue where popup iframe is not initialized correctly and fixed issue where multiple region/country controls in a profile did not work correctly.

DotNetNuke 7.3.4 will be a great content management system that support many advance website features such as blogs, forums, e-commerce system, photo galleries and more. DotNetNuke 7.3.4 is a great platform to build your web presence with. HostForLIFE.eu can help customize any web software that company wishes to utilize.

Further information and the full range of features DotNetNuke 7.3.4 Hosting can be viewed here http://www.hostforlife.eu/European-DotNetNuke-734-Hosting

About Company
HostForLIFE.eu is European Windows Hosting Provider which focuses on Windows Platform only. HostForLIFE.eu deliver on-demand hosting solutions including shared hosting, Reseller Hosting, Cloud Hosting, Dedicated Servers, and IT as a Service for companies of all sizes.

HostForLIFE.eu is awarded Top No#1 SPOTLIGHT Recommended Hosting Partner by Microsoft (see http://www.asp.net/hosting/hostingprovider/details/953). Our service is ranked the highest top #1 spot in several European countries, such as: Germany, Italy, Netherlands, France, Belgium, United Kingdom, Sweden, Finland, Switzerland and other European countries.


ASP.NET MVC 6 Hosting Germany - HostForLIFE.eu :: How to Create Random Authorization code in c# in ASP.NET MVC ?

clock December 19, 2014 06:19 by author Peter

Now, with this article I am going to create random 15 characters long authorization number in ASP.NET MVC 6. This can be used for several completely different purposes in your MVC application like unique barcodes, authorization codes etc. to make thinks more fascinating we are getting to force the method to place letter before and after random code. GenerateLetter method is responsible to provide us only letter. I used this code based on small tutorial.

Controller
public char GenerateLetter()
        {
            Random randomNumber = new Random();
            int number = randomNumber.Next(0, 26);
            char letter = (char)('a' + number);
            return letter;
        }
        public string GenerateAuthCode()
        {
            bool codeExists = false;
            string code = GenerateLetter().ToString();
            do
            {
                code += Guid.NewGuid().ToString("N").Substring(0, 13);
                code += GenerateLetter().ToString();
                YourDBContext dbContext = new YourDBContext();
var Exists = dbContext.products.FirstOrDefault(m => m.barcode ==   code);
                codeExists = Exists == null? false : true;
            }
            while (codeExists);               
            return code;       
        }

I am calling GenerateLetter method twice before & after random 13 characters code is generated. I also want to make sure that code is always unique so I am calling Database to find if any product already have this barcode, if so my method will repeat whole process.


ASP.NET MVC 5 Hosting UK - HostForLIFE.eu :: Create jQuery Accordion in ASP.NET MVC

clock December 18, 2014 10:14 by author Peter

At this moment, I am going to explain about create jQuery Accordion in ASP.NET MVC 5. This  is very simple and easy to develop a jQuery accordion in ASP.NET MVC. If we need to implement any jQuery UI widgets in ASP.NET MVC there there is no need to do any extra work. This is a cool feature of ASP.NET MVC.

And this is the example with ASP.NET MVC 5 Apps:
1. Create a blank ASP.NET MVC application.
2. Download the jQuery and jQuery UI libray fron Nuget Package Manager in the apps.
3. Create the Home Controller with this code:
using System; 
using System.Collections.Generic; 
using System.Linq; 
using System.Web; 
using System.Web.Mvc; 
  namespace MvcApplication8.Controllers 

    public class HomeController : Controller 
    { 
        // 
        // GET: /Home/ 
         public ActionResult Index() 
        { 
            return View(); 
        }       

}

4.  Make the Index view and implement the jQuery and style sheet as in this code snippet.
   @{ 
        ViewBag.Title = "Index"; 
   }        
    <script src="~/Scripts/jquery-2.1.1.min.js"></script> 
    <script src="~/Scripts/jquery-ui-1.11.2.min.js"></script> 
    <link href="~/Content/themes/base/all.css" rel="stylesheet" /> 
    <link href="~/Content/themes/base/accordion.css" rel="stylesheet" /> 
    <link href="~/Content/demos.css" rel="stylesheet" /> 
          <script type="text/javascript">         
 $(function () { 
           $("#accordion").accordion(); 
       }); 
    </script> 
      <div class="demo"> 
    <div id="accordion"> 
      <h3>This is the Title1</h3> 
      <div> 
        <p> 
        This is sample text
        </p> 
      </div> 
      <h3>This is the Title2</h3> 
      <div> 
        <p> 
       This is sample text
        </p> 
      </div>          
    </div>     
</div>


HostForLIFE.eu Proudly Launches of WordPress 4.0.1 Hosting

clock December 15, 2014 10:11 by author Peter

European leading web hosting provider, HostForLIFE.eu announced the support for WordPress 4.0.1 hosting plan due to high demand of WordPress 4.0.1 users in Europe. HostForLIFE.eu is a popular online WordPress hosting service provider catering to those people who face such issues. The company has managed to build a strong client base in a very short period of time. It is known for offering fast, fully-managed and secured services in the competitive market.

HostForLIFE.eu hosts its servers in top class data centers that is located in Amsterdam (NL), London (UK), Paris (France) and Seattle (US) to guarantee 99.9% network uptime. All data center feature redundancies in network connectivity, power, HVAC, security, and fire suppression. All hosting plans from HostForLIFE.eu include 24×7 support and 30 days money back guarantee. All hosting plans from HostForLIFE.eu include 24×7 support and 30 days money back guarantee. The customer can start hosting our Wordpress 4.0.1 site on our environment from as just low €3.00/month only.

WordPress 4.0.1 patches a critical cross-site scripting vulnerability affecting comment boxes on websites running the content management system software. An attacker would need only to inject malicious JavaScript into a comment that would infect a reader viewing it on the webpage or an admin in the management dashboard.

The update also addresses three other cross-site scripting vulnerabilities, a cross-side request forgery flaw, a denial-of-service bug related to password checks, server-side request forgery issues, and what WordPress called “an extremely unlikely hash collision” that could lead to account compromise. WordPress said it also invalidates links in a password reset email if the user remembers our password and logs in and changes our email address.

WordPress 4.0.1 addresses an additional eight security issues, including three other XSS vulnerabilities that can be exploited by a contributor or an author, a cross-site request forgery (CSRF) that can be leveraged to trick a user into changing his/her password, and a denial-of-service (DoS) bug. HostForLIFE.eu is a popular online Windows based hosting service provider catering to those people who face such issues. The company has managed to build a strong client base in a very short period of time. It is known for offering ultra-fast, fully-managed and secured services in the competitive market. Our powerful servers are specially optimized and ensure WordPress 4.0.1 performance.

For more information about this new product, please visit http://hostforlife.eu/European-WordPress-401-Hosting

About us:
HostForLIFE.eu is awarded Top No#1 SPOTLIGHT Recommended Hosting Partner by Microsoft (see http://www.asp.net/hosting/hostingprovider/details/953). Our service is ranked the highest top #1 spot in several European countries, such as: Germany, Italy, Netherlands, France, Belgium, United Kingdom, Sweden, Finland, Switzerland and other European countries. Besides this award, we have also won several awards from reputable organizations in the hosting industry and the detail can be found on our official website.


European ASP.NET MVC 5 Hosting - UK :: How to Use jQuery DatePicker for MVC

clock December 11, 2014 08:38 by author Scott

For those of you using ASP.NET MVC and hoping to receive a little guidance on how to implement a jQuery UI DatePicker widget on a date input field, as well as the appropriate way to pass dates from the view back to the controller,  the following article is just for you.

The first gotcha was to download the entire jQuery UI (Combined Library) package from Nuget.  Downloading the older jQuery UI DatePicker package has some incompatibilities with the jQuery core framework that the bootstrap template needs to function correctly.

The next step is to extend the model you are using to support a datetime field you’d like to manage with the jQuery UI DatePicker. Take a look at the DateOfBirth field in the code below.

public class RegisterViewModel
{
    [Required]
    [Display(Name = "User name")]
    public string UserName { get; set; } 

    [Required]
    [Display(Name = "Email Address")]
    public string EmailAddress { get; set; } 

    [Required]
    [Display(Name = "Date of Birth")]
    public DateTime DateOfBirth { get; set; }

Extending the view to support this datetime field is pretty straight forward razor coding. The one thing to notice in this piece of code is the “datefield” css class used in the TextBoxFor method. We’ll be using the class later on to allow for easier jQuery UI DatePicker widget initialization. It also allows for more reusability across your applications.

<div class="form-group">
    @Html.LabelFor(m => m.DateOfBirth, new { @class = "col-md-2 control-label" })
    <div class="col-md-10">
        @Html.TextBoxFor(m => m.DateOfBirth, new { @class = "form-control datefield" })
    </div>
</div>

The code to initialize any jQuery UI DatePicker widgets is only 3 lines of code. We utilize the “datefield” css class here as a generic selector so all input fields with this class will transform into jQuery UI DatePicker widgets.

$(function () {
    $(".datefield").datepicker();
});

The final touch is to include all required .js and .css files necessary to a common layout which provides this codes use throughout your web application.  If you are concerned about page load times you can cherry pick where you’d like these includes to go.

    <div class="container body-content">
        @RenderBody()
        <hr />
        <footer>
            <p>&copy; @DateTime.Now.Year - My ASP.NET Application</p>

        </footer>
    </div> 

    @Scripts.Render("~/bundles/jquery")
    @Scripts.Render("~/bundles/bootstrap") 

    <link href="~/Content/themes/base/jquery.ui.core.css" rel="stylesheet" />
    <link href="~/Content/themes/base/jquery.ui.datepicker.css" rel="stylesheet" />
    <link href="~/Content/themes/base/jquery.ui.theme.css" rel="stylesheet" />
    <script src="~/Scripts/jquery-ui-1.10.4.js"></script>
    <script src="~/Scripts/Common/DatePickerReady.js"></script> 

    @RenderSection("scripts", required: false)
</body>
</html>

The nice thing about this approach is that ASP.NET MVC5 takes care of all the model binding for you since the jQuery UI DateTime picker sets the input field as a valid date value that native model binding understands. By the time you get to your controller you’ll have your datetime value set.

// POST: /Account/Register
[HttpPost]
[AllowAnonymous]
[ValidateAntiForgeryToken]
public async Task<ActionResult> Register(RegisterViewModel model)
{
    if (ModelState.IsValid)
    {
        var user = new ApplicationUser() { UserName = model.UserName };
        var result = await UserManager.CreateAsync(user, model.Password);
        if (result.Succeeded)
        {
            await SignInAsync(user, isPersistent: false);
            var message = new EmailMessage();
            message.ToEmail = model.EmailAddress;
            message.Subject = "Insurance Website Registration";
            message.IsHtml = false;
            message.Body =
                String.Format("You have succesfully registered for Vanderbuilt Insurance with the following" +
                              "username: {0}", model.UserName); 

            var status = EmailService.SendEmailMessage(message); 

            return RedirectToAction("Index", "Home");
        }
        else
        {
            AddErrors(result);
        }
    } 

    // If we got this far, something failed, redisplay form
    return View(model);
}


ASP.NET MVC 5 Hosting Spain - HostForLIFE.eu :: Create a Simple API in ASP.NET MVC

clock December 9, 2014 08:34 by author Peter

On this tutorial, I will show you how to create a simple API in ASP.NET MVC 5 that could return both collection of movies or one movie in Json format naturally, but depends on browser outcomes could be displayed in XML format. I targeted only on GET method during this tutorial.

1. Let’s make a new ASP.MVC apps in Visual Studio.
2. In models create interface IMoviesRepository, class Movie and MoviesRepository.

public interface IMoviesRepository
    {
        IQueryable<Movie> GetAll();
        Movie GetById(int id);
        Movie Add(Movie movie);
        bool Edit(Movie movie);
        bool Remove(Guid? id);
    }
public class Movie
    {
        public int movieId { get; set; }
        public string name { get; set; }
        public string releaseYear { get; set; }
    }
public class MovieRepository : IMoviesRepository
    {
        private List<Movie> _listOfMovies = new List<Movie>();
        public MovieRepository()
        {
            _listOfMovies.Add(new Movie {
                movieId = 1,
                name = "Keyboard massacre",
                releaseYear = "1999" });
            _listOfMovies.Add(new Movie {
                movieId = 2,
                name = "Keyboard massacre 2",
                releaseYear = "2000" });
            _listOfMovies.Add(new Movie {
                movieId = 3,
                name = "Keyboard massacre 3 ",
                releaseYear = "2001" });
        }
        public IQueryable<Movie> GetAll()
        {
            return _listOfMovies.AsQueryable();
        }
        public Movie GetById(int id)
        {
            return _listOfMovies.Find(m => m.movieId == id);
        }
        public Movie Add(Movie movie)
        {
            throw new NotImplementedException();
        }
        public bool Edit(Movie movie)
        {
            throw new NotImplementedException();
        }
        public bool Remove(Guid? id)
        {
            throw new NotImplementedException();
        }
    }

Create interface first after which MovieRepository that could inherit IMoviesRepository and merely correct click on class name and apply Implement Interface.

3. Then create new folder to your main project WebApiControllers and create Api Controller.Call itMoviesController.cs.

And here is the code for your controller class:
MovieRepository movieRepository;
        public MoviesController()
       {
            this.movieRepository = new MovieRepository();
        }

Calling default constructor can ensure that all repositories are set up. It's great practice to call all services that could be needed for controller - we're ensuring which our application is loose coupled. If you're acquainted with dependency injection this is very typical concept.

As I described I will be able to concentrate only on GET method, thus replace each GET methods along with custom code. You controller ought to such as this :
public class MoviesController : ApiController
    {
        MovieRepository movieRepository; 
        public MoviesController()        
{
            this.movieRepository = new MovieRepository();
        } 
        // GET api/movies
        public IQueryable<Movie> Get()
        {
            return movieRepository.GetAll();
        } 
        // GET api/movies/5
        public Movie Get(int id)
        {
            return movieRepository.GetById(id);
        }
        // POST api/movies
        public void Post([FromBody]string value)
        {
        } 
        // PUT api/movies/5
        public void Put(int id, [FromBody]string value)
        {
        }
        // DELETE api/movies/5
        public void Delete(int id)
        {
        }
    }

4. Run your application now and call localhost:YourPortNumber/api/movies
You should get this results in Chrome:

If you run it in IE you will be asked to save file. With opening it in notepad you will get this JSON results
[{"movieId":1,"name":"Keyboard massacre","releaseYear":"1999"},{"movieId":2,"name":"Keyboard massacre 2","releaseYear":"2000"},{"movieId":3,"name":"Keyboard massacre 3 ","releaseYear":"2001"}]

5. And this code below will improve GetById method. If movie can’t be found we want to return HttpResponseException.
// GET api/movies/5
        public Movie Get(int id)
        {
            var movie = movieRepository.GetById(id);
            if (movie == null)
            {
                throw new HttpResponseException(HttpStatusCode.NotFound);
           }
           return movie;
        }


HostForLIFE.eu Proudly Launches ASP.NET 5 Hosting

clock December 8, 2014 10:14 by author Peter

European leading web hosting provider, HostForLIFE.eu announces the launch of ASP.NET 5  support on the recently released Windows Server 2012.

HostForLIFE.eu was established to cater to an under served market in the hosting industry; web hosting for customers who want excellent service. HostForLIFE.eu – a cheap, constant uptime, excellent customer service, quality, and also reliable hosting provider in advanced Windows and ASP.NET technology. HostForLIFE.eu proudly announces the availability of the ASP.NET 5 hosting in our entire servers environment.

ASP.NET is Microsoft's dynamic website technology, enabling developers to create data-driven websites using the .NET platform and the latest version is 5 with lots of awesome features. ASP.NET 5 is a lean .NET stack for building modern web apps. Microsoft built it from the ground up to provide an optimized development framework for apps that are either deployed to the cloud or run on-premises. It consists of modular components with minimal overhead.

According to Microsoft officials, much of the functionality in the ASP.NET 5 release is a new flexible and cross-platform runtime, a new modular HTTP request pipeline, Cloud-ready environment configuration, Unified programming model that combines MVC, Web API, and Web Pages, Ability to see changes without re-building the project, etc.

HostForLIFE.eu hosts its servers in top class data centers that is located in Amsterdam (NL), London (UK), Paris (FR) and Seattle (US) to guarantee 99.9% network uptime. All data center feature redundancies in network connectivity, power, HVAC, security, and fire suppression. All hosting plans from HostForLIFE.eu include 24×7 support and 30 days money back guarantee. The customers can start hosting our ASP.NET 5 site on our environment from as just low €3.00/month only.

HostForLIFE.eu is a popular online ASP.NET  based hosting service provider catering to those people who face such issues. The company has managed to build a strong client base in a very short period of time. It is known for offering ultra-fast, fully-managed and secured services in the competitive market.

HostForLIFE.eu offers the latest European ASP.NET 5 hosting installation to all our new and existing customers. The customers can simply deploy our ASP.NET 5 website via our world-class Control Panel or conventional FTP tool. HostForLIFE.eu is happy to be offering the most up to date Microsoft services and always had a great appreciation for the products that Microsoft offers.

Further information and the full range of features ASP.NET 5 Hosting can be viewed here http://www.hostforlife.eu

About Company
HostForLIFE.eu is European Windows Hosting Provider which focuses on Windows Platform only. HostForLIFE.eu deliver on-demand hosting solutions including Shared hosting, Reseller Hosting, Cloud Hosting, Dedicated Servers, and IT as a Service for companies of all sizes.

HostForLIFE.eu is awarded Top No#1 SPOTLIGHT Recommended Hosting Partner by Microsoft (see http://www.asp.net/hosting/hostingprovider/details/953). Their service is ranked the highest top #1 spot in several European countries, such as: Germany, Italy, Netherlands, France, Belgium, United Kingdom, Sweden, Finland, Switzerland and other European countries. Besides this award, we have also won several awards from reputable organizations in the hosting industry and the detail can be found on our official website.


ASP.NET MVC 5 Hosting France - HostForLIFE.eu :: Develop a Custom HTML Helpers in ASP.NET MVC

clock December 5, 2014 07:06 by author Peter

With this article, I want to tell you about develop custom a HTML Helpers, thus that many of us could use inside the MVC 5 views, utilizing HTML Helpers class we will decrease the massive level of typing of HTML tags.

HTML Helpers
A HTML Helper is simply a method which returns a string. The string can represent any kinds of content that you need. As an example, you are able to use HTML Helpers to render standard HTML tags such as HTML <input> and <img> tags. You can also use HTML Helpers to render a lot of complicated content such as a tab strip or an HTML table of database data.

The listed are many of the standard HTML Helpers currently added in ASP. NET MVC :
Html.ActionLink()
Html.BeginForm()
Html.CheckBox()
Html.DropDownList()
Html.EndForm()
Html.Hidden()
Html.ListBox()
Html.Password()
Html.RadioButton()
Html.TextArea()
Html.TextBox()

Develop a HTML Helpers with Static Methods
The easiest method to develop a new HTML Helper is to make a static method that returns a string. For example, that you decide to create some new HTML Helpers that render an HTML <Image> tag, HTML <ActionLink> tag, HTML <ActionLinkSortable> tag, HTML <DisplayAddress> tag and HTML < label> tag. And here is the example code that I used:
public static class HtmlHelpers  
{  
     /// <summary> 
     /// Creates an Html helper for an Image 
     /// </summary>  
     /// <param name="helper"></param>  
     /// <param name="src"></param>  
     /// <param name="altText"></param>  
     /// <returns></returns>     
     public static MvcHtmlString Image(this HtmlHelper helper, string src, string altText)  
     {  
         var builder = new TagBuilder("img");  
         builder.MergeAttribute("src", src);  
         builder.MergeAttribute("alt", altText);  
         return MvcHtmlString.Create(builder.ToString(TagRenderMode.SelfClosing));  
     }     
     //create an action link that can display html     
     public static MvcHtmlString ActionLinkHtml(this AjaxHelper ajaxHelper, string linkText, string actionName,  
 string controllerName, object routeValues, AjaxOptions ajaxOptions, object htmlAttributes)  
     {  
         var repID = Guid.NewGuid().ToString();  
         var lnk = ajaxHelper.ActionLink(repID, actionName, controllerName, routeValues, ajaxOptions, htmlAttributes);  
         return MvcHtmlString.Create(lnk.ToString().Replace(repID, linkText));  
     }     
     //create an action link that can be clicked to sort and has a sorting icon (this is meant to be used to create column headers)  
     public static MvcHtmlString ActionLinkSortable(this HtmlHelper helper, string linkText, string actionName,  
 string sortField, string currentSort, object currentDesc)  
     {  
         bool desc = (currentDesc == null) ? false : Convert.ToBoolean(currentDesc);  
         //get link route values  
         var routeValues = new System.Web.Routing.RouteValueDictionary();  
         routeValues.Add("id", sortField);  
         routeValues.Add("desc", (currentSort == sortField) && !desc);  
         //build the tag  
         if (currentSort == sortField) linkText = string.Format("{0} <span class='badge'><span class='glyphicon glyphicon-sort-by-attributes{1}'></span></span>", linkText, (desc) ? "-alt" : "");
TagBuilder tagBuilder = new TagBuilder("a");  
         tagBuilder.InnerHtml = linkText;  
         //add url to the link  
         var urlHelper = new UrlHelper(helper.ViewContext.RequestContext);  
         var url = urlHelper.Action(actionName, routeValues);  
         tagBuilder.MergeAttribute("href", url);  
         //put it all together  
         return MvcHtmlString.Create(tagBuilder.ToString(TagRenderMode.Normal));  
     }     
     //custom html helper to output a nicely-formatted address element     
     public static MvcHtmlString DisplayAddressFor<TModel, TProperty>(this HtmlHelper<TModel> helper, 
 System.Linq.Expressions.Expression<Func<TModel, TProperty>> expression, bool isEditable = false,   object htmlAttributes = null)  
   {  
        var valueGetter = expression.Compile();  
        var model = valueGetter(helper.ViewData.Model) as InGaugeService.Address;  
        var sb = new List<string>();  
        if (model != null)  
       {  
             if (!string.IsNullOrEmpty(model.AddressLine1)) sb.Add(model.AddressLine1);  
             if (!string.IsNullOrEmpty(model.AddressLine2)) sb.Add(model.AddressLine2);  
             if (!string.IsNullOrEmpty(model.AddressLine3)) sb.Add(model.AddressLine3);  
             if (!string.IsNullOrEmpty(model.City) || !string.IsNullOrEmpty(model.StateRegion) ||   !string.IsNullOrEmpty(model.PostalCode)) sb.Add(string.Format("{0}, {1} {2}", model.City,  model.StateRegion, model.PostalCode));  
             if (model.IsoCountry != null) sb.Add(model.IsoCountry.CountryName);  
             if (model.Latitude != null || model.Longitude != null) sb.Add(string.Format("{0}, {1}",   model.Latitude, model.Longitude));  
         }     
         var delimeter = (isEditable) ? Environment.NewLine : "<br />";  
         var addr = (isEditable) ? new TagBuilder("textarea") : new TagBuilder("address");            addr.MergeAttributes(new System.Web.Routing.RouteValueDictionary(htmlAttributes));        addr.InnerHtml = string.Join(delimeter, sb.ToArray());  
        return MvcHtmlString.Create(addr.ToString());  
     }  
     public static string Label(string target, string text)  
     {  
        return String.Format("<label for='{0}'>{1}</label>", target, text);  
     }     
     //Submit Button Helper  
     public static MvcHtmlString SubmitButton(this HtmlHelper helper, string buttonText)       
{  
         string str = "<input type=\"submit\" value=\"" + buttonText + "\" />";  
         return new MvcHtmlString(str);  
     } 
 } 


European ASP.NET MVC 4 Hosting - France :: Configuring Custom Membership and Role Provider using ASP.NET MVC4

clock December 4, 2014 07:25 by author Scott

ASP.NET membership is designed to enable you to easily use a number of different membership providers for your ASP.NET applications. You can use the supplied membership providers that are included with the .NET Framework, or you can implement your own providers.

There are two primary reasons for creating a custom membership provider.

You need to store membership information in a data source that is not supported by the membership providers included with the .NET Framework, such as a MysQL database, an Oracle database, or other data sources.

You need to manage membership information using a database schema that is different from the database schema used by the providers that ship with the .NET Framework. A common example of this would be membership data that already exists in a SQL Server database for a company or Web site.

In tis tutorial, we are going to implement and configure a custom Membership Provider using ASP.NET MVC4

Create Custom MemberShip Application class Library

1. Create a class Library Project (our sample Projet name isLogCorner.SoftwareStore.Security)

Reference the assembly  System.Web.ApplicationServices (Right Click Reference => Add reference => Select Assemblies => navigate toSystem.Web.ApplicationServices and add it)

2. Create a Class CustomMembershipProvider and derive it fromMembershipProvider

3. Override ValidateUser as follow

Create ASP.NET MVC 4 Application Client

1. Create an ASP.NET MVC4 application Client ( Add New projet => ASP.NETMVC4 Web Application => Select Template Internet Web Appliction and Click OK)

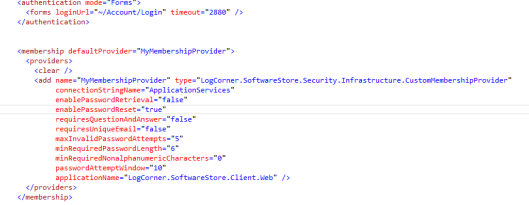
2. Open Web.config file

3. Add or Replace membership section as follow

4. Open HomeController and Authorize Attribute to Index ActionResult

5. Run the application ASP.NET MVC4 application Client,  you ll have the errors below

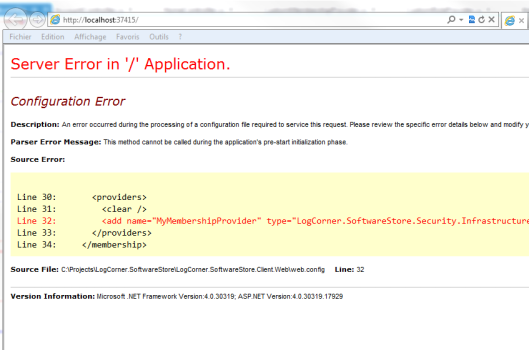
6. If you see the above error, then execute this command:

<add key= »enableSimpleMembership » value= »false »/>
<add key= »autoFormsAuthentication » value= »false »/>

7. Run the application ASP.NET MVC4 application Client,  you ll have another error

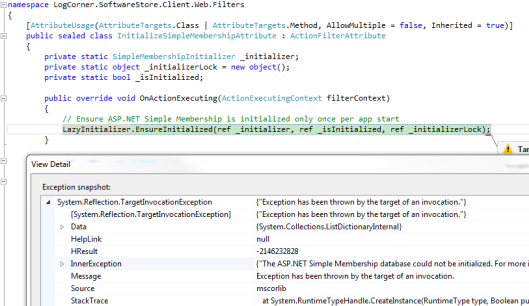
8. To fix it Open AccountController and comment InitializeSimpleMembership , because we using Custom Membership Provider instead of Simple Membership

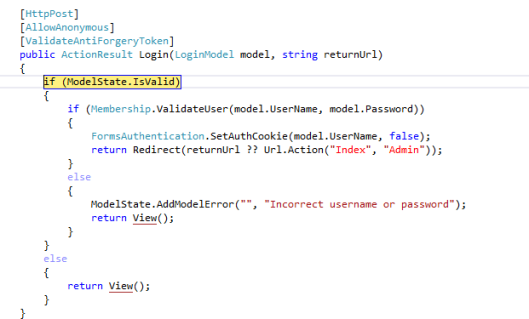
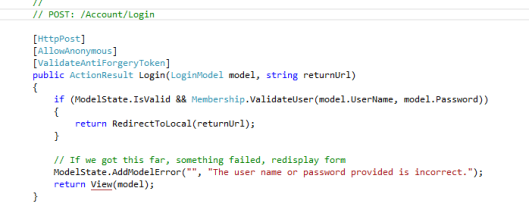
9. Override Login Action of AccountController as follow :

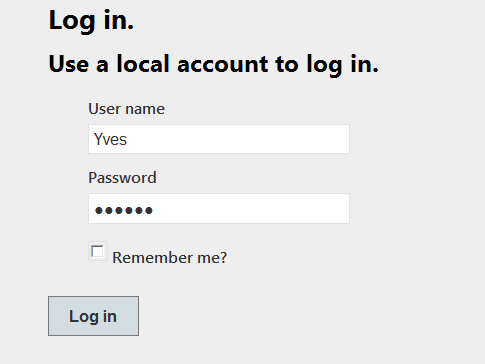
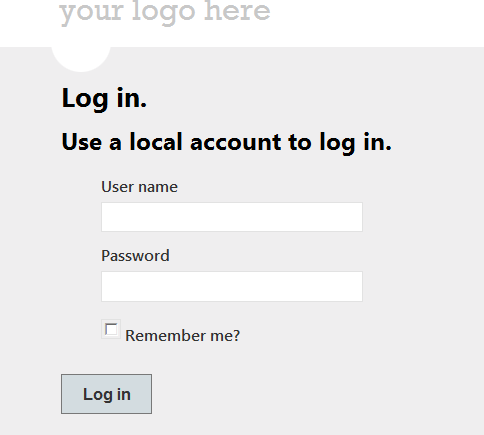
10. Run the application ASP.NET MVC4 application Client,  you’ll have  the form authentication below:


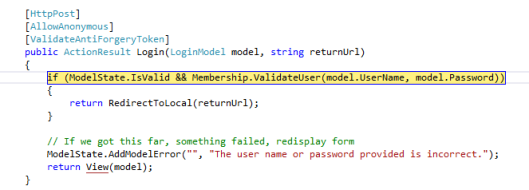
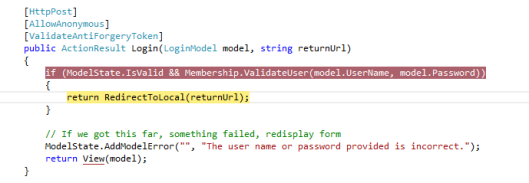
11. Enter user credentials and click Log In, then you will have the execution workflow below:

Last Step – Configuring Custom Role Provider

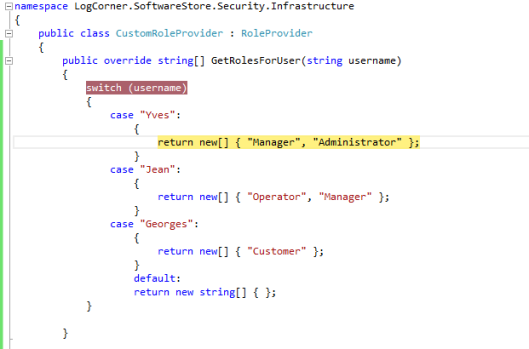
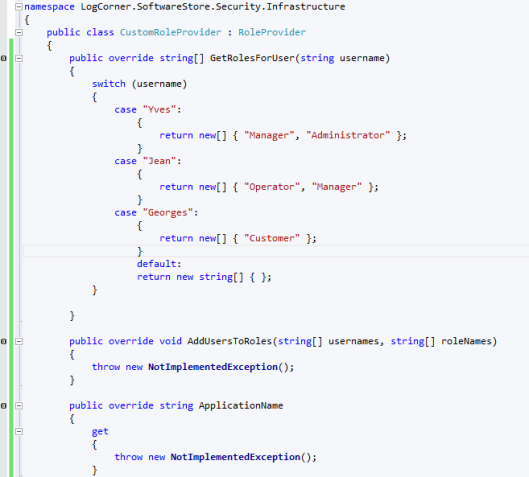
1. create a class CustomRoleProvider  that inherits from  RoleProvider

2. Overrides GetRolesForUser method


3. Now open web.config file of your client asp.net web application and add a RoleManager section


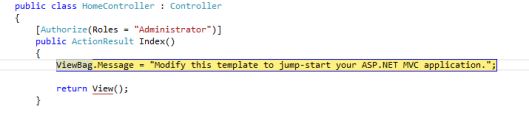
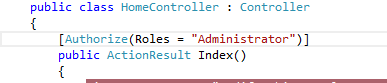
4. Open HomeController and change Authorization as follow : 


5. Now test your sample. Only users who have approved login credentials and who belong to role Administrator can view Index page 


ASP.NET MVC 5 Hosting Germany - HostForLIFE.eu :: How to use jQuery UI in ASP.NET MVC 5 ?

clock December 2, 2014 10:25 by author Peter

Several developers struggle to work along with jQuery UI inside an ASP.NET MVC 5 application. During this publish, I will be able to show you 3 actions needed to begin dealing with jQuery UI inside an ASP.NET MVC application. In the end from the publish we'll check out working with the autocomplete widget. On the listed 3 steps that could allow you perform along with jQuery UI inside an ASP.NET MVC Apps:

1. Add the jQuery UI Reference
Add the jQuery UI reference straight into the project by using the NuGet manager. Once this is done, you ought to discover the reference additional inside the Content folder and also the Scripts folder.

2. Bundle the needed files
Open up the BundleConfig.cs file. In this file add 2 entries, one to the jQuery UI scripts along with other for jQuery UI CSS. Add the script entry as follows :
bundles.Add(new ScriptBundle("~/bundles/jqueryui").Include(
            "~/Scripts/jquery-ui-{version}.js"));

Next add the CSS files for jQueryUI widgets. CSS for all those the widgets could be bundled such as this:
bundles.Add(new StyleBundle("~/Content/themes/base/css").Include(
              "~/Content/themes/base/jquery.ui.core.css",
              "~/Content/themes/base/jquery.ui.resizable.css",
              "~/Content/themes/base/jquery.ui.selectable.css",
              "~/Content/themes/base/jquery.ui.accordion.css",
              "~/Content/themes/base/jquery.ui.autocomplete.css",
              "~/Content/themes/base/jquery.ui.button.css",
              "~/Content/themes/base/jquery.ui.dialog.css",
              "~/Content/themes/base/jquery.ui.slider.css",
              "~/Content/themes/base/jquery.ui.tabs.css",
              "~/Content/themes/base/jquery.ui.datepicker.css",
              "~/Content/themes/base/jquery.ui.progressbar.css",
              "~/Content/themes/base/jquery.ui.theme.css"));


For the purpose of the example, let’s say you're solely dealing with the autocomplete widget. During this case, you'd just bundle the core. css and autocomplete. css as shown beneath:
bundles.Add(new StyleBundle("~/Content/themes/base/css").Include(
              "~/Content/themes/base/jquery.ui.core.css",            
              "~/Content/themes/base/jquery.ui.autocomplete.css",             
              "~/Content/themes/base/jquery.ui.theme.css"));

3. Refer towards the Bundles
Once the bundles for jQuery UI happen to be produced, you have to add them to be able to the layout file. That may be done as follows:
    @Styles.Render("~/Content/css")
    @Styles.Render("~/Content/themes/base/css")
    @Scripts.Render("~/bundles/modernizr")
    @Scripts.Render("~/bundles/jquery")
    @Scripts.Render("~/bundles/bootstrap")
    @Scripts.Render("~/bundles/jqueryui")


Obviously you will see the jQuery bundle at the end from the layout file. To work along with jQuery UI widgets, you ought to transfer the jQuery bundle to the top of the file and likewise include the bundles for jQuery UI CSS and Scripts.

You've currently completed the 3 steps needed to work along with jQueryUI inside an ASP. NET MVC application.

Use jQueryUI Widgets
Now let’s look into the autocomplete widget in action. I've developed a controller for returning JSON data as follows:
public ActionResult Index()
        {
                     return View();
        }
        public ActionResult GetMP(string term)
        {
            var result = from r in _db.GetMPDetails()
                         where r.Name.ToLower().Contains(term)
                         select r.Name;           
            return Json(result, JsonRequestBehavior.AllowGet);
        }


We'll currently bind the returned JSON coming from the GetMP () motion towards the autocomplete widget. Upon the razor view, you are able to create an autocomplete widget such as this:
<input type="text" id="mpvalue" name="mpvalue" /> 
<script type="text/javascript">
    $(document).ready(function () { 
        $('#mpvalue').autocomplete({
            source: '@Url.Action("GetMP")'
        }); 
    })
</script>


Be certain the view is using the layout file in which you added the reference from the bundles.


About HostForLIFE.eu

HostForLIFE.eu is European Windows Hosting Provider which focuses on Windows Platform only. We deliver on-demand hosting solutions including Shared hosting, Reseller Hosting, Cloud Hosting, Dedicated Servers, and IT as a Service for companies of all sizes.

We have offered the latest Windows 2016 Hosting, ASP.NET Core 2.2.1 Hosting, ASP.NET MVC 6 Hosting and SQL 2017 Hosting.


Tag cloud

Sign in