European ASP.NET MVC 4 and MVC 5 Hosting

BLOG about ASP.NET MVC 3, ASP.NET MVC 4, and ASP.NET MVC 5 Hosting and Its Technology - Dedicated to European Windows Hosting Customer

ASP.NET MVC Hosting - HostForLIFE.eu :: Using Ajax in MVC Application

clock June 21, 2016 00:16 by author Anthony

In asp.net web form application, if we need ajax service, we will need to create wcf services on server side to serve ajax calls, while in MVC web application, no wcf is needed, a controller will do.

Here are two examples (GET and POST) of how to use ajax in mvc application

Http Get example: ajax consumer in view

<script type="text/javascript">
  var user = {
                'id': 1
            };
    $.get(
                'home/getUser',
                user,
                function (data) {
                    alert(data.name);
                }
    );
</script>


Http Get example: ajax server in home controller

public class HomeController : Controller
{
    // data GET service
     public JsonResult getUser(int id)
     {
            User user = db.Users.where(u=>u.id==id)
            return Json(user,JsonRequestBehavior.AllowGet);     }
}

A few points:


Controller must return JsonResult rather than ActionResult as a normal controller does as we would want the data to be returnd as json data, and it does not have a ‘d’ wrapper

JsonRequestBehavior.AllowGet must be set in Json()call, otherwise you will get:

500 internal server error with message like

This request has been blocked because sensitive information could be disclosed to third party web sites when this is used in a GET request. To allow GET requests, set JsonRequestBehavior to AllowGet

You only need to set this parameter for GET and returning JSON array to avoid JSON hijacking, no need for POST requests.
Http POST example: ajax consumer in view


<script type="text/javascript">
var user={
            'name':’TheUser’,
            'age':30
        };
 $.post(
            'home/SaveUser',
            user,
            function (data) {
                if (data === true) {
                   alert('User is saved');
                }
                else {

                    alert('Failed to save the user');
                }
            },
            'json'
        );
</script>


Http POST example: ajax server in home controller

public class HomeController : Controller
{
    // data POST service
  [AcceptVerbs(HttpVerbs.Post)]
   public JsonResult SaveUser (string name, int age)
   {
        return Json(true);    }
}

A few points:

Have to decorate the controller with ‘POST’

Datatype in $.post in example is set to json, but it is not necessary to be so, if you just pass data in fields rather than in complex object. When it is not set to json it will use application/x-www-form-urlencoded as a way to pass data in standard post.


Summary:
In asp.net MVC you can use controller as ajax server without having to use wcf, compared with wcf, no configuration is needed


HostForLIFE.eu ASP.NET MVC Hosting
HostForLIFE.eu is European Windows Hosting Provider which focuses on Windows Platform only. We deliver on-demand hosting solutions including Shared hosting, Reseller Hosting, Cloud Hosting, Dedicated Servers, and IT as a Service for companies of all sizes. We have customers from around the globe, spread across every continent. We serve the hosting needs of the business and professional, government and nonprofit, entertainment and personal use market segments.


ASP.NET MVC Hosting - HostForLIFE.eu :: Configuring ELMAH In ASP.NET MVC

clock June 13, 2016 21:35 by author Anthony

In this article, I will integrate and setup ELMAH to asp.net MVC project. I will finish whole article in 5 different steps. ELMAH stands for Error Logging Modules and Handlers providing application wide error logging facilities. ELMAH is pluggable and easy to implement without changing single line of code. ELMAH work as interceptor of unhandled dotnet exceptions, that display over yellow screen of death. As per Author you can dynamically add ELMAH on running asp.net application without recompile or re-deploy whole application.You can download ELMAH binaries from google code or if you are using nuget then visit ELMAH nuget page.

Install

The best way to install any module to Asp.net MVC project is to use Nuget package Console. You can visit ELMAH nuget page for get latest version command.

Configure

After installing ELMAH , it will automatically update Web.Config file. If it's not so you can add following code to Web.Config file.

<configuration>
<configSections>
    <sectionGroup name="elmah">
      <section name="security" requirePermission="false" type="Elmah.SecuritySectionHandler, Elmah" />
      <section name="errorLog" requirePermission="false" type="Elmah.ErrorLogSectionHandler, Elmah" />
      <section name="errorMail" requirePermission="false" type="Elmah.ErrorMailSectionHandler, Elmah" />
      <section name="errorFilter" requirePermission="false" type="Elmah.ErrorFilterSectionHandler, Elmah" />
    </sectionGroup>
</configSections>

<system.web>   
    <httpModules>
      <add name="ErrorLog" type="Elmah.ErrorLogModule, Elmah" />
      <add name="ErrorMail" type="Elmah.ErrorMailModule, Elmah" />
      <add name="ErrorFilter" type="Elmah.ErrorFilterModule, Elmah" />
    </httpModules>
</system.web>

<system.webServer>
<modules>
      <add name="ErrorLog" type="Elmah.ErrorLogModule, Elmah" preCondition="managedHandler" />
      <add name="ErrorMail" type="Elmah.ErrorMailModule, Elmah" preCondition="managedHandler" />
      <add name="ErrorFilter" type="Elmah.ErrorFilterModule, Elmah" preCondition="managedHandler" />
</modules>
</system.webServer>
<elmah>
    <security allowRemoteAccess="false" />
    <errorLog type="Elmah.SqlErrorLog, Elmah" connectionStringName="YourConnectionStringName" />
</elmah>
    <location path="elmah.axd" inheritInChildApplications="false">
    <system.web>
      <httpHandlers>
        <add verb="POST,GET,HEAD" path="elmah.axd" type="Elmah.ErrorLogPageFactory, Elmah" />
      </httpHandlers>
      <!--
      <authorization>
        <allow roles="admin" />
        <deny users="*" /> 
      </authorization>
      --> 
    </system.web>
    <system.webServer>
      <handlers>
        <add name="ELMAH" verb="POST,GET,HEAD" path="elmah.axd" type="Elmah.ErrorLogPageFactory, Elmah" preCondition="integratedMode" />
      </handlers>
    </system.webServer>
  </location>
</configuration>
Usage Now, It's time to use and test elmah for application. Generate exception in Home Controller
public ActionResult Index()
{
   throw new Exception("This is test Exception");
          
   return View();
}


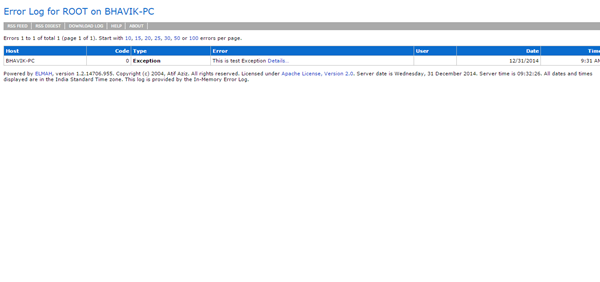
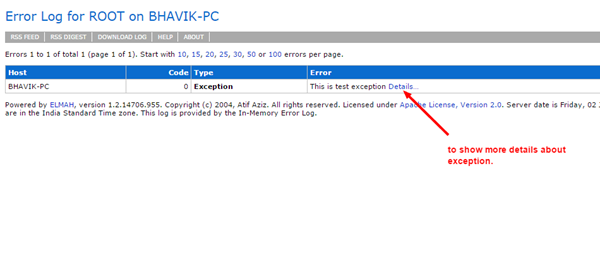
after generating exception check your elmah like http://www.example.com/elmah.axd
Here is our output
integrate-elmah-in-aspnet-mvc

integrate elmah in asp. net mvc

Security

In addition ELMAH provides seamless security feature to prevent unauthorized access. Please read our next article to make your elmah secure.

Filtering

ELMAH identify and store exceptions in different category, you can make or edit ELMAH error screen with different filters which we will discuss in our next ELMAH series.

Notification

You can setup ELMAH email notification when any exception occurs. To unable notification option you must include below code

Add ErrorMail module
<httpModules>
    <add name="ErrorMail" type="Elmah.ErrorMailModule, Elmah"/>
</httpModules>


Add SMTP Setting
<system.net>
    <mailSettings>
        <smtp deliveryMethod="network">
            <network host="..." port="25" userName="..." password="..." />
        </smtp>
    </mailSettings>
</system.net>
 

or
<elmah>
<errorMail from="..." to="..."  async="true" smtpServer="..." smtpPort="25" userName="..." password="..." />
</elmah>


HostForLIFE.eu ASP.NET MVC Hosting
HostForLIFE.eu is European Windows Hosting Provider which focuses on Windows Platform only. We deliver on-demand hosting solutions including Shared hosting, Reseller Hosting, Cloud Hosting, Dedicated Servers, and IT as a Service for companies of all sizes. We have customers from around the globe, spread across every continent. We serve the hosting needs of the business and professional, government and nonprofit, entertainment and personal use market segments.



ASP.NET MVC Hosting - HostForLIFE.eu :: How To Make Simple Application In ASP.NET MVC Using Select2?

clock June 6, 2016 23:46 by author Anthony

In this tutorial, I will show you how to make simple application in ASP.NET MVC using Select2. The infinite scrolling feature has also been implemented with server side options population. Select2 is very useful for dropdown lists with large datasets.

Why Select2 :

  • Using this jQuery plugin for dropdown lists, you can implement features such as option grouping, searching, infinite scrolling, tagging, remote data sets and other highly used features.
  • To use select2 in web projects, you just have to include JavaScript and CSS files of Select2 in your website.
  • Current version of select2 is 4.0.0. You can easily include these files by installation of NuGet package ‘Select2.js’ from NuGet package manager.

Steps of Implementation:
1. Create a blank ASP.NET MVC project, and install NuGet packages Select2.js, jQuery and jQuery Unobtrusive.
2. Add one controller with the name ‘HomeController’ and add view for default method ‘Index’.
3. Create new class in Models folder ‘IndexViewModel.cs as shown below:

public class IndexViewModel
{
   [Required(ErrorMessage="Please select any option")]
   public string OptionId { get; set; }
}

4. Bind ‘Index.cshtml’ view with IndexViewModelClass as model, by adding the following line in Index view:

@model Select2InMvcProject.Models.IndexViewModel

5. In ‘Index.cshtml’, include the css and js files below:

<link href="~/Content/css/select2.css" rel="stylesheet" />
<script src="~/Scripts/jquery-2.1.4.js"></script>
<script src="~/Scripts/select2.js"></script>
<script src="~/Scripts/jquery.validate.js"></script>
<script src="~/Scripts/jquery.validate.unobtrusive.js"></script>


6. Write the following code in the Index view for creation of select list:

@using (Html.BeginForm())
{
   <br /><br />
   @Html.DropDownListFor(n => n.OptionId, Enumerable.Empty<SelectListItem>(), new { @id = "txtOptionId", @style = "width:300px;" })
//Created selectlist with empty enumerable of SelectListItem and given //id as “txtOptionId”
   @Html.ValidationMessageFor(n => n.OptionId)
//Adds span of validation error message
   <br /><br />
<button type="submit">Submit</button>
   <br /><br />
}


7. For applying Select2 to the dropdown list created above, fetching data from server side and for infinite scroll, use the jQuery code below in Index view:

<script type="text/javascript">
   $(document).ready(function () {
       var pageSize = 20;
       var optionListUrl = '@Url.Action("GetOptionList", "Home")';
//Method which is to be called for populating options in dropdown //dynamically
       $('#txtOptionId').select2(
       {
           ajax: {
               delay: 150,
               url: optionListUrl,
               dataType: 'json',
               data: function (params) {
                   params.page = params.page || 1;
                   return {
                       searchTerm: params.term,
                       pageSize: pageSize,
                       pageNumber: params.page
                   };
               },
               processResults: function (data, params) {
                   params.page = params.page || 1;
                  return {
                       results: data.Results,
                       pagination: {
                           more: (params.page * pageSize) < data.Total
                       }
                   };
               }
           },
           placeholder: "-- Select --",
           minimumInputLength: 0,
           allowClear: true,
   });
});
</script>


8. Create new class in Models folder with name ‘Select2OptionModel’ and add the two classes below:

public class Select2OptionModel
{
       public string id { get; set; }
       public string text { get; set; }
}
public class Select2PagedResult
{
       public int Total { get; set; }
       public List<Select2OptionModel> Results { get; set; }
}


9. Create one new folder with name ‘Repository’ in the solution, and add new class in that folder with name ‘Select2Repository. The functions in this class are mentioned below:

public class Select2Repository
   {
       IQueryable<Select2OptionModel> AllOptionsList;
public Select2Repository()
{
           AllOptionsList = GetSelect2Options();
}
IQueryable<Select2OptionModel> GetSelect2Options()
                  {
                                     string cacheKey = "Select2Options";
                                     //check cache
                                     if (HttpContext.Current.Cache[cacheKey] != null)
                                     {
return (IQueryable<Select2OptionModel>)HttpContext.Current.Cache[cacheKey];
                                     }
                                     var optionList = new List<Select2OptionModel>();
                                     var optionText = "Option Number ";
                                     for (int i = 1; i < 1000; i++)
                                     {
                                     optionList.Add(new Select2OptionModel
                                     {
                                               id = i.ToString(),
                                               text = optionText + i
                                     });
                                   }
                                   var result = optionList.AsQueryable();
                                     //cache results
                                     HttpContext.Current.Cache[cacheKey] = result;
                                     return result;}
 
List<Select2OptionModel> GetPagedListOptions(string searchTerm, int pageSize, int pageNumber, out int totalSearchRecords)
                  {
                                     var allSearchedResults = GetAllSearchResults(searchTerm);
                                     totalSearchRecords = allSearchedResults.Count;
return allSearchedResults.Skip((pageNumber - 1) * pageSize).Take(pageSize).ToList();
                  }
                  List<Select2OptionModel> GetAllSearchResults(string searchTerm)
                  {

                                     var resultList = new List<Select2OptionModel>();
                                      if (!string.IsNullOrEmpty(searchTerm))
resultList = AllOptionsList.Where(n => n.text.ToLower().Contains(searchTerm.ToLower())).ToList();
                                     else
                                     resultList = AllOptionsList.ToList();
                                     return resultList;
                  }
                  public Select2PagedResult GetSelect2PagedResult(string searchTerm, int pageSize, int pageNumber)
                  {
                                     var select2pagedResult = new Select2PagedResult();
                                     var totalResults = 0;
                                     select2pagedResult.Results = GetPagedListOptions(searchTerm,
pageSize, pageNumber, out totalResults);
                                     select2pagedResult.Total = totalResults;
                                     return select2pagedResult;
}
}

10.  In HomeController class, create new method as shown below:

public JsonResult GetOptionList(string searchTerm, int pageSize, int pageNumber)
{
     var select2Repository = new Select2Repository();
     var result = select2Repository.GetSelect2PagedResult(searchTerm, pageSize, pageNumber);
     return Json(result, JsonRequestBehavior.AllowGet);
}

11. Once you are done with coding, you can build and run the project. The output will be shown as below:

dropdown1.png

dropdown2.png


HostForLIFE.eu ASP.NET MVC Hosting
HostForLIFE.eu is European Windows Hosting Provider which focuses on Windows Platform only. We deliver on-demand hosting solutions including Shared hosting, Reseller Hosting, Cloud Hosting, Dedicated Servers, and IT as a Service for companies of all sizes. We have customers from around the globe, spread across every continent. We serve the hosting needs of the business and professional, government and nonprofit, entertainment and personal use market segments.


European ASP.NET MVC Hosting - UK :: Tips Using BindAttribute in ASP.NET MVC

clock March 3, 2015 06:21 by author Scott

The Bind attribute is used to protect against over-posting. Represents an attribute that is used to provide details about how model binding to a parameter should occur.

Let’s take an example of Employee Controller which creates the records for employee basic information.

This code adds the Employee entity created by the ASP.NET MVC model binder to the Employees entity set and then saves the changes to the database.

The ValidateAntiForgeryToken attribute helps prevent cross-site request forgery attacks.

EmployeeController.cs –> Create

[HttpPost]
[ValidateAntiForgeryToken]
public ActionResult Create(
   [Bind(Include = "FirstName, LastName, JoiningDate")]
   Employee employee)
{
   try
   {
      if (ModelState.IsValid)
      {
         db.Employees.Add(employee);
         db.SaveChanges();
         return RedirectToAction("Index");
      }
   }
   catch (DataException ex)
   {
      //Log the error
      ModelState.AddModelError("", "Unable to save. Try again.");
   }
   return View(employee);
}

Employee.cs

public class Employee
   {
      public int ID { get; set; }
      public string LastName { get; set; }
      public string FirstName { get; set; }
      public DateTime JoiningDate { get; set; }
      public string City { get; set; }

    }

For example, suppose the Employee entity includes a City property that you don’t want this web page to update. Even if you don’t have a City field on the web page, a hacker could use a tool such as fiddler, or write some JavaScript, to post a City form value. Without the Bind attribute limiting the fields that the model binder uses when it creates an Employee instance, the model binder would pick up that City form value and use it to update the Employee entity instance. Then whatever value the hacker specified for the City form field would be updated in your database.

It’s a security best practice to use the Include parameter with the Bind attribute to whitelist fields. It’s also possible to use the Exclude parameter to blacklist fields you want to exclude. The reason Include is more secure is that when you add a new property to the entity, the new field is not automatically protected by an Exclude list.

Another alternative approach, and one preferred by many, is to use only view models with model binding. The view model contains only the properties you want to bind. Once the MVC model binder has finished, you copy the view model properties to the entity instance.


European ASP.NET MVC 5 Hosting - UK :: How to Use jQuery DatePicker for MVC

clock December 11, 2014 08:38 by author Scott

For those of you using ASP.NET MVC and hoping to receive a little guidance on how to implement a jQuery UI DatePicker widget on a date input field, as well as the appropriate way to pass dates from the view back to the controller,  the following article is just for you.

The first gotcha was to download the entire jQuery UI (Combined Library) package from Nuget.  Downloading the older jQuery UI DatePicker package has some incompatibilities with the jQuery core framework that the bootstrap template needs to function correctly.

The next step is to extend the model you are using to support a datetime field you’d like to manage with the jQuery UI DatePicker. Take a look at the DateOfBirth field in the code below.

public class RegisterViewModel
{
    [Required]
    [Display(Name = "User name")]
    public string UserName { get; set; } 

    [Required]
    [Display(Name = "Email Address")]
    public string EmailAddress { get; set; } 

    [Required]
    [Display(Name = "Date of Birth")]
    public DateTime DateOfBirth { get; set; }

Extending the view to support this datetime field is pretty straight forward razor coding. The one thing to notice in this piece of code is the “datefield” css class used in the TextBoxFor method. We’ll be using the class later on to allow for easier jQuery UI DatePicker widget initialization. It also allows for more reusability across your applications.

<div class="form-group">
    @Html.LabelFor(m => m.DateOfBirth, new { @class = "col-md-2 control-label" })
    <div class="col-md-10">
        @Html.TextBoxFor(m => m.DateOfBirth, new { @class = "form-control datefield" })
    </div>
</div>

The code to initialize any jQuery UI DatePicker widgets is only 3 lines of code. We utilize the “datefield” css class here as a generic selector so all input fields with this class will transform into jQuery UI DatePicker widgets.

$(function () {
    $(".datefield").datepicker();
});

The final touch is to include all required .js and .css files necessary to a common layout which provides this codes use throughout your web application.  If you are concerned about page load times you can cherry pick where you’d like these includes to go.

    <div class="container body-content">
        @RenderBody()
        <hr />
        <footer>
            <p>&copy; @DateTime.Now.Year - My ASP.NET Application</p>

        </footer>
    </div> 

    @Scripts.Render("~/bundles/jquery")
    @Scripts.Render("~/bundles/bootstrap") 

    <link href="~/Content/themes/base/jquery.ui.core.css" rel="stylesheet" />
    <link href="~/Content/themes/base/jquery.ui.datepicker.css" rel="stylesheet" />
    <link href="~/Content/themes/base/jquery.ui.theme.css" rel="stylesheet" />
    <script src="~/Scripts/jquery-ui-1.10.4.js"></script>
    <script src="~/Scripts/Common/DatePickerReady.js"></script> 

    @RenderSection("scripts", required: false)
</body>
</html>

The nice thing about this approach is that ASP.NET MVC5 takes care of all the model binding for you since the jQuery UI DateTime picker sets the input field as a valid date value that native model binding understands. By the time you get to your controller you’ll have your datetime value set.

// POST: /Account/Register
[HttpPost]
[AllowAnonymous]
[ValidateAntiForgeryToken]
public async Task<ActionResult> Register(RegisterViewModel model)
{
    if (ModelState.IsValid)
    {
        var user = new ApplicationUser() { UserName = model.UserName };
        var result = await UserManager.CreateAsync(user, model.Password);
        if (result.Succeeded)
        {
            await SignInAsync(user, isPersistent: false);
            var message = new EmailMessage();
            message.ToEmail = model.EmailAddress;
            message.Subject = "Insurance Website Registration";
            message.IsHtml = false;
            message.Body =
                String.Format("You have succesfully registered for Vanderbuilt Insurance with the following" +
                              "username: {0}", model.UserName); 

            var status = EmailService.SendEmailMessage(message); 

            return RedirectToAction("Index", "Home");
        }
        else
        {
            AddErrors(result);
        }
    } 

    // If we got this far, something failed, redisplay form
    return View(model);
}


About HostForLIFE.eu

HostForLIFE.eu is European Windows Hosting Provider which focuses on Windows Platform only. We deliver on-demand hosting solutions including Shared hosting, Reseller Hosting, Cloud Hosting, Dedicated Servers, and IT as a Service for companies of all sizes.

We have offered the latest Windows 2016 Hosting, ASP.NET Core 2.2.1 Hosting, ASP.NET MVC 6 Hosting and SQL 2017 Hosting.


Tag cloud

Sign in