European ASP.NET MVC 4 and MVC 5 Hosting

BLOG about ASP.NET MVC 3, ASP.NET MVC 4, and ASP.NET MVC 5 Hosting and Its Technology - Dedicated to European Windows Hosting Customer

European ASP.NET MVC 4 Hosting :: Tips on How To Improve MVC Application Performance

clock December 10, 2013 07:32 by author Patrick

In this post we will cover a few tips and tricks to improve ASP.NET MVC Application Performance. While working on this site, I have tried to improve page loading speeds as much as possible. There are a lot of tricks that you can do to improve the speed of your site. I have constantly been learning new things by delving into the world of site performance.

These are a few of the steps that I took to speed up my site:

Run in Release mode

Make sure your production application always runs in release mode in the web.config

  <compilation debug="false"></compilation>

or change this in the machine.config on the production servers

<configuration>
    <system.web>
          <deployment retail="true"></deployment>
    </system.web>
</configuration>

Only use the View Engines that you require

protected void Application_Start()
{
    ViewEngines.Engines.Clear();
    ViewEngines.Engines.Add(new RazorViewEngine());
}

Use the CachedDataAnnotationsModelMetadataProvider

ModelMetadataProviders.Current = new CachedDataAnnotationsModelMetadataProvider();

Avoid passing null models to views

Because a NullReferenceException will be thrown when the expression gets evaluated, which .NET then has to handle gracefully.

// BAD
public ActionResult Profile()
{
    return View();
}

// GOOD
public ActionResult Profile()
{
    return View(new Profile());
}

Use OutputCacheAttribute when appropriate

For content that does not change often, use the OutputCacheAttribute to save unnecessary and action executions.

[OutputCache(VaryByParam = "none", Duration = 3600)]
public ActionResult Categories()
{
    return View(new Categories());
}

Use HTTP Compression

<system.webserver>
<urlcompression dodynamiccompression="true" dostaticcompression="true" dynamiccompressionbeforecache="true"></urlcompression>
</system.webserver>

Remove unused HTTP Modules

If you run into any problems after removing them, try adding them back in.

<httpmodules>
      <remove name="WindowsAuthentication"></remove>
      <remove name="PassportAuthentication"></remove>
      <remove name="Profile"></remove>
      <remove name="AnonymousIdentification"></remove>
</httpmodules>

Flush your HTML as soon as it is generated

<pages buffer="true" enableviewstate="false"></pages>

Turn off Tracing

<configuration>
     <system.web>
          <trace enabled="false"></trace>
     </system.web>
</configuration>

Remove HTTP Headers

This is more of a security thing

<system.web>
    <httpruntime enableversionheader="false"></httpruntime>
</system.web>

<httpprotocol>
 <customheaders>
  <remove name="X-Powered-By"></remove>
 </customheaders>
</httpprotocol>

Uninstall the URL Rewrite module if not required

This saves CPU cycles used to check the server variable for each request.

Go to "Add or Remove Programs" and find "Microsoft URL Rewrite Module" and select uninstall.


European ASP.NET MVC 4 Hosting :: Single Page Application in ASP.NET MVC 4

clock December 5, 2013 11:20 by author Scott

Single Page Applications (SPA)?

Normally a web application is a collection of web pages, each doing a specific task. For example, consider a web application that does CRUD operations (Create, Read, Update and Delete) on data. A common practice is to create different web pages for operations such as showing a list of existing records, adding a new record, updating an existing record and deleting a record. A trend becoming increasingly popular is to have a single web page perform all of these operations. Such an application is called Single Page Application or SPA. So, in this example instead of developing four separate web pages you develop just one web page. At runtime, depending on the operation selected by a user, the web page renders an appropriate user interface. Such an application heavily relies on client side JavaScript libraries.

It should be noted that SPA is a general concept and ASP.NET MVC 4 has decided to offer some basic infrastructure to the developers to put this concept into practice. ASP.NET MVC 4 provides a project template that creates a basic yet functional SPA application. You can then customize the application to add more functionality. In the discussion that follows you will learn SPA with respect to ASP.NET MVC 4.

Parts of SPA

A Single Page Application consists of several pieces that fit together to provide the overall functionality of the application. A typical SPA consists of the following pieces:

  • Data Model : This is a server side piece that represents your data (often mapping database tables as .NET objects).
  • Data Service : Data service provides operations for database access (typically CRUD operations). This is also a service side piece and uses Entity Framework Code First approach.
  • ViewModel : View Model refers to your data and UI level operations that you wish to perform on the data. You can think of View Model as a wrapper over your model data that adds UI level operations to it.
  • Views : Views display your data to the user and also contain associated JavaScript. The default SPA project template uses Razor views.
  • Database: SPA uses Entity Framework Code First approach for database operations. The default project template creates a database in the local installation of SQL Server Express.

The following sections discuss all these parts from the default SPA project template in detail.

Creating a New Project Based on SPA Template

Installing ASP.NET MVC 4 adds a new project template in Visual Studio 2010. To create a new SPA you should create an ASP.NET MVC4 Web Application project based on this template.

The default project created using the SPA project template contains data models, views and client script files for performing CRUD operations of a sample "To Do" application. SPA extensively uses two JavaScript libraries, namely Knockout and Upshot. The following figure shows these libraries added in the Solution Explorer.

Data Model

The sample application created by the default SPA project template deals with "To Do" items, i.e. tasks. A task is represented by a data model class - TodoItem. The TodoItem class resides in the Models folder and looks like this:

public class TodoItem
{
    public int TodoItemId { get; set; }
    [Required]
    public string Title { get; set; }
    public bool IsDone { get; set; }
}

As you can see the TodoItem is a simple class with three properties, viz. TodoItemId, Title and IsDone. The Title property is a required property as indicated by Data Annotation Attribute [Required].

To deal with the application data you need to create a DbContext and a DbDataController. This is done for you when you add a new controller to the project specifying the SPA controller template. Right click on the Controllers folder and select Add > Controller. In the Add Controller dialog specify details as shown below:

Specify the controller name as TodoController. Select scaffolding template of "Single Page Application with read/write actions and views, using Entity Framework". In the Model class drop-down select TodoItem class. In the Data context class drop-down click "New data context" and specify a name for the DbContext class. Once you click on the Add button the following files will be created for you:

  1. TodoController.cs (Controllers folder)
  2. SPADefaultDemoController.cs (Controllers folder)
  3. SPADefaultDemoController.TodoItem.cs (Controllers folder)
  4. SPADefaultDemoContext.cs (Models folder)
  5. Index.cshtml and associated partial views (Views folder)

Out of these classes the DbContext class (SPADefaultDemoContext) looks like this:

public class SPADefaultDemoContext : DbContext
{
    public DbSet<TodoItem> TodoItems { get; set; }
}

As you can see the SPADefaultDemoContext class inherits from DbContext base class and contains a DbSet of TodoItem.

Data Service

The job of performing CRUD operations is handled by the SPADefaultDemoController (the data service) class. This class is shown below:

public partial class SPADefaultDemoController :
               DbDataController<SPADefaultDemo.Models.SPADefaultDemoContext>
{
    public IQueryable<SPADefaultDemo.Models.TodoItem> GetTodoItems() {
        return DbContext.TodoItems.OrderBy(t => t.TodoItemId);
    } 

    public void InsertTodoItem(SPADefaultDemo.Models.TodoItem entity) {
        InsertEntity(entity);
    } 

    public void UpdateTodoItem(SPADefaultDemo.Models.TodoItem entity) {
        UpdateEntity(entity);
    } 

    public void DeleteTodoItem(SPADefaultDemo.Models.TodoItem entity) {
        DeleteEntity(entity);
    }
}

As you can see the SPADefaultDemoController class inherits from DbDataController base class and includes methods for selecting, inserting, updating and deleting TodoItem records to the database. The data service is called from the client side JavaScript code as you will see later.

ViewModel

The ViewModel class for the TodoItem data model is created automatically for you and is placed in the Scripts folder.

As you can see TodoItemsViewModel.js file is placed in the Scripts folder. This ViewModel is developed using Knockout and a part of it is shown below:

// TodoItem class
var entityType = "TodoItem:#SPADefaultDemo.Models";
MyApp.TodoItem = function (data) {
    var self = this;
    // Underlying data
    self.TodoItemId = ko.observable(data.TodoItemId);
    self.Title = ko.observable(data.Title);
    self.IsDone = ko.observable(data.IsDone);
    upshot.addEntityProperties(self, entityType);
}
...

As you can see the TodoItem ViewModel class contains the same properties as the server side data model. These properties are observable properties as indicated by ko.observable() syntax. Knockout synchronizes the data between views and ViewModel. The communication between the ViewModel and the server side data happens through Upshot.js.

View

The Index.cshtml file represents the main view of the application. Three partial views are also created viz. _Grid, _Editor and _Paging that provide the user interface for list, insert/update and paging respectively. Depending on the operation selected by the user the appropriate partial view is rendered. The following markup shows a fragment from the Index.cshtml.

@{
    ViewBag.Title = "TodoItems";
    Layout = "~/Views/Shared/_SpaLayout.cshtml";


<div data-bind="visible: editingTodoItem">
    @Html.Partial("_Editor")
</div> 

<div data-bind="visible: !editingTodoItem()">
    @Html.Partial("_Grid")
</div> 

<div class="message-info message-success" data-bind="flash: { text: successMessage, duration: 5000
}"></div>
<div class="message-info message-error" data-bind="flash: { text: errorMessage, duration: 20000 }"></div>

<script type="text/javascript" src="@Url.Content("~/Scripts/TodoItemsViewModel.js")"></script>
<script type="text/javascript">
    $(function () {
        upshot.metadata(@(Html.Metadata<SPADefaultDemo.Controllers.SPADefaultDemoController>())); 

        var viewModel = new MyApp.TodoItemsViewModel({
            serviceUrl: "@Url.Content("~/api/SPADefaultDemo")"
        });
        ko.applyBindings(viewModel);
    });
</script>

Notice that data service URL is specified as ~/api/SPADefaultDemo. The Html.Metadata() method provides the metadata of the types to the Upshot. The binding between View and ViewModel is provided by the applyBindings() method of Knockout.

If you run the application and navigate to http://localhost:1275/todo (change the port no. as per your setup) you will see something similar to the following figure.

You can click on the "Create TodoItem" button to add a few records. You can then modify or delete them. The following figure shows the view in edit mode.

Database

At this stage the sample "To do" application is able to store and retrieve the data but you might be wondering where the actual data is. Since SPA uses Code First approach to database operations, the database is automatically created for you when you run the application for the first time. The subsequent runs use the previously created database. Have a look at the following figure that shows a sample database generated under local installation of SQL Express.

As you can see, by default the database name is the same as the fully qualified name of the DbContext class. Inside there is a TodoItems table that stores the application data.


European ASP.NET MVC 4 Hosting :: How to Setup Scheduler in ASP.NET MVC 4

clock November 27, 2013 06:02 by author Scott

As always, we try to keep our Scheduler .NET control up-to-date and easy to use. Nowadays it supports all the latest .NET frameworks and IDEs, including ASP.NET 4.5 and Visual Studio 2012.

With regard to all recent updates, your remarks and fixed bugs, we decided to give you further setup instructions. This time we explain how Scheduler .NET setup process can be reduced to only 5 steps that you can cover in less than 5 minutes.

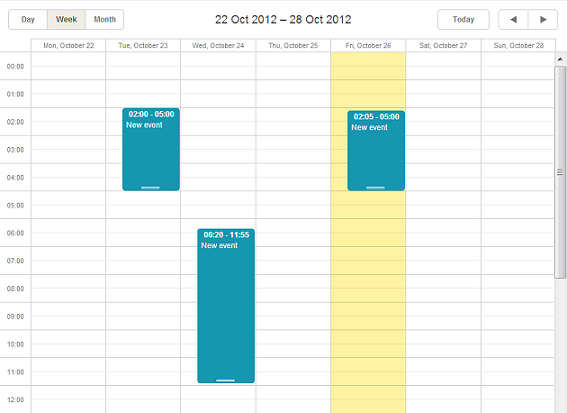
This article represents a new step-by-step guide on how to create a simple yet elegant Google-like calendar/scheduler in ASP.NET MVC3/MVC4 Razor (C#).

Follow the steps described below and you’ll get a nice-looking scheduler in ASP.NET with a rich user interface. It provides the following features:

- Day, week and month views 
- Convenient drag-and-drop
- Highlighting of the current day
- Ajax loading
- Easy data load and save


Create a New Project

Create a new project in Visual Studio by selecting ASP.NET MVC 3/ MVC4 Web Application from the list. The project template should be empty. The view engine is Razor by default.

We will create a simple scheduler in C#.

Set Up the Database

The next step is to set up a database. Right-click on ‘Your_project_name’ (e.g. SimpleScheduler) ->  Add -> Add ASP.NET Folder -> App_Data -> Add New Item and name it “Sample.mdf”. 

A new database has been created. 

Note: for ASP.NET MVC4 project the folder App_Data is created automatically.

Go to the Server Explorer to create a new Table “Events”. Right-click on the Table folder to add the following query. It creates a table with all necessary fields including primary key and identity column:

CREATE TABLE [dbo].[Events](
  [id] int IDENTITY(1,1) NOT NULL,
  [text] nvarchar(250) NULL,
  [start_date] datetime NOT NULL,
  [end_date] datetime NOT NULL,
  PRIMARY KEY (id)
)

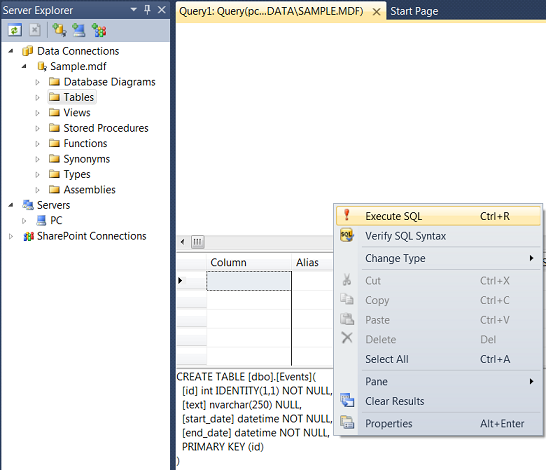
Note: To see the updates, remember to refresh connection in the Server Explorer.

Scheduler Setup via NuGet

Right-click on you project name in the Solution Explorer to select “Manage NuGet Packages…”: 

For quick search type  ‘dhtmlx’ in the input. In a moment you’ll see DHMTLX Scheduler .NET library and the available samples: 

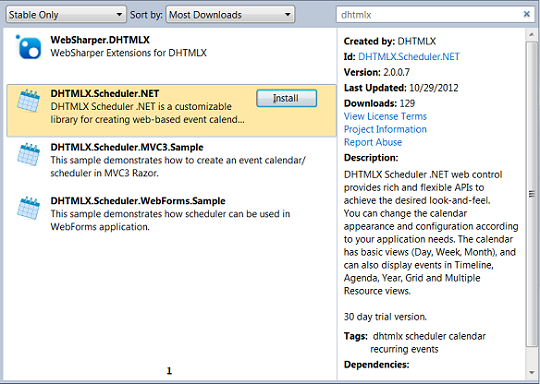
To save your time, install MVC3 Sample first. It contains the basic template of Scheduler .NET calendar control. The template includes a controller with three actions (initialization, data load and save) and view with a calendar.

Thus, the installed sample updates the project with:

- /Controllers/CalendarController.cs  -- a controller that needs updating;
- /Views/Calendar/Index.cshtml   -- a calendar page that requires no changes;
- /Models/CalendarEvent.cs  -- a sample model that can be deleted. 

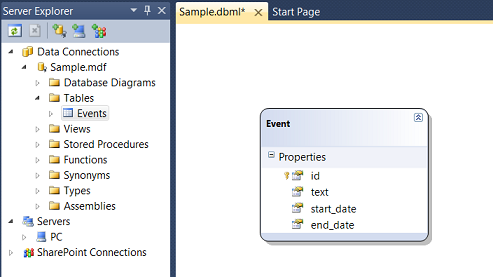
Create Scheduler Model

The installed MVC3 Sample also contains a sample class model. You don’t need it and can delete it.

To create a new model right-click on the folder Models -> Add New Item. In the new opened window choose LINQ to SQL Classes and name it Sample.dbml. Double click it to open a visual editor and drag the Event table from the Server Explorer to the Editor.

Updating a Controller

As stated above, the controller has been created when you installed MVC3 Sample. It contains action templates for data load and save, working with static data.

Let’s update the methods in the CalendarController.cs to connect the controller with the newly created Model. 

First we need to load data from the Model. 

The default data load before update looks as follows:

public ContentResult Data()
{
    var data = new SchedulerAjaxData(
        new List<CalendarEvent>{
            new CalendarEvent{
                id = 1,
                text = "Sample Event",
                start_date = new DateTime(2012, 09, 03, 6, 00, 00),
                end_date = new DateTime(2012, 09, 03, 8, 00, 00)
            },
            ...
        });
    return (ContentResult)data;
}

Let’s update the DataAction to load data from SampleDataContext:

public ContentResult Data()
{
            var data = new SchedulerAjaxData(new SampleDataContext().Events);
            return (ContentResult)data;
}

Secondly, enable data save. The data save set by default is:

public ContentResult Save(int? id, FormCollection actionValues)
{
    var action = new DataAction(actionValues);             

    try
    {
        var changedEvent = (CalendarEvent)DHXEventsHelper.Bind(typeof(CalendarEvent), actionValues);
        switch (action.Type)
        {
            case DataActionTypes.Insert:
                //do insert
                action.TargetId = changedEvent.id;//assign postoperational id
                break;
            case DataActionTypes.Delete:
                //do delete
                break;
            default:// "update"                         
                //do update
                break;
        }
    }
}

Data save parses the request, contains a switch case for all types of operations and returns operation success. Let’s update it to enable save of actual changes:

public ContentResult Save(int? id, FormCollection actionValues)
{
     var action = new DataAction(actionValues); 

     var changedEvent = (Event)DHXEventsHelper.Bind(typeof(Event), actionValues); 

     var data = new SampleDataContext(); 

     try
     {
          switch (action.Type)
          {
              case DataActionTypes.Insert: // define here your Insert logic
                  data.Events.InsertOnSubmit(changedEvent);                             
                  break;
              case DataActionTypes.Delete: // define here your Delete logic
                  changedEvent = data.Events.SingleOrDefault(ev => ev.id == action.SourceId);
                  data.Events.DeleteOnSubmit(changedEvent);
                  break;
              default:// "update" // define here your Update logic
                  var eventToUpdate = data.Events.SingleOrDefault(ev => ev.id == action.SourceId);
                  DHXEventsHelper.Update(eventToUpdate, changedEvent, new List<string>() { "id" });//update all properties, except for id
                  break;
              }
              data.SubmitChanges();
              action.TargetId = changedEvent.id;
         }
     }
}

We have changed the Model class used in the method. We’ve also added the required methods from LINQ to SQL and a helper that updates all object properties in the data base (except for the id).

Notes.

The initial class model in the action used to be:

public ContentResult Save(int? id, FormCollection actionValues)
        {
            var action = new DataAction(actionValues);

If a new event is added to the data base, an id assigned to the new event in the data base should be returned to the client. It returns TargetId of the object itself.

action.TargetId = changedEvent.id;

This action is implemented after changes are submitted: data.SubmitChanges();

The full code will look like this:

using System;
using System.Collections.Generic;
using System.Linq;
using System.Web;
using System.Web.Mvc; 

using DHTMLX.Scheduler;
using DHTMLX.Common;
using DHTMLX.Scheduler.Data;
using SimpleScheduler.Models;
namespace SimpleScheduler.Controllers
{
    public class CalendarController : Controller
    {
        public ActionResult Index()
        {
            var scheduler = new DHXScheduler(this); 

            scheduler.Skin = DHXScheduler.Skins.Terrace;
            scheduler.InitialDate = new DateTime(2012, 09, 03); 

            scheduler.Config.multi_day = true;//render multiday events 

            scheduler.LoadData = true;
            scheduler.EnableDataprocessor = true; 

            return View(scheduler);
        } 

        public ContentResult Data()
        {
            var data = new SchedulerAjaxData(
                    new SampleDataContext().Events
                ); 

            return (ContentResult)data;
        } 

        public ContentResult Save(int? id, FormCollection actionValues)
        {
            var action = new DataAction(actionValues);
            var changedEvent = (Event)DHXEventsHelper.Bind(typeof(Event), actionValues);
            var data = new SampleDataContext(); 

            try
            {
                switch (action.Type)
                {
                    case DataActionTypes.Insert: // define here your Insert logic
                        data.Events.InsertOnSubmit(changedEvent); 

                        break;
                    case DataActionTypes.Delete: // define here your Delete logic
                        changedEvent = data.Events.SingleOrDefault(ev => ev.id == action.SourceId);
                        data.Events.DeleteOnSubmit(changedEvent);
                        break;
                    default:// "update" // define here your Update logic
                        var eventToUpdate = data.Events.SingleOrDefault(ev => ev.id == action.SourceId);
                        DHXEventsHelper.Update(eventToUpdate, changedEvent, new List<string>() { "id" });//update all properties, except for id
                        break;
                }
                data.SubmitChanges();
                action.TargetId = changedEvent.id;
            }
            catch (Exception a)
            {
                action.Type = DataActionTypes.Error;
            }
            return (new AjaxSaveResponse(action));
        }
    }
}

Finally, update the route from ‘Home’ to ‘Calendar’ in Global.asax.cs as follows:

routes.MapRoute(
              "Default", // Route name
              "{controller}/{action}/{id}", // URL with parameters
              new { controller = "Calendar", action = "Index", id = UrlParameter.Optional } // Parameter defaults
          );

Note: ASP.NET MVC4 project creates App_Start directory with configuration files. The controller route is changed to "Calendar" in Route.Config.cs:

routes.MapRoute(
                name: "Default",
                url: "{controller}/{action}/{id}",
                defaults: new { controller = "Calendar", action = "Index", id = UrlParameter.Optional }
            );

That’s it! The scheduler for ASP.NET MVC3/MVC4 Razor is ready to use.


European ASP.NET MVC Hosting :: How to Send Email Using ASP.NET MVC

clock November 12, 2013 11:53 by author Scott

Introduction

Sending email is a very common task in any web application for many purposes. In daily development we need to add some mail functionality to our project to send e-mail to the customer or another in our web site.

Using the code

For sending mail from ASP.NET MVC we use the "System.Net.Mail" namespace. Let's see how to do this.

Open Visual Studio

"File" -> "New" -> "Project..."

Choose Visual C#- Web then select ASP.NET MVC4 Web Application

Add a new Internet Application then click OK

Step 1: Create a new Model Class in the model folder.

The following is the code for the new Model

MailModel.cs

public class MailModel

{
   
 public string From { get; set; }
   
 public string To { get; set; }
   
 public string Subject { get; set; }
   
 public string Body { get; set; }
}

Step 2: Create a New SendMailerController in the Controller folder.

The following is the code for the design of the new Controller.

SendMailerController.cs

using System;

using System.Collections.Generic;
using
 System.Linq;
using
 System.Net.Mail;
using
 System.Web;
using
 System.Web.Mvc; 

namespace SendMail.Controllers

{
   
 public class SendMailerController : Controller
    {
       
 //
       
 // GET: /SendMailer/  
       
 public ActionResult Index()
        {
           
 return View();
        } 
 
        [HttpPost]
       
 public ViewResult Index(SendMail.Models.MailModel _objModelMail)
       {
           
 if (ModelState.IsValid)
            {
               
 MailMessage mail = new MailMessage();
                mail.To.Add(_objModelMail.To);
                mail.From =
 new MailAddress(_objModelMail.From);
                mail.Subject = _objModelMail.Subject;
               
 string Body = _objModelMail.Body;
                mail.Body = Body;
                mail.IsBodyHtml =
 true;
               
 SmtpClient smtp = new SmtpClient();
                smtp.Host =
 "smtp.gmail.com";
                smtp.Port = 587;
                smtp.UseDefaultCredentials =
 false;
                smtp.Credentials =
 new System.Net.NetworkCredential
                ("username",
 "password");// Enter seders User name and password
                smtp.EnableSsl =
 true;
                smtp.Send(mail);
               
 return View("Index", _objModelMail);
            }
           
 else
            {
               
 return View();
            }
        }
    }

}

Index.cshtml

@model SendMail.Models.MailModel
@{
ViewBag.Title =
 "Index";
}
<h2>Index</h2>
<fieldset>
<legend>
Send Email
</legend>
@using (Html.BeginForm())
{
@Html.ValidationSummary()
<
p>From:
 </p>
<p>
@Html.TextBoxFor(m=>m.From)</p>
 <p>To:
 </p>
<p>
@Html.TextBoxFor(m=>m.To)</p>
<p>Subject:
 </p>
<p>
@Html.TextBoxFor(m=>m.Subject)</p>
 <p>Body:
 </p>
<p>
@Html.TextAreaFor(m=>m.Body)</p>
<input
 type ="submit" value ="Send" />
}
  </fieldset>

In the code above we have the following 3 fields:

  • To
  • Subject
  • Message

When the user clicks the "Send" button, the mail will be sent to the specified mail address that you provide in the To TextBox. So add the following code for the [HttpPost] Method for the send button click.

SendMailerController.cs

using System;

using System.Collections.Generic;
using
 System.Linq;
using
 System.Net.Mail;
using
 System.Web;
using
 System.Web.Mvc; 

namespace SendMail.Controllers

{
   
 public class SendMailerController : Controller
    {
       
 //
       
 // GET: /SendMailer/ 
 
       
 public ActionResult Index()
        {
           
 return View();
        } 

        [HttpPost]

       public ViewResult Index(SendMail.Models.MailModel _objModelMail)
        {
           
 if (ModelState.IsValid)
            {
               
 MailMessage mail = new MailMessage();
                mail.To.Add(_objModelMail.To);
                mail.From =
 new MailAddress(_objModelMail.From);
               mail.Subject = _objModelMail.Subject;
               
 string Body = _objModelMail.Body;
                mail.Body = Body;
                mail.IsBodyHtml =
 true;
               
 SmtpClient smtp = new SmtpClient();
                smtp.Host =
 "smtp.gmail.com";
                smtp.Port = 587;
                smtp.UseDefaultCredentials =
 false;
                smtp.Credentials =
 new System.Net.NetworkCredential
                ("username",
 "password");// Enter seders User name and password 
 
                smtp.EnableSsl =
 true;
                smtp.Send(mail);
               
 return View("Index", _objModelMail);
            }
          
 else
            {
               
 return View();
            }
        }
    }

}

Understanding the Code

In the code above we have a:

ViewResult Index(SendMail.Models.MailModel _objModelMail)

user defined method. In this method, we have a parameter of our MailModel object. Now we create a MailMessage object.

MailMessage mail = new MailMessage();

MailMessage is the main class for sending mail, it is in the System.Net.Mail namespace.

The MailMessage class has properties, the important ones are:

  • To
  • From
  • Cc
  • Bcc
  • Subject
  • Body

So we add our data into specified properties.

For sending mail we need a SMTP Server, so in ASP.Net we have the SmtpClient class, we set the SMTP settings using the properties of that class.

SmtpClient smtp = new SmtpClient();

The SMTPClient class has these basic properties:

  • Host
  • Port
  • UseDefaultCredential
  • Credentials
  • EnableSsl
  • Send

smtp.Host = "smtp.gmail.com";
smtp.Port = 587;
smtp.UseDefaultCredentials = false;
smtp.Credentials = new System.Net.NetworkCredential("username", "password");
smtp.EnableSsl = true;

In the code above is:

smtp.Host = "smtp.gmail.com";

That is the SMTP Host address of Gmail, if you want to use any other SMTP host service then please add a different SMTP host protocol, for example for Hotmail it is smtp.live.com.

For example, in:

Smtp.Port=587

587 is the port for Gmail, so for any other service port you need to change the port correspondingly.

smtp.Credentials = new System.Net.NetworkCredential("username""password");

Smtp.Credentials specifies the Network Crendentials of your Gmail id so please add your username and password instead of ("username", "password");

The following is for a secure mail server, so you enable your SSL layer.

smtp.EnableSsl = true;

Smtp.Send sends the mail so please add your MailMesssage object here. Then, based on the properties, your mail will be sent


European ASP.NET MVC 4 Hosting :: Preventing Cross Site Scripting Attacks in ASP.NET MVC 4

clock November 8, 2013 08:14 by author Scott

A website is exposed to various types of attacks and one of the most common types of attack is what is known as Cross Site Scripting (XSS). In a cross site scripting attack, malicious markup and script is entered in the web pages that are viewed by other users. If proper care is not taken to filter this malicious piece of markup, the script gets stored in the system and also rendered on web pages. Depending on the script injected by the hacker it can cause damage ranging from annoying popups to stolen credentials to accessing data stored in cookies. Therefore, it is important for ASP.NET MVC developers to prevent these types of attacks. Luckily, ASP.NET MVC offers a helping hand in safeguarding your websites. This article discusses some of the basics involved in the process.

What is Cross Site Scripting Attack?

In order to understand what a cross site scripting attack is, let's develop a simple ASP.NET MVC website that accepts some user input. Suppose that you are developing a blog engine and users are allowed to leave comments on blog posts. The following figure shows how the comments might be accepted:

As you might have guessed, the user can enter any text in the textbox and the textarea, including HTML markup tags and script fragments! Once the form is submitted the posted data is saved in the database as shown below:

public ActionResult SaveData(FormCollection form)

{
   
BlogEntities1 db = new BlogEntities1();
   
Comment comment = new Comment();
    comment
.UserName = form["username"];
    comment
.UserComment = form["usercomment"];
    comment
.PostedOn = DateTime.Now;
    db
.Comments.Add(comment);
    db
.SaveChanges();
   
return View("Index");
}

As shown above, the form is submitted to the SaveData() action method. The SaveData() method saves the data in a SQL Server database table named Comments. So far so good. Now assume that a use enters the following text in the comments textarea:

<h1>Hello   World!</h1>
<script>
alert('Cross   site scripting attack!');
</script>  

When such a user posts the above content it gets saved in the database. Later when this saved content is rendered on a web page it executes the script!

What the above example illustrates is a very mild version of a cross site scripting attack. Imagine what would happen if a clever hacker loads a malicious script from some different location and stole end user cookies or loaded undesirable content. That is why it is important for you to prevent cross site scripting attacks.

Note: 
By default ASP.NET 4.5 throws an exception if potentially dangerous content is detected in the request. However, you may need to deviate from this default mechanism in certain cases. In certain legitimate cases it is perfectly acceptable for the user to submit markup. For example, a web page where a blog owner enters the content of a blog post should accept HTML tags. In such cases you can skip the default checking performed by ASP.NET. You can either set requestValidationMode in web.config or use the [ValidateInput] attribute on action methods.

Preventing Cross Site Scripting Attacks

Most of the cross site scripting attacks can be prevented if you encode all the user input properly. You need to ensure that strings are encoded properly at two distinct places as far as ASP.NET MVC applications are concerned:

- Views
- Controllers or classes

In order to encode strings in views you can use the Html.Encode() method as shown below:

<%= Html.Encode(c.UserComment) %>

As you can see the view that displays the user comment now encodes the comment using the Html.Encode() method; this way all of the special characters such as <, > and & are encoded properly. For example, once Encode() method is in place the same malicious input by the end user is encoded and then rendered on the page as shown below:

As you can see the script is no longer executed even if the comment saved in the database contains the <script> tag. Instead the HTML markup is encoded and then displayed on the page.

There is also a shortcut to using the Html.Encode(), you can use <%: and %> block instead of <%= and %>. The following code shows how:

<%: c.UserComment %>

The <%: and %> block HTML encodes the string and then emits on the page.

The above code takes care of displaying content on the page by HTML encoding it. Here the encoding happens at the View level but the database still contains the malicious markup and script. Wouldn't it be nice if you HTML encode the content before saving it into the database? You can do so in your controllers or other classes using the Server.HtmlEncode() method.

comment.UserComment   = Server.HtmlEncode(form["usercomment"]);
...
db.SaveChanges();
...

As you can see the HtmlEncode() method of Server object accepts the raw string and returns an HTML encoded version of the same. The database now stores the HTML encoded version of the comments rather than the raw version. If you need to decode the HTML encoded version back you can use Server.HtmlDecode() method.

In addition to the HTML output displayed on a web page, you may also consider encoding attributes and URLs. Encoding attribute values is important if you are dynamically changing them based on user input. For example, you might be accepting a user's website URL and then setting the href attribute of an anchor tag dynamically. In such cases it is better to encode attribute values using the Html.AttributeEncode() method. On the same lines you can encode URL values using the  Url.Encode() method.

Using AntiXssEncoder to Encode Strings

The techniques to prevent cross site scripting attacks that we covered so far are traditional techniques that have roots in the core ASP.NET framework. In some cases where security is extremely important you may want to use an even more secure technique of encoding. Luckily, System.Web.Security.AntiXss namespace provides a class - AntiXssEncoder - that can be used to encode HTML content and attribute values. The major difference between the default encoder used by ASP.NET and the AntiXssEncoder class is that the former uses a blacklist of a set of prohibited characters whereas the later uses a whitelist of a set of allowed characters making it more secure.

The following code shows how AntiXssEncoder class can be used in a controller:

public   ActionResult SaveData(FormCollection form)
{
     BlogEntities1 db = new BlogEntities1();
     Comment comment = new Comment();
 comment.UserName   = AntiXssEncoder.HtmlEncode(form["username"], false);   comment.UserComment =   AntiXssEncoder.HtmlEncode(form["usercomment"], false);    comment.PostedOn =   DateTime.Now;
     db.Comments.Add(comment);
     db.SaveChanges();
     return View("Index");
}

As you can see, AntiXssEncoder class has static methods such as HtmlEncode() and HtmlAttributeEncode() that can be used to encode form data.

By default, methods such as Server.HtmlEncode() use the HttpEncoder class for performing the encoding. You can override this default with the AntiXssEncoder class by adding the following markup in the web.config file:

<httpRuntime encoderType="System.Web.Security.AntiXss.AntiXssEncoder" />

As shown above, the encoderType attribute of the <httpRuntime> tag is set to System.Web.Security.AntiXss.AntiXssEncoder so that the default encoder class is now set to AntiXssEncoder.


European ASP.NET MVC 4 Hosting - Amsterdam :: Creating MVC 4 Application with Umbraco

clock August 16, 2013 06:38 by author Scott

Hello, how do you do? In this article, I will gonna show you how to integrate ASP.NET MVC 4 using Umbraco. Note that Umbraco does not provide a “pure” MVC application as the Umbraco UI comes with a fair amount of webforms baggage. That said, it plays nicely with an MVC 4 project in Visual Studio and provides a flexible view rendering engine that lets you build genuinely testable page templates.

Setting up the project

Umbraco is shipped as an ASP.NET website which you can use directly, though this is not ideal. It is a better idea to create a full MVC 4 project, manage the dependencies using the Umbraco NuGet package and drop the Umbraco files directly into the site. Use the following steps to set up Umbraco as an MVC 4 project in Visual Studio:

Firstly, start an empty MVC 4 project in Visual Studio – make sure it is an empty project as you will not need any of the baggage that comes with other project templates.

Add the NuGet Umbraco Cms Core Binaries package which will manage the various dependencies and references that Umbraco 6 requires for you.

Copy all the files from the Umbraco installation ZIP archive directly into your project in Visual Studio except the App_Code and Bin folders – you won’t need the binaries as they are managed by NuGet and the App_Code folder is not used in a web application project.

The default mode for Umbraco is to use web forms rendering. You will need to switch this to use MVC by changing the defaultRenderingEngine setting in the Umbraco configuration file UmbracoSettings.config as shown below:

<templates>
  <useAspNetMasterPages>true</useAspNetMasterPages>
  <defaultRenderingEngine>Mvc</defaultRenderingEngine>
</templates>

Now you’re good to go – run the Umbraco site to set up the database and once the admin console comes up you can create a first view.

Note that you may optionally wish to remove the App_Start directory and Global.asax.cs files from your Visual Studio project – they are not used in a default Umbraco application as global.asax inherits directly from the Umbraco.Web.UmbracoApplication class and does not execute this code.

Creating a view

You can create a basic view in the Umbraco UI. In the “Settings” section create a new Document Type – call it “Home” and ensure that “Create matching template” is checked. A new file will be created in your Views folder with the following mark-up:

@inherits Umbraco.Web.Mvc.UmbracoTemplatePage
@{

    Layout = null;
}

If you create and publish a first page based on this content type it will become your site’s home page. This is all you do to start creating pages based on MVC as Umbraco uses a default routing process that delivers the page properties to the view. You can actually build basic content pages without having to worry about the plumbing around controllers and models – this only starts to become important if you want to put more logic in behind the scenes.

Creating a custom controller

The default rendering engine for Umbraco routes requests through RenderMvcController with an IPublishedContent object as the model view. This provides a pretty simple means of  basic pages rigged up with managed content but you can extend this behavior by creating custom controllers. Umbraco refers to this technique of creating custom controllers as hijacking, though really it is just a matter of creating a controller where MVC would normally look.

To create a controller for our Home view we just create a controller called HomeController. To hook it up to Umbraco’s content API you will need to inherit from RenderMvcController and override the Index method as shown below:

public class HomeController : Umbraco.Web.Mvc.RenderMvcController
{
    public override ActionResult Index(RenderModel model)
    {
        //Do some stuff here, then return the base method
        return base.Index(model);
    }
}

Creating controllers to handle forms and actions is a little more involved as you have to create what Umbraco calls a surface controller. This is a controller like any other but one that is derived from the Umbraco SurfaceController class. These controllers can be implemented as a normal part of your MVC project (“locally declared” in Umbraco-speak) or implemented as a plug-in for shipping as part of a package.

If you want to include your own custom MVC routes then you will have to override the OnApplicationStarted method. This can be done by creating your own custom global.asax file that inherits from Umbraco.Web.UmbracoApplication.

Creating a custom model

Once you have wired up a controller it’s pretty straightforward to create in your own model and pass it into the page. You will need to change the view so that it inherits the generic version of UmbracoViewPage with your custom model specified as the generic parameter. The example below shows the view adjusted for a new model called HomeModel.

@inherits Umbraco.Web.Mvc.UmbracoViewPage<UmbracoMvc4.Models.HomeModel>
@{

    Layout = null;
}

The controller will still accept a RenderModel object but you can pass your custom model by using the CurrentTemplate method as shown below:

public override ActionResult Index(RenderModel model)
{
    HomeModel customModel = new HomeModel();
    return CurrentTemplate(customModel);
}

If you want to take advantage of the Umbraco view helpers then you can extend the RenderModel object by creating a constructor that initialises the base class as shown below. This will ensure that your derived model still exposes the page data and current culture properly.

public class HomeModel : RenderModel
{
    public HomeModel(RenderModel model)
        : base(model.Content, model.CurrentCulture)
    { }
}

Beyond the basics

Although it is not a “pure” MVC implementation you can still get Umbraco 6 to sit quite nicely within an MVC 4 web application just so long as you set it up carefully. Beyond the basics of models, views and controllers there is support for features such as partial views and child actions as well as scope for you to use dependency injection and your IoC container of choice. So long as you’re prepared to ignore the messy webforms back-end that lurks in the background Umbraco 6 can really feel like working with an MVC 4 application.


European ASP.NET MVC 4 Hosting - Amsterdam :: Enhanced Default Template MVC 4

clock July 5, 2013 07:10 by author Scott

MVC 4 introduces many new features. In today post, I will talk about MVC 4 and enhanced default templates.

When you create a new project, the default website looks quite different from previous versions.  Besides the improved aesthetics, the default website has improved functionality thanks to a technique called adaptive rendering.

Adaptive rendering is where the page is rendered specific to the browser without any customization.  This is an absolute must for most developers today; write once, run everywhere.  The adaptive rendering is made possible thanks to a new CSS type -> media queries

@media all and (min-width: 640px) { #media-queries-1 { background-color: #0f0; } }
@media screen and (max-width: 2000px) { #media-queries-2 { background-color: #0f0; } }

After you creating a new website, you’ll be able to see the improvements in the default layout.

To see the adaptive rendering in action, open the page using a mobile device.

Here’s how the page looks on an iPhone.

And here’s how the page look on an iPad.

The page renders differently depending on the size of the screen.  Making the page do that without media queries is tricky.  Using media queries makes it simple.

One final thing to note is the default template takes advantage of jQuery UI also.  The Login and Register links show you how to use this JavaScript library to  provide a richer UI.  You can read all about the other features that are available to you with jQuery UI here.

Testing with Emulators

The best way I found to test what the site will look like is with FireFox and User Agent Switcher add-on,
which changes the user agent that’s sent to the browser.  That can be downloaded
here.


European ASP.NET MVC 4 Hosting - Amsterdam :: How to Fix CSS Problem in ASP.NET MVC 4

clock July 1, 2013 12:10 by author Scott

Some of you will face this problem when using Bundling and Minification in ASP.NET MVC 4. This post cover about how to fix relative CSS Path in ASP.NET MVC 4.

Recently, I hit a known problem with deploying to IIS virtual directories. It’s not a problem for ASP.NET which understands virtual directories and so if you ask for “~” or “/” will return “yoursite/virtualfolder”. However, JavaScript is run under IIS, which doesn’t understand this idea so well. Do “/” in JS and you’ll get back “yoursite” NOT “yoursite/virtualfolder”.

So what’s the fix? Well, for JavaScript there are a couple of answers. So I check my javascript. Based on this answer, I came up with this:

1. Add a hidden field to a masterpage:

  @Html.Hidden("HiddenCurrentUrl",  Url.Content("~"))

2. As one of the first things you do, ensure this JS runs. All it does it take the value in the field and store it:

var baseUrl = "";
baseUrl = $("#HiddenCurrentUrl").val();


3. Use baseUrl wherever you need to call things in JavaScript:

Silverlight.createObject(
            baseUrl + "ClientBin/SilverlightBridge.xap",  // source
            ...
        );

Hmm… But you know, that is not the problem. The problem is with the CSS file

    .link-button.cancel {
        background-image: url('../Images/appbar.cancel.darkgrey.png');
    }

A similar problem occures where these URLs start with a slash(/) because IIS interprets that incorrectly. You can’t invoke ASP.NET, which does know the right root into a CSS file

After some messing around, I came to this compromise, which works well. It also exposes some of the hidden power of using Bundling:

  1. For any images you reference in CSS, move them into a relative folder, such as /images near the CSS. I know, this may be an unacceptable compromise for you. But actually, it makes a lot of sense. The image is probably only used by the CSS so it makes sense to have it nearby, not in some global /images folder.  
  2. In order to make this work, you need to get your CSS (which you’ve bundled up) into the same place relative to the images you’re reference, or at least, you need to cheat the browser into thinking this happening.
  3. So, for instance:

      bundles.Add(new StyleBundle("~/Content/DataTableStyle").Include(


    comes out the other end as:

Don’t forget that all your “static” content, such as images won’t be affected by Bundling and can be referenced using the folder structure you expect, i.e. the one you’ve set up in Visual Studio.

So… when you create the Style Bundle you give it a name which reflects where you have it in your Visual Studio folder structure, then it will pop out the other end in the same place, relatively, to the image files which it’s references! And because the Bundling is happening via ASP.NET, the URL of the CSS file, and wherever it is referenced, works fine in virtual directories!


About HostForLIFE.eu

HostForLIFE.eu is European Windows Hosting Provider which focuses on Windows Platform only. We deliver on-demand hosting solutions including Shared hosting, Reseller Hosting, Cloud Hosting, Dedicated Servers, and IT as a Service for companies of all sizes.

We have offered the latest Windows 2016 Hosting, ASP.NET Core 2.2.1 Hosting, ASP.NET MVC 6 Hosting and SQL 2017 Hosting.


Tag cloud

Sign in