
July 30, 2020 13:16 by
 Peter
PeterToday, let me explain you how to handle multiple submit buttons in ASP.NET MVC 6. Sometimes you will need to handle multiple submit buttons on a similar form as as in the following picture.
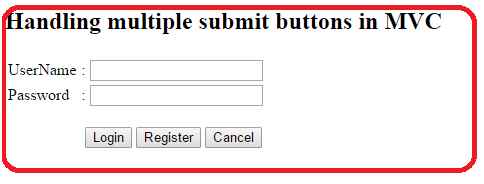
As you can see on the above picture, we've got the three buttons Login, Register and Cancel. Here every button has totally different functionality. in this way every submit button will post a form to the server but will provide totally different values of every button.
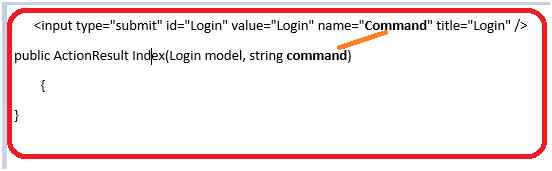
Make a controller with one action method that accepts other parameters, one is for the model and the other is for determining the status of the button click.
[HttpPost]
public ActionResult Index(Login model, string command)
{
if (command=="Login")
{
// do stuff
return RedirectToAction("Home");
}
else if (command=="Register")
{
// do stuff
ViewBag.msg = "You have Clicked Register button";
return View();
}
else if (command=="Cancel")
{
// do stuff
ViewBag.msg = "You have Clicked Cancel Button";
return View();
}
else
{
return View();
}
}
In the preceding code snippet, assume you clicked on the Login button, then the command parameter can have the values Login, null, null respectively. Create a View for the preceding controller.
@model MvcMultipleSubmitButtons.Models.Login
@{
ViewBag.Title = "Index";
}
<h2>
Handling multiple submit buttons in MVC </h2>
<h5 style="color: Red">@ViewBag.msg</h5>
<form action="Home/Index" id="myform" method="post" >
//here action name is Index, controller name is Home. So the action path is Home/Index
<table>
<tr>
<td>
UserName
</td>
<td>
:
</td>
<td>@Html.TextBoxFor(m => m.userName)
</td>
<td>
@Html.ValidationMessageFor(m => m.userName)
</td>
</tr>
<tr>
<td>
Password
</td>
<td>
:
</td>
<td>@Html.TextBoxFor(m => m.password)
</td>
<td>
@Html.ValidationMessageFor(m => m.password)
</td>
</tr>
</table>
<br/>
<div style="padding-left: 80px;">
<input type="submit" id="Login" value="Login" name="Command" title="Login" />
<input type="submit" id="Register" value="Register" name="Command" title="Register" />
<input type="submit" value="Cancel" name="Command" title="Cancel" />
</div>
</form>
You can declare the form tag in another way as within the following:
@using(Html.BeginForm("Index","Home",FormMethod.Post))
{
//here action name is Index, controller name is Home and form method is post.
}
Note: there's a relation between button name and action method parameter. for instance, the button name is “Command”, the action parameter name ought to be “command”.
You can have different names for each button. So in that case you need to handle it as in the following:
<input type="submit" id="Login" value="Login" name="Command1" title="Login" />
<input type="submit" id="Register" value="Register" name="Command2" title="Register" />
<input type="submit" value="Cancel" name="Command3" title="Cancel" />
Controller
public ActionResult Index(Login model, string command1, string command2, string command3)
{
// here command1 is for Login, command2 is for Register and command3 is for cancel
}
Create a Model class with the name Login.
public class Login
{
public string userName { get; set; }
public string password { get; set; }
}
I hope it helps for you!
HostForLIFE.eu ASP.NET MVC 6 Hosting
HostForLIFE.eu is European Windows Hosting Provider which focuses on Windows Platform only. We deliver on-demand hosting solutions including Shared hosting, Reseller Hosting, Cloud Hosting, Dedicated Servers, and IT as a Service for companies of all sizes. We have customers from around the globe, spread across every continent. We serve the hosting needs of the business and professional, government and nonprofit, entertainment and personal use market segments.

July 3, 2020 14:12 by
PeterAction filter in MVC provides the option to handle the situations after we would really like to perform an operation before and after the execution of a controller action. For this purpose, we create a custom class, which inherits the FilterAttribute class and implements the IActionFilter interface. when creating the filter, we simply apply the class name as an attribute on the controller.

Here, the FilterAttribute class makes it possible to use the class as an attribute and IActionFilter interface contains two methods named OnActionExecuting and OnActionExecuted. The OnActionExecuting is executed before the controller method is executed and OnActionExecuted is called after the execution of the controller method. This kind of technique is quite helpful for the logging purposes. Thus, let's see how we can use this filter.
Let's start by adding a new class named MyActionFilter.cs. Now, derive this class from the FilterAttribute and the IActionFilter. Implement the OnActionExecuting and OnActionExecuted methods and add your custom logic into the methods.Thus, the code will look as shown below.
public class MyActionFilter : FilterAttribute, IActionFilter
{
public void OnActionExecuted(ActionExecutedContext filterContext)
{
//Fires after the method is executed
}
public void OnActionExecuting(ActionExecutingContext filterContext)
{
//Fires before the action is executed
}
}
Simply, apply the class as an attribute on the controller. Add debuggers on both the methods as well as the controller method.
public class HomeController : Controller
{
[MyActionFilter]
public ActionResult Index()
{
return View();
}
public ActionResult About()
{
ViewBag.Message = "Your application description page.";
return View();
}
public ActionResult Contact()
{
ViewBag.Message = "Your contact page.";
return View();
}
}
Run the Application and debug step by step to see the order of execution of the methods. First, the OnActionExecuting will be executed, then the controller method and finally the OnActionExecuted method.
HostForLIFE.eu ASP.NET MVC 6 Hosting
HostForLIFE.eu is European Windows Hosting Provider which focuses on Windows Platform only. We deliver on-demand hosting solutions including Shared hosting, Reseller Hosting, Cloud Hosting, Dedicated Servers, and IT as a Service for companies of all sizes. We have customers from around the globe, spread across every continent. We serve the hosting needs of the business and professional, government and nonprofit, entertainment and personal use market segments.

June 26, 2020 13:15 by
PeterToday, I want to show you how to delete multiple Items in ASP.NET with JSON. JSON (JavaScript Object Notation) is a lightweight data-interchange format. It is easy for humans to read and write. It is easy for machines to parse and generate. JSON is a text format that is completely language independent but uses conventions that are familiar to programmers of the C-family of languages, including C, C++, C#, Java, JavaScript, Perl, Python, and many others. These properties make JSON an ideal data-interchange language. Now, open your project and write the following code:

View
<table class="table">
@foreach (var role in Model) {
<tr>
<td>
<input id="responsable1" name="checkResp" value="@role.id" type="checkbox" />
<strong>@role.Name</strong>
</td>
</tr>
}
</table>
<input id="DeleteBtn" type="button" value="Delete Selected" />
<script>
$("#DeleteBtn").on("click", function() {
var boxData = [];
$("input[name='checkResp']:checked").each(function() {
boxData.push($(this).val());
});
$.ajax({
url: '/Roles/DeleteMultiple',
data: {
RoleId: boxData.join(",")
},
cache: false,
type: "POST",
timeout: 10000,
dataType: "json",
success: function(result) {
window.location.reload();
}
});
});
</script>
Controller
[HttpPost]
public JsonResult DeleteMultiple(string RoleId) {
ApplicationDbContext db = new ApplicationDbContext();
var RoleIds = RoleId.Split(',');
foreach(var id in RoleIds) {
int idConverted = Convert.ToInt32(id);
Roles roleid = db.Roles.Find(idConverted);
db.Roles.Remove(roleid);
}
context.SaveChanges();
var message = "Selected roles have been deleted";
return Json(message);
}
DeleteMultiple - Action Name
Roles - Controller Name
HostForLIFE.eu ASP.NET MVC 6 Hosting
HostForLIFE.eu is European Windows Hosting Provider which focuses on Windows Platform only. We deliver on-demand hosting solutions including Shared hosting, Reseller Hosting, Cloud Hosting, Dedicated Servers, and IT as a Service for companies of all sizes. We have customers from around the globe, spread across every continent. We serve the hosting needs of the business and professional, government and nonprofit, entertainment and personal use market segments.

May 13, 2020 09:18 by
PeterThis article is an overview of FileResult in ASP.Net Core MVC. The FileResult actions are used to read and write files. FileResult is the parent of all file-related action results. There is a method on ControllerBase class called File. This method accepts a set of parameters based on the type of file and its location, which maps directly to the more specific return types. I’ll discuss how to use all the FileResult actions available in ASP.Net Core MVC.
There are different type of file results in core MVC.
FileResult
FileContentResult
FileStreamResult
VirtualFileResult
PhysicalFileResult
FileResult
FileResult is the parent of all file-related action results. It is a base class that is used to send binary file content to the response. It represents an ActionResult that when executed will write a file as the response.
public FileResult DownloadFile()
{
return File("/Files/File Result.pdf", "text/plain", "File Result.pdf");
}
FileContentResult
FileContentResult is an ActionResult that when executed will write a binary file to the response.
public FileContentResult DownloadContent()
{
var myfile = System.IO.File.ReadAllBytes("wwwroot/Files/FileContentResult.pdf");
return new FileContentResult(myfile, "application/pdf");
}
FileStreamResult
FileStreamResult Sends binary content to the response by using a Stream instance when we want to return the file as a FileStream.
public FileStreamResult CreateFile()
{
var stream = new MemoryStream(Encoding.ASCII.GetBytes("Hello World"));
return new FileStreamResult(stream, new MediaTypeHeaderValue("text/plain"))
{
FileDownloadName = "test.txt"
};
}
VirtualFileResult
A FileResult that on execution writes the file specified using a virtual path to the response using mechanisms provided by the host. You can use VirtualFileResult if you want to read a file from a virtual address and return it.
public VirtualFileResult VirtualFileResult()
{
return new VirtualFileResult("/Files/PhysicalFileResult.pdf", "application/pdf");
}
PhysicalFileResult
A FileResult on execution will write a file from disk to the response using mechanisms provided by the host.You can use PhysicalFileResult to read a file from a physical address and return it, as shown in PhysicalFileResult method.
public PhysicalFileResult PhysicalFileResult()
{
return new PhysicalFileResult(_environment.ContentRootPath + "/wwwroot/Files/PhysicalFileResult.pdf", "application/pdf");
}
Step 1
Open Visual Studio 2019 and select the ASP.NET Core Web Application template and click Next.
Step 2
Name the project FileResultActionsCoreMvc_Demo and click Create.
Step 3
Select Web Application (Model-View-Controller), and then select Create. Visual Studio used the default template for the MVC project you just created.
Step 4
In Solution Explorer, right-click the wwwroot folder. Select Add > New Folder. Name the folder Files. Add some files to work with them.
Complete controller code
using Microsoft.AspNetCore.Hosting;
using Microsoft.AspNetCore.Mvc;
using Microsoft.Net.Http.Headers;
using System.IO;
using System.Text;
namespace FileResultActionsCoreMvc_Demo.Controllers
{
public class HomeController : Controller
{
private readonly IWebHostEnvironment _environment;
public HomeController(IWebHostEnvironment environment)
{
_environment = environment;
}
public IActionResult Index()
{
return View();
}
public FileResult DownloadFile()
{
return File("/Files/File Result.pdf", "text/plain", "File Result.pdf");
}
public FileContentResult DownloadContent()
{
var myfile = System.IO.File.ReadAllBytes("wwwroot/Files/FileContentResult.pdf");
return new FileContentResult(myfile, "application/pdf");
}
public FileStreamResult CreateFile()
{
var stream = new MemoryStream(Encoding.ASCII.GetBytes("Hello World"));
return new FileStreamResult(stream, new MediaTypeHeaderValue("text/plain"))
{
FileDownloadName = "test.txt"
};
}
public VirtualFileResult VirtualFileResult()
{
return new VirtualFileResult("/Files/PhysicalFileResult.pdf", "application/pdf");
}
public PhysicalFileResult PhysicalFileResult()
{
return new PhysicalFileResult(_environment.ContentRootPath + "/wwwroot/Files/PhysicalFileResult.pdf", "application/pdf");
}
}
}
Step 5
Open Index view which is in views folder under Home folder. Add the below code in Index view.
Index View
@{
ViewData["Title"] = "Home Page";
}
<h3 class="text-center text-uppercase">FileResult Action in core mvc</h3>
<ul class="list-group list-group-horizontal">
<li class="list-group-item"><a asp-action="DownloadFile" asp-controller="Home">File Result</a></li>
<li class="list-group-item"><a asp-action="DownloadContent" asp-controller="Home" target="_blank">File Content Result</a></li>
<li class="list-group-item"><a asp-action="CreateFile" asp-controller="Home">File Stream Result</a></li>
<li class="list-group-item"><a asp-action="VirtualFileResult" asp-controller="Home" target="_blank">Virtual File Result</a></li>
<li class="list-group-item"><a asp-action="PhysicalFileResult" asp-controller="Home" target="_blank">Physical File Result</a></li>
</ul>
Step 6
Build and run your Project ctrl+F5
April 9, 2020 05:10 by
PeterWhat is an Html Helper?
Html helper is a method that is used to render HTML content in a view. Html helpers are implemented using an extension method. If you want to create an input text box with
id=email and name in email:
<input type=text id=email name=email value=’’/>
This is all the Html we need to write -- by using the helper method it becomes so easy:
@Html.TextBox(‘email’)
It will generate a textbox control whose name is the email.
If we want to assign the value of the textbox with some initial value then use the below method:
@Html.TextBox(‘email’,’[email protected]’)
If I want to set an initial style for textbox we can achieve this by using the below way:
@Html.TextBox(‘email’,’[email protected]’,new {style=’your style here’ , title=’your title here’});
Here the style we pass is an anonymous type.
If we have a reserved keyword like class readonly and we want to use this as an attribute we will do this using the below method, which means append with @ symbol with the reserved word.
@Html.TextBox(‘email’,’[email protected]’,new {@class=’class name’, @readonly=true});
If we want to generate label:
@Html.Label(‘firstname’,’sagar’)
For password use the below Html helper method to create password box:
@Html.Password(“password”)
If I want to generate a textarea then for this also we have a method:
@Html.TextArea(“comments”,”,4,12,null)
In the above code 4 is the number of rows and 12 is the number of columns.
To generate a hidden box:
@Html.Hidden(“EmpID”)
Hidden textboxes are not displayed on the web page but used for storing data and when we need to pass data to action method then we can use that.
Is it possible to create our Html helpers in asp.net MVC?
Yes, we can create our Html helpers in MVC.
Is it mandatory to use Html helpers?
No, we can use plain Html for that but Html helpers reduce a significant amount of Html code to write that view.
Also, your code is simple and maintainable and if you require some complicated logic to generate view then this is also possible.
March 20, 2020 12:00 by
PeterPartial view in ASP.NET MVC is special view which renders a portion of view content. It is just like a user control of a web form application. Partial can be reusable in multiple views. It helps us to reduce code duplication. In other word a partial view enables us to render a view within the parent view.
The partial view is instantiated with its own copy of a ViewDataDictionary object which is available with the parent view so that partial view can access the data of the parent view. If we made the change in this data (ViewDataDictionary object), the parent view's data is not affected. Generally the Partial rendering method of the view is used when related data that we want to render in a partial view is part of our model.
Creating Partial View
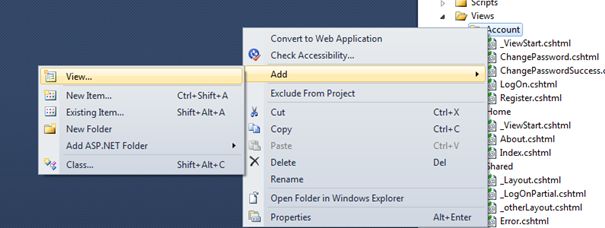
To create a partial view, right-click on view -> shared folder and select Add -> View option. In this way we can add a partial view.
Creating Partial View
It is not mandatory to create a partial view in a shared folder but a partial view is mostly used as a reusable component, it is a good practice to put it in the "shared" folder.

HTML helper has two methods for rendering the partial view: Partial and RenderPartial.
<div>
@Html.Partial("PartialViewExample")
</div>
<div>
@{
Html.RenderPartial("PartialViewExample");
}
</div>
@Html.RenderPartial
The result of the RenderPartial method is written directly into the HTTP response, it means that this method used the same TextWriter object as used by the current view. This method returns nothing.
@Html.Partial
This method renders the view as an HTML-encoded string. We can store the method result in a string variable.
The Html.RenderPartial method writes output directly to the HTTP response stream so it is slightly faster than the Html.Partial method.
Returning a Partial view from the Controller's Action method:
public ActionResult PartialViewExample()
{
return PartialView();
}
Render Partial View Using jQuery
Sometimes we need to load a partial view within a model popup at runtime, in this case we can render the partial view using JQuery element's load method.
<script type="text/jscript">
$('#partialView').load('/shared/PartialViewExample’);
</script>
February 28, 2020 11:15 by
PeterIn this post we will implement modal pop up to display the detailed information of user after clicking on detail anchor. So this is the view on which we are going to apply modal popup.
View code
Enumerable<CodeFirst.Models.FriendsInfo>
@{
ViewBag.Title = "Index";
}
<h2>Index</h2>
<p>
@Html.ActionLink("View All", "Index")
@using (Html.BeginForm("Search", "Home", FormMethod.Post))
{
<table>
<tr>
<td>
<input type="text" id="txtName" name="searchparam" placeholder="type here to search" />
</td>
<td>
<input type="submit" id="btnSubmit" value="Search" />
</td>
</tr>
</table>
}
</p>
<table class="table">
<tr>
<th>
@Html.DisplayNameFor(model => model.Name)
</th>
<th>
@Html.DisplayNameFor(model => model.Mobile)
</th>
<th>
@Html.DisplayNameFor(model => model.Address)
</th>
<th></th>
</tr>
@foreach (var item in Model)
{
<tr>
<td>
@Html.DisplayFor(modelItem => item.Name)
</td>
<td>
@Html.DisplayFor(modelItem => item.Mobile)
</td>
<td>
@Html.DisplayFor(modelItem => item.Address)
</td>
<td>
@*@Html.ActionLink("Edit", "Edit", new { id=item.Id }) |
@Html.ActionLink("Details", "Details", new { id=item.Id }) |
@Html.ActionLink("Delete", "Delete", new { id=item.Id })*@
<a href="javascript:void(0);" class="anchorDetail" data-id="@item.Id">Details</a>
</td>
</tr>
}
</table>
As we can see we have detail anchor, with class anchorDetail and with data-id, which will get the id of clicked anchor and show the corresponding data to modal (detail view) on screen.
We have an Action method Details(int id) which will return the partial view.
public ActionResult Details(int Id)
{
FriendsInfo frnds = new FriendsInfo();
frnds = db.FriendsInfo.Find(Id);
return PartialView("_Details",frnds);
}
Here we added a partial view for this purpose to show detail view when user click on detail anchor in the list.
View Code
@model CodeFirst.Models.FriendsInfo
<div>
<div class="modal-header">
<button type="button" class="close" data-dismiss="modal" aria-hidden="true">×</button>
<h4 class="modal-title" id="myModalLabel">FriendsInfo</h4>
</div>
<hr />
<dl class="dl-horizontal">
<dt>
@Html.DisplayNameFor(model => model.Name)
</dt>
<dd>
@Html.DisplayFor(model => model.Name)
</dd>
<dt>
@Html.DisplayNameFor(model => model.Mobile)
</dt>
<dd>
@Html.DisplayFor(model => model.Mobile)
</dd>
<dt>
@Html.DisplayNameFor(model => model.Address)
</dt>
<dd>
@Html.DisplayFor(model => model.Address)
</dd>
</dl>
</div>
We have a div for modal pop-up.
<div id='myModal' class='modal'>
<div class="modal-dialog">
<div class="modal-content">
<div id='myModalContent'></div>
</div>
</div>
</div>
Here is the script for showing modal (partial view) on above div when user click on detail anchor. Here we used Ajax call for this purpose.
Script
@section scripts
{
<script src="~/Scripts/jquery-1.10.2.min.js"></script>
<script src="~/Scripts/bootstrap.js"></script>
<script src="~/Scripts/bootstrap.min.js"></script>
<script>
var TeamDetailPostBackURL = '/Home/Details';
$(function () {
$(".anchorDetail").click(function () {
debugger;
var $buttonClicked = $(this);
var id = $buttonClicked.attr('data-id');
var options = { "backdrop": "static", keyboard: true };
$.ajax({
type: "GET",
url: TeamDetailPostBackURL,
contentType: "application/json; charset=utf-8",
data: { "Id": id },
datatype: "json",
success: function (data) {
debugger;
$('#myModalContent').html(data);
$('#myModal').modal(options);
$('#myModal').modal('show');
},
error: function () {
alert("Dynamic content load failed.");
}
});
});
//$("#closebtn").on('click',function(){
// $('#myModal').modal('hide');
$("#closbtn").click(function () {
$('#myModal').modal('hide');
});
});
</script>
}
HostForLIFE.eu ASP.NET MVC 6 Hosting
HostForLIFE.eu is European Windows Hosting Provider which focuses on Windows Platform only. We deliver on-demand hosting solutions including Shared hosting, Reseller Hosting, Cloud Hosting, Dedicated Servers, and IT as a Service for companies of all sizes. We have customers from around the globe, spread across every continent. We serve the hosting needs of the business and professional, government and nonprofit, entertainment and personal use market segments.
September 13, 2019 11:51 by
PeterjQuery UI has an AutoComplete widget. The AutoComplete widget is quite nice and straight forward to use. In this post, I will show you how to use jQuery AutoComplete widget to consolidate AutoComplete function in ASP.NET MVC application.

Step 1
The first step is to add the jQuery scripts and styles. With ASP.NET MVC, the following code does the work:
@Styles.Render("~/Content/themes/base/css")
@Scripts.Render("~/bundles/jquery")
@Scripts.Render("~/bundles/jqueryui")
Step 2
Using the AutoComplete widget is also simple. You will have to add a textbox and attach the AutoComplete widget to the textbox. The only parameter that is required for the widget to function is source. For this example, we will get the data for the AutoComplete functionality from a MVC action method.
$(document).ready(function () {
$('#tags').autocomplete(
{
source: '@Url.Action("TagSearch", "Home")'
});
})
In the above code, the textbox with id=tags is attached with the AutoComplete widget. The source points to the URL of TagSearch action in the HomeController: /Home/TagSearch. The HTML of the textbox is below:
<input type="text" id="tags" />
Step 3
When the user types some text in the textbox, the action method (TagSearch) is called with a parameter in the request body. The parameter name is term. So, your action method should have the following signature:
public ActionResult TagSearch(string term)
{
// Get Tags from database
string[] tags = { "ASP.NET", "WebForms",
"MVC", "jQuery", "ActionResult",
"MangoDB", "Java", "Windows" };
return this.Json(tags.Where(t => t.StartsWith(term)),
JsonRequestBehavior.AllowGet);
}
Now, the AutoComplete functionality is complete!
HostForLIFE.eu ASP.NET MVC 6 Hosting
HostForLIFE.eu is European Windows Hosting Provider which focuses on Windows Platform only. We deliver on-demand hosting solutions including Shared hosting, Reseller Hosting, Cloud Hosting, Dedicated Servers, and IT as a Service for companies of all sizes. We have customers from around the globe, spread across every continent. We serve the hosting needs of the business and professional, government and nonprofit, entertainment and personal use market segments.
June 18, 2019 12:12 by
PeterIn this article, I will explain the concept of HTTP verbs in MVC 5. I will also explain the various types of HTTP verbs in MVC 5 and how it works in the project.
What is HTTP?
- HTTP stands for hypertext transfer protocol.
- This protocol works while working with a client-server application.
- This protocol provides communication between the client and the server.
HTTP provides methods (verbs) for the actions performed on a response. HTTP verbs are used on an action method. HTTP provides the following main verbs.
HTTP Get
This verb is used to get existing data from the database. In HttpGet, data travels in the URL only. To use the HttpGet method, we use HttpGet attribute on the Action method. It is also the default HTTP verb.
Example
domain.com/student/GetStudent/1
domain.com/student/GetStudent?studentid=1
[HttpGet]
public object GetStudent(int studentid)
{
// code here
}
HTTP Post
This verb is used while we have to create a new resource in the database. In HttpPost, data travels in the URL and body. To use HttpPost method, we use HttpPost attribute on the Action method.
Example
domain/student/Studentsave
Body - Json body
[HttpPost]
public object Studentsave(studentclass obj)
{
}
HTTP Put
This verb is used while we have to update an existing resource in the database. In HttpPut, the data travels in the URL and body. To use HttpPut method, we use HttpPut attribute on the Action method.
Example
domain.com/student/studentupdate/1
Body- Json body
[HttpPut]
public object Studentupdate(int studentid ,Studentclass objVM)
{
}
HTTP Delete
This verb is used while we have to delete the existing resources in the database. In HttpDelete, data travels in the URL and body. To use HttpDelete, we use HttpDelete attribute on the Action method.
Example
domain.com/student/studentdelete/1
[HttpDelete]
public object Studentupdate(int studentid)
{
} HostForLIFE.eu ASP.NET MVC 6 Hosting
European best, cheap and reliable ASP.NET hosting with instant activation. HostForLIFE.eu is #1 Recommended Windows and ASP.NET hosting in European Continent. With 99.99% Uptime Guaranteed of Relibility, Stability and Performace. HostForLIFE.eu security team is constantly monitoring the entire network for unusual behaviour. We deliver hosting solution including Shared hosting, Cloud hosting, Reseller hosting, Dedicated Servers, and IT as Service for companies of all size.

April 12, 2019 12:28 by
PeterIn this article, I will explain about getting lookup dataa into you view ASP.Net MVC 6. This is a super common problem I encounter when building ASP.net MVC applications. I have a form that has a drop down box. Not only do I need to select the correct item from the edit model to pick from the drop down but I need to populate the drop down with the possible values.
Over the years I've used two approaches to doing this. The first is to push into the ViewBag a list of values in the controller action. That looks like
public ActionResult Edit(int id){
var model = repository.get(id);
ViewBag.Provinces = provincesService.List();
return View(model);
}
Then in the view you can retrieve this data and use it to populate the drop down. If you're using the HTML helpers then this looks like
@Html.DropDownListFor(x=>x.province, (IEnumerable<SelectListItem>)ViewBag.Provinces)
This becomes somewhat messy when you have a lot of drop downs on a page. For instance consider something like
public ActionResult Edit(int id){
var model = repository.get(id);
ViewBag.Provinces = provincesService.List();
ViewBag.States = statesService.List();
ViewBag.StreetDirections = streetDirectionsService.List();
ViewBag.Countries = countriesService.List();
ViewBag.Counties = countiesService.List();
return View(model);
}
The work of building up the data in the model becomes the primary focus of the view. We could extract it to a method but then we have to go hunting to find the different drop downs that are being populated. An approach I've taken in the past is to annotate the methods with an action filter to populate the ViewBag for me. This makes the action look like
[ProvincesFilter]
[StatesFilter]
[StreetDirectionsFilter]
[CountriesFilter]
[CountiesFilter]
public ActionResult Edit(int id){
var model = repository.get(id);
return View(model);
}
One of the filters might look like
public override void OnActionExecuting(ActionExecutingContext filterContext)
{
var countries = new List<SelectListItem>();
if ((countries = (filterContext.HttpContext.Cache.Get(GetType().FullName) as List<SelectListItem>)) == null)
{
countries = countriesService.List();
filterContext.HttpContext.Cache.Insert(GetType().FullName, countries);
}
filterContext.Controller.ViewBag.Countries = countries;
base.OnActionExecuting(filterContext);
}
This filter also adds a degree of caching to the request so that we don't have to keep bugging the database.
Keeping a lot of data in the view bag presents a lot of opportunities for error. We don't have any sort of intellisense with the dynamic view object and I frequently use the wrong name in the controller and view, by mistake. Finally building the drop down box using the HTML helper requires some nasty looking casting. Any time I cast I feel uncomfortable.
@Html.DropDownListFor(x=>x.province, (IEnumerable<SelectListItem>)ViewBag.Provinces)
Now a lot of people prefer transferring the data as part of the model; this is the second approach. There is nothing special about this approach you just put some collections into the model.
I've always disliked this approach because it mixes the data needed for editing with the data for the drop downs which is really incidental. This data seems like a view level concern that really doesn't belong in the view model. This is a bit of a point of contention and I've challenged more than one person to a fight to the death over this very thing.
So neither option is particularly palatable. What we need is a third option and the new dependency injection capabilities of ASP.net MVC open up just such an option: we can inject the data services directly into the view. This means that we can consume the data right where we retrieve it without having to hammer it into some bloated DTO. We also don't have to worry about annotating our action or filling it with junk view specific code.
To start let's create a really simple service to return states.
public interface IStateService
{
IEnumerable<State> List();
}
public class StateService : IStateService
{
public IEnumerable<State> List() {
return new List<State>
{
new State { Abbreviation = "AK", Name = "Alaska" },
new State { Abbreviation = "AL", Name = "Alabama" }
};
}
}
Umm, looks like we're down to only two states, sorry Kentucky.
Now we can add this to our container. I took a singleton approach and just registered a single instance in the Startup.cs.
services.AddInstance(typeof(IStateService), new StateService());
This is easily added the the view by adding
@inject ViewInjection.Services.IStateService StateService
As the first line in the file. Then the final step is to actually make use of the service to populate a drop down box:
<div class="col-lg-12">
@Html.DropDownList("States", StateService.List().Select(x => new SelectListItem { Text = x.Name, Value = x.Abbreviation }))
</div>
That's it! Now we have a brand new way of getting the data we need to the view without having to clutter up our controller with anything that should be contained in the view.
HostForLIFE.eu ASP.NET MVC 6 Hosting
European best, cheap and reliable ASP.NET hosting with instant activation. HostForLIFE.eu is #1 Recommended Windows and ASP.NET hosting in European Continent. With 99.99% Uptime Guaranteed of Relibility, Stability and Performace. HostForLIFE.eu security team is constantly monitoring the entire network for unusual behaviour. We deliver hosting solution including Shared hosting, Cloud hosting, Reseller hosting, Dedicated Servers, and IT as Service for companies of all size.