European ASP.NET MVC 4 and MVC 5 Hosting

BLOG about ASP.NET MVC 3, ASP.NET MVC 4, and ASP.NET MVC 5 Hosting and Its Technology - Dedicated to European Windows Hosting Customer

European ASP.NET MVC 4 Hosting :: Single Page Application in ASP.NET MVC 4

clock December 5, 2013 11:20 by author Scott

Single Page Applications (SPA)?

Normally a web application is a collection of web pages, each doing a specific task. For example, consider a web application that does CRUD operations (Create, Read, Update and Delete) on data. A common practice is to create different web pages for operations such as showing a list of existing records, adding a new record, updating an existing record and deleting a record. A trend becoming increasingly popular is to have a single web page perform all of these operations. Such an application is called Single Page Application or SPA. So, in this example instead of developing four separate web pages you develop just one web page. At runtime, depending on the operation selected by a user, the web page renders an appropriate user interface. Such an application heavily relies on client side JavaScript libraries.

It should be noted that SPA is a general concept and ASP.NET MVC 4 has decided to offer some basic infrastructure to the developers to put this concept into practice. ASP.NET MVC 4 provides a project template that creates a basic yet functional SPA application. You can then customize the application to add more functionality. In the discussion that follows you will learn SPA with respect to ASP.NET MVC 4.

Parts of SPA

A Single Page Application consists of several pieces that fit together to provide the overall functionality of the application. A typical SPA consists of the following pieces:

  • Data Model : This is a server side piece that represents your data (often mapping database tables as .NET objects).
  • Data Service : Data service provides operations for database access (typically CRUD operations). This is also a service side piece and uses Entity Framework Code First approach.
  • ViewModel : View Model refers to your data and UI level operations that you wish to perform on the data. You can think of View Model as a wrapper over your model data that adds UI level operations to it.
  • Views : Views display your data to the user and also contain associated JavaScript. The default SPA project template uses Razor views.
  • Database: SPA uses Entity Framework Code First approach for database operations. The default project template creates a database in the local installation of SQL Server Express.

The following sections discuss all these parts from the default SPA project template in detail.

Creating a New Project Based on SPA Template

Installing ASP.NET MVC 4 adds a new project template in Visual Studio 2010. To create a new SPA you should create an ASP.NET MVC4 Web Application project based on this template.

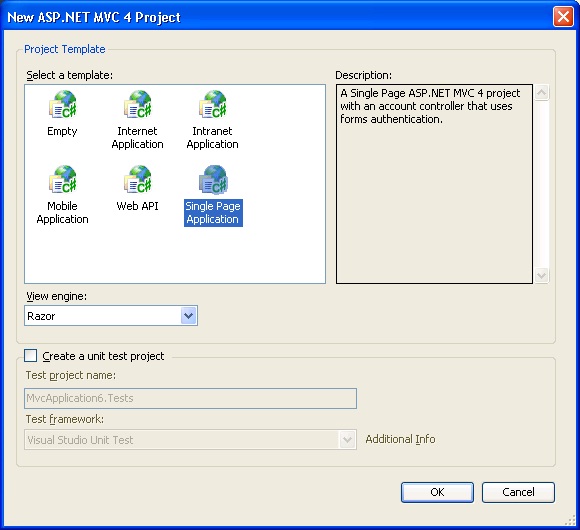
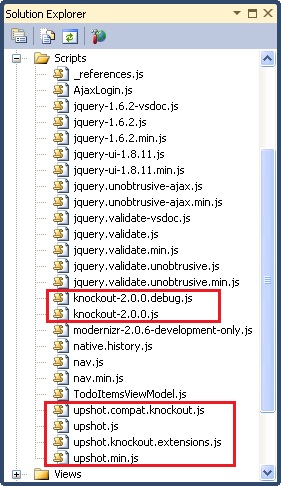
The default project created using the SPA project template contains data models, views and client script files for performing CRUD operations of a sample "To Do" application. SPA extensively uses two JavaScript libraries, namely Knockout and Upshot. The following figure shows these libraries added in the Solution Explorer.

Data Model

The sample application created by the default SPA project template deals with "To Do" items, i.e. tasks. A task is represented by a data model class - TodoItem. The TodoItem class resides in the Models folder and looks like this:

public class TodoItem
{
    public int TodoItemId { get; set; }
    [Required]
    public string Title { get; set; }
    public bool IsDone { get; set; }
}

As you can see the TodoItem is a simple class with three properties, viz. TodoItemId, Title and IsDone. The Title property is a required property as indicated by Data Annotation Attribute [Required].

To deal with the application data you need to create a DbContext and a DbDataController. This is done for you when you add a new controller to the project specifying the SPA controller template. Right click on the Controllers folder and select Add > Controller. In the Add Controller dialog specify details as shown below:

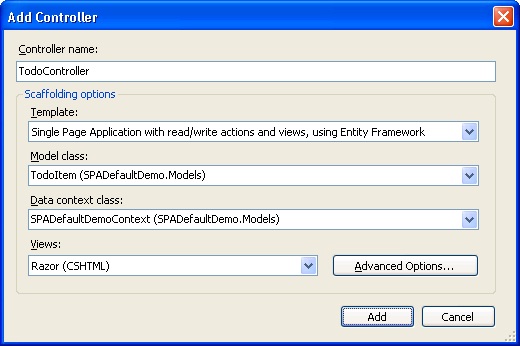
Specify the controller name as TodoController. Select scaffolding template of "Single Page Application with read/write actions and views, using Entity Framework". In the Model class drop-down select TodoItem class. In the Data context class drop-down click "New data context" and specify a name for the DbContext class. Once you click on the Add button the following files will be created for you:

  1. TodoController.cs (Controllers folder)
  2. SPADefaultDemoController.cs (Controllers folder)
  3. SPADefaultDemoController.TodoItem.cs (Controllers folder)
  4. SPADefaultDemoContext.cs (Models folder)
  5. Index.cshtml and associated partial views (Views folder)

Out of these classes the DbContext class (SPADefaultDemoContext) looks like this:

public class SPADefaultDemoContext : DbContext
{
    public DbSet<TodoItem> TodoItems { get; set; }
}

As you can see the SPADefaultDemoContext class inherits from DbContext base class and contains a DbSet of TodoItem.

Data Service

The job of performing CRUD operations is handled by the SPADefaultDemoController (the data service) class. This class is shown below:

public partial class SPADefaultDemoController :
               DbDataController<SPADefaultDemo.Models.SPADefaultDemoContext>
{
    public IQueryable<SPADefaultDemo.Models.TodoItem> GetTodoItems() {
        return DbContext.TodoItems.OrderBy(t => t.TodoItemId);
    } 

    public void InsertTodoItem(SPADefaultDemo.Models.TodoItem entity) {
        InsertEntity(entity);
    } 

    public void UpdateTodoItem(SPADefaultDemo.Models.TodoItem entity) {
        UpdateEntity(entity);
    } 

    public void DeleteTodoItem(SPADefaultDemo.Models.TodoItem entity) {
        DeleteEntity(entity);
    }
}

As you can see the SPADefaultDemoController class inherits from DbDataController base class and includes methods for selecting, inserting, updating and deleting TodoItem records to the database. The data service is called from the client side JavaScript code as you will see later.

ViewModel

The ViewModel class for the TodoItem data model is created automatically for you and is placed in the Scripts folder.

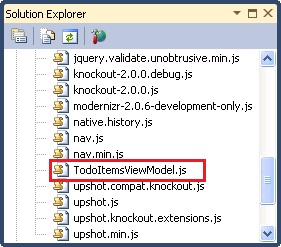
As you can see TodoItemsViewModel.js file is placed in the Scripts folder. This ViewModel is developed using Knockout and a part of it is shown below:

// TodoItem class
var entityType = "TodoItem:#SPADefaultDemo.Models";
MyApp.TodoItem = function (data) {
    var self = this;
    // Underlying data
    self.TodoItemId = ko.observable(data.TodoItemId);
    self.Title = ko.observable(data.Title);
    self.IsDone = ko.observable(data.IsDone);
    upshot.addEntityProperties(self, entityType);
}
...

As you can see the TodoItem ViewModel class contains the same properties as the server side data model. These properties are observable properties as indicated by ko.observable() syntax. Knockout synchronizes the data between views and ViewModel. The communication between the ViewModel and the server side data happens through Upshot.js.

View

The Index.cshtml file represents the main view of the application. Three partial views are also created viz. _Grid, _Editor and _Paging that provide the user interface for list, insert/update and paging respectively. Depending on the operation selected by the user the appropriate partial view is rendered. The following markup shows a fragment from the Index.cshtml.

@{
    ViewBag.Title = "TodoItems";
    Layout = "~/Views/Shared/_SpaLayout.cshtml";


<div data-bind="visible: editingTodoItem">
    @Html.Partial("_Editor")
</div> 

<div data-bind="visible: !editingTodoItem()">
    @Html.Partial("_Grid")
</div> 

<div class="message-info message-success" data-bind="flash: { text: successMessage, duration: 5000
}"></div>
<div class="message-info message-error" data-bind="flash: { text: errorMessage, duration: 20000 }"></div>

<script type="text/javascript" src="@Url.Content("~/Scripts/TodoItemsViewModel.js")"></script>
<script type="text/javascript">
    $(function () {
        upshot.metadata(@(Html.Metadata<SPADefaultDemo.Controllers.SPADefaultDemoController>())); 

        var viewModel = new MyApp.TodoItemsViewModel({
            serviceUrl: "@Url.Content("~/api/SPADefaultDemo")"
        });
        ko.applyBindings(viewModel);
    });
</script>

Notice that data service URL is specified as ~/api/SPADefaultDemo. The Html.Metadata() method provides the metadata of the types to the Upshot. The binding between View and ViewModel is provided by the applyBindings() method of Knockout.

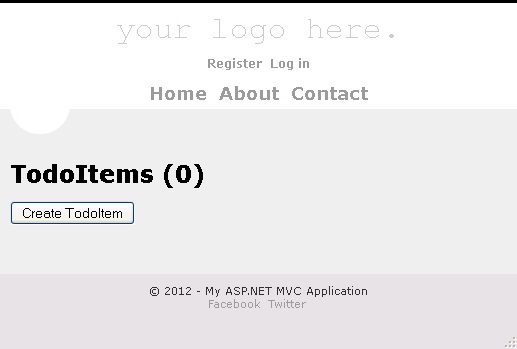
If you run the application and navigate to http://localhost:1275/todo (change the port no. as per your setup) you will see something similar to the following figure.

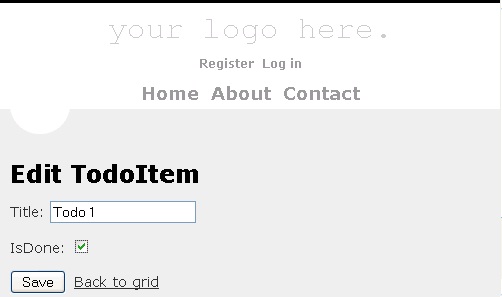
You can click on the "Create TodoItem" button to add a few records. You can then modify or delete them. The following figure shows the view in edit mode.

Database

At this stage the sample "To do" application is able to store and retrieve the data but you might be wondering where the actual data is. Since SPA uses Code First approach to database operations, the database is automatically created for you when you run the application for the first time. The subsequent runs use the previously created database. Have a look at the following figure that shows a sample database generated under local installation of SQL Express.

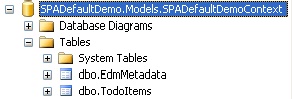
As you can see, by default the database name is the same as the fully qualified name of the DbContext class. Inside there is a TodoItems table that stores the application data.


European ASP.NET MVC 4 Hosting - Amsterdam :: ValidateInput and AllowHtml attribute in MVC4

clock October 28, 2013 09:43 by author Scott

Sometimes, your required to save Html data in the database. By default Asp.Net MVC doesn't allow a user to submit html for avoiding Cross Site Scripting attack to your application. Suppose you have below form and you can submit the Html in description textarea.

If you do this and try to submit it you will get the error below

However, if you want to do this, you can achieve it by using ValidateInput attribute and AllowHtml attribute.

ValidateInput Attribute

This is the simple way to allow the submission of HTML. This attribute can enable or disable input validation at the controller level or at any action method.

ValidateInput at Controller Level

[ValidateInput(false)]
public class HomeController : Controller
{
public ActionResult AddArticle()
{
return View();
}

[HttpPost]
public ActionResult AddArticle(BlogModel blog)
{
if (ModelState.IsValid)
{

}
return View();
}
}

Now, the user can submit Html for this Controller successfully.

ValidateInput at Action Method Level

public class HomeController : Controller
{
public ActionResult AddArticle()
{
return View();
}

[ValidateInput(false)]
[HttpPost]
public ActionResult AddArticle(BlogModel blog)
{
if (ModelState.IsValid)
{

}
return View();
}
}

Now, the user can submit Html for this action method successfully.

Limitation of ValidateInput attribute

This attribute also has the issue since this allow the Html input for all the properties and that is unsafe. Since you have enable Html input for only one-two properties then how to do this. To allow Html input for a single property, you should useAllowHtml attribute.

AllowHtml Attribute

This is the best way to allow the submission of HTML for a particular property. This attribute will be added to the property of a model to bypass input validation for that property only. This explicit declaration is more secure than the ValidateInput attribute.

using System.ComponentModel.DataAnnotations;
using System.Web.Mvc; 

public class BlogModel
{
[Required]
[Display(Name = "Title")]
public string Title { get; set; } 

[AllowHtml]
[Required]
[Display(Name = "Description")]
public string Description{ get; set; } 

}

Make sure, you have removed the ValidateInput attribute from Conroller or Action method. Now, the user can submit Html only for the Description property successfully.


European ASP.NET MVC Hosting - Amsterdam :: Example Routing in ASP.NET MVC

clock October 18, 2013 12:32 by author Scott

Basically, Routing is a pattern matching system that monitor the incoming request and figure out what to do with that request. At runtime, Routing engine use the Route table for matching the incoming request's URL pattern against the URL patterns defined in the Route table. You can register one or more URL patterns to the Route table at Application_Start event.

How to defining route...

    public static void RegisterRoutes(RouteCollection routes)
    {
    routes.MapRoute(
    "Default", // Route name
    "{controller}/{action}/{id}", // Route Pattern
    new { controller = "Home", action = "Index", id = UrlParameter.Optional } // Default values for above defined parameters
    );
    }    

    protected void Application_Start()
    {
    RegisterRoutes(RouteTable.Routes);
    //To:DO
    }

When the routing engine finds a match in the route table for the incoming request's URL, it forwards the request to the appropriate controller and action. If there is no match in the route table for the incoming request's URL, it returns a 404 HTTP status code.

Note

Always remeber route name should be unique across the entire application. Route name cann't be duplicate.

How it works...

In above example we have defined the Route Pattern {controller}/{action}/{id} and also provide the default values for controller,action and id parameters. Default values means if you will not provide the values for controller or action or id defined in the pattern then these values will be serve by the routing system.

Suppose your webapplication is running on www.example.com then the url pattren for you application will be www.example.com/{controller}/{action}/{id}. Hence you need to provide the controller name followed by action name and id if it is required. If you will not provide any of the value then default values of these parameters will be provided by the routing system.

Difference between Routing and URL Rewriting

Many developers compares routing to URL rewritting that is wrong. Since both the approaches are very much different. Moreover, both the approaches can be used to make SEO friendly URLs. Below is the main difference between these two approaches.

  • URL rewriting is focused on mapping one URL (new url) to another URL (old url) while routing is focused on mapping a URL to a resource.
  • Actually, URL rewriting rewrites your old url to new one while routing never rewrite your old url to new one but it map to the original route.


European ASP.NET MVC 4 Hosting - Amsterdam :: How To Build async Unit of Work with MVC 4

clock October 8, 2013 12:06 by author Ronny

In the RavenDB mailing list, How to combine the standard unit of work pattern of working with RavenDB in MVC applications with async. In particular, the problematic code was:

public class HomeController : Controller
   {
        public IAsyncDocumentSession Db { get; set; }
        public async Task<ActionResult> Index()
       {
            var person = new Person {Name = "Khalid Abuhakmeh"};
            await Db.StoreAsync(person);     

          return View(person);
       }
           protected override void OnActionExecuting(ActionExecutingContext filterContext)
       {
           Db = MvcApplication.DocumentStore.OpenAsyncSession();
           base.OnActionExecuting(filterContext);
       }

       protected override void OnActionExecuted(ActionExecutedContext filterContext)
       {
           Db.SaveChangesAsync()
               .ContinueWith(x => { });
           base.OnActionExecuted(filterContext);
       }
    lic class Person
       {
           public string Id { get; set; }
           public string Name { get; set; }
       }
   }

As you probably noticed, the problem Db.SaveChangesAsync(). We want to execute the save changes in an async manner, but we don’t want to do that in a way that would block the thread. The current code just assume the happy path, and any error would be ignored. That ain’t right. If we were using Web API, this would be trivially easy, but we aren’t. So let us see what can be done about it.

I created a new MVC 4 application and wrote the following code:

As you can see, I have a break point after the await, which means that when that break point is hit, I’ll be able to see what is responsible for handling async calls in MVC4. When the breakpoint was hit, I looked at the call stack, and saw:


Not very useful, right? But we can fix that:

And now we get:

This is a whole bunch of stuff that doesn’t really help, I am afraid. But then I thought about putting the breakpoint before the await, which gave me:

And this means that I can check the code here. I got the code and started digging. At first I thought that I couldn’t do it, but then I discovered that I could. See, all you have to do is to create you own async action invoker, like so:

 public class UnitOfWorkAsyncActionInvoker : AsyncControllerActionInvoker
   
{
  
     protected override IAsyncResult BeginInvokeActionMethod(
  
         ControllerContext controllerContext,
  
         ActionDescriptor actionDescriptor,
  
         IDictionary<string, object> parameters, AsyncCallback callback,
  
         object state)
  
    {
  
         return base.BeginInvokeActionMethod(controllerContext, actionDescriptor, parameters,
 
                                             result => DoSomethingAsyncAfterTask().ContinueWith(task => callback(task)),
 
                                             state);
 
     }
 
     public async Task DoSomethingAsyncAfterTask()
 
     {
 
         await Task.Delay(1000);
 
     }
  
}
And then register it :

   DependencyResolver.SetResolver(type =>
 
     {
 
         if (type == typeof (IAsyncActionInvoker))
 
             return new UnitOfWorkAsyncActionInvoker();
 
         return null;
 
     }, type => Enumerable.Empty<object>());

Note: Except for doing a minimum of F5 in the debugger, I have neither tested nor verified this code. It appears to do what I want it to, and since I am only getting to this because a customer asked about this in the mailing list, that is about as much investigation time that I can dedicate to it.


European ASP.NET MVC 4 Hosting - Amsterdam :: How to Create Async Controllers with MVC 4

clock August 9, 2013 08:59 by author Scott

In this post I will show how to create async controllers in MVC 4.

The way to build asynchronous controllers has been completely changed compared to how it was done in MVC3 with the AsyncController superclass. This class and the inherent complexity in using it are gone in MVC4.

Start Visual Studio 2012 and create an MVC4 Web Application and choose the Internet template. Create a folder called “Services” in the solution. Insert two classes in this folder: DatabaseService and CalculationService. They represent long running calls to external services and have the following content:

DatabaseService.cs:

public class DatabaseService
    {
        public string GetData()
        {
            StringBuilder dataBuilder = new StringBuilder();
            dataBuilder.Append("Starting GetData on thread id ").Append(Thread.CurrentThread.ManagedThreadId)
                .Append(". ");
            Thread.Sleep(2000);
            dataBuilder.Append("Results from the database. ").Append(Environment.NewLine);
            dataBuilder.Append("Finishing GetData on thread id ").Append(Thread.CurrentThread.ManagedThreadId)
                .Append(".");
            return dataBuilder.ToString();
        }
    }

CalculationService.cs:

public class CalculationService
    {
        public string GetResult()
        {
            StringBuilder resultBuilder = new StringBuilder();
            resultBuilder.Append("Starting GetResult on thread id ").Append(Thread.CurrentThread.ManagedThreadId)
                .Append(". ");
            Thread.Sleep(2000);
            resultBuilder.Append("This is the result of a long running calculation. ");
            resultBuilder.Append("Finishing GetResult on thread id ").Append(Thread.CurrentThread.ManagedThreadId)
                .Append(".");
            return resultBuilder.ToString();
        }
    }

There should be nothing complicated in either class implementation.

Create another folder in the solution called ViewModels. Add a class called HomePageViewModel in that folder:

public class HomePageViewModel
    {
        public List<String> Messages { get; set; } 

        public void AddMessage(string message)
        {
            if (Messages == null)
            {
                Messages = new List<string>();
            }
            Messages.Add(message);
        }
    }

Navigate to the Index action of the Home controller and modify it as follows:

public ActionResult Index()
        {
            DateTime startDate = DateTime.UtcNow; 

            HomePageViewModel viewModel = new HomePageViewModel();
            viewModel.AddMessage(string.Concat("Starting Action on thread id ", Thread.CurrentThread.ManagedThreadId));
            CalculationService calcService = new CalculationService();
            DatabaseService dataService = new DatabaseService(); 
            viewModel.AddMessage(calcService.GetResult());
            viewModel.AddMessage(dataService.GetData()); 

            DateTime endDate = DateTime.UtcNow;
            TimeSpan diff = endDate - startDate; 

            viewModel.AddMessage(string.Concat("Finishing Action on thread id ", Thread.CurrentThread.ManagedThreadId));
            viewModel.AddMessage(string.Concat("Action processing time: ", diff.TotalSeconds));
            return View(viewModel);
        }

Nothing complicated here either: we’re just adding messages to the view model, show the thread ids and measure the time it takes to complete the action.

Modify Index.cshtml of the Home view as follows:

@model Mvc4.ViewModels.HomePageViewModel
@{
    ViewBag.Title = "Home Page";


<ul>
    @foreach (String message in Model.Messages)
    {
        <li>@message</li>
    }
</ul>

So when you run the web page you should see an output similar to the following:

It’s easy to see the following:

  • The Index() action blocks the thread when it calls CalculationService and DatabaseService
  • The total processing time took about 4 seconds in total
  • All involved methods executed on the same thread

Now our goal is to make this process more efficient: as it stands now the main thread is only sitting idle for most of the processing time. This can be a serious problem if we’re intending to build a scalable and responsive application.

We need to make a couple of changes to our code:

  • The Index() action needs to return a Task of type ActionResult and turned to an async method: we do not directly return an ActionResult but a Task that represents an ActionResult
  • Remember that if an action is of type async then it needs to have its pair ‘await’ somewhere in the method body
  • We have two long running method calls within the Index() action, so we’ll instruct MVC4 to await them
  • Since we’ll await those two method calls we need to insert async versions of DatabaseService.GetData() and CalculationService.GetResult() as well: they in turn must also return Tasks of type string instead of plain string

Using our experience from the Console app in the previous post we’ll include an async version of GetResult() in CalculationService.cs:

public async Task<String> GetResultAsync()
        {
            StringBuilder resultBuilder = new StringBuilder();
            resultBuilder.Append("Starting GetResult on thread id ").Append(Thread.CurrentThread.ManagedThreadId)
                .Append(". ");
            await Task.Delay(2000);
            resultBuilder.Append("This is the result of a long running calculation. ");
            resultBuilder.Append("Finishing GetResult on thread id ").Append(Thread.CurrentThread.ManagedThreadId)
                .Append(".");
            return resultBuilder.ToString();
        }

We’ll also insert a GetDataAsync() in DatabaseService.cs:

public async Task<String> GetDataAsync()
        {
            StringBuilder dataBuilder = new StringBuilder();
            dataBuilder.Append("Starting GetData on thread id ").Append(Thread.CurrentThread.ManagedThreadId)
                .Append(". ");
            await Task.Delay(2000);
            dataBuilder.Append("Results from the database. ").Append(Environment.NewLine);
            dataBuilder.Append("Finishing GetData on thread id ").Append(Thread.CurrentThread.ManagedThreadId)
                .Append(".");
            return dataBuilder.ToString();
        }

Update the Index action of the Home controller to call the async method versions of the services:

public async Task Index()
        {
            DateTime startDate = DateTime.UtcNow; 

            HomePageViewModel viewModel = new HomePageViewModel();
            viewModel.AddMessage(string.Concat("Starting Action on thread id ", Thread.CurrentThread.ManagedThreadId));
            CalculationService calcService = new CalculationService();
            DatabaseService dataService = new DatabaseService(); 

            string calculationResult = await calcService.GetResultAsync();
            string databaseResult = await dataService.GetDataAsync(); 

            viewModel.AddMessage(calculationResult);
            viewModel.AddMessage(databaseResult); 

            DateTime endDate = DateTime.UtcNow;
            TimeSpan diff = endDate - startDate; 

            viewModel.AddMessage(string.Concat("Finishing Action on thread id ", Thread.CurrentThread.ManagedThreadId));
            viewModel.AddMessage(string.Concat("Action processing time: ", diff.TotalSeconds));
            return View(viewModel);
        }

Run the web app now and you may see an output similar to the following:

Note the following:

  • The Index action started on thread id 10
  • The same thread enters GetResultAsync
  • The main thread exits GetResultAsync at the await keyword and thread 9 takes over
  • Thread 9 enters GetDataAsync and exits at the await keyword and thread 5 takes over
  • Thread 5 finished Index()
  • The total processing time is still about 4 seconds, but remember from the previous post: if you want to couple asynchronous methods with concurrency you need to include the TPL as well. This will be resolved later in this post.

The output on your screen may be different when you run the sample. It is not guaranteed that 3 different threads will be involved throughout the lifetime of the Index() action. It depends on the availability of threads, may only be 2 in total.

If you are working with WCF services and add a service reference to your project then you’ll have the option to generate the Async() versions of the service calls automatically. Make sure to select the ‘Allow generation of asynchronous operations’ checkbox and the ‘Generate task-based operations’ radiobutton in the Service Reference Settings window.

.NET4.5 is now interspersed with built-in async versions of long running and/or remote methods. Typical examples include: HttpClient.SendAsync that returns a Task of type HttpResponseMessage, or HttpContent.ReadAsStringAsync that returns a Task of type String.

We can now introduce TPL to make the service calls run in parallel. As it stands now the Index action first waits for GetResultAsync to finish before it goes on with GetDataAsync. Ideally Index should wait for both actions to complete in parallel and not one after the other. We will basically hold a reference to the Task values returned by the services and await them both together.

Update the Index action as follows:

public async Task<ActionResult> Index()
        {
            DateTime startDate = DateTime.UtcNow; 

            HomePageViewModel viewModel = new HomePageViewModel();
            viewModel.AddMessage(string.Concat("Starting Action on thread id ", Thread.CurrentThread.ManagedThreadId));
            CalculationService calcService = new CalculationService();
            DatabaseService dataService = new DatabaseService(); 

            Task<String> calculationResultTask = calcService.GetResultAsync();
            Task<String> databaseResultTask = dataService.GetDataAsync(); 

            await Task.WhenAll(calculationResultTask, databaseResultTask); 

            viewModel.AddMessage(calculationResultTask.Result);
            viewModel.AddMessage(databaseResultTask.Result); 

            DateTime endDate = DateTime.UtcNow;
            TimeSpan diff = endDate - startDate; 

            viewModel.AddMessage(string.Concat("Finishing Action on thread id ", Thread.CurrentThread.ManagedThreadId));
            viewModel.AddMessage(string.Concat("Action processing time: ", diff.TotalSeconds));
            return View(viewModel);
        }

Note the following:

  • We do not await the two service calls one by one
  • Both of them will be awaited using Task.WhenAll
  • Task.WhenAll accepts an array of Task objects that should run in parallel
  • Task.WhenAll will block until all tasks in the array have finished
  • The await keyword will make sure that Index will wait upon all tasks to complete in the array
  • To retrieve the returned value from the service calls just use the Result property of the Task object: this will be populated if the Task has a return value i.e. it is a Task of some type

When you run the updated Index page you may see something like this:

Again, your results will almost certainly differ. Which thread is allocated to which task is up to the thread scheduler. Refresh the page a couple of times to see some different results.


European ASP.NET MVC 4 Hosting - Amsterdam :: Using MVC 4 to Run Sitecore

clock July 17, 2013 11:19 by author Scott

ASP.NET MVC is everywhere, and if you judge from the the job adverts ASP.NET Web Forms is rapidly being consigned to the “legacy” category. So where does that leave developers like me, currently using Sitecore?
Although it seems to me that Sitecore is Web Forms to it’s back teeth, there are nevertheless some signs that it too is going MVC.

From Sitecore version 6.6 there is support for MVC straight out of the tin (or the installer, at least). This is great but how do you get from that install to not just an MVC project, but MVC 4 (.NET 4.5) using Visual Studio 2012?
The steps are available around and about, but this post seeks to update the process to the latest version of Sitecore and pull it all together.

If you are really new to Sitecore MVC, probably the best place to start is here.

1. Create a Visual Studio Project from the install

a.) Using the latest version of Sitecore (Sitecore 6.6.0 rev. 130214), create a new instance
b.) Create a new Empty Website with Visual Studio 2012 using .NET 4 (but NOT MVC)
c.) Copy the Sitecore instance into your Empty Project Directory, and include the files (and Assembly References) into it. I found that the best way to get the Assemblies in was to copy them to a third directory (not the bin directory), then browse to that and Visual Studio will add them, nice and cleanly.
d.) Take the global.asax from the Sitecore Instance, pull out the inline code and paste it into a new global.asax.cs
e.) Publish the Site

2. Make the project MVC3

a.) Unload the project, then right-mouse click to edit the project file. In the project file you will find an element

<ProjectTypeGuids>

add this GUID to it at the front of the list, separated by a semi-colon:
{E53F8FEA-EAE0-44A6-8774-FFD645390401};

b.) Reload the project you now have an MVC3 Sitecore project.

c.) You should now confirm that MVC3 is working:

(this taken from John West’s blog)

Create a the subdirectory /Views containing a nested subdirectory named Sitecore.
Create the /Views/Sitecore/index.cshtml file containing some Razor code (note that the @inherits directive is not necessary if the /Views subdirectory contains the proper web.config file, such as that installed when you create an MVC project in Visual Studio):

@inherits System.Web.Mvc.WebViewPage
@{
  Layout = null;
}
<html>
  <body>
  <h4>Index.cshtml</h4>
  <div>Model:
@{
  if (Model == null)
  {
<text>null</text>
  }
  else
  {
@Model.GetType();
  }
}
    </div>
  </body>
</html>

In the Sitecore Content Editor user interface, navigate to the /sitecore/layout/Layouts/Sample Layout item that defines the default layout.
Click the Content Tab.

In the Path field, enter /Views/Sitecore/index.cshtml, and save.

Either publish the layout definition item and view the home page of the published site (http://playground – not http://playground/default.aspx), or use the Page Editor. You should see content such as the following:

Index.cshtml

Model: Sitecore.Mvc.Presentation.RenderingModel

3. Make the Project MVC 4

a.) In the project Website Properties change the Target Framework to .NET 4.5

b.) Update the references from MVC3 to MVC4

all references in .config files need to reflect these versions:
System.Web.Mvc, Version=4.0.0.0, Culture=neutral, PublicKeyToken=31bf3856ad364e35″
System.Web.WebPages, Version=2.0.0.0, Culture=neutral, PublicKeyToken=31bf3856ad364e35
System.Web.Helpers, Version=2.0.0.0, Culture=neutral, publicKeyToken=”31bf3856ad364e35″
System.Web.WebPages.Razor, Version=2.0.0.0, Culture=neutral, PublicKeyToken=31BF3856AD364E35

these appSettings need to be added to the web.config:

<appSettings>
  <add key="webpages:Version" value="2.0.0.0" />
  <add key="PreserveLoginUrl" value="true" />
</appSettings>

further details here:

c.) In Solution Explorer, right-click on the References and select Manage NuGet Packages. In the left pane, select Online\NuGet official package source, then update the following:

ASP.NET MVC 4
(Optional) jQuery, jQuery Validation and jQuery UI
(Optional) Entity Framework
(Optonal) Modernizr

d.) Update ProjectTypeGuids element and replace {E53F8FEA-EAE0-44A6-8774-FFD645390401} with {E3E379DF-F4C6-4180-9B81-6769533ABE47}.

e.) If the project references any third-party libraries that are compiled using previous versions of ASP.NET MVC, open the root Web.config file and add the following three bindingRedirect elements under the configuration section:

  <runtime>
    <assemblyBinding xmlns="urn:schemas-microsoft-com:asm.v1">
      <dependentAssembly>
        <assemblyIdentity name="System.Web.Helpers"
             publicKeyToken="31bf3856ad364e35" />
        <bindingRedirect oldVersion="1.0.0.0" newVersion="2.0.0.0"/>
      </dependentAssembly>
      <dependentAssembly>
        <assemblyIdentity name="System.Web.Mvc"
             publicKeyToken="31bf3856ad364e35" />
        <bindingRedirect oldVersion="1.0.0.0-3.0.0.0" newVersion="4.0.0.0"/>
      </dependentAssembly>
      <dependentAssembly>
        <assemblyIdentity name="System.Web.WebPages"
             publicKeyToken="31bf3856ad364e35" />
        <bindingRedirect oldVersion="1.0.0.0" newVersion="2.0.0.0"/>
      </dependentAssembly>
    </assemblyBinding>
  </runtime>
</configuration>

f.) Finally, there is an incompatability with the Sitecore login page under .NET 4.5, to do with the use of an iframe. The file sitecore/login/default.aspx contains an iframe to the SDN that .NET 4.5 doesn’t like. Replace it with a div:

<iframe id="SDN">
  <div id="StartPage" runat="server" allowtransparency="true"
 frameborder="0" scrolling="auto" marginheight="0" marginwidth="0"
 style="display: none"></div>
</iframe> 

<div id="SDN">
  <div id="StartPage" runat="server" allowtransparency="true"
 frameborder="0" scrolling="auto" marginheight="0" marginwidth="0"
 style="display: none"></div>
</div>

and you’re off to the races. More detail here.

I should point out, of course that .NET 4.5 is not supported as yet by Sitecore, but with this you can play with 4.5… until Sitecore 7 arrives.

Good luck.


European ASP.NET MVC 4 Hosting - Amsterdam :: Enhanced Default Template MVC 4

clock July 5, 2013 07:10 by author Scott

MVC 4 introduces many new features. In today post, I will talk about MVC 4 and enhanced default templates.

When you create a new project, the default website looks quite different from previous versions.  Besides the improved aesthetics, the default website has improved functionality thanks to a technique called adaptive rendering.

Adaptive rendering is where the page is rendered specific to the browser without any customization.  This is an absolute must for most developers today; write once, run everywhere.  The adaptive rendering is made possible thanks to a new CSS type -> media queries

@media all and (min-width: 640px) { #media-queries-1 { background-color: #0f0; } }
@media screen and (max-width: 2000px) { #media-queries-2 { background-color: #0f0; } }

After you creating a new website, you’ll be able to see the improvements in the default layout.

To see the adaptive rendering in action, open the page using a mobile device.

Here’s how the page looks on an iPhone.

And here’s how the page look on an iPad.

The page renders differently depending on the size of the screen.  Making the page do that without media queries is tricky.  Using media queries makes it simple.

One final thing to note is the default template takes advantage of jQuery UI also.  The Login and Register links show you how to use this JavaScript library to  provide a richer UI.  You can read all about the other features that are available to you with jQuery UI here.

Testing with Emulators

The best way I found to test what the site will look like is with FireFox and User Agent Switcher add-on,
which changes the user agent that’s sent to the browser.  That can be downloaded
here.


European ASP.NET MVC 4 Hosting - Amsterdam :: How to Fix CSS Problem in ASP.NET MVC 4

clock July 1, 2013 12:10 by author Scott

Some of you will face this problem when using Bundling and Minification in ASP.NET MVC 4. This post cover about how to fix relative CSS Path in ASP.NET MVC 4.

Recently, I hit a known problem with deploying to IIS virtual directories. It’s not a problem for ASP.NET which understands virtual directories and so if you ask for “~” or “/” will return “yoursite/virtualfolder”. However, JavaScript is run under IIS, which doesn’t understand this idea so well. Do “/” in JS and you’ll get back “yoursite” NOT “yoursite/virtualfolder”.

So what’s the fix? Well, for JavaScript there are a couple of answers. So I check my javascript. Based on this answer, I came up with this:

1. Add a hidden field to a masterpage:

  @Html.Hidden("HiddenCurrentUrl",  Url.Content("~"))

2. As one of the first things you do, ensure this JS runs. All it does it take the value in the field and store it:

var baseUrl = "";
baseUrl = $("#HiddenCurrentUrl").val();


3. Use baseUrl wherever you need to call things in JavaScript:

Silverlight.createObject(
            baseUrl + "ClientBin/SilverlightBridge.xap",  // source
            ...
        );

Hmm… But you know, that is not the problem. The problem is with the CSS file

    .link-button.cancel {
        background-image: url('../Images/appbar.cancel.darkgrey.png');
    }

A similar problem occures where these URLs start with a slash(/) because IIS interprets that incorrectly. You can’t invoke ASP.NET, which does know the right root into a CSS file

After some messing around, I came to this compromise, which works well. It also exposes some of the hidden power of using Bundling:

  1. For any images you reference in CSS, move them into a relative folder, such as /images near the CSS. I know, this may be an unacceptable compromise for you. But actually, it makes a lot of sense. The image is probably only used by the CSS so it makes sense to have it nearby, not in some global /images folder.  
  2. In order to make this work, you need to get your CSS (which you’ve bundled up) into the same place relative to the images you’re reference, or at least, you need to cheat the browser into thinking this happening.
  3. So, for instance:

      bundles.Add(new StyleBundle("~/Content/DataTableStyle").Include(


    comes out the other end as:

Don’t forget that all your “static” content, such as images won’t be affected by Bundling and can be referenced using the folder structure you expect, i.e. the one you’ve set up in Visual Studio.

So… when you create the Style Bundle you give it a name which reflects where you have it in your Visual Studio folder structure, then it will pop out the other end in the same place, relatively, to the image files which it’s references! And because the Bundling is happening via ASP.NET, the URL of the CSS file, and wherever it is referenced, works fine in virtual directories!


European ASP.NET MVC 4 Hosting - Amsterdam :: Implementing a Custom IPrincipal in ASP.NET MVC 4 Internet Project

clock April 16, 2013 10:49 by author Scott

This article explains a simple tip on how to customized the IPrincipal used in ASP.NET MVC4 internet application project template. You can try this tip if you want to attach additional information on the IPrincipal (Controller.User) for some purposes.

This tip is based from the solution I used in implementing custom identity in my ASP.NET MVC 3 project which I got from this thread: http://stackoverflow.com/questions/1064271/asp-net-mvc-set-custom-iidentity-or-iprincipal.

The main solution is almost the same from the said thread but with just a few tweaks required to set data to additional IPrincipal properties when OAuthWebSecurity is used as authentication method.  

Initially ASP.NET MVC 4 internet project template is configured to use both WebMatrix.WebSecurity (for local accounts) and OAuthWebSecurity (for external site accounts) for authentication. Also accounts data are getting saved in a UserProfile table which only have properties for user ID and username, and some predefined webpages_TABLES. 

This initial setup is not enough for us to achieve our goal: that is to attach additional information in the IPrincipal. In this example we will going to need to add the first name and last name info of the user but you can add any data to suit your needs.

We will need first a storage of the additional data we want to attach. To do this you can just simply add properties on the UserProfile class defined in AccountModels.cs. Or use any table then modify the InitializeSimpleMembershipAttribute.cs from the Filters folder and set your DBContext and table name:

public SimpleMembershipInitializer()
{
    Database.SetInitializer<YourDBContext>(null);

    try
    {
      using (var context = new UsersContext())
      {
        if (!context.Database.Exists())
        {
          // Create the SimpleMembership database without Entity Framework migration schema
          ((IObjectContextAdapter)context).ObjectContext.CreateDatabase();
        }
      }

      WebSecurity.InitializeDatabaseConnection("DefaultConnection", "YourDesiredTable",
              "UserId", "UserName", autoCreateTables: true);
    }
    catch (Exception ex)
    {
      throw new InvalidOperationException("The ASP.NET Simple Membership database could " +
        "not be initialized. For more information, please see " +
        "http://go.microsoft.com/fwlink/?LinkId=256588", ex);
    }
}

Another way is to leave the SimpleMembershipInitializer as it is and check this tutorial: http://www.asp.net/mvc/tutorials/mvc-4/using-oauth-providers-with-mvc 

If your data storage is now ready we can now start creating custom IPrincipal: 

public interface ICustomPrincipal : System.Security.Principal.Iprincipal
{
    string FirstName { get; set; }

    string LastName { get; set; }
}
public class CustomPrincipal : IcustomPrincipal
{
    public IIdentity Identity { get; private set; }

    public CustomPrincipal(string username)
      {
            this.Identity = new GenericIdentity(username);
      }

      public bool IsInRole(string role)
      {
            return Identity != null && Identity.IsAuthenticated &&
               !string.IsNullOrWhiteSpace(role) && Roles.IsUserInRole(Identity.Name, role);
      }

      public string FirstName { get; set; }

      public string LastName { get; set; }

      public string FullName { get { return FirstName + " " + LastName; } }
}

public class CustomPrincipalSerializedModel
{
    public int Id { get; set; }

    public string FirstName { get; set; }

    public string LastName { get; set; }
}

Then in the AccountController class, add this method. We will need this method to serialize the user data and attach it in a cookie: 

public void CreateAuthenticationTicket(string username) {      

      var authUser = Repository.Find(u => u.Username == username); 
      CustomPrincipalSerializedModel serializeModel = new CustomPrincipalSerializedModel();     

      serializeModel.FirstName = authUser.FirstName;
      serializeModel.LastName = authUser.LastName;
      JavaScriptSerializer serializer = new JavaScriptSerializer();
      string userData = serializer.Serialize(serializeModel);     

      FormsAuthenticationTicket authTicket = new FormsAuthenticationTicket(
        1,username,DateTime.Now,DateTime.Now.AddHours(8),false,userData);
      string encTicket = FormsAuthentication.Encrypt(authTicket);
      HttpCookie faCookie = new HttpCookie(FormsAuthentication.FormsCookieName, encTicket);
      Response.Cookies.Add(faCookie);
}

Call the above method: From the ExternalLoginCallback method: 

public ActionResult ExternalLoginCallback(string returnUrl)
{
      AuthenticationResult result = OAuthWebSecurity.VerifyAuthentication(
        Url.Action("ExternalLoginCallback", new { ReturnUrl = returnUrl }));
      if (!result.IsSuccessful)
      {
        return RedirectToAction("ExternalLoginFailure");
      }

      if (OAuthWebSecurity.Login(result.Provider, result.ProviderUserId, createPersistentCookie: true))
      {
        CreateAuthenticationTicket(OAuthWebSecurity.GetUserName(
                        result.Provider, result.ProviderUserId));
        return RedirectToLocal(returnUrl);
      }

      if (User.Identity.IsAuthenticated)
      {
        // If the current user is logged in add the new account
        OAuthWebSecurity.CreateOrUpdateAccount(result.Provider, result.ProviderUserId, User.Identity.Name);
        CreateAuthenticationTicket(User.Identity.Name);
        return RedirectToLocal(returnUrl);
      }
      else
      {
        // User is new, ask for their desired membership name
        string loginData = OAuthWebSecurity.SerializeProviderUserId(result.Provider, result.ProviderUserId);
        ViewBag.ProviderDisplayName = OAuthWebSecurity.GetOAuthClientData(result.Provider).DisplayName;
        ViewBag.ReturnUrl = returnUrl;
        return View("ExternalLoginConfirmation",
          new RegisterExternalLoginModel { UserName = result.UserName, ExternalLoginData = loginData });
      }
}

In Register method: 

public ActionResult Register(RegisterModel model)
{
  if (ModelState.IsValid)
  {
    // Attempt to register the user
    try
    {
      WebSecurity.CreateUserAndAccount(
        model.UserName,
        model.Password,
        new {            
            UpdatedBy = 0,
            UpdatedDate = DateTime.Today,
            CreatedBy = 0,
            CreatedDate = DateTime.Today
          }
       );

      WebSecurity.Login(model.UserName, model.Password);
      CreateAuthenticationTicket(model.UserName);
      return RedirectToAction("Index", "Home");
    }
    catch (MembershipCreateUserException e)
    {
      ModelState.AddModelError("", ErrorCodeToString(e.StatusCode));
    }
}

In ExternalLoginConfirmation method: 

...
OAuthWebSecurity.CreateOrUpdateAccount(provider, providerUserId, model.UserName);
 OAuthWebSecurity.Login(provider, providerUserId, createPersistentCookie: false);
 CreateAuthenticationTicket(model.UserName);
 return RedirectToLocal(returnUrl);   
... 

And in the Login method: 

public ActionResult Login(LoginModel model, string returnUrl)
{
      if (ModelState.IsValid && WebSecurity.Login(model.UserName,
                model.Password, persistCookie: model.RememberMe))
      {
        CreateAuthenticationTicket(model.UserName);
        return RedirectToLocal(returnUrl);
      }

      // If we got this far, something failed, redisplay form
      ModelState.AddModelError("", "The user name or password provided is incorrect.");
      return View(model);
}

It's now time to read the serialized data from our cookie and replace the HttpContext.Current.User. Do this by overriding the Application_PostAuthenticateRequest method in project's Global.asax.cs . 

protected void Application_PostAuthenticateRequest(Object sender, EventArgs e)
{
      HttpCookie authCookie = Request.Cookies[FormsAuthentication.FormsCookieName];
      if (authCookie != null)
      {
        FormsAuthenticationTicket authTicket = FormsAuthentication.Decrypt(authCookie.Value);
        JavaScriptSerializer serializer = new JavaScriptSerializer();
        if (authTicket.UserData == "OAuth") return;
        CustomPrincipalSerializedModel serializeModel =           serializer.Deserialize<CustomPrincipalSerializedModel>(authTicket.UserData);
        CustomPrincipal newUser = new CustomPrincipal(authTicket.Name);
        newUser.Id = serializeModel.Id;
        newUser.FirstName = serializeModel.FirstName;
        newUser.LastName = serializeModel.LastName;
        HttpContext.Current.User = newUser;
      }
}

To access the attached data from pages:

@(User as CustomPrincipal).FullName

And from server: 

@(User as CustomPrincipal).FullName


European ASP.NET MVC 4 Hosting - Amsterdam :: How to Add Metatags on .cshtml Pages in MVC

clock April 8, 2013 09:08 by author Scott

This quick article is a response to a question I received today on Facebook. Please use the following procedure to add metatags on .cshtml pages.

Step 1

When we create a MVC4 Application using an Internet Template we get a "Shared" folder inside the "Views" folder on the root and in the "Shared" folder you will find a layout page named "_Layout.cshtml". Open that file.

Step 2

In the "_Layout.cshtml" page add a new section call inside the <head> tag, as given below:

In the above image you can see that a section call is not required; in other words whenever we need metatags on a page we can define.

Step 3

Now, open you .cshtml page where you wish to add metatags and add the following section reference:

Step 4

Now, open the page in a browser and you will see your metatags in action.

Advanced

We can also make these metatags dynamic, in other words we can control them from controllers.

Controller

public ActionResult Index()
{
    ViewBag.Message = "Modify this template to jump-start your ASP.NET MVC application.";
    ViewBag.MetaKeywords = "abc";
    ViewBag.MetaDescription = "abc";

    return View();
}

Section on .cshtml page

@section metatags {
    <meta name='keywords' content='@ViewBag.MetaKeywords'/>
    <meta name='description' content='@ViewBag.MetaDescription'/>
}

Hope this helps.


About HostForLIFE.eu

HostForLIFE.eu is European Windows Hosting Provider which focuses on Windows Platform only. We deliver on-demand hosting solutions including Shared hosting, Reseller Hosting, Cloud Hosting, Dedicated Servers, and IT as a Service for companies of all sizes.

We have offered the latest Windows 2016 Hosting, ASP.NET Core 2.2.1 Hosting, ASP.NET MVC 6 Hosting and SQL 2017 Hosting.


Tag cloud

Sign in