European ASP.NET MVC 4 and MVC 5 Hosting

BLOG about ASP.NET MVC 3, ASP.NET MVC 4, and ASP.NET MVC 5 Hosting and Its Technology - Dedicated to European Windows Hosting Customer

ASP.NET MVC 6 Hosting - HostForLIFE.eu :: Display A Document From SQL Server To A Web Page In ASP.NET MVC

clock September 9, 2020 09:24 by author Peter

In this blog post, I'll discuss a useful yet easy to implement document viewer API. Using that you can display a source file (e.g. Word, Presentation, Diagram, PSD) from your server to your browser without downloading it.
 
Some Use-Cases
    Display a Word resume to a user in a web browser
    Render a Visio Diagram on the web page
    View a Presentation or a Slide online without downloading it

Implementation

Now as the use-cases are clear, we will dive into the API implementation. It'll be an ASP.NET MVC application. We'll pull data/documents from the database and save it to a stream. You have to specify the file format in order to render it correctly. The source document will be then rendered to HTML. Eventually, our controller will return this stream to the View/browser.  
    public ActionResult Index()  
    {  
         License lic = new License();  
         lic.SetLicense(@"D:/GD Licenses/Conholdate.Total.NET.lic");  
         MemoryStream outputStream = new MemoryStream();  
         //specify just the file name if you are pulling the data from database   
         string fileName = "sample.pdf";  
      
         FileType fileType = FileType.FromExtension(Path.GetExtension(fileName));  
      
         using (Viewer viewer = new Viewer(() => GetSourceFileStream(fileName), () => new LoadOptions(fileType)))  
         {  
               HtmlViewOptions Options = HtmlViewOptions.ForEmbeddedResources(  
                    (pageNumber) => outputStream,  
                    (pageNumber, pageStream) => { });  
               viewer.View(Options);  
         }
         outputStream.Position = 0;  
         return File(outputStream, "text/html");  
                   
    }  
    private Stream GetSourceFileStream(string fileName) =>  
                new MemoryStream(GetSourceFileBytesFromDb(fileName));  
      
    //TODO: If you want to pull the data from the DB  
    private byte[] GetSourceFileBytesFromDb(string fileName) =>  
                System.IO.File.ReadAllBytes(fileName);  


HostForLIFE.eu ASP.NET MVC 6 Hosting
HostForLIFE.eu is European Windows Hosting Provider which focuses on Windows Platform only. We deliver on-demand hosting solutions including Shared hosting, Reseller Hosting, Cloud Hosting, Dedicated Servers, and IT as a Service for companies of all sizes. We have customers from around the globe, spread across every continent. We serve the hosting needs of the business and professional, government and nonprofit, entertainment and personal use market segments.


ASP.NET MVC 6 Hosting - HostForLIFE.eu :: Using Auto-Mapper In An ASP.NET Core MVC Application

clock August 25, 2020 08:24 by author Peter

In today’s article we will look at an extremely useful feature. In many applications, the data we collect on the user interface needs to be converted to some different form before it can be stored in the data store and vice versa. This requires some mapping logic and it is mostly done using mapping classes and logic. Today, we will look at a ready to use Nuget package to do this mapping for us and make the process amazingly simple. We will apply this mapping in an ASP.NET Core MVC application.

Creating the .NET Core MVC application
We will start by creating an ASP.NET Core 3.1 MVC application using Visual Studio 2019 community edition as below,

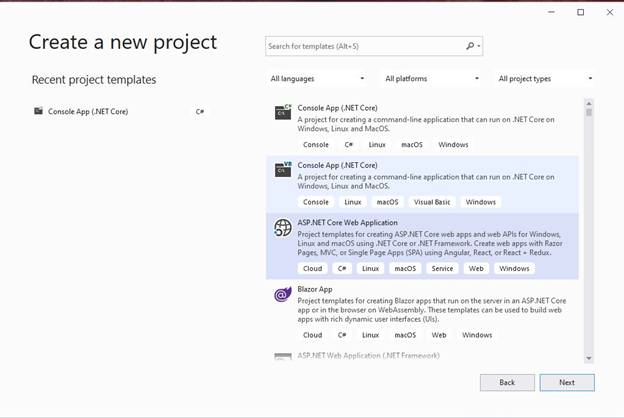
We select the ASP.NET Core web application and click “Next”

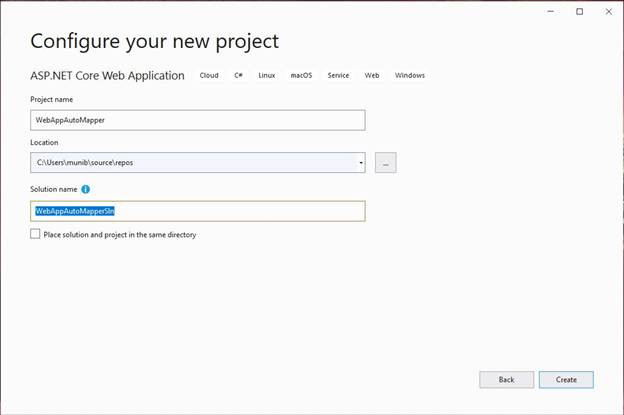
Next, we enter the project details and click “Create”

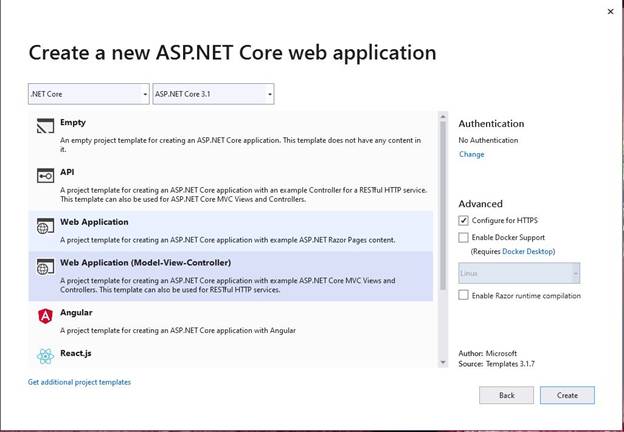
From the list of ASP.NET Core web applications, we select “Web Application (Model-View-Controller) and leave all other values as default.
 
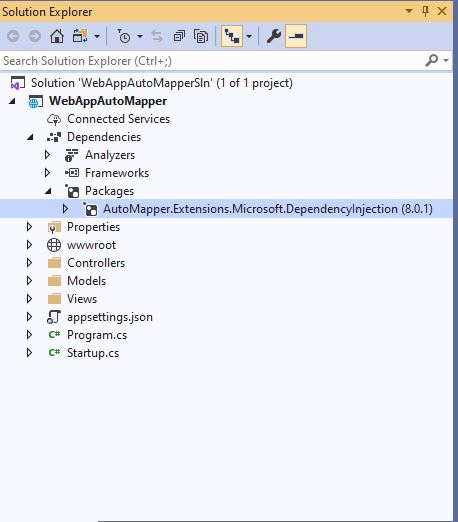
We now have the ASP.NET Core MVC application created. The next step is to add the “AutoMapper” Nugget package as below,

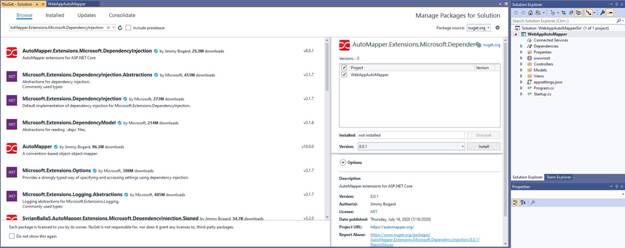
Remember to select the latest version.

After that create three classes under the “Models” folder as below,
 
Employee.cs

    namespace WebAppAutoMapper.Models { 
        publicclassEmployee { 
            publicstring FirstName { 
                get; 
                set; 
            } 
            publicstring LastName { 
                get; 
                set; 
            } 
            publicstring StreetAddress { 
                get; 
                set; 
            } 
            publicstring City { 
                get; 
                set; 
            } 
            publicstring Province { 
                get; 
                set; 
            } 
            publicstring Country { 
                get; 
                set; 
            } 
            publicstring Email { 
                get; 
                set; 
            } 
            publicstring Phone { 
                get; 
                set; 
            } 
            publicEmployee() { 
                FirstName = "Munib"; 
                LastName = "Butt"; 
                StreetAddress = "123 Street One"; 
                City = "Toronto"; 
                Province = "Ontario"; 
                Country = "Canada"; 
                Email = "[email protected]"; 
                Phone = "+14161112222"; 
            } 
        } 
    } 

EmployeeDTO.cs

    namespace WebAppAutoMapper.Models { 
        publicclassEmployeeDTO { 
            publicstring Name { 
                get; 
                set; 
            } 
            publicstring Address { 
                get; 
                set; 
            } 
            publicstring Email { 
                get; 
                set; 
            } 
            publicstring Phone { 
                get; 
                set; 
            } 
        } 
    } 

And finally,AutoMap.cs

    using AutoMapper; 
     
    namespace WebAppAutoMapper.Models 
    { 
    publicclassAutoMap : Profile 
        { 
    publicAutoMap() 
            { 
                CreateMap<Employee, EmployeeDTO>() // means you want to map from Employee to EmployeeDTO 
                .ForMember(d => d.Name, source => source.MapFrom(s => s.FirstName + " " + s.LastName)) 
                .ForMember(d => d.Address, source => source.MapFrom(s => s.StreetAddress + ", " + s.City + ", " + s.Province + ", " + s.Country)) 
                .ForMember(d => d.Phone, source => source.MapFrom(s => s.Phone)) 
                .ForMember(d => d.Email, source => source.MapFrom(s => s.Email)); 
            } 
        } 
    } 

Here we see that we have an Employee class which has several properties. We also have an EmployeeDTO class which has fewer properties than the Employee class. Now, we want to map the values from the Employee class to the EmployeeDTO class using some mapping logic. This logic is implemented in the AutoMap.cs class which inherits from the Profile class.
 
Finally, we setup the AutoMap in the Startup.cs class in the “ConfigureServices” function as below,

    using Microsoft.AspNetCore.Builder; 
    using Microsoft.AspNetCore.Hosting; 
    using Microsoft.Extensions.Configuration; 
    using Microsoft.Extensions.DependencyInjection; 
    using Microsoft.Extensions.Hosting; 
    using AutoMapper; 
    using WebAppAutoMapper.Models; 
     
    namespace WebAppAutoMapper 
    { 
    publicclassStartup 
        { 
    publicStartup(IConfiguration configuration) 
            { 
                Configuration = configuration; 
            } 
     
    public IConfiguration Configuration { get; } 
     
    // This method gets called by the runtime. Use this method to add services to the container. 
    publicvoid ConfigureServices(IServiceCollection services) 
            { 
                services.AddAutoMapper(c => c.AddProfile<AutoMap>(), typeof(Startup)); 
                services.AddControllersWithViews(); 
            } 
     
    // This method gets called by the runtime. Use this method to configure the HTTP request pipeline. 
    publicvoid Configure(IApplicationBuilder app, IWebHostEnvironment env) 
            { 
    if (env.IsDevelopment()) 
                { 
                    app.UseDeveloperExceptionPage(); 
                } 
    else 
                { 
                    app.UseExceptionHandler("/Home/Error"); 
    // The default HSTS value is 30 days. You may want to change this for production scenarios, see https://aka.ms/aspnetcore-hsts. 
                    app.UseHsts(); 
                } 
                app.UseHttpsRedirection(); 
                app.UseStaticFiles(); 
     
                app.UseRouting(); 
     
                app.UseAuthorization(); 
     
                app.UseEndpoints(endpoints => 
                { 
                    endpoints.MapControllerRoute( 
                        name: "default", 
                        pattern: "{controller=Home}/{action=Index}/{id?}"); 
                }); 
            } 
        } 
    } 

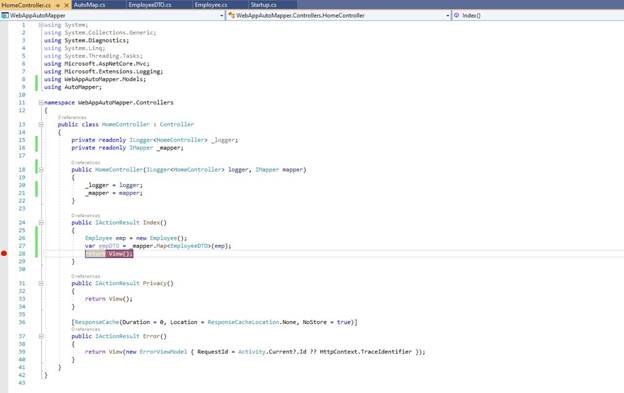
Now, all the plumbing is in place and we can use the mapping as below in the Home Controller,

    using System.Diagnostics; 
    using Microsoft.AspNetCore.Mvc; 
    using Microsoft.Extensions.Logging; 
    using WebAppAutoMapper.Models; 
    using AutoMapper; 
     
    namespace WebAppAutoMapper.Controllers 
    { 
    publicclassHomeController : Controller 
        { 
    privatereadonly ILogger<HomeController> _logger; 
    privatereadonly IMapper _mapper; 
     
    publicHomeController(ILogger<HomeController> logger, IMapper mapper) 
            { 
                _logger = logger; 
                _mapper = mapper; 
            } 
     
    public IActionResult Index() 
            { 
                Employee emp = new Employee(); 
    var empDTO = _mapper.Map<EmployeeDTO>(emp); 
    return View(); 
            } 
     
    public IActionResult Privacy() 
            { 
    return View(); 
            } 
     
            [ResponseCache(Duration = 0, Location = ResponseCacheLocation.None, NoStore = true)] 
    public IActionResult Error() 
            { 
    return View(new ErrorViewModel { RequestId = Activity.Current?.Id ?? HttpContext.TraceIdentifier }); 
            } 
        } 
    } 

We can put a breakpoint at the “return View();” line in the Index function and see the Employee DTO values as below,

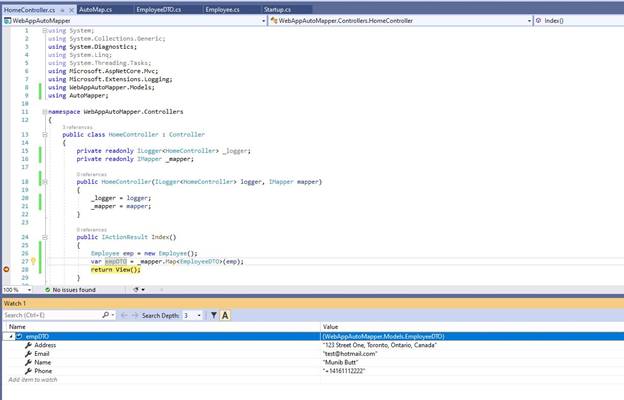
Here we see that the empDTO object has the values extracted and mapped from the Employee object.

HostForLIFE.eu ASP.NET MVC 6 Hosting
HostForLIFE.eu is European Windows Hosting Provider which focuses on Windows Platform only. We deliver on-demand hosting solutions including Shared hosting, Reseller Hosting, Cloud Hosting, Dedicated Servers, and IT as a Service for companies of all sizes. We have customers from around the globe, spread across every continent. We serve the hosting needs of the business and professional, government and nonprofit, entertainment and personal use market segments.


ASP.NET MVC 6 Hosting - HostForLIFE.eu :: TempData in ASP.NET MVC 6

clock August 7, 2020 13:02 by author Peter

In this Article, we will discuss about TempData. TempData in ASP.NET MVC can be used to store temporary data which can be used in the subsequent request. TempData will be cleared out after the completion of a subsequent request.

TempData is useful when you want to transfer non-sensitive data from one action method to another action method of the same or a different controller as well as redirects. It is dictionary type which is derived from TempDataDictionary.

You can add a key-value pair in TempData as shown in the below example.

TempData allows you to store data & it will remain after redirects. It uses the Session to store data. When an object in a TempDataDictionary. It will be marked for deletion at the end of that request.

TempData declared as

TempData["value"] = "data";

Example


public ActionResult FirstAction()

{
    // store something into the tempdata that will be available during a single redirect
    TempData["FirstAction"] = "SecondAction";
    // you should always redirect if you store something into TempData to
    // a controller action that will consume this data
    return RedirectToAction("SecondAction");
}
public ActionResult SecondAction()
{    var data = TempData["FirstAction"];
   return View();
}

 
The Peek and Keep methods allow to read the value without deletion. we can say that first request data will remains in TempData. You can use Peek when you always want to retain the value for another request. Use Keep when retaining the value depends on additional logic.

//second request, Peek value is not deleted at the end of the request
object value = TempData.Peek("value");

//third request, read value and delete
object value = TempData["value"];


Keep
//second request, get value going for delete

object value = TempData.["value"];

//later  decide to keep it for next request
TempData.Keep("value");

//third request, read value and mark it for deletion
object value = TempData["value"];

Removing TempData

TempData.Clear() : It is use to remove all keys from the TempDataDictionary TempData.Remove(key) :Remove a specific key from TempDataDictionary.

Note: Since TempData makes use of the Session State behavior, it must be enabled on the controller using TempData. By default it is always enabled, You can disable session state for your controllers by adding [SessionState(SessionStateBehavior.Disabled)] attribute.

HostForLIFE.eu ASP.NET MVC 6 Hosting
HostForLIFE.eu is European Windows Hosting Provider which focuses on Windows Platform only. We deliver on-demand hosting solutions including Shared hosting, Reseller Hosting, Cloud Hosting, Dedicated Servers, and IT as a Service for companies of all sizes. We have customers from around the globe, spread across every continent. We serve the hosting needs of the business and professional, government and nonprofit, entertainment and personal use market segments.


ASP.NET MVC 6 Hosting - HostForLIFE.eu :: How to Handle Multiple Submit Buttons in ASP.NET MVC 6?

clock July 30, 2020 13:16 by author Peter

Today, let me explain you how to handle multiple submit buttons in ASP.NET MVC 6. Sometimes you will need to handle multiple submit buttons on a similar form as as in the following picture.

As you can see on the above picture, we've got the three buttons Login, Register and Cancel. Here every button has totally different functionality. in this way every submit button will post a form to the server but will provide totally different values of every button.

Make a controller with one action method that accepts other parameters, one is for the model and the other is for determining the status of the button click.
[HttpPost] 
public ActionResult Index(Login model, string command) 

if (command=="Login") 

// do stuff 
return RedirectToAction("Home"); 

else if (command=="Register") 

// do stuff 
ViewBag.msg = "You have Clicked Register button"; 
return View(); 


else if (command=="Cancel") 

// do stuff 
ViewBag.msg = "You have Clicked Cancel Button"; 
return View(); 

else 

return View(); 


In the preceding code snippet, assume you clicked on the Login button, then the command parameter can have the values Login, null, null respectively. Create a View for the preceding controller.
@model MvcMultipleSubmitButtons.Models.Login 
@{ 
ViewBag.Title = "Index"; 

<h2> 
Handling multiple submit buttons in MVC </h2> 
<h5 style="color: Red">@ViewBag.msg</h5> 
<form action="Home/Index" id="myform" method="post" >  
//here action name is Index, controller name is Home. So the action path is Home/Index 
<table> 
<tr> 
<td> 
UserName 
</td> 
<td> 

</td> 
<td>@Html.TextBoxFor(m => m.userName) 
</td> 
<td> 
@Html.ValidationMessageFor(m => m.userName) 
</td> 
</tr> 
<tr> 
<td> 
Password 
</td> 
<td> 

</td> 
<td>@Html.TextBoxFor(m => m.password) 
</td> 
<td> 
@Html.ValidationMessageFor(m => m.password) 
</td> 
</tr> 
</table> 
<br/> 

<div style="padding-left: 80px;"> 
<input type="submit" id="Login" value="Login" name="Command" title="Login" /> 
<input type="submit" id="Register" value="Register" name="Command" title="Register" /> 
<input type="submit" value="Cancel" name="Command" title="Cancel" /> 

</div> 
</form> 


You can declare the form tag in another way as within the following:
@using(Html.BeginForm("Index","Home",FormMethod.Post)) 
{  
//here action name is Index, controller name is Home and form method is post. 
}


Note: there's a relation between button name and action method parameter. for instance, the button name is “Command”, the action parameter name ought to be “command”.

You can have different names for each button. So in that case you need to handle it as in the following:
<input type="submit" id="Login" value="Login" name="Command1" title="Login" /> 
<input type="submit" id="Register" value="Register" name="Command2" title="Register" /> 
<input type="submit" value="Cancel" name="Command3" title="Cancel" /> 


Controller
public ActionResult Index(Login model, string command1, string command2, string command3) 

   // here command1 is for Login, command2 is for Register and command3 is for cancel 


Create a Model class with the name Login.
public class Login 

    public string userName { get; set; } 
    public string password { get; set; } 

I hope it helps for you!

HostForLIFE.eu ASP.NET MVC 6 Hosting
HostForLIFE.eu is European Windows Hosting Provider which focuses on Windows Platform only. We deliver on-demand hosting solutions including Shared hosting, Reseller Hosting, Cloud Hosting, Dedicated Servers, and IT as a Service for companies of all sizes. We have customers from around the globe, spread across every continent. We serve the hosting needs of the business and professional, government and nonprofit, entertainment and personal use market segments.


ASP.NET MVC 6 Hosting - HostForLIFE.eu :: Action Filter In MVC

clock July 3, 2020 14:12 by author Peter

Action filter in MVC provides the option to handle the situations after we would really like to perform an operation before and after the execution of a controller action. For this purpose, we create a custom class, which inherits the FilterAttribute class and implements the IActionFilter interface. when creating the filter, we simply apply the class name as an attribute on the controller.

Here, the FilterAttribute class makes it possible to use the class as an attribute and IActionFilter interface contains two methods named OnActionExecuting and OnActionExecuted. The OnActionExecuting is executed before the controller method is executed and OnActionExecuted is called after the execution of the controller method. This kind of technique is quite helpful for the logging purposes. Thus, let's see how we can use this filter.
 
Let's start by adding a new class named MyActionFilter.cs. Now, derive this class from the FilterAttribute and the IActionFilter. Implement the  OnActionExecuting and OnActionExecuted methods and add your custom logic into the methods.Thus, the code will look as shown below. 
    public class MyActionFilter : FilterAttribute, IActionFilter 
    { 
        public void OnActionExecuted(ActionExecutedContext filterContext) 
        { 
            //Fires after the method is executed 
        } 
     
        public void OnActionExecuting(ActionExecutingContext filterContext) 
        { 
            //Fires before the action is executed 
        } 
    } 


Simply, apply the class as an attribute on the controller. Add debuggers on both the methods as well as the controller method.
    public class HomeController : Controller 
    { 
        [MyActionFilter] 
        public ActionResult Index() 
        { 
            return View(); 
        } 
     
        public ActionResult About() 
        { 
            ViewBag.Message = "Your application description page."; 
            return View(); 
        } 
     
        public ActionResult Contact() 
        { 
            ViewBag.Message = "Your contact page."; 
            return View(); 
        } 
    } 


Run the Application and debug step by step to see the order of execution of the methods. First, the OnActionExecuting will be executed, then the controller method and finally the OnActionExecuted method.

HostForLIFE.eu ASP.NET MVC 6 Hosting
HostForLIFE.eu is European Windows Hosting Provider which focuses on Windows Platform only. We deliver on-demand hosting solutions including Shared hosting, Reseller Hosting, Cloud Hosting, Dedicated Servers, and IT as a Service for companies of all sizes. We have customers from around the globe, spread across every continent. We serve the hosting needs of the business and professional, government and nonprofit, entertainment and personal use market segments.


ASP.NET MVC 6 Hosting UK - HostForLIFE.eu :: How to Delete Multiple Items in ASP.NET with JSON?

clock June 26, 2020 13:15 by author Peter

Today, I want to show you how to delete multiple Items in ASP.NET with JSON. JSON (JavaScript Object Notation) is a lightweight data-interchange format. It is easy for humans to read and write. It is easy for machines to parse and generate. JSON is a text format that is completely language independent but uses conventions that are familiar to programmers of the C-family of languages, including C, C++, C#, Java, JavaScript, Perl, Python, and many others. These properties make JSON an ideal data-interchange language. Now, open your project and write the following code:

View
<table class="table"> 
@foreach (var role in Model) { 
<tr> 
    <td> 
        <input id="responsable1" name="checkResp" value="@role.id" type="checkbox" /> 
        <strong>@role.Name</strong> 
    </td> 
</tr> 

</table> 
<input id="DeleteBtn" type="button" value="Delete Selected" /> 
<script> 
$("#DeleteBtn").on("click", function() { 
    var boxData = []; 
    $("input[name='checkResp']:checked").each(function() { 
        boxData.push($(this).val()); 
    }); 
    $.ajax({ 
        url: '/Roles/DeleteMultiple', 
        data: { 
            RoleId: boxData.join(",") 
        }, 
        cache: false, 
        type: "POST", 
        timeout: 10000, 
        dataType: "json", 
        success: function(result) { 
            window.location.reload(); 
        } 
    }); 
}); 
</script> 


Controller
[HttpPost] 
public JsonResult DeleteMultiple(string RoleId) { 
ApplicationDbContext db = new ApplicationDbContext(); 
var RoleIds = RoleId.Split(','); 
foreach(var id in RoleIds) { 
    int idConverted = Convert.ToInt32(id); 
    Roles roleid = db.Roles.Find(idConverted); 
    db.Roles.Remove(roleid); 

context.SaveChanges(); 
var message = "Selected roles have been deleted"; 
return Json(message); 


DeleteMultiple - Action Name
Roles - Controller Name


HostForLIFE.eu ASP.NET MVC 6 Hosting
HostForLIFE.eu is European Windows Hosting Provider which focuses on Windows Platform only. We deliver on-demand hosting solutions including Shared hosting, Reseller Hosting, Cloud Hosting, Dedicated Servers, and IT as a Service for companies of all sizes. We have customers from around the globe, spread across every continent. We serve the hosting needs of the business and professional, government and nonprofit, entertainment and personal use market segments.


ASP.NET MVC 6 Hosting - HostForLIFE.eu :: FileResult In ASP.NET Core MVC

clock May 13, 2020 09:18 by author Peter

This article is an overview of FileResult in ASP.Net Core MVC. The FileResult actions are used to read and write files. FileResult is the parent of all file-related action results. There is a method on ControllerBase class called File. This method accepts a set of parameters based on the type of file and its location, which maps directly to the more specific return types. I’ll discuss how to use all the FileResult actions available in ASP.Net Core MVC.

There are different type of file results in core MVC.
FileResult
FileContentResult
FileStreamResult
VirtualFileResult
PhysicalFileResult

FileResult

FileResult is the parent of all file-related action results. It is a base class that is used to send binary file content to the response. It represents an ActionResult that when executed will write a file as the response.

public FileResult DownloadFile() 

     return File("/Files/File Result.pdf", "text/plain", "File Result.pdf"); 


FileContentResult
FileContentResult is an ActionResult that when executed will write a binary file to the response.
public FileContentResult DownloadContent() 

            var myfile = System.IO.File.ReadAllBytes("wwwroot/Files/FileContentResult.pdf"); 
            return new FileContentResult(myfile, "application/pdf"); 


FileStreamResult

FileStreamResult Sends binary content to the response by using a Stream instance when we want to return the file as a FileStream.
public FileStreamResult CreateFile() 

   var stream = new MemoryStream(Encoding.ASCII.GetBytes("Hello World")); 
   return new FileStreamResult(stream, new MediaTypeHeaderValue("text/plain")) 
   { 
      FileDownloadName = "test.txt" 
   }; 


VirtualFileResult
A FileResult that on execution writes the file specified using a virtual path to the response using mechanisms provided by the host. You can use VirtualFileResult if you want to read a file from a virtual address and return it.
public VirtualFileResult VirtualFileResult() 

    return new VirtualFileResult("/Files/PhysicalFileResult.pdf", "application/pdf"); 


PhysicalFileResult
A FileResult on execution will write a file from disk to the response using mechanisms provided by the host.You can use PhysicalFileResult to read a file from a physical address and return it, as shown in PhysicalFileResult method.
public PhysicalFileResult PhysicalFileResult() 

   return new PhysicalFileResult(_environment.ContentRootPath + "/wwwroot/Files/PhysicalFileResult.pdf", "application/pdf"); 


Step 1
Open Visual Studio 2019 and select the ASP.NET Core Web Application template and click Next.

Step 2
Name the project FileResultActionsCoreMvc_Demo and click Create.

Step 3
Select Web Application (Model-View-Controller), and then select Create. Visual Studio used the default template for the MVC project you just created.

Step 4
In Solution Explorer, right-click the wwwroot folder. Select Add > New Folder. Name the folder Files. Add some files to work with them.

Complete controller code
using Microsoft.AspNetCore.Hosting; 
using Microsoft.AspNetCore.Mvc; 
using Microsoft.Net.Http.Headers; 
using System.IO; 
using System.Text; 
 
namespace FileResultActionsCoreMvc_Demo.Controllers 

    public class HomeController : Controller 
    { 
        private readonly IWebHostEnvironment _environment; 
 
        public HomeController(IWebHostEnvironment environment) 
        { 
            _environment = environment; 
        } 
        public IActionResult Index() 
        { 
            return View(); 
        } 
 
        public FileResult DownloadFile() 
        { 
            return File("/Files/File Result.pdf", "text/plain", "File Result.pdf"); 
        } 
 
        public FileContentResult DownloadContent() 
        { 
            var myfile = System.IO.File.ReadAllBytes("wwwroot/Files/FileContentResult.pdf"); 
            return new FileContentResult(myfile, "application/pdf"); 
        } 
 
        public FileStreamResult CreateFile() 
        { 
            var stream = new MemoryStream(Encoding.ASCII.GetBytes("Hello World")); 
            return new FileStreamResult(stream, new MediaTypeHeaderValue("text/plain")) 
            { 
                FileDownloadName = "test.txt" 
            }; 
        } 
        public VirtualFileResult VirtualFileResult() 
        { 
            return new VirtualFileResult("/Files/PhysicalFileResult.pdf", "application/pdf"); 
        } 
 
        public PhysicalFileResult PhysicalFileResult() 
        { 
            return new PhysicalFileResult(_environment.ContentRootPath + "/wwwroot/Files/PhysicalFileResult.pdf", "application/pdf"); 
        } 
 
    } 


Step 5
Open Index view which is in views folder under Home folder. Add the below code in Index view.
Index View
@{ 
    ViewData["Title"] = "Home Page"; 

 
<h3 class="text-center text-uppercase">FileResult Action in core mvc</h3> 
<ul class="list-group list-group-horizontal"> 
    <li class="list-group-item"><a asp-action="DownloadFile" asp-controller="Home">File Result</a></li> 
    <li class="list-group-item"><a asp-action="DownloadContent" asp-controller="Home" target="_blank">File Content Result</a></li> 
    <li class="list-group-item"><a asp-action="CreateFile" asp-controller="Home">File Stream Result</a></li> 
    <li class="list-group-item"><a asp-action="VirtualFileResult" asp-controller="Home" target="_blank">Virtual File Result</a></li> 
    <li class="list-group-item"><a asp-action="PhysicalFileResult" asp-controller="Home" target="_blank">Physical File Result</a></li> 
</ul> 


Step 6
Build and run your Project ctrl+F5


ASP.NET MVC 6 Hosting - HostForLIFE.eu :: HTML Helpers In ASP.NET MVC

clock April 9, 2020 05:10 by author Peter

What is an Html Helper?
Html helper is a method that is used to render HTML content in a view. Html helpers are implemented using an extension method. If you want to create an input text box with

id=email and name in email:
  <input type=text id=email name=email value=’’/> 


This is all the Html we need to write -- by using the helper method it becomes so easy:
  @Html.TextBox(‘email’) 

It will generate a textbox control whose name is the email.

If we want to assign the value of the textbox with some initial value then use the below method:
  @Html.TextBox(‘email’,’[email protected]’) 

If I want to set an initial style for textbox we can achieve this by using the below way:
  @Html.TextBox(‘email’,’[email protected]’,new {style=’your style here’ , title=’your title here’});  

Here the style we pass is an anonymous type.

If we have a reserved keyword like class readonly and we want to use this as an attribute  we will do this using the below method, which means append with @ symbol with the reserved word.
  @Html.TextBox(‘email’,’[email protected]’,new {@class=’class name’, @readonly=true}); 

If we want to generate label:
  @Html.Label(‘firstname’,’sagar’) 

For password use the below Html helper method to create password box:
  @Html.Password(“password”) 

If I want to generate a textarea then for this also we have a method:
  @Html.TextArea(“comments”,”,4,12,null)  

In the above code 4 is the number of rows and 12 is the number of columns.

To generate a hidden box:
  @Html.Hidden(“EmpID”) 

Hidden textboxes are not displayed on the web page but used for storing data and when we need to pass data to action method then we can use that.

Is it possible to create our Html helpers in asp.net MVC?

Yes, we can create our Html helpers in MVC.

Is it mandatory to use Html helpers?

No, we can use plain Html for that but Html helpers reduce a significant amount of Html code to write that view.
Also, your code is simple and maintainable and if you require some complicated logic to generate view then this is also possible.


ASP.NET MVC 6 Hosting - HostForLIFE.eu :: Partial View in MVC

clock March 20, 2020 12:00 by author Peter

Partial view in ASP.NET MVC is special view which renders a portion of view content. It is just like a user control of a web form application. Partial can be reusable in multiple views. It helps us to reduce code duplication. In other word a partial view enables us to render a view within the parent view.
 

The partial view is instantiated with its own copy of a ViewDataDictionary object which is available with the parent view so that partial view can access the data of the parent view. If we made the change in this data (ViewDataDictionary object), the parent view's data is not affected. Generally the Partial rendering method of the view is used when related data that we want to render in a partial view is part of our model.
 
Creating Partial View
To create a partial view, right-click on view -> shared folder and select Add -> View option. In this way we can add a partial view.
 

Creating Partial View
It is not mandatory to create a partial view in a shared folder but a partial view is mostly used as a reusable component, it is a good practice to put it in the "shared" folder.

HTML helper has two methods for rendering the partial view: Partial and RenderPartial.
    <div> 
        @Html.Partial("PartialViewExample") 
    </div> 
    <div> 
        @{ 
            Html.RenderPartial("PartialViewExample"); 
        } 
    </div>

@Html.RenderPartial
The result of the RenderPartial method is written directly into the HTTP response, it means that this method used the same TextWriter object as used by the current view. This method returns nothing.
 
@Html.Partial
This method renders the view as an HTML-encoded string. We can store the method result in a string variable.
 
The Html.RenderPartial method writes output directly to the HTTP response stream so it is slightly faster than the Html.Partial method.
 
Returning a Partial view from the Controller's Action method:
    public ActionResult PartialViewExample() 
    { 
        return PartialView(); 
    }

Render Partial View Using jQuery
Sometimes we need to load a partial view within a model popup at runtime, in this case we can render the partial view using JQuery element's load method.
    <script type="text/jscript"> 
            $('#partialView').load('/shared/PartialViewExample’); 
    </script>


ASP.NET MVC 6 Hosting - HostForLIFE.eu :: Modal Popup In MVC Application

clock February 28, 2020 11:15 by author Peter

In this post we will implement modal pop up to display the detailed information of user after clicking on detail anchor. So this is the view on which we are going to apply modal popup.

View code
Enumerable<CodeFirst.Models.FriendsInfo> 
 
@{ 
    ViewBag.Title = "Index"; 

 
<h2>Index</h2> 
 
<p> 
    @Html.ActionLink("View All", "Index") 
 
    @using (Html.BeginForm("Search", "Home", FormMethod.Post)) 
    { 
        <table> 
            <tr> 
                <td> 
                    <input type="text" id="txtName" name="searchparam" placeholder="type here to search" /> 
                </td> 
                <td> 
                    <input type="submit" id="btnSubmit" value="Search" /> 
                </td> 
            </tr> 
        </table> 
    } 
 
</p> 
<table class="table"> 
    <tr> 
        <th> 
            @Html.DisplayNameFor(model => model.Name) 
        </th> 
        <th> 
            @Html.DisplayNameFor(model => model.Mobile) 
        </th> 
        <th> 
            @Html.DisplayNameFor(model => model.Address) 
        </th> 
        <th></th> 
    </tr> 
 
    @foreach (var item in Model) 
    { 
        <tr> 
            <td> 
                @Html.DisplayFor(modelItem => item.Name) 
            </td> 
            <td> 
                @Html.DisplayFor(modelItem => item.Mobile) 
            </td> 
            <td> 
                @Html.DisplayFor(modelItem => item.Address) 
            </td> 
            <td> 
                @*@Html.ActionLink("Edit", "Edit", new { id=item.Id }) | 
                    @Html.ActionLink("Details", "Details", new { id=item.Id }) | 
                    @Html.ActionLink("Delete", "Delete", new { id=item.Id })*@ 
 
                <a href="javascript:void(0);" class="anchorDetail"  data-id="@item.Id">Details</a> 
 
            </td> 
        </tr> 
    } 
 
</table>  

As we can see we have detail anchor, with class anchorDetail and with data-id, which will get the id of clicked anchor and show the corresponding data to modal (detail view) on screen.

We have an Action method Details(int id) which will return the partial view.
public ActionResult Details(int Id) 

    FriendsInfo frnds = new FriendsInfo(); 
    frnds = db.FriendsInfo.Find(Id); 
    return PartialView("_Details",frnds); 
 

Here we added a partial view for this purpose to show detail view when user click on detail anchor in the list.

View Code
@model CodeFirst.Models.FriendsInfo 
 
<div> 
   
    <div class="modal-header"> 
        <button type="button" class="close" data-dismiss="modal" aria-hidden="true">×</button> 
        <h4 class="modal-title" id="myModalLabel">FriendsInfo</h4> 
    </div>                
                 
     
    <hr /> 
    <dl class="dl-horizontal"> 
        <dt> 
            @Html.DisplayNameFor(model => model.Name) 
        </dt> 
 
        <dd> 
            @Html.DisplayFor(model => model.Name) 
        </dd> 
 
        <dt> 
            @Html.DisplayNameFor(model => model.Mobile) 
        </dt> 
 
        <dd> 
            @Html.DisplayFor(model => model.Mobile) 
        </dd> 
 
        <dt> 
            @Html.DisplayNameFor(model => model.Address) 
        </dt> 
 
        <dd> 
            @Html.DisplayFor(model => model.Address) 
        </dd> 
 
    </dl> 
</div> 


We have a div for modal pop-up.

<div id='myModal' class='modal'> 
    <div class="modal-dialog"> 
        <div class="modal-content"> 
            <div id='myModalContent'></div> 
        </div> 
    </div>  
     
</div>  


Here is the script for showing modal (partial view) on above div when user click on detail anchor. Here we used Ajax call for this purpose.

Script
@section scripts 

    <script src="~/Scripts/jquery-1.10.2.min.js"></script> 
    <script src="~/Scripts/bootstrap.js"></script> 
    <script src="~/Scripts/bootstrap.min.js"></script> 
<script> 
    var TeamDetailPostBackURL = '/Home/Details'; 
    $(function () { 
        $(".anchorDetail").click(function () { 
            debugger; 
            var $buttonClicked = $(this); 
            var id = $buttonClicked.attr('data-id'); 
            var options = { "backdrop": "static", keyboard: true }; 
            $.ajax({ 
                type: "GET", 
                url: TeamDetailPostBackURL, 
                contentType: "application/json; charset=utf-8", 
                data: { "Id": id }, 
                datatype: "json", 
                success: function (data) { 
                    debugger; 
                    $('#myModalContent').html(data); 
                    $('#myModal').modal(options); 
                    $('#myModal').modal('show');                   
 
                }, 
                error: function () { 
                    alert("Dynamic content load failed."); 
                } 
            }); 
        }); 
        //$("#closebtn").on('click',function(){ 
        //    $('#myModal').modal('hide');   
 
        $("#closbtn").click(function () { 
            $('#myModal').modal('hide'); 
        });       
    }); 
    
</script> 
 

HostForLIFE.eu ASP.NET MVC 6 Hosting
HostForLIFE.eu is European Windows Hosting Provider which focuses on Windows Platform only. We deliver on-demand hosting solutions including Shared hosting, Reseller Hosting, Cloud Hosting, Dedicated Servers, and IT as a Service for companies of all sizes. We have customers from around the globe, spread across every continent. We serve the hosting needs of the business and professional, government and nonprofit, entertainment and personal use market segments.


About HostForLIFE.eu

HostForLIFE.eu is European Windows Hosting Provider which focuses on Windows Platform only. We deliver on-demand hosting solutions including Shared hosting, Reseller Hosting, Cloud Hosting, Dedicated Servers, and IT as a Service for companies of all sizes.

We have offered the latest Windows 2016 Hosting, ASP.NET Core 2.2.1 Hosting, ASP.NET MVC 6 Hosting and SQL 2017 Hosting.


Tag cloud

Sign in