As you are aware, one of the most useful features in Visual Studio 2013 is "One ASP.NET," which allows us to construct an application using Web Forms, MVC, and Web API. We can build it all in a single application. When using all of these ASP.NET components within a single application, there may be a few alternatives, such as:

- An existing Web Forms project can be configured with MVC functionality to generate modules
- Modules can communicate with Web Forms and receive information from the MVC controller
There are various sections, as specified below, to construct the scenario in which we can pass data from the GridView to the new MVC controller and view it through the MVC View.
- Creating an application
- Adding MVC Controller and Models
- Creating View
- Run the application.
Creating an Application
In this section, we can build an empty project template and then use the ASP.NET wizard to add the Web Forms project using the steps below.
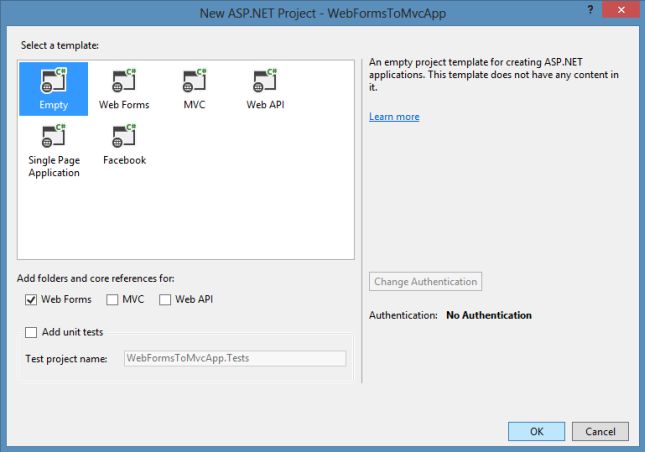
Step 1: Create an ASP.NET web application.
Step 2: Choose the empty project and online forms.
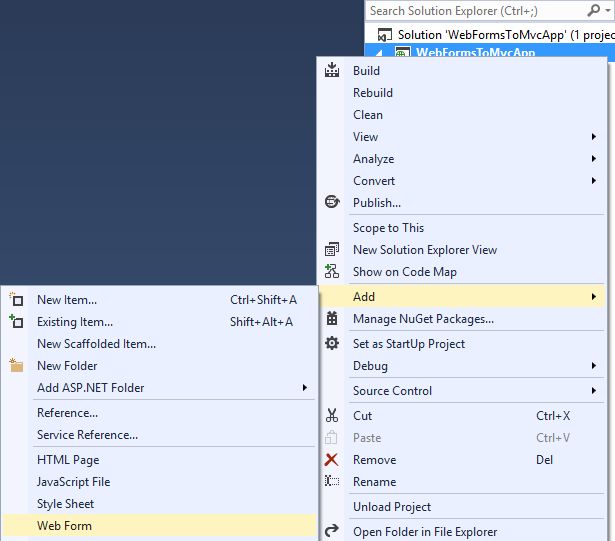
Step 3: Add the WebForm named DataWebForm to the project.
Step 4: Now add the GridView from the toolbox
Adding MVC Controller and Models
In this section we'll create the model and controller for the project using the following procedure.
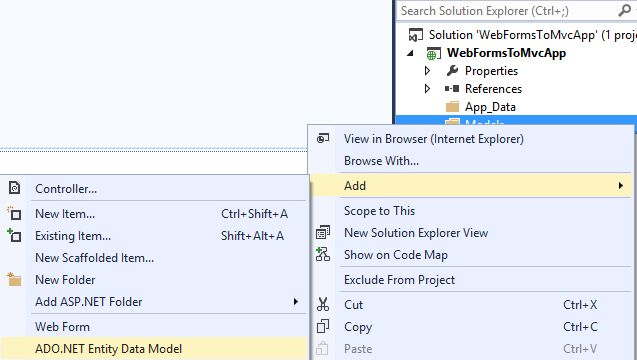
Step 1: Add the ADO.NET Data Entity Model to the Models folder.
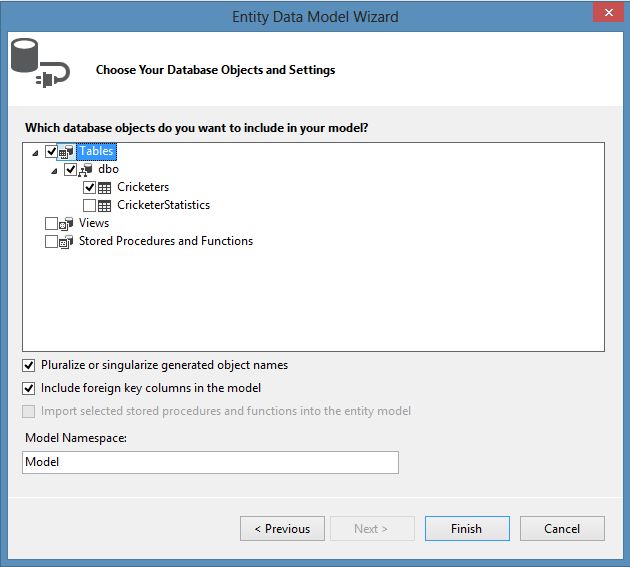
Step 2: Now configure the data model with the database table.
Step 3: Now configure the data source for the Grid View and then add the Button template filed inside the GridView with the following code:
<asp:TemplateField ShowHeader="false">
<ItemTemplate>
<asp:Button ID="BtnEdit" Text="Edit" PostBackUrl="Cricketer/Edit" runat="server" />
</ItemTemplate>
</asp:TemplateField>
In the code above we have set the PostBackUrl property to the Edit View page. We'll create it in the following procedure.
Step 4: Now run the application
Step 5: Now add the following code of HiddenField and Literal after the GridView control:
<asp:HiddenField ID="FormToMVC" runat="server" />
<br />
<asp:Literal ID="Literal1" runat="server"></asp:Literal>
Step 6: Add the jQuery to the Scripts folder. You can download it. Modify your page head part with the following code:
<head runat="server">
<title>WebForms To MVC</title>
<script src="Scripts/jquery-2.0.3.js"></script>
<script type="text/javascript">
$(document).ready(function () {
$("input:submit").click(function (evt) {
var Cric_Data = {};
Cric_Data.ID = $(evt.target).closest("tr").children("td:eq(0)").html();
Cric_Data.Name = $(evt.target).closest("tr").children("td:eq(1)").html();
Cric_Data.Team = $(evt.target).closest("tr").children("td:eq(2)").html();
Cric_Data.Grade = $(evt.target).closest("tr").children("td:eq(3)").html();
$("#FormToMVC").val(JSON.stringify(Cric_Data));
});
});
</script>
</head>
In the code above you can see that the ready handler is used to handle the click event for all buttons in the form and if the edit button is selected by the user then it creates the JavaScript object and sets the properties, like id, name and so on to the values from a GridView row. The closest method gets the reference of the table row for editing and then the html method returns the data inside the GridView.
Step 7: Now we create a new folder named Controllers and add a new scaffolded item
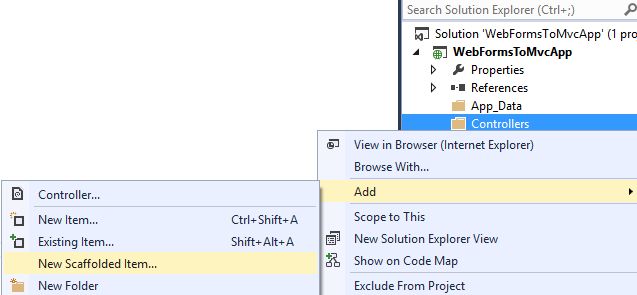
Note: Please build the solution before scaffolding.
Step 8: Create a Empty MVC 5 Controller.
Add Scaffold in MVC 5
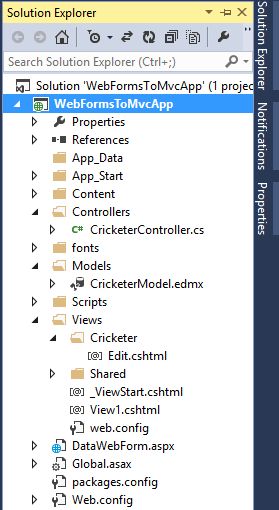
This will add the Content, App_Start, fonts and Views folders to the project automatically. Now modify your controller with the code below:
using Newtonsoft.Json;
using System.Web.Mvc;
using WebFormsToMvcApp.Models;
namespace WebFormsToMvcApp.Controllers
{
public class CricketerController : Controller
{
//
// GET: /Cricketer/
public ActionResult Index()
{
return View();
}
public ActionResult Edit()
{
string Jason_Data = Request.Form["FormToMVC"];
Cricketer CricObj = JsonConvert.DeserializeObject<Cricketer>(Jason_Data);
return View(CricObj);
}
public void Update(Cricketer CricObj)
{
CricketerSite_Entities CricDb = new CricketerSite_Entities();
Cricketer Cric_Exist = CricDb.Cricketers.Find(CricObj.ID);
Cric_Exist.Name = CricObj.Name;
Cric_Exist.Team = CricObj.Team;
Cric_Exist.Grade = CricObj.Grade;
CricDb.SaveChanges();
Response.Redirect("/DataWebForm.aspx?cricketerid=" + CricObj.ID);
}
}
}
In the code above, the Edit action method is used to read the JSON data sent from the webform and then the JSON.NET library is used to desterilize the JSON string ("FormToMVC") into the Cricketer class object.
We have also created the Update() to get the information of the Edit() View. It receives the data as the Cricketer object. It simply applies the changes to the database.
Step 9: Modify the Global.asax file with the following code:
using System;
using System.Web.Mvc;
using System.Web.Optimization;
using System.Web.Routing;
namespace WebFormsToMvcApp
{
public class Global : System.Web.HttpApplication
{
protected void Application_Start(object sender, EventArgs e)
{
AreaRegistration.RegisterAllAreas();
RouteConfig.RegisterRoutes(RouteTable.Routes);
FilterConfig.RegisterGlobalFilters(GlobalFilters.Filters);
BundleConfig.RegisterBundles(BundleTable.Bundles);
}
}
}
Creating View
In this section we'll create the view for the controller using the following procedure.
Step 1: Right-click on the Edit method for adding the view.

Step 2: Edit and modify the view with the following code:
@model WebFormsToMvcApp.Models.Cricketer
@{
ViewBag.Title = "Edit Cricketer";
}
<h2>Edit</h2>
@using (Html.BeginForm("Update","Cricketer",FormMethod.Post))
{
<div class="form-horizontal">
<h4>Cricketer</h4>
<hr/>
<div class="form-group">
@Html.LabelFor(model=> model.ID)
<div class="col-md-10">
@Html.TextBoxFor(model=> model.ID)
</div>
</div>
<div class="form-group">
@Html.LabelFor(model => model.Name)
<div class="col-md-10">
@Html.TextBoxFor(model => model.Name)
</div>
</div>
<div class="form-group">
@Html.LabelFor(model => model.Team)
<div class="col-md-10">
@Html.TextBoxFor(model => model.Team)
</div>
</div>
<div class="form-group">
@Html.LabelFor(model => model.Grade)
<div class="col-md-10">
@Html.TextBoxFor(model => model.Grade)
</div>
</div>
<div class="form-group">
<div class="col-md-10">
<input type="submit" value="Update" />
</div>
</div>
</div>
}
The code defined above submits the data to the Update method.
Step 3: Now at last add the following code to the DataWebForm's Page_Load() event:
public partial class DataWebForm : System.Web.UI.Page
{
protected void Page_Load(object sender, EventArgs e)
{
if (!string.IsNullOrEmpty(Request.QueryString["cricketerid"]))
{
Literal1.Text = "Cricketer" + Request.QueryString["cricketerid"] + "Updated Successfully";
}
}
}
That's it. You can see the following figure of Solution Explorer to view the entire project:
Running the Application
Step 1: Run the DataWebForm and click on the Edit button to update the data
Step 2: Update the info and click on the Update