European ASP.NET MVC 4 and MVC 5 Hosting

BLOG about ASP.NET MVC 3, ASP.NET MVC 4, and ASP.NET MVC 5 Hosting and Its Technology - Dedicated to European Windows Hosting Customer

Press Release :: European HostForLIFE.eu Proudly Launches ASP.NET MVC 5 Hosting

clock August 28, 2013 11:05 by author Ronny

European Windows and ASP.NET hosting specialist, HostForLIFE.eu, has announced the availability of new hosting plans that are optimized for the latest update of the Microsoft ASP.NET Model View Controller (MVC) technology. The MVC web application framework facilitates the development of dynamic, data-driven websites.

The latest update to Microsoft’s popular MVC (Model-View-Controller) technology,  ASP.NET MVC 5 adds sophisticated features like single page applications, mobile optimization, adaptive rendering, and more. Here are some new features of ASP.NET MVC 5:

- ASP.NET Identity
- Bootstrap in the MVC template
- Authentication Filters
- Filter overrides

HostForLIFE.eu is Microsoft’s number one Recommended Windows and ASP.NET Spotlight Hosting Partner in Europe for its support of Microsoft technologies that include WebMatrix, WebDeploy, Visual Studio 2012, ASP.NET 4.5, ASP.NET MVC 4.0, Silverlight 5, and Visual Studio Lightswitch.

HostForLIFE.eu hosts its servers in top class data centers that is located in Amsterdam to guarantee 99.9% network uptime. All data center feature redundancies in network connectivity, power, HVAC, security, and fire suppression.

In addition to shared web hosting, shared cloud hosting, and cloud server hosting, HostForLIFE.eu offers reseller hosting packages and specialized hosting for Microsoft SharePoint 2010 and 2013. All hosting plans from HostForLIFE.eu include 24×7 support and 30 days money back guarantee.

For more information about this new product, please visit http://www.HostForLIFE.eu

About HostForLIFE.eu:

HostForLIFE.eu is Microsoft No #1 Recommended Windows and ASP.NET Hosting in European Continent. HostForLIFE.eu service is ranked the highest top #1 spot in several European countries, such as: Germany, Italy, Netherlands, France, Belgium, United Kingdom, Sweden, Finland, Switzerland and many top European countries.

HostForLIFE.eu number one goal is constant uptime. HostForLIFE.eu data center uses cutting edge technology, processes, and equipment. HostForLIFE.eu has one of the best up time reputations in the industry.

HostForLIFE.eu second goal is providing excellent customer service. HostForLIFE.eu technical management structure is headed by professionals who have been in the industry since it's inception. HostForLIFE.eu has customers from around the globe, spread across every continent. HostForLIFE.eu serve the hosting needs of the business and professional, government and nonprofit, entertainment and personal use market segments.


European ASP.NET MVC 4 Hosting - Amsterdam :: Creating MVC 4 Application with Umbraco

clock August 16, 2013 06:38 by author Scott

Hello, how do you do? In this article, I will gonna show you how to integrate ASP.NET MVC 4 using Umbraco. Note that Umbraco does not provide a “pure” MVC application as the Umbraco UI comes with a fair amount of webforms baggage. That said, it plays nicely with an MVC 4 project in Visual Studio and provides a flexible view rendering engine that lets you build genuinely testable page templates.

Setting up the project

Umbraco is shipped as an ASP.NET website which you can use directly, though this is not ideal. It is a better idea to create a full MVC 4 project, manage the dependencies using the Umbraco NuGet package and drop the Umbraco files directly into the site. Use the following steps to set up Umbraco as an MVC 4 project in Visual Studio:

Firstly, start an empty MVC 4 project in Visual Studio – make sure it is an empty project as you will not need any of the baggage that comes with other project templates.

Add the NuGet Umbraco Cms Core Binaries package which will manage the various dependencies and references that Umbraco 6 requires for you.

Copy all the files from the Umbraco installation ZIP archive directly into your project in Visual Studio except the App_Code and Bin folders – you won’t need the binaries as they are managed by NuGet and the App_Code folder is not used in a web application project.

The default mode for Umbraco is to use web forms rendering. You will need to switch this to use MVC by changing the defaultRenderingEngine setting in the Umbraco configuration file UmbracoSettings.config as shown below:

<templates>
  <useAspNetMasterPages>true</useAspNetMasterPages>
  <defaultRenderingEngine>Mvc</defaultRenderingEngine>
</templates>

Now you’re good to go – run the Umbraco site to set up the database and once the admin console comes up you can create a first view.

Note that you may optionally wish to remove the App_Start directory and Global.asax.cs files from your Visual Studio project – they are not used in a default Umbraco application as global.asax inherits directly from the Umbraco.Web.UmbracoApplication class and does not execute this code.

Creating a view

You can create a basic view in the Umbraco UI. In the “Settings” section create a new Document Type – call it “Home” and ensure that “Create matching template” is checked. A new file will be created in your Views folder with the following mark-up:

@inherits Umbraco.Web.Mvc.UmbracoTemplatePage
@{

    Layout = null;
}

If you create and publish a first page based on this content type it will become your site’s home page. This is all you do to start creating pages based on MVC as Umbraco uses a default routing process that delivers the page properties to the view. You can actually build basic content pages without having to worry about the plumbing around controllers and models – this only starts to become important if you want to put more logic in behind the scenes.

Creating a custom controller

The default rendering engine for Umbraco routes requests through RenderMvcController with an IPublishedContent object as the model view. This provides a pretty simple means of  basic pages rigged up with managed content but you can extend this behavior by creating custom controllers. Umbraco refers to this technique of creating custom controllers as hijacking, though really it is just a matter of creating a controller where MVC would normally look.

To create a controller for our Home view we just create a controller called HomeController. To hook it up to Umbraco’s content API you will need to inherit from RenderMvcController and override the Index method as shown below:

public class HomeController : Umbraco.Web.Mvc.RenderMvcController
{
    public override ActionResult Index(RenderModel model)
    {
        //Do some stuff here, then return the base method
        return base.Index(model);
    }
}

Creating controllers to handle forms and actions is a little more involved as you have to create what Umbraco calls a surface controller. This is a controller like any other but one that is derived from the Umbraco SurfaceController class. These controllers can be implemented as a normal part of your MVC project (“locally declared” in Umbraco-speak) or implemented as a plug-in for shipping as part of a package.

If you want to include your own custom MVC routes then you will have to override the OnApplicationStarted method. This can be done by creating your own custom global.asax file that inherits from Umbraco.Web.UmbracoApplication.

Creating a custom model

Once you have wired up a controller it’s pretty straightforward to create in your own model and pass it into the page. You will need to change the view so that it inherits the generic version of UmbracoViewPage with your custom model specified as the generic parameter. The example below shows the view adjusted for a new model called HomeModel.

@inherits Umbraco.Web.Mvc.UmbracoViewPage<UmbracoMvc4.Models.HomeModel>
@{

    Layout = null;
}

The controller will still accept a RenderModel object but you can pass your custom model by using the CurrentTemplate method as shown below:

public override ActionResult Index(RenderModel model)
{
    HomeModel customModel = new HomeModel();
    return CurrentTemplate(customModel);
}

If you want to take advantage of the Umbraco view helpers then you can extend the RenderModel object by creating a constructor that initialises the base class as shown below. This will ensure that your derived model still exposes the page data and current culture properly.

public class HomeModel : RenderModel
{
    public HomeModel(RenderModel model)
        : base(model.Content, model.CurrentCulture)
    { }
}

Beyond the basics

Although it is not a “pure” MVC implementation you can still get Umbraco 6 to sit quite nicely within an MVC 4 web application just so long as you set it up carefully. Beyond the basics of models, views and controllers there is support for features such as partial views and child actions as well as scope for you to use dependency injection and your IoC container of choice. So long as you’re prepared to ignore the messy webforms back-end that lurks in the background Umbraco 6 can really feel like working with an MVC 4 application.


European ASP.NET MVC 4 Hosting - Amsterdam :: How to Create Async Controllers with MVC 4

clock August 9, 2013 08:59 by author Scott

In this post I will show how to create async controllers in MVC 4.

The way to build asynchronous controllers has been completely changed compared to how it was done in MVC3 with the AsyncController superclass. This class and the inherent complexity in using it are gone in MVC4.

Start Visual Studio 2012 and create an MVC4 Web Application and choose the Internet template. Create a folder called “Services” in the solution. Insert two classes in this folder: DatabaseService and CalculationService. They represent long running calls to external services and have the following content:

DatabaseService.cs:

public class DatabaseService
    {
        public string GetData()
        {
            StringBuilder dataBuilder = new StringBuilder();
            dataBuilder.Append("Starting GetData on thread id ").Append(Thread.CurrentThread.ManagedThreadId)
                .Append(". ");
            Thread.Sleep(2000);
            dataBuilder.Append("Results from the database. ").Append(Environment.NewLine);
            dataBuilder.Append("Finishing GetData on thread id ").Append(Thread.CurrentThread.ManagedThreadId)
                .Append(".");
            return dataBuilder.ToString();
        }
    }

CalculationService.cs:

public class CalculationService
    {
        public string GetResult()
        {
            StringBuilder resultBuilder = new StringBuilder();
            resultBuilder.Append("Starting GetResult on thread id ").Append(Thread.CurrentThread.ManagedThreadId)
                .Append(". ");
            Thread.Sleep(2000);
            resultBuilder.Append("This is the result of a long running calculation. ");
            resultBuilder.Append("Finishing GetResult on thread id ").Append(Thread.CurrentThread.ManagedThreadId)
                .Append(".");
            return resultBuilder.ToString();
        }
    }

There should be nothing complicated in either class implementation.

Create another folder in the solution called ViewModels. Add a class called HomePageViewModel in that folder:

public class HomePageViewModel
    {
        public List<String> Messages { get; set; } 

        public void AddMessage(string message)
        {
            if (Messages == null)
            {
                Messages = new List<string>();
            }
            Messages.Add(message);
        }
    }

Navigate to the Index action of the Home controller and modify it as follows:

public ActionResult Index()
        {
            DateTime startDate = DateTime.UtcNow; 

            HomePageViewModel viewModel = new HomePageViewModel();
            viewModel.AddMessage(string.Concat("Starting Action on thread id ", Thread.CurrentThread.ManagedThreadId));
            CalculationService calcService = new CalculationService();
            DatabaseService dataService = new DatabaseService(); 
            viewModel.AddMessage(calcService.GetResult());
            viewModel.AddMessage(dataService.GetData()); 

            DateTime endDate = DateTime.UtcNow;
            TimeSpan diff = endDate - startDate; 

            viewModel.AddMessage(string.Concat("Finishing Action on thread id ", Thread.CurrentThread.ManagedThreadId));
            viewModel.AddMessage(string.Concat("Action processing time: ", diff.TotalSeconds));
            return View(viewModel);
        }

Nothing complicated here either: we’re just adding messages to the view model, show the thread ids and measure the time it takes to complete the action.

Modify Index.cshtml of the Home view as follows:

@model Mvc4.ViewModels.HomePageViewModel
@{
    ViewBag.Title = "Home Page";


<ul>
    @foreach (String message in Model.Messages)
    {
        <li>@message</li>
    }
</ul>

So when you run the web page you should see an output similar to the following:

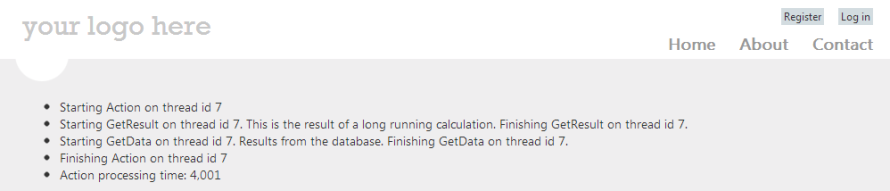
It’s easy to see the following:

  • The Index() action blocks the thread when it calls CalculationService and DatabaseService
  • The total processing time took about 4 seconds in total
  • All involved methods executed on the same thread

Now our goal is to make this process more efficient: as it stands now the main thread is only sitting idle for most of the processing time. This can be a serious problem if we’re intending to build a scalable and responsive application.

We need to make a couple of changes to our code:

  • The Index() action needs to return a Task of type ActionResult and turned to an async method: we do not directly return an ActionResult but a Task that represents an ActionResult
  • Remember that if an action is of type async then it needs to have its pair ‘await’ somewhere in the method body
  • We have two long running method calls within the Index() action, so we’ll instruct MVC4 to await them
  • Since we’ll await those two method calls we need to insert async versions of DatabaseService.GetData() and CalculationService.GetResult() as well: they in turn must also return Tasks of type string instead of plain string

Using our experience from the Console app in the previous post we’ll include an async version of GetResult() in CalculationService.cs:

public async Task<String> GetResultAsync()
        {
            StringBuilder resultBuilder = new StringBuilder();
            resultBuilder.Append("Starting GetResult on thread id ").Append(Thread.CurrentThread.ManagedThreadId)
                .Append(". ");
            await Task.Delay(2000);
            resultBuilder.Append("This is the result of a long running calculation. ");
            resultBuilder.Append("Finishing GetResult on thread id ").Append(Thread.CurrentThread.ManagedThreadId)
                .Append(".");
            return resultBuilder.ToString();
        }

We’ll also insert a GetDataAsync() in DatabaseService.cs:

public async Task<String> GetDataAsync()
        {
            StringBuilder dataBuilder = new StringBuilder();
            dataBuilder.Append("Starting GetData on thread id ").Append(Thread.CurrentThread.ManagedThreadId)
                .Append(". ");
            await Task.Delay(2000);
            dataBuilder.Append("Results from the database. ").Append(Environment.NewLine);
            dataBuilder.Append("Finishing GetData on thread id ").Append(Thread.CurrentThread.ManagedThreadId)
                .Append(".");
            return dataBuilder.ToString();
        }

Update the Index action of the Home controller to call the async method versions of the services:

public async Task Index()
        {
            DateTime startDate = DateTime.UtcNow; 

            HomePageViewModel viewModel = new HomePageViewModel();
            viewModel.AddMessage(string.Concat("Starting Action on thread id ", Thread.CurrentThread.ManagedThreadId));
            CalculationService calcService = new CalculationService();
            DatabaseService dataService = new DatabaseService(); 

            string calculationResult = await calcService.GetResultAsync();
            string databaseResult = await dataService.GetDataAsync(); 

            viewModel.AddMessage(calculationResult);
            viewModel.AddMessage(databaseResult); 

            DateTime endDate = DateTime.UtcNow;
            TimeSpan diff = endDate - startDate; 

            viewModel.AddMessage(string.Concat("Finishing Action on thread id ", Thread.CurrentThread.ManagedThreadId));
            viewModel.AddMessage(string.Concat("Action processing time: ", diff.TotalSeconds));
            return View(viewModel);
        }

Run the web app now and you may see an output similar to the following:
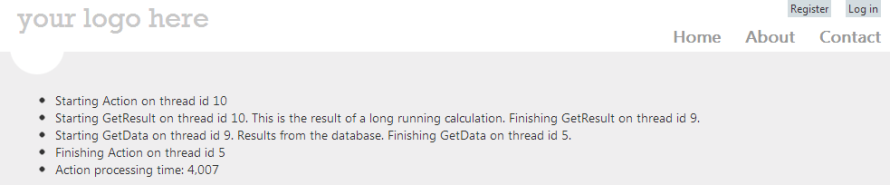
Note the following:

  • The Index action started on thread id 10
  • The same thread enters GetResultAsync
  • The main thread exits GetResultAsync at the await keyword and thread 9 takes over
  • Thread 9 enters GetDataAsync and exits at the await keyword and thread 5 takes over
  • Thread 5 finished Index()
  • The total processing time is still about 4 seconds, but remember from the previous post: if you want to couple asynchronous methods with concurrency you need to include the TPL as well. This will be resolved later in this post.

The output on your screen may be different when you run the sample. It is not guaranteed that 3 different threads will be involved throughout the lifetime of the Index() action. It depends on the availability of threads, may only be 2 in total.

If you are working with WCF services and add a service reference to your project then you’ll have the option to generate the Async() versions of the service calls automatically. Make sure to select the ‘Allow generation of asynchronous operations’ checkbox and the ‘Generate task-based operations’ radiobutton in the Service Reference Settings window.

.NET4.5 is now interspersed with built-in async versions of long running and/or remote methods. Typical examples include: HttpClient.SendAsync that returns a Task of type HttpResponseMessage, or HttpContent.ReadAsStringAsync that returns a Task of type String.

We can now introduce TPL to make the service calls run in parallel. As it stands now the Index action first waits for GetResultAsync to finish before it goes on with GetDataAsync. Ideally Index should wait for both actions to complete in parallel and not one after the other. We will basically hold a reference to the Task values returned by the services and await them both together.

Update the Index action as follows:

public async Task<ActionResult> Index()
        {
            DateTime startDate = DateTime.UtcNow; 

            HomePageViewModel viewModel = new HomePageViewModel();
            viewModel.AddMessage(string.Concat("Starting Action on thread id ", Thread.CurrentThread.ManagedThreadId));
            CalculationService calcService = new CalculationService();
            DatabaseService dataService = new DatabaseService(); 

            Task<String> calculationResultTask = calcService.GetResultAsync();
            Task<String> databaseResultTask = dataService.GetDataAsync(); 

            await Task.WhenAll(calculationResultTask, databaseResultTask); 

            viewModel.AddMessage(calculationResultTask.Result);
            viewModel.AddMessage(databaseResultTask.Result); 

            DateTime endDate = DateTime.UtcNow;
            TimeSpan diff = endDate - startDate; 

            viewModel.AddMessage(string.Concat("Finishing Action on thread id ", Thread.CurrentThread.ManagedThreadId));
            viewModel.AddMessage(string.Concat("Action processing time: ", diff.TotalSeconds));
            return View(viewModel);
        }

Note the following:

  • We do not await the two service calls one by one
  • Both of them will be awaited using Task.WhenAll
  • Task.WhenAll accepts an array of Task objects that should run in parallel
  • Task.WhenAll will block until all tasks in the array have finished
  • The await keyword will make sure that Index will wait upon all tasks to complete in the array
  • To retrieve the returned value from the service calls just use the Result property of the Task object: this will be populated if the Task has a return value i.e. it is a Task of some type

When you run the updated Index page you may see something like this:

Again, your results will almost certainly differ. Which thread is allocated to which task is up to the thread scheduler. Refresh the page a couple of times to see some different results.


European ASP.NET MVC 4 Hosting - Amsterdam :: Tips to Enable and Disable Client Side Validation in MVC

clock August 5, 2013 10:38 by author Scott

In this article, I would like to demonstrate various ways for enabling or disabling the client side validation in ASP.NET MVC  3/4.

Enable Client-Side Validation in MVC

For enabling client side validation, we required to include the jQuery min, validate & unobtrusive scripts in our view or layout page in the following order.

<script src="@Url.Content("~/Scripts/jquery-1.6.1.min.js")" type="text/javascript"></script>
<script src="@Url.Content("~/Scripts/jquery.validate.js")" type="text/javascript"></script>
<script src="@Url.Content("~/Scripts/jquery.validate.unobtrusive.js")" type="text/javascript"></script>

The order of included files as shown above, is fixed since below javascript library depends on top javascript library.

Enabling and Disabling Client-Side Validation at Application Level

We can enable and disable the client-side validation by setting the values of ClientValidationEnabled & UnobtrusiveJavaScriptEnabled keys true or false. This setting will be applied to application level.

<appSettings>
<add key="ClientValidationEnabled" value="true"/>
<add key="UnobtrusiveJavaScriptEnabled" value="true"/>
</appSettings>

For client-side validation, the values of above both the keys must be true. When we create new project using Visual Studio in MVC3 or MVC4, by default the values of both the keys are set to true.

We can also enable the client-side validation programmatically. For this we need to do code with in the Application_Start() event of the Global.asax, as shown below.

protected void Application_Start()
{
//Enable or Disable Client Side Validation at Application Level
HtmlHelper.ClientValidationEnabled = true;
HtmlHelper.UnobtrusiveJavaScriptEnabled = true;
}

Enabling and Disabling Client-Side Validation for Specific View

We can also enable or disable client-side validation for a specific view. For this we required to enable or disable client side validation inside a Razor code block as shown below. This option will overrides the application level settings for that specific view.

@model MvcApp.Models.Appointment
@{
ViewBag.Title = "Make A Booking";
HtmlHelper.ClientValidationEnabled = false;
}
...


About HostForLIFE.eu

HostForLIFE.eu is European Windows Hosting Provider which focuses on Windows Platform only. We deliver on-demand hosting solutions including Shared hosting, Reseller Hosting, Cloud Hosting, Dedicated Servers, and IT as a Service for companies of all sizes.

We have offered the latest Windows 2016 Hosting, ASP.NET Core 2.2.1 Hosting, ASP.NET MVC 6 Hosting and SQL 2017 Hosting.


Tag cloud

Sign in