European ASP.NET MVC 4 and MVC 5 Hosting

BLOG about ASP.NET MVC 3, ASP.NET MVC 4, and ASP.NET MVC 5 Hosting and Its Technology - Dedicated to European Windows Hosting Customer

European ASP.NET MVC Core Hosting :: Layout View ASP.NET Core MVC

clock November 28, 2019 07:58 by author Scott

Short tutorial only about Layout view in ASP.NET Core MVC. We will discuss about it. Let’s get started!

What is Layout?

The layouts are like the master pages in Webforms applications.  The common UI code, which can be used in many views can go into a common view called layout.

Why do we need Layout View in ASP.NET Core MVC?

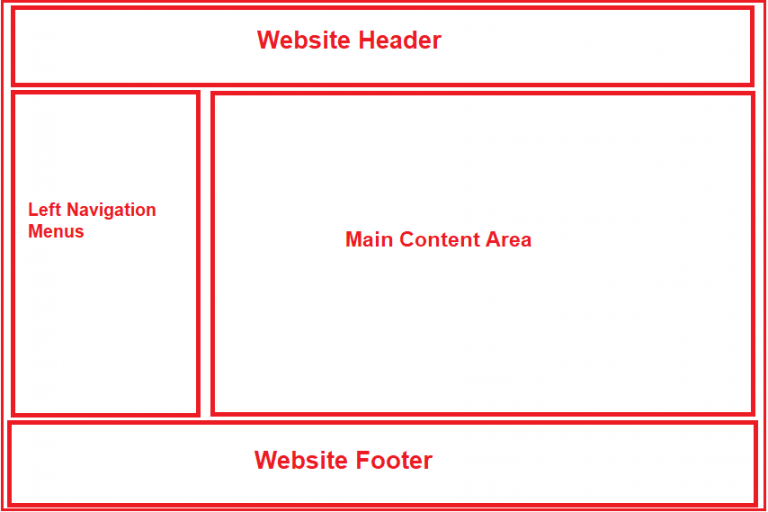
Nowadays, almost all web applications have the following sections.

  • Website Header
  • Website Footer
  • Navigation Menus
  • Main Content Area

Please have a look at the following image which shows the above mentioned four areas on a website.

Instead of putting all the sections (i.e. the HTML) in each and every view pages, it is always better and advisable to put them in a layout view and then inherit that layout view in each and every view where you want that look and feel. With the help of layout views, now it is easier to maintain the consistent look and feel of your application. This is because if you at all need to do any changes then you need to do it only at one place i.e. in the layout view and the changes will be reflected immediately across all the views which are inherited from the layout view.

Layout View in ASP.NET Core MVC Application:

  1. Like the regular view in ASP.NET Core MVC, the layout view is also a file with a .cshtml extension
  2. If you are coming from ASP.NET Web Forms background, you can think the layout view as the master page in asp.net web forms application.
  3. As the layout views are not specific to any controller, so, we usually place the layout views in a subfolder called “Shared” within the “Views” folder.
  4. By default, in ASP.NET Core MVC Application, the layout view file is named _Layout.cshtml.
  5. The leading underscore in the file name indicates that these files are not intended to be served directly by the browser.
  6. In ASP.NET Core MVC, it is also possible to create multiple layout files for a single application. For example, you may have one layout file for the admin users and another layout file for non-admin users of your application.

How to Create a Layout View in ASP.NET Core MVC Application?

  1. In order to create a layout view in ASP.NET Core MVC, you need to follow the below steps.
  2. Right-click on the “Views” folder and then add a new folder with the name “Shared“.
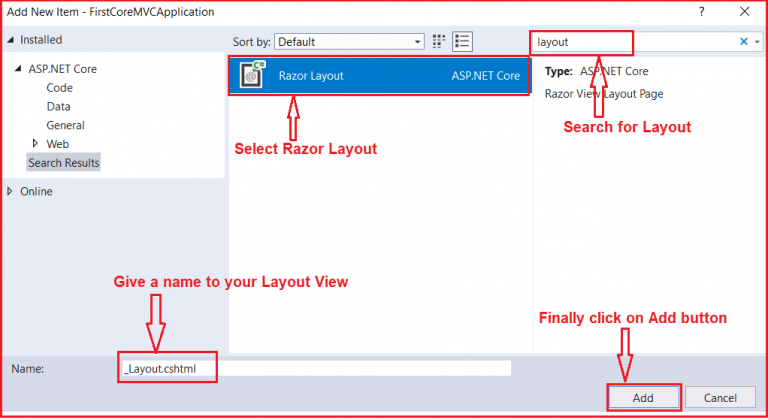
  3. Next, Right-click on the “Shared” folder and then select the “Add” – “New Item” option from the context menu which will open the Add New Item window.
  4. From the “Add New Item” window search for Layout and then select “Razor Layout”, give a meaning full name (_Layout.cshtml) to your layout view and finally click on the “Add” button as shown below which should add _Layout.cshtml file within the Shared folder.


Note: In this article, I am going to show you how to create and use a layout file and in our upcoming articles, I will show you how to use website header, footer, and navigation menus.

Understanding the _Layout.cshtml file:

Let us have a look at the auto-generated HTML code in the _Layout.cshtml file. The following HTML is auto-generated in the _Layout.cshtml file.

<!DOCTYPE html>
<html>
<head>
    <meta name="viewport" content="width=device-width" />
    <title>@ViewBag.Title</title>
</head>
<body>
    <div>
        @RenderBody()
    </div>
</body>
</html>

As you can see in the above layout file, it contains the standard Html, head, title and body elements. As the above elements are present in the layout file, so you don’t have to repeat all the above elements in each and every view.

The View or Page-specific title is retrieved by using the @ViewBag.Title expression. For example, when “index.cshtml” view is rendered using this layout view, then the index.cshtml view will set the Title property on the ViewBag. This is then retrieved by the Layout view using the expression @ViewBag.Title and set as the value for the <title> tag.

The @RenderBody() specifies the location where the view or page-specific content is injected. For example, if “index.cshtml” view is rendered using this layout view, then index.cshtml view content is injected at the location.

Let us modify the _Layout.cshtml page as shown below to include the header, footer, left navigation menus and main content area section.

<!DOCTYPE html>
<html>
<head>
    <meta name="viewport" content="width=device-width" />
    <title>@ViewBag.Title</title>
</head>
<body>
    <table border="1" style="width:800px; font-family:Arial">
        <tr>
            <td colspan="2" style="text-align:center">
                <h3>Website Header</h3>
            </td>
        </tr>
        <tr>
            <td style="width:200px">
                <h3>Left Navigation Menus</h3>
            </td>
            <td style="width:600px">
                @RenderBody()
            </td>
        </tr>
        <tr>
            <td colspan="2" style="text-align:center; font-size:x-small">
                <h3>Website Footer</h3>
            </td>
        </tr>
    </table>
</body>
</html>

Modifying the Startup class:

Please modify the Startup class as shown below where we configure the required services for MVC.

using Microsoft.AspNetCore.Builder;
using Microsoft.AspNetCore.Hosting;
using Microsoft.Extensions.DependencyInjection;
namespace FirstCoreMVCApplication
{
    public class Startup
    {
        public void ConfigureServices(IServiceCollection services)
        {
            services.AddMvc();
        }
        public void Configure(IApplicationBuilder app, IHostingEnvironment env)
        {
            app.UseMvcWithDefaultRoute();
        }
    }
}

Modifying the Home Controller:

Please modify the Home Controller as shown below.

using Microsoft.AspNetCore.Mvc;
namespace FirstCoreMVCApplication.Controllers
{
    public class HomeController : Controller
    {
        public ViewResult Index()
        {
            return View();
        }       

        public ViewResult Details()
        {
            return View();
        }
    }
}

As you can see here we have created two action methods i.e. Index and View.

Using Layout view in ASP.NET Core MVC Application:

Now we are going to create the Index and Details views using the Layout view. In order to render a view using the layout view (_Layout.cshtml), you need to set the Layout property.

Index.cshtml:

Please modify the Index view as shown below to use the layout view.

@{
    ViewBag.Title = "Home Page";
    Layout = "~/Views/Shared/_Layout.cshtml";
}
<h1>Home Page</h1>

Details.cshtml:

Please modify the Details view as shown below to use the layout view.

@{
    ViewBag.Title = "Details Page";
    Layout = "~/Views/Shared/_Layout.cshtml";
}
<h1>Details Page</h1>

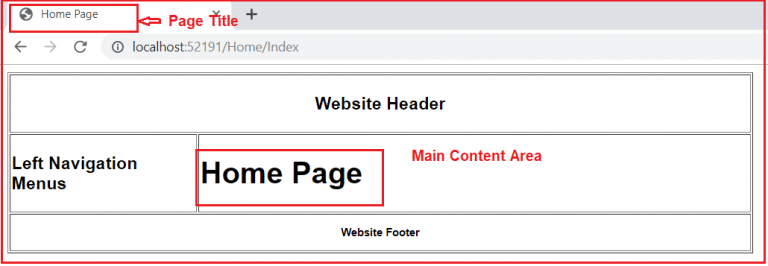
Now run the application and navigate to the Home/Index URL which should display the page as shown below.

If you don’t have a layout view for your website, then you need to repeat the required HTML for the above-mentioned sections in each and every view of your application. This is violating the DRY (Don’t Repeat Yourself) principle as we are repeating the same code in multiple views. As a result, it is very difficult to maintain the application. For example, if you have to remove or add a menu item from the list of navigation menus or even if you want to change the header or footer of your website then you need to do this in each and every view which is tedious, time-consuming as well as error-prone.


ASP.NET MVC Hosting UK - HostForLIFE.eu :: How to Use Automapper with ASP.NET MVC Application

clock November 8, 2019 11:20 by author Peter

At this moment, I will show you How to Use Automapper with ASP.NET MVC Application. Automapper could be a convention primarily based object - object mapper. it's offered in GitHub. Here I make a case for about a way to use Automapper to map between domain model objects and think about model objects in ASP.NET MVC applications.  Install Automapper to the project through Nuget.

Consider there's a powerfully typed view that expects a model object of type EmployeeViewModel. thus after querying with the Emplyee model object, we want to map this to EmployeeViewModel object.
public class Employee
   {
      public int EmployeeId { get; set; }
      public string EmployeeName { get; set; }
    }

And my employee view model
public class EmployeeViewModel
    {
        public int EmployeeId { get; set; }
        public string EmployeeName { get; set; }

    }

The use of AutoMapper
AutoMapper is designed within the web project. to form this more maintainable, create a folder (say Mappings) within the solution. Here we will produce 2 profile classes.  One for mapping from domain model object to look at model object and another one for reverse mapping.

public class DomainToViewModelMappingProfile : Profile
    {
        public override string ProfileName
        {
            get { return "DomainToViewModelMappings"; }
        }
        protected override void Configure()
        {
            Mapper.CreateMap<Employee, EmployeeViewModel>();
        }
    }
public class ViewModelToDomainMappingProfile : Profile
    {
        public override string ProfileName
        {
            get { return "ViewModelToDomainMappings"; }
        }
        protected override void Configure()
        {
            Mapper.CreateMap<EmployeeViewModel, Employee>();
        }
    }

Now create a configuration class within Mappings folder.
public class AutoMapperConfiguration
    {
        public static void Configure()
        {
            Mapper.Initialize(x =>
            {
                x.AddProfile<DomainToViewModelMappingProfile>();
                x.AddProfile<ViewModelToDomainMappingProfile>();
            });
        }
    }

And then call this configuration from global.asax.
AutoMapperConfiguration.Configure();

And from the controller simply map the employeeObject (domain model object) to employeeViewModelObject (view model object).
var employeeViewModelObject = Mapper.Map<Employee, EmployeeViewModel>(employeeObject);

In advanced situation we will even customise the configuration. for instance we will map a specific property from source to destination.
Mapper.CreateMap<X, XViewModel>()
.ForMember(x => x.Property1, opt => opt.MapFrom(source => source.PropertyXYZ));

Automapper provides extremely an improved and straightforward way to map between objects.


Silverlight 6 Hosting Netherlands - Cookie with JavaScript in Silverlight

clock November 1, 2019 11:07 by author Peter

Cookies are knowledge stored by the web browser, as easy as that. you'll be able to save something; yes I said anything, in cookies. I will conjointly do that through Silverlight itself, except for fun let's attempt doing it with JavaScript Silverlight 6. With this method we tend to follow, we'll be accessing JavaScript's function from Silverlight. This sometime becomes a headache for many developers.

The first step towards setting cookies through JavaScript, is to call the JavaScript function from Silverlight. Calling a JavaScript function from Silverlight is extremely straightforward. to know this, and more forthcoming things, produce a brand new Silverlight application "JavaScriptTweaks". Open JavaScriptTweaksTestpage.aspx, and add the subsequent code somewhere with <head> tag:
<script type="text/javascript">
    function SayHello()
   {
        alert("Hello!");
   }
</script>

Next step in the mainpage.cs inside the constructor add the code below:
HtmlPage.Window.Invoke("SayHello");
When you run the application, what you will see is a message box that pops up saying Hello at the very beginning of the app.

Now, we want to Setting the Cooking. Remove the SayHello function from the JavaScript. Write the following code:
function SetCookie(cookieName, cookieValue, Days)
{           
    var todayDate = new Date();
    var expireDate = new Date();
    if (Days == null || Days == 0) Days = 1;
    expire.setTime(todayDate.getTime() + 3600000 * 24 * Days);
    document.cookie = cookieName + ":" + cookieValue
    + ";expires=" + expireDate.toGMTString();          
}
Next step, call the function SetCookie with this code:
HtmlPage.Window.Invoke("SetCookie", "Name", "Peter", 5);


On the code above will call SetCookie function with the parameters cookieName "Name", cookieValue "Peter" and validity, in other words Days as "5". Line #5 of the function will set the expiry time period of cookies, which is in milliseconds and is about 432000000 for 5 days. Line #6 of the function will set the cookie's information like, its Name, Value and Expiry date. Our cookie is set to give information.

Now, we want to retrieve the information. Create three buttons in the XAML of the main page, 1 for each setcookie, getcookie and deletecookie.

Copy the function on the main page to the click event of the SetCookie Button.  And here is the code that I used:
function GetCookie(cookieName)
{
   var allcookies = document.cookie;
   // Get all the cookies in an array
   var cookiearray = allcookies.split(';');
   for (var i = 0; i < cookiearray.length; i++)
   {
       var nameOfCookie = cookiearray[i].split('=')[0];
       if (cookieName == nameOfCookie)
       {
           return cookiearray[i];
    }
 }
           return null;
}

Pass in the cookie name (which in our case is "Name") &  the function can return the entire cookie. On the GetCookie button select event and we should call this function. Write the following code:
private void ButtonGet_OnClick(object sender, RoutedEventArgs e)
{
    var cookie = HtmlPage.Window.Invoke("GetCookie", "Name");
    if (cookie == null)
    {
        MessageBox.Show("No cookie found");
        return;
    }
    MessageBox.Show(cookie.ToString().Split('=').LastOrDefault());
}

This will pop up a message box, showing the value of the cookie specified. Since I have my cookie as "name=Peter" it shows me "Peter".
Finally we want delete a cookie. You need to set the expiry date to a previous date. That can be done thorugh JavaScript's function as follows:
function DeleteCookie(cookieName)
{
    var exp = new Date();
    exp.setTime(exp.getTime() - 1);
    document.cookie = cookieName + "=;expires=" + exp.toGMTString();
}
In the delete button click event call this function as:
private void ButtonDelete_OnClick(object sender, RoutedEventArgs e)
{
    HtmlPage.Window.Invoke("DeleteCookie", "Name");
}


Pass within the name of the cookie you wish to delete and bang! it'll be deleted. currently simply do this. Click on SetCookie, it'll set the cookie for you. now click on GetCookie to verify whether or not it did set a cookie or not, you ought to see the value of the cookie within the message box. Click on Deletecookie to delete the cookie. Finally click on Getcookie button once more, if everything worked fine then you ought to see a message within the message box saying: "No cookie found".

HostForLIFE.eu Silverlight 6 Hosting
HostForLIFE.eu is European Windows Hosting Provider which focuses on Windows Platform only. We deliver on-demand hosting solutions including Shared hosting, Reseller Hosting, Cloud Hosting, Dedicated Servers, and IT as a Service for companies of all sizes. We have customers from around the globe, spread across every continent. We serve the hosting needs of the business and professional, government and nonprofit, entertainment and personal use market segments.


About HostForLIFE.eu

HostForLIFE.eu is European Windows Hosting Provider which focuses on Windows Platform only. We deliver on-demand hosting solutions including Shared hosting, Reseller Hosting, Cloud Hosting, Dedicated Servers, and IT as a Service for companies of all sizes.

We have offered the latest Windows 2016 Hosting, ASP.NET Core 2.2.1 Hosting, ASP.NET MVC 6 Hosting and SQL 2017 Hosting.


Tag cloud

Sign in