European ASP.NET MVC 4 and MVC 5 Hosting

BLOG about ASP.NET MVC 3, ASP.NET MVC 4, and ASP.NET MVC 5 Hosting and Its Technology - Dedicated to European Windows Hosting Customer

ASP.NET MVC 5 Hosting - HostForLIFE.eu :: Tracking Error with Log4net Library in ASP.NET MVC

clock June 29, 2015 08:48 by author Peter

Logging may be a method of tracking/monitoring what's happening when an application is in progress/running. Log records are going to be most required things when one thing goes wrong in your application, be it Windows Forms, mobile or web applications.

Here I will be able to be walking through the basic steps in implementing work functionality using Apache log4net framework in an ASP.NET MVC 5 application. I'm using Visual Studio express 2013 for web as my development environment targeting .NET framework 4.5. Open Visual Studio 2013 for web and build a new ASP.NET web application selecting MVC template.

Here in this demo application, we are going to use Apache Log4net framework for logging. We'd like to add reference of Log4net DLL using NuGet package manager. In VS 2013 solution explorer and then Right click on Reference and select Manage NuGet Packages. Search for ‘log4net’ and Install.

Once installation is successful, we are able to see the log4net DLL added beneath the solution explorer Reference section as shown below:

Next, we'd like to piece our application to use log4net logging framework. Add the below line in your startup.cs get into ASP.NET MVC5 solution folder. The below line of code provides data about log4net configuration file.
[assembly: log4net.Config.XmlConfigurator(ConfigFile = "Web.config", Watch = true)]

Now, write the following code to web.config file:
<configSections>
<!-- Add log4net config section-->
<section name="log4net" type="log4net.Config.Log4NetConfigurationSectionHandler,     log4net" />
</configSections>

<log4net debug="true">
<appender name="RollingLogFileAppender" type="log4net.Appender.RollingFileAppender">
<file value="logs\log.txt" />
<appendToFile value="true" />
<rollingStyle value="Size" />
<maxSizeRollBackups value="10" />
<maximumFileSize value="10MB" />
<staticLogFileName value="true" />
<layout type="log4net.Layout.PatternLayout">
<conversionPattern value="%-5p %d %5rms %-22.22c{1} %-18.18M - %m%n" />
</layout>
</appender>
<root>
<level value="DEBUG" />
<appender-ref ref="RollingLogFileAppender" />
</root>
</log4net>


Modify the Global.asax.cs and add the following code inside Application_Start() method.
log4net.Config.XmlConfigurator.Configure(new FileInfo(Server.MapPath("~/Web.config")));

Now our log4net library is ready to use with MVC5 application.
Add logger declaration in classes for which we want to make logs as below:
readonly log4net.ILog logger = log4net.LogManager.GetLogger(System.Reflection.MethodBase.GetCurrentMethod().DeclaringType);

Use the following logger.Error() method to log messages when needed as you can see on the below picture:

Run an application and that we will see the log file generated underneath the logs folder under the application root directory as configured in the web config file.

HostForLIFE.eu ASP.NET MVC 5 Hosting

HostForLIFE.eu is European Windows Hosting Provider which focuses on Windows Platform only. We deliver on-demand hosting solutions including Shared hosting, Reseller Hosting, Cloud Hosting, Dedicated Servers, and IT as a Service for companies of all sizes. We have customers from around the globe, spread across every continent. We serve the hosting needs of the business and professional, government and nonprofit, entertainment and personal use market segments.


ASP.NET MVC Hosting - HostForLIFE.eu :: How to List Data from Database Into Grid

clock June 27, 2015 11:25 by author Rebecca

In this article, you are going to learn how to quickly list the data from the database into Grid in ASP.NET MVC. We all know the benefit and beauty of GridView in ASP.NET Web Form. This is the best data control in ASP.NET MVC to quickly list the data from the database without specifying columns, table format etc. This was missing in ASP.NET MVC as it has not server side control like GridView.

The good thing here is that you can still use the GridView of System.Web.UI.WebControls namespace in ASP.NET MVC and populate with data and get it rendered in the ASP.NET MVC view. Here is how the action method looks like:

The Controller

public ActionResult ListDataInGridView()

        {

            System.Web.UI.WebControls.GridView gView =

                new System.Web.UI.WebControls.GridView();

            gView.DataSource = db.PersonalDetails.ToList();

            gView.DataBind();


            using (System.IO.StringWriter sw = new System.IO.StringWriter())

            {

                using (System.Web.UI.HtmlTextWriter htw = new System.Web.UI.HtmlTextWriter(sw))

                {

                    gView.RenderControl(htw);

                    ViewBag.GridViewString = sw.ToString();

                }

            }

            return View();

        }

In this action method, you have first instantiated the GridView control and set its data source and called DataBind method that will bind the data from the data source. 

Next, you have to use StringWriter and HtmlTextWriter to render the GridView content string into the StringWriter. The same is being set to the ViewBag.GridViewString.

The View

The View looks like below that simply use @Html.Raw method to write the content of the ViewBag:

@{ ViewBag.Title = "ListDataInGridView"; }

<h2>List Data In GridView</h2>

@Html.Raw(ViewBag.GridViewString)

Using @Html.Raw method is important as without this, it will simply render the HTML encoded characters of the GridView content string.

HostForLIFE.eu is European Windows Hosting Provider which focuses on Windows Platform only. We deliver on-demand hosting solutions including Shared hosting, Reseller Hosting, Cloud Hosting, Dedicated Servers, and IT as a Service for companies of all sizes. We have customers from around the globe, spread across every continent. We serve the hosting needs of the business and professional, government and nonprofit, entertainment and personal use market segments.


ASP.NET MVC 6 Hosting - HostForLIFE.eu :: How to Authenticate HTML files with ASP.NET MVC ?

clock June 26, 2015 08:08 by author Peter

Today, let me explain about how to Authenticate HTML files with ASP.NET MVC. To Check Html URL is Authenticated or Not Using Asp.net/MVC using the following code:
Coding:
if (Request.RawUrl.ToLower().EndsWith(".html")) 

if (Request.Cookies[".ASPXAUTH"] != null) 

  string value = Request.Cookies[".ASPXAUTH"].Value; 
  if (value == null || value == "") 
  { 
     Response.Redirect("~/Account/LogOn"); 
  } 

else 

  Response.Redirect("~/Account/LogOn"); 

}

The .ASPXAUTH is the Form Authentication Cookies and Account is the Controller. The LogOn is the action. Next step, write the following code in webconfig section:
<buildProviders> 
<add extension=".html" type="System.Web.Compilation.PageBuildProvider" /> 
<add extension=".htm" type="System.Web.Compilation.PageBuildProvider" /> 
</buildProviders> 

<handlers> 
<add name="HTML" path="*.html" verb="GET, HEAD, POST, DEBUG" type="System.Web.UI.PageHandlerFactory" resourceT
ype="Unspecified" requireAccess="Script" /> 
<add name="HTM" path="*.htm" verb="GET, HEAD, POST, DEBUG" type="System.Web.UI.PageHandlerFactory" resourceTyp
e="Unspecified" requireAccess="Script" /> 
</handlers>  

I hope it works for you! Happy coding.

HostForLIFE.eu ASP.NET MVC 6 Hosting
HostForLIFE.eu is European Windows Hosting Provider which focuses on Windows Platform only. We deliver on-demand hosting solutions including Shared hosting, Reseller Hosting, Cloud Hosting, Dedicated Servers, and IT as a Service for companies of all sizes. We have customers from around the globe, spread across every continent. We serve the hosting needs of the business and professional, government and nonprofit, entertainment and personal use market segments.


ASP.NET MVC 6 Hosting - HostForLIFE.eu :: How to Use Dropzone.js and HTML to Upload File in ASP.NET MVC

clock June 26, 2015 06:19 by author Rebecca

In this article, you can learn how to file upload in ASP.NET MVC using Dropzone.js and HTML5. Dropzone.js is an open source library that provides drag and drop file uploads with image previews. It’s lightweight, doesn’t depend on any other library (like jQuery) and is highly customizable. Follow these steps to upload your file using Dropzone.js and HTML.

Step 1

Before jumping to the project, first you will download the Dropzone.js files. You can download the latest version from the official site here http://www.dropzonejs.com/ and also you can install using the nuget package manage console by the following command Package Manager Console:

PM> Install-Package dropzone

In this tutorial, I'm using the nuget command to install Dropzone.js:

Step 2

Next is file upload implementation. You have to create a default ASP.NET MVC Web Application after you have installed the Dropzone.js. Then, create a bundle for your script file in BundleConfig.cs:

bundles.Add(new ScriptBundle("~/bundles/dropzonescripts").Include(
                     "~/Scripts/dropzone/dropzone.js"));

Step 3

Similarly you can add the Dropzone stylesheet in the BundleConfig.cs:

bundles.Add(new StyleBundle("~/Content/dropzonescss").Include(
                     "~/Scripts/dropzone/css/basic.css",
                     "~/Scripts/dropzone/css/dropzone.css"));

Step 4

Now add the bundle reference in your _Layout page:

Step 5

Everything is fine, you can start writing up the application code. Now go to /Home/Index.cshtml file and Dropzone form in the page using this code:

div class="jumbotron">
    <form action="~/Home/SaveUploadedFile" method="post" enctype="multipart/form-data" class="dropzone" id="dropzoneForm" style="width: 50px; background: none; border: none;">
        <div class="fallback">
            <input name="file" type="file" multiple />
            <input type="submit" value="Upload" />
        </div>
    </form>
</div>

Step 6

Now open the HomeController.cs and add the following code as follows:

public ActionResult SaveUploadedFile()
        {
            bool isSavedSuccessfully = true;
            string fName = "";
                    try{
            foreach (string fileName in Request.Files)
            {
                HttpPostedFileBase file = Request.Files[fileName];
                //Save file content goes here
                fName = file.FileName;
                if (file != null && file.ContentLength > 0)
                {

                    var originalDirectory = new DirectoryInfo(string.Format("{0}Images\\WallImages", Server.MapPath(@"\")));

                    string pathString = System.IO.Path.Combine(originalDirectory.ToString(), "imagepath");

                    var fileName1 = Path.GetFileName(file.FileName);

                    bool isExists = System.IO.Directory.Exists(pathString);

                    if (!isExists)
                        System.IO.Directory.CreateDirectory(pathString);

                    var path = string.Format("{0}\\{1}", pathString, file.FileName);
                    file.SaveAs(path);

                }

            }
                       
           }
           catch(Exception ex)
            {
                isSavedSuccessfully = false;
            }


            if (isSavedSuccessfully)
            {
                return Json(new { Message = fName });
            }
            else
            {
                return Json(new { Message = "Error in saving file" });
            }
        }

Step 7

Then, add the following script to your Index.cshtml page:

//File Upload response from the server
        Dropzone.options.dropzoneForm = {
            init: function () {
                this.on("complete", function (data) {
                    //var res = eval('(' + data.xhr.responseText + ')');
                     var res = JSON.parse(data.xhr.responseText);
                });
            }
        };

Also add the following css:

#dropZone {
        background: gray;
        border: black dashed 3px;
        width: 200px;
        padding: 50px;
        text-align: center;
        color: white;
    }

Now, you have uploaded your file using Dropzone.js and HTML5.

HostForLIFE.eu ASP.NET MVC 6 Hosting
HostForLIFE.eu is European Windows Hosting Provider which focuses on Windows Platform only. We deliver on-demand hosting solutions including Shared hosting, Reseller Hosting, Cloud Hosting, Dedicated Servers, and IT as a Service for companies of all sizes. We have customers from around the globe, spread across every continent. We serve the hosting needs of the business and professional, government and nonprofit, entertainment and personal use market segments.


ASP.NET MVC 6 Hosting - HostForLIFE.eu :: How to Deploy Google ReCAPTCHA in ASP.NET MVC

clock June 22, 2015 06:48 by author Rebecca

Here in this tutorial, I will explain about how to use Google reCAPTCHA in ASP.NET MVC. 

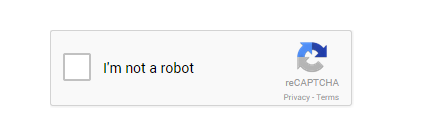
What is reCAPTCHA? reCAPTCHA protects the websites you love from spam and abuse. Google has updated thier reCAPTCHA API  to 2.0 . Now, users can now attest they are human without having to solve a CAPTCHA. Instead with just a single click they’ll confirm they are not a robot and it is called as “No CAPTCHA reCAPTCHA“.  This is how new reCAPTCHA look as follows:

Getting Google ReCAPTCHA

Now, lets create an API key pair for your site at https://www.google.com/recaptcha/intro/index.html and click on Get reCAPTCHA at top of the page and follow the below steps to create an application.


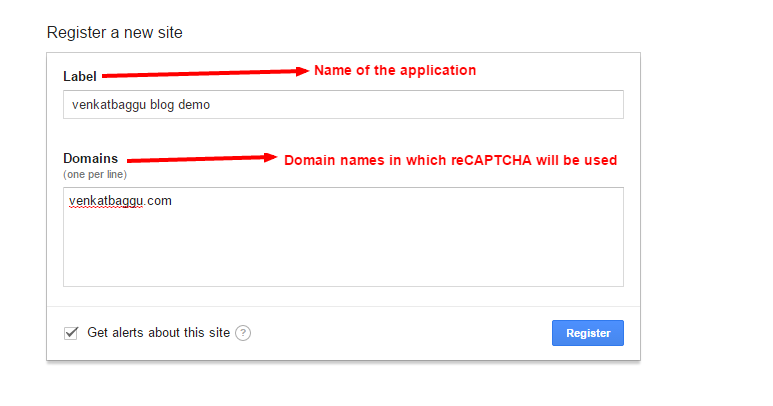
Once you have done with registration, the following keys will be generated:

  • Site key : is used to display the widget in your page or code.
  • Secret key: can be used as communication between your site and Google to verify the user response whether the reCAPTCHA is valid or not.

The next is to display the reCAPTCHA widget in your site.

Displaying Widget

We can render the Google reCAPTCHA widget in two ways as:

  1.     Automatically render the widget
  2.     Explicitly render the widget

For this example we will use Automatically render the widget in your page.

First load the script reference:

<script src="https://www.google.com/recaptcha/api.js" async defer></script>

Now, you need generate a DIV element with class name as g-recaptcha and your site key in the data-site key attribute in your webpage to generate reCAPTCHA.

<div class="g-recaptcha" data-sitekey="your_site_key"></div>

Now, implement above code in Home/Index.cshtml view page.

<div class="row">
    <div class="col-md-12">
        <form action="/home/validatecaptcha" method="POST">
            <div class="g-recaptcha" data-sitekey="6LfiS_8SAAAAABvF6ixcyP5MtsevE5RZ9dTorUWr"></div>
            <br />
            <input type="submit" value="Submit">
        </form>
    </div>

 
</div>
@section scripts{
   <script src="https://www.google.com/recaptcha/api.js" async defer></script>
}

Verifying User Response

Once reCAPTCHA is generated  and solved by a end user, a field with g-recaptcha-response will be populated in the html. When ever user submit the form on your site, you can POST the parameter g-recaptcha-response to verify the user response. The following API url is used to verify the user response.

https://www.google.com/recaptcha/api/siteverify?secret=your_secret&response=response_string&remoteip=user_ip_address

In above API url the secret and response parameters are required and where as remoteip is optional. Here secret represents the Secret Key that was generated in the key pair and the repsonse is the g-recaptcha-response that was submitted during the form post. The following is the API JSON response object that we get once the response is submitted.

{
  "success": true|false,
  "error-codes": [...]   // optional
}

Next, you will create an response class to verify the user response:

public class CaptchaResponse
{
    [JsonProperty("success")]
    public bool Success { get; set; }

    [JsonProperty("error-codes")]
    public List<string> ErrorCodes { get; set; }
}

Then, you can create a POST method in Index action in the Home controller to verify the user response.

[HttpPost]
public ActionResult ValidateCaptcha()
{
    var response = Request["g-recaptcha-response"];
    //secret that was generated in key value pair
    const string secret = "YOUR KEY VALUE PAIR";

    var client = new WebClient();
    var reply =
        client.DownloadString(
            string.Format("https://www.google.com/recaptcha/api/siteverify?secret={0}&response={1}", secret, response));

    var captchaResponse = JsonConvert.DeserializeObject<CaptchaResponse>(reply);

    //when response is false check for the error message
    if (!captchaResponse.Success)
    {
        if (captchaResponse.ErrorCodes.Count <= 0) return View();

        var error = captchaResponse.ErrorCodes[0].ToLower();
        switch (error)
        {
            case ("missing-input-secret"):
                ViewBag.Message = "The secret parameter is missing.";
                break;
            case ("invalid-input-secret"):
                ViewBag.Message = "The secret parameter is invalid or malformed.";
                break;

            case ("missing-input-response"):
                ViewBag.Message = "The response parameter is missing.";
                break;
            case ("invalid-input-response"):
                ViewBag.Message = "The response parameter is invalid or malformed.";
                break;

            default:
                ViewBag.Message = "Error occured. Please try again";
                break;
        }
    }
    else
    {
        ViewBag.Message = "Valid";
    }

    return View();
}

That's all! Hope it works for you!

HostForLIFE.eu ASP.NET MVC 6 Hosting
HostForLIFE.eu is European Windows Hosting Provider which focuses on Windows Platform only. We deliver on-demand hosting solutions including Shared hosting, Reseller Hosting, Cloud Hosting, Dedicated Servers, and IT as a Service for companies of all sizes. We have customers from around the globe, spread across every continent. We serve the hosting needs of the business and professional, government and nonprofit, entertainment and personal use market segments.


ASP.NET MVC 6 Hosting - HostForLIFE.eu :: How to Return JavaScript Content from The Controller

clock June 19, 2015 06:50 by author Rebecca

In this tutorial, we're gonna discuss about how to return JavaScript Content from controller action method. I have created a demonstration here, let's follow it step by step.

Step 1

Create a controller action method that returns a view:

public ActionResult OutputJavaScript()
  {
      return View();
  }

View for above action method:

@{
    ViewBag.Title = "OutputJavaScript";
}

<h2>OutputJavaScript</h2>

Try clicking on the link below <br />

@Html.ActionLink("Test JavaScript", "OutputJavaScriptAlert)

Step 2

The view appears in the browser like below:

Notice the 2nd parameter of the ActionLink method, this is the action method name of the controller. When the link “Test JavaScript” is clicked, it calls the OutputJavaScriptAlert action method of the controller.

Step 3

Controller code:

public JavaScriptResult OutputJavaScriptAlert()
  {
      string a = "alert('this is alert')";
      return JavaScript(a);
  }


This action method returns JavaScript content that we get it in the new window or to download as displayed in the above picture (depending on the browser).

In general, these methods are used in the Ajax methods to return partial content.

HostForLIFE.eu ASP.NET MVC 6 Hosting
HostForLIFE.eu is European Windows Hosting Provider which focuses on Windows Platform only. We deliver on-demand hosting solutions including Shared hosting, Reseller Hosting, Cloud Hosting, Dedicated Servers, and IT as a Service for companies of all sizes. We have customers from around the globe, spread across every continent. We serve the hosting needs of the business and professional, government and nonprofit, entertainment and personal use market segments.


ASP.NET MVC 6 Hosting - HostForLIFE.eu :: How to Validate Input in ASP.NET MVC ?

clock June 18, 2015 08:37 by author Peter

When you develop an app, sometimes your requirements could be that you need to send HTML values from view to the controller. Sometimes, we tend to use HTML Editors to save lots of some information into the view. By default, ASP.NET MVC does not permit a user to submit the HTML content. thus let's have a look at how to submit your form with HTML content.

First step, Open Visual Studio, then choose "New Project", then choose ASP.NET MVC Apps.

Name it the project name, then click OK.

Now, select Internet Application, then click OK.

Next step, make a new Model
ValidateModel.cs
using System.Collections.Generic;
using System.Linq;
using System.Web;
using System.Web.Mvc;
namespace ValidateInputDemo.Models
{
    public class ValidateModel
    {
        public string description { get; set; }
    }
}

HomeController.cs
public ActionResult ValidateInput()
{
    return View();
}
[HttpPost]
public ActionResult  ValidateInput(string description)
{
    ValidateModel validateInputModel = new ValidateModel();
    validateInputModel.description = description;
    return View(validateInputModel);
}

Add a new method to your Controller

ValidateInput.cshtml
@model ValidateInputDemo.Models.ValidateModel
@{
       ViewBag.Title = "ValidateInput";
}
@using (@Html.BeginForm("ValidateInput","Home",
FormMethod.Post, new { @id = "form1", @enctype = "multipart/form-data" }))
{
    <label id="lblDescription">Description

     @Html.TextAreaFor(m=>m.description, new {@id="txtDescription",@name="description" })

    <input type="submit" id="bttn_Submit" />
}


You can see in the code above, there is a text area and a submit button, have a glance within the browser. Press F5.

You'll be able to see in the preceding screen, if you type one thing into the description and press Submit then nothing happens.

Now check the following example. Add HTML content into text area.

You'll get the error higher than. This error comes because this is often the security from ASP.NET MVC. For applications, a user cannot send HTML values to the controller, but sometimes we wish to send values to the controller. For resolving this issue, we've the ValidateInput(false) attribute. simply place this into your controller and have a look.
[HttpPost]
[ValidateInput(false)]
public ActionResult  ValidateInput(string description)
{
   ValidateModel validateInputModel = new ValidateModel();
   validateInputModel.description = description;
   return View(validateInputModel);
}

Now press F5. After filling in the HTML attribute press the submit button, you will never get an error. So when you want to work with HTML attributes in your app text area or textboxes, remember to use validateinpute(false) in your ActionMethod.

HostForLIFE.eu ASP.NET MVC 6 Hosting
HostForLIFE.eu is European Windows Hosting Provider which focuses on Windows Platform only. We deliver on-demand hosting solutions including Shared hosting, Reseller Hosting, Cloud Hosting, Dedicated Servers, and IT as a Service for companies of all sizes. We have customers from around the globe, spread across every continent. We serve the hosting needs of the business and professional, government and nonprofit, entertainment and personal use market segments.


ASP.NET MVC 6 Hosting - HostForLIFE.eu :: How to Use HTML Helper to Generate a DropDownList in ASP.NET MVC

clock June 15, 2015 07:24 by author Rebecca

A dropdownlist in MVC is a collection of SelectListItem objects. Depending on your project requirement you may either hard code the values in code or retrieve them from a database table. In this tutorial, I will show you how to generate a dropdownlist using DropDownList html helper based on both approaches.

Generating a DropDownList using Hard Coded Values

You will use the following overloaded version of "DropDownList" HTML helper.
DropDownList(string name, IEnumerable<SelectListItem> selectList, string optionLabel)

The following code will generate a departments dropdown list. The first item in the list will be "Select Department".
@Html.DropDownList("Departments", new List<SelectListItem>
{
    new SelectListItem { Text = "IT", Value = "1", Selected=true},
    new SelectListItem { Text = "HR", Value = "2"},
    new SelectListItem { Text = "Payroll", Value = "3"}
}, "Select Department")

The downside of hard coding dropdownlist values with-in code is that, if we have to add or remove departments from the dropdownlist, the code needs to be modified.

Retrieve DropDownList from A Database Table

Pass list of Departments from the controller, then store them in "ViewBag"

public ActionResult Index()
{
    // Connect to the database
    SampleDBContext db = new SampleDBContext();
    // Retrieve departments, and build SelectList
    ViewBag.Departments = new SelectList(db.Departments, "Id", "Name");
           
    return View();
}

Now in the "Index" view, you can access Departments list from "ViewBag"
@Html.DropDownList("Departments", "Select Department")

HostForLIFE.eu ASP.NET MVC 6 Hosting
HostForLIFE.eu is European Windows Hosting Provider which focuses on Windows Platform only. We deliver on-demand hosting solutions including Shared hosting, Reseller Hosting, Cloud Hosting, Dedicated Servers, and IT as a Service for companies of all sizes. We have customers from around the globe, spread across every continent. We serve the hosting needs of the business and professional, government and nonprofit, entertainment and personal use market segments.


ASP.NET MVC 6 Hosting - HostForLIFE.eu :: How to Detect Errors in View at ASP.NET MVC

clock June 12, 2015 08:49 by author Rebecca

In this tutorial, I will tell you about detecting errors in views at compile-time rather than at run-time.

The following code will display employee's FullName and Gender. Here we are working with a strongly typed view. Employee is the model class for this view. This class has got "FullName" and "Gender" properties.

@model MVCDemo.Models.Employee
<fieldset>
    <legend>Employee</legend>

    <div class="display-label">
         @Html.DisplayNameFor(model => model.FullName)
    </div>
    <div class="display-field">
        @Html.DisplayFor(model => model.FullName)
    </div>

    <div class="display-label">
         @Html.DisplayNameFor(model => model.Gender)
    </div>
    <div class="display-field">
        @Html.DisplayFor(model => model.Gender)
    </div>
</fieldset>

For example, if you mis-spell FullName property as shown below, and when you compile the project, you wouldn't get any compile time errors.

@Html.DisplayNameFor(model => model.FullName1)

You will only come to know, about the error when the page crashes at run-time. If you want to enable compile time error checking for views in MVC, please folow this step:

1. Open MVC project file using a notepad. Project files have the extension of .csproj or .vbproj
2. Search for MvcBuildViews under PropertyGroup. MvcBuildViews is false by default. Turn this to true as shown below.
<MvcBuildViews>true</MvcBuildViews>
3. Save the changes.

If you now build the project, you should get compile time error.

HostForLIFE.eu ASP.NET MVC 6 Hosting
HostForLIFE.eu is European Windows Hosting Provider which focuses on Windows Platform only. We deliver on-demand hosting solutions including Shared hosting, Reseller Hosting, Cloud Hosting, Dedicated Servers, and IT as a Service for companies of all sizes. We have customers from around the globe, spread across every continent. We serve the hosting needs of the business and professional, government and nonprofit, entertainment and personal use market segments.


Free ASP.NET MVC 5 Hosting - HostForLIFE.eu :: How to Create Web Application with ASP.NET MVC 5

clock June 5, 2015 06:04 by author Rebecca

This post will show you how to create a new ASP.NET MVC 5 application using Visual Studio 2013.

Step 1

Open Visual Studio 2013. It goes without saying, you're gonna need Visual Studio to create a web application using ASP.NET, and the version you will need for ASP.NET MVC 5 is Visual Studio 2013.

Step 2

Create a new ASP.NET MVC 5 Application:

  • Click File, New, then Project.

  • Select Web, then ASP.NET Web Application, give the project a name, and then click OK.

  • Select the MVC template, tick Add unit tests, and then click OK.

Step 3

Update existing NuGet packages. Click on Tools, then NuGet Package Manager, then NuGet Package Manager Console.

Then, enter the following command into the Package Manager Console window:

Update-Package

This will update all the existing packages.

Step 4

Run your new web application for the first time. Click on the MyWebApplication project, and then click the Play icon to launch the website.

Step 5

Admire your new project!

That's it!

A newly created web application that includes some impressive functionality out of the box. The default template gives you:

  • Bundling and minification.
  • The ability to register, and sign into your account.
  • A snazzy prebuilt layout that uses bootstrap.
  • And you get a framework that lets you create scaleable web applications using the well-established MVC design pattern.

Free ASP.NET MVC Hosting
Try our Free ASP.NET MVC Hosting today and your account will be setup soon! You can also take advantage of our Windows & ASP.NET Hosting support with Unlimited Domain, Unlimited Bandwidth, Unlimited Disk Space, etc.


About HostForLIFE.eu

HostForLIFE.eu is European Windows Hosting Provider which focuses on Windows Platform only. We deliver on-demand hosting solutions including Shared hosting, Reseller Hosting, Cloud Hosting, Dedicated Servers, and IT as a Service for companies of all sizes.

We have offered the latest Windows 2016 Hosting, ASP.NET Core 2.2.1 Hosting, ASP.NET MVC 6 Hosting and SQL 2017 Hosting.


Tag cloud

Sign in