European ASP.NET MVC 4 and MVC 5 Hosting

BLOG about ASP.NET MVC 3, ASP.NET MVC 4, and ASP.NET MVC 5 Hosting and Its Technology - Dedicated to European Windows Hosting Customer

ASP.NET MVC Hosting - HostForLIFE.eu :: Understanding Controller In ASP.NET MVC

clock March 26, 2025 08:41 by author Peter

Here, in this article, we will see more about the controllers and understanding about RouteConfig File. I will be using the same solution which we had used in our previous article. Thus, let's start an introduction.

Open our solution MVCTestApplication, given below:

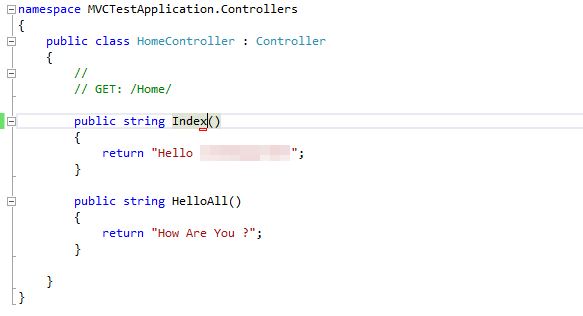
You can see in our Home Controller class; we have two Action methods; one is Index() and other is HelloAll() . The Index methods are invoked, when you run the Application. Now, just run the Application and you will see:

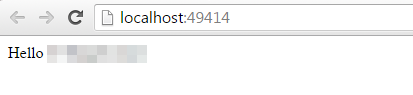
By default, Hello CsharpCorner has been displayed, because in RouteConfig file, the default action method is Index and we had written “Hello HostForLIFE ” in Index Action Method.

Now, let's type the URL i.e. ControllerName/ActionName and see what we are getting:

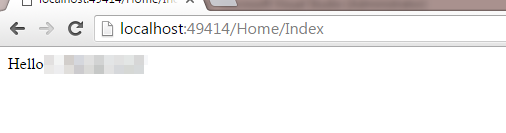
As you can see, we had got the same result: “Hello CsharpCorner.” Here, Home is our ControllerName and Index is our Action Method . Similarly, we will see our second Action Method i.e. HelloAll()

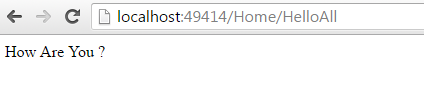
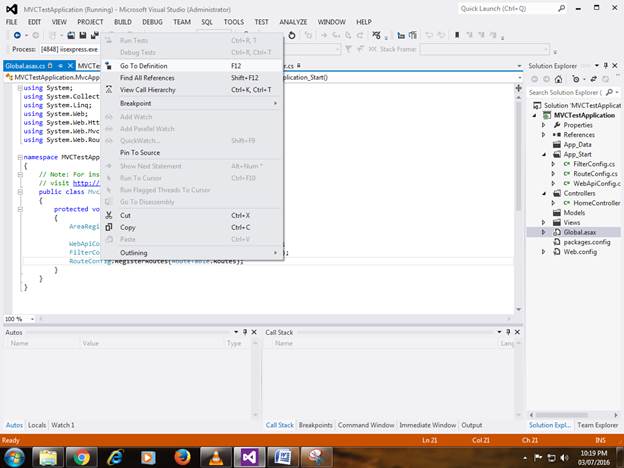
As you can see, HelloAll() Action Method has been invoked. Now, let's understand RouteConfig and how these controllers are displayed. Just Open global.asax file in our solution and you will see:


Open this file and you will see Application_start () method, in which you will see this line as:

Go to its Definition section, it will redirect to RouteConfig File and you will see:


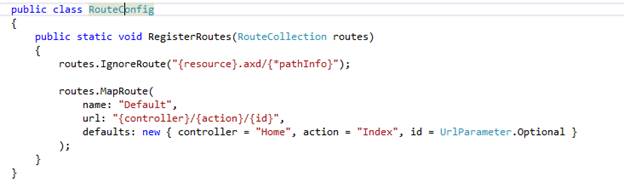
In RouteConfig class, we have default document as:
name:”Default”-Specifies the name

URL: “{Controller}/{action}/{id}” – This line actually says that when you run the solution by default, it will first fire the controllername/index and then Id.

Defaults: As you can see, the default controller' s Home is called and is followed by the action Index and then Id. Note: Here the specified Id is normal and if you want to retrieve the results, you have to pass the Id.

Now, we will see how to pass the Id in our URL and see what output we are getting. Hence, let's start:

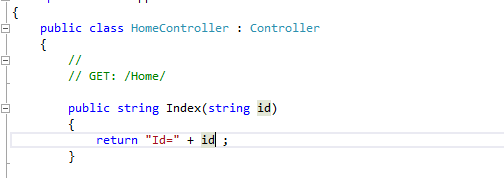
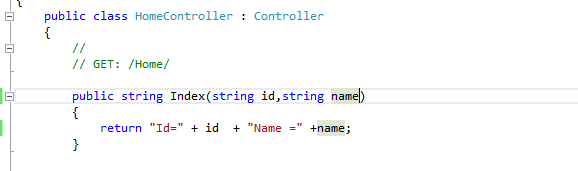
In our Homecontroller class, in our Index Action method, just pass a parameter as a string name and return as a name . Now, we will run the Application and see what values we are getting.

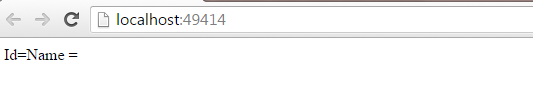
When you run the solution, it will ask for the name. Now, let's pass the name in our URL:

As you can see in the output, given above, it had passed Id=1 and got Id=1. Just type Home/index/1 an you will get the output, given above. Now, we will modify the code, write the name and see the output that we will get:

I had passed the name. Now, run the Application. You will see the following output:

Now, just pass the Id and name. We saw the last Id, how to specify the Id or name and how to display it. Now, let's get back to the RouteConfig file and understand the line, given below:

Here, what this line says is: Whatever you are doing in the Controller or in the Index Action method, a trace is getting generated in the form of axd format. We will see how these are generated and how to generate a resource.axd trace. Just open web.config file, shown below:

Just write this line in your web.config file.

Now, run the Application and type trace.axd. You will see the following output:

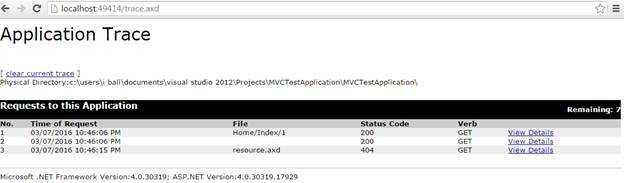
Click the View details and you will get all the details, shown below:

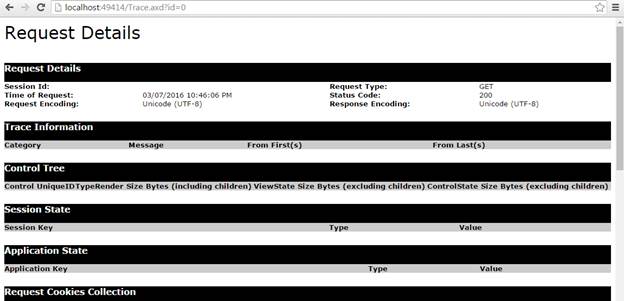
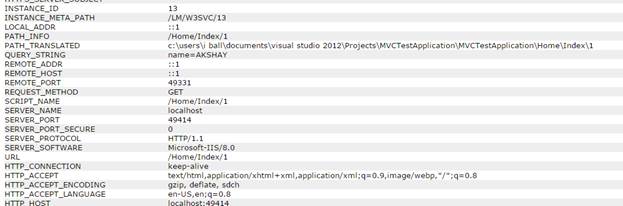
Scroll down at the bottom of the page and you will see that its path, query string and its respective URLs are:

The trace.axd is useful, when you have built a huge application and you require tracing to find out the details. Conclusion: This was controllers in MVC. I hope you found this article helpful.


ASP.NET MVC Hosting - HostForLIFE.eu :: Using External Projects And Assemblies To Extend MVC Controllers

clock March 18, 2025 07:30 by author Peter

I thought I would take a moment to discuss how one might handle the situation after seeing a recent question on Stack Overflow about how to extend an existing ASP.NET MVC Controller that was present within another assembly or project (i.e., external to the "main" MVC application).

The Fundamental Concept
Assuming you are working on two projects,

  • ProjectA is your primary MVC program.
  • ProjectB is merely a basic class library.

Your goal is to add more controller actions or functionality to an already-existing controller in Project A. These extra steps will originate from a separate project or assembly and won't be included in your primary application. When developing client-specific functionality—that is, when a client requests a certain behavior that might not be pertinent in the main application—this could be helpful.

Thus, for example, your ProjectA controller definition could resemble this:

    namespace ProjectA.Controllers    
    {  
        // This is the primary controller that we want to extend  
        public class FooController : ApplicationController  
        {  
              public ActionResult Index()  
              {  
                  return Content("Foo");  
              }  
        }  
    }   


And you might have a similar class in ProjectB that resembles this,
    namespace ProjectB.Controllers    
    {  
        // You want to essentially add the Bar action to the existing controller  
        public class CustomFooController : FooController  
        {  
            public ActionResult Bar()  
            {  
                return Content("Bar");  
            }  
        }  
    }   


You want to allow all of the different clients to access Foo, but perhaps only a certain client to be exposed to Foo/Bar.

Breaking Down The Steps
This process requires a few different steps that will need to be done to get everything working as expected, which I'll review below,

  • Inheritance
    • The custom controller will inherit from the controller in our main application to streamline extension.
  • Routing
    • Routing can be a tricky business, so using attribute routing might ease some of the burden of fighting with route tables or conflicting controller names.
  • Build Events
    • Build events are just one simple approach to actually getting the necessary .dll files from your custom project into your main application so they can be used.

Taking Advantage of Inheritance
If you actually want to extend the functionality of an existing controller, then inheritance might be the way to go. Inheriting from the controller within your main application will allow you to take advantage of any existing attributes, overridden methods, or underlying base controllers that might already place.

You'll just want to add a reference to your ProjectA project in ProjectB and then target the appropriate controller you wish to inherit from,
    // Other references omitted for brevity  
    using ProjectA.Controllers;  
      
    namespace ProjectB.Controllers    
    {  
        public class CustomFooController : FooController  
        {  
            public ActionResult Bar()  
            {  
                return Content("Bar");  
            }  
        }  
    }   


Leverage Attribute Routing
Doing this kind of thing can get a bit dicey with regards to routing. When you attempt to create this new controller within your current application, it'll attempt to use the existing routes defined in that application, which can lead to naming conflicts and ambiguity if you aren't careful.

Based on the code provided, this means you could easily access /CustomFoo/Bar, but not /Foo/Bar like you might prefer. Thankfully, attribute routing can help with this.

Simply decorate your custom controller action with a [Route] attribute that indicates how you wish to access it,
    [Route("Foo/Bar")]  
    public ActionResult Bar()    
    {  
         return new Content("Bar");  
    }   

This will let MVC know to use map this action to the Foo/Bar URL before taking a look at some of the other routes. In order for attribute routing to work as expected, you'll need to ensure to call the MapMvcAttributeRoutes() method within the RouteConfig.cs file of your main application,
    public static void RegisterRoutes(RouteCollection routes)    
    {  
        // This is important to write up your Route Attributes  
        routes.MapMvcAttributeRoutes();  
      
        // Route declarations omitted for brevity  
    }   


Note
If you were extending a controller that was present within an MVC Area, you would do the same thing within the RegisterArea() method in your AreaRegistration.cs file,
    public override void RegisterArea(AreaRegistrationContext context)    
    {  
        // Wire up any attribute based routing  
        context.Routes.MapMvcAttributeRoutes();  
      
        // Area routing omitted for brevity  
    }   

Properly Scoping Routes
One additional change that will need to be made within your main application will be to prioritize routes within its own namespace. The MapRoute() method supports an overload to handle this via the namespaces parameter.

Set the namespaces parameter to point to the namespaces that you wish to prioritize, namely those in your main application (i.e. "ProjectA.Controllers").
    routes.MapRoute(    
       name: "Default",  
       url: "{controller}/{action}/{id}",  
       defaults: new { controller = "Foo", action = "Index", id = UrlParameter.Optional },  
       // This will prioritize routes within your main application  
       namespaces: new[] { "ProjectA.Controllers"}  
    );   

Putting It All Together
At this point, code-wise, everything should be in place. The only thing left to do is actually get the code from your ProjectB into ProjectA so that you can run it. There are a variety of ways to handle this and configure this entire process, but a very simple one might be through a Build Event. Build Events allow you to execute a bit of code during various stages of the build process.

We are interested in defining a Post-Build event that will move our ProjectB.dll file into the bin directory of ProjectA, which might look like this,
xcopy /E /Y /S "$(ProjectName).dll" "$(SolutionDir)\ProjectA\Bin\"

This would be defined under ProjectB > Properties > Build Events > Post-Build Event Command Line as seen below,

Now if you perform a Rebuild Solution, you should see that all of the proper files have been added to your bin directory as expected,

Now if you were to navigate to /Foo within your application, you would see the content that you might expect,

And likewise, /Foo/Bar should now hit your custom code and do exactly what you'd imagine,


ASP.NET MVC Hosting - HostForLIFE.eu :: ASP.NET MVC Membership Provider

clock March 13, 2025 09:16 by author Peter

Here, we will learn how to use ASP.NET MVC membership provider, create users and their roles using ASP.NET MVC membership, assign roles to users in ASP.NET MVC membership provider, and remove users from roles once we have all user roles from ASP.NET MVC membership. Finally, we will demonstrate how to implement security in ASP.NET MVC applications.

To make security in ASP.NET MVC application use the following method to create the security in ASP.NET MVC application.

Authentication And Authorization in ASP.NET MVC
Authentication: It is the process of checking that the user is valid or not.
Authorization: It is the process of checking that the user is applicable for the process or not.

Membership providers in ASP.NET MVC
Roles based authentication for user in ASP.NET MVC.

We will learn how to create a database for the membership provider in ASP.NET MVC and how to assign role to user, we will create a registration page to understand this.

Let’s create a application for membership provider ASP.NET MVC.
Step 1: Go to visual studio and click on new project -> a window will open from here select a 'ASP.NET MVC4 web application' and give the name for this project in my case I give it as “MVCMembershipProvider "

Now click ok and select a template as Internet Application and engine as Razor engine , after sleeting all these click ok. it will click a solution project this will contain .css file ,script file and MVC application structure.

Step 2: After creation of application let's create a database for this and give the name for this database i gave it as 'MVCApp' and then add a connection string to the database.
    <connectionStrings>  
        <add name="DBConnection" connectionString="Data Source=MUNESH-PC;Database=MVCApp;UID=sa;Password=*****" providerName="System.Data.SqlClient" />  
    </connectionStrings>  


After adding the connection string to the project now we need to create membership tables to the database but before this go to the models folder and have a look on AccountModels.cs class. this class automatically create when we select mvc application as Internet application.

AccountModel.cs class contain following methods.

Now for creating membership tables in database initialize the connection in globel.asax . here we will use code first approach for that we need to add following code in this class.
For adding data table in database membership we need to add a line of code in Global.asax.
WebSecurity.InitializeDatabaseConnection("DBConnection", "UserProfile", "UserId","UserName", autoCreateTables: true);  
Here namespace for WebSecurity is “using WebMatrix.WebData;”

WebSecurity.InitializeDatabaseConnection

Definition for the InitializeDatabaseConnection is:
Public static void InitializeDatabaseConnection (string connectionStringName, stringuserTableName, string userIdColumn, string userNameColumn, bool autoCreateTables);  

connectionStringName: It the name of database table where user information stored.
userTableName: It contain user profile information.
userIdColumn: This column name of table contain user ID this should be integer.
userNameColumn: Column name of table contain user name. This column is basically used to match profile data of user with membership account data.

autoCreateTables: True to indicate that user profile and membership tables should be created if they do not exist; false to indicate that tables should not be created automatically. Although the membership tables can be created automatically, the database itself must already exist.

Now globel.asax page will look like:

Now after all this configuration let's run your application and see the ur hoe page and click on register link which is your page's right side. After running your application you go to the database and see the table, it will generate the following tables for us.

When you will click on registration link the following screen will open with 3 fields.

We can add more fields to this view, for making changes in registration view 1st weneed to add field in database and the  table name is “UserProfile”;


Here we added 3 columns as shown above; now we need to add these column parameters in registration model, it is in Account.cs class which is available in Model.
Code for registration model is:
    public class RegisterModel  
    {  
        [Required]  
        [Display(Name = "User name")]  
        public string UserName  
        {  
            get;  
            set;  
        }  
        [Required]  
        [StringLength(100, ErrorMessage = "The {0} must be at least {2} characters long.", MinimumLength = 6)]  
        [DataType(DataType.Password)]  
        [Display(Name = "Password")]  
        public string Password  
        {  
            get;  
            set;  
        }  
        [DataType(DataType.Password)]  
        [Display(Name = "Confirm password")]  
        [Compare("Password", ErrorMessage = "The password and confirmation password do not match.")]  
        public string ConfirmPassword  
        {  
            get;  
            set;  
        }  
        [Required]  
        [Display(Name = "EmailID")]  
        public string EmailId  
        {  
            get;  
            set;  
        }  
        [Required]  
        [Display(Name = "address")]  
        public string Address  
        {  
            get;  
            set;  
        }  
        [Required]  
        [Display(Name = "Mobile No")]  
        public string MobileNo  
        {  
            get;  
            set;  
        }  
    }  


Add these field in registration view:
    <fieldset>  
        <legend>Registration Form</legend>  
        <ol>  
            <li>  
                @Html.LabelFor(m => m.UserName) @Html.TextBoxFor(m => m.UserName)  
            </li>  
            <li>  
                @Html.LabelFor(m => m.Password) @Html. PasswordFor (m => m.Password)  
            </li>  
            <li>  
                @Html.LabelFor(m => m.ConfirmPassword) @Html.PasswordFor(m => m.ConfirmPassword)  
            </li>  
            <li>  
                @Html.LabelFor(m => m.EmailId) @Html.TextBoxFor(m => m.EmailId)  
            </li>  
            <li>  
                @Html.LabelFor(m => m.Address) @Html.TextBoxFor(m => m.Address)  
            </li>  
            <li>  
                @Html.LabelFor(m => m.MobileNo) @Html.TextBoxFor(m => m.MobileNo)  
            </li>  
        </ol>  
        <input type="submit" value="Register" />  
    </fieldset>  


Now if you will run your application and you will see registration page it will look with new fields.

Now according to this we need to add or handle these field in controller also so for that go to Account Controller and we have to make changes in HTTPPost method of registration Action.

Now the code for this action according to old registration model is:
WebSecurity.CreateUserAndAccount(model.UserName, model.Password);  

Now will make changes in this according to new model:
    WebSecurity.CreateUserAndAccount(model.UserName, model.Password,  
    new  
    {  
       EmailID = model.EmailId,  
       Address = model.Address,  
       MobileNo = model.MobileNo  
    }  
    );  

So the code for the Registration action method is:

    [HttpPost]  
    [AllowAnonymous]  
    [ValidateAntiForgeryToken]  
    public ActionResult Register(RegisterModel model)  
    {  
        if (ModelState.IsValid)  
        {  
            // Attempt to register the user  
            try  
            {  
                WebSecurity.CreateUserAndAccount(model.UserName, model.Password,  
                    new  
                    {  
                        EmailID = model.EmailId,  
                            Address = model.Address,  
                            MobileNo = model.MobileNo  
                    }  
                );  
                WebSecurity.Login(model.UserName, model.Password);  
                return RedirectToAction("Index", "Home");  
            }  
            catch (MembershipCreateUserException e)  
            {  
                ModelState.AddModelError("", ErrorCodeToString(e.StatusCode));  
            }  
        }  
        // If we got this far, something failed, redisplay form  
        return View(model);  
    }  


Now run your application and go to registration page and enter some data to fields then save it ,data will save in database.


About HostForLIFE.eu

HostForLIFE.eu is European Windows Hosting Provider which focuses on Windows Platform only. We deliver on-demand hosting solutions including Shared hosting, Reseller Hosting, Cloud Hosting, Dedicated Servers, and IT as a Service for companies of all sizes.

We have offered the latest Windows 2016 Hosting, ASP.NET Core 2.2.1 Hosting, ASP.NET MVC 6 Hosting and SQL 2017 Hosting.


Tag cloud

Sign in