European ASP.NET MVC 4 and MVC 5 Hosting

BLOG about ASP.NET MVC 3, ASP.NET MVC 4, and ASP.NET MVC 5 Hosting and Its Technology - Dedicated to European Windows Hosting Customer

Free UK ASP.NET MVC Hosting - HostForLIFE.eu :: Using Bower in ASP.NET

clock March 25, 2014 07:43 by author Peter

Today, I’d like to show you how you can use this awesome tool in ASP.NET MVC projects. First of all, unlike nuget bower runs on node, so if you haven’t installed it go and grab the installer from nodejs.org. After that, the installation is really easy—just type the following command.

npm install -g bower

Great, we have installed bower and now we need to configure our dependencies in the ASP.NET MVC project. For this purpose go to the project root (not the solution, but MVC project root) and create a file called .bowerrc, and in this file we are going to specify the directory where to put components.

{

"directory" : "Content/components"

}

You can place this file to your home folder and all your projects will use this configuration, but I prefer project specific settings. Next step is defining the dependencies with bower.json file. Put it in your project root folder as well.

{

  "name": "Bonobo Git Server",

  "dependencies": {

    "pure": "0.4.2",

    "font-awesome": "4.0.3"

}

}

This is my configuration file for Bonobo Git Server. At the moment, I use two libraries—Pure CSS framework and Font Awesome. Change them to the ones you wish to use in your project. There is a useful package explorer is on the bower homepage. Excellent, we have configured the dependencies and are ready to install them. Open a command prompt or PowerShell and navigate to the root of your MVC project and run the following command.

bower install

After that, all your dependencies will be installed under Content\components directory and there is one last thing you need to do to start use them in your project. You have to include them in your project file and for this we are going to use solution explorer inside Visual Studio. Firstly, turn on the option Show All Files.

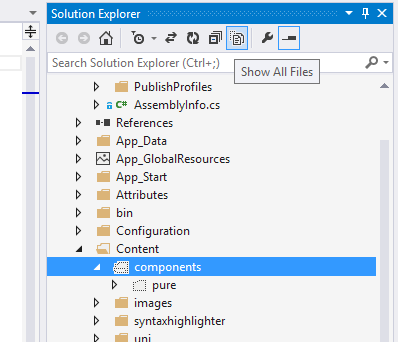
Secondly, locate the Content\components folder and include it into your project. This can be done by right-clicking on the folder or file and clicking on Include In Project.

Personally, I include only the files I need, because lots of packages comes with chatty sources and other development stuff. For example, for Pure framework I include only the pure-min.css file. And that’s it. From now, you can use the libraries in your project.


ASP.NET MVC 5 Germany Hosting - HostForLIFE.eu :: Bundling and Minification

clock March 10, 2014 07:13 by author Peter

While this article may be very simple and straightforward, there are a few concepts here I think are important to note. In my next article will be looking more in depth on the idea of creating a customized Web.config, but for now with this article, I just want to look at activating the bundling and minification feature by using the xml tags inside a MVC's Web.config. This feature is only available in ASP.NET 4.5 and above.

The First Problem

With the following inside your Web.config.

<location>

    <system>

      <compilation debug="true" targetframework="4.5"></compilation>

    </system>

</location>

And with either of the following inside your build config or customized Web.config (I.E. Web.Release.config)

<system>

    <compilation xdt:transform="RemoveAttributes(debug)"></compilation>

</system>

This also can be achieved by doing the following

<system>

 <compilation debug="false" xdt:transform="SetAttributes(debug)">

 </compilation>

</system>

In both snippets of code you do not need to use the "xdt:Locator" attribute (used only in cases where there are multiples elements of the same name.  What you may not see is that in the Web.config we have the "location" tag wrapped around the "system" tag. This is important and something I missed when debugging the problem. So by wrapping my snippet of code with "location" tag this corrects the problem, and started up the bundling and minification in mvc. It is important to note that by default if the debug attribute is not specified it is false and will start up the bundling and minification.

The Second Problem

Now everything looks good, but wait the main css isn't working! Thanks to this feature there are warnings in the actually css or javascript files! They will appear as comments for example I saw the following:

/* Minification failed. Returning unminified contents.(1779,2): run-time error CSS1062: 
Expected semicolon or closing curly-brace, found ' '(1785,2): run-time error CSS1062: 
Expected semicolon or closing curly-brace, found ' '(1790,2): run-time error CSS1062: 
Expected semicolon or closing curly-brace, found ' ' */

The cause of this was actually a issue created by the repository's character notation and not being cleaned up before being checked in (Git uses '*' to note a change). The issue existed for a while but since most browser work around issue nothing appeared out of the order. I normally disable css warnings on chrome because it gets a little annoying but in this case it made me miss the issue (ops). Either way a good catch and now everything is working like it should. Remember to actually check your bundling and minification!


About HostForLIFE.eu

HostForLIFE.eu is European Windows Hosting Provider which focuses on Windows Platform only. We deliver on-demand hosting solutions including Shared hosting, Reseller Hosting, Cloud Hosting, Dedicated Servers, and IT as a Service for companies of all sizes.

We have offered the latest Windows 2016 Hosting, ASP.NET Core 2.2.1 Hosting, ASP.NET MVC 6 Hosting and SQL 2017 Hosting.


Tag cloud

Sign in