Short tutorial only about Layout view in ASP.NET Core MVC. We will discuss about it. Let’s get started!
What is Layout?
The layouts are like the master pages in Webforms applications. The common UI code, which can be used in many views can go into a common view called layout.
Why do we need Layout View in ASP.NET Core MVC?
Nowadays, almost all web applications have the following sections.
-
Website Header
-
Website Footer
-
Navigation Menus
-
Main Content Area
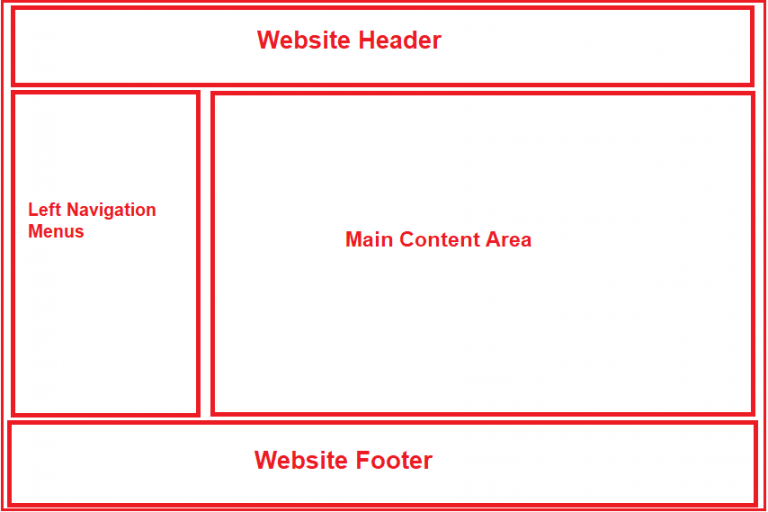
Please have a look at the following image which shows the above mentioned four areas on a website.

Instead of putting all the sections (i.e. the HTML) in each and every view pages, it is always better and advisable to put them in a layout view and then inherit that layout view in each and every view where you want that look and feel. With the help of layout views, now it is easier to maintain the consistent look and feel of your application. This is because if you at all need to do any changes then you need to do it only at one place i.e. in the layout view and the changes will be reflected immediately across all the views which are inherited from the layout view.
Layout View in ASP.NET Core MVC Application:
-
Like the regular view in ASP.NET Core MVC, the layout view is also a file with a .cshtml extension
-
If you are coming from ASP.NET Web Forms background, you can think the layout view as the master page in asp.net web forms application.
-
As the layout views are not specific to any controller, so, we usually place the layout views in a subfolder called “Shared” within the “Views” folder.
-
By default, in ASP.NET Core MVC Application, the layout view file is named _Layout.cshtml.
-
The leading underscore in the file name indicates that these files are not intended to be served directly by the browser.
-
In ASP.NET Core MVC, it is also possible to create multiple layout files for a single application. For example, you may have one layout file for the admin users and another layout file for non-admin users of your application.
How to Create a Layout View in ASP.NET Core MVC Application?
-
In order to create a layout view in ASP.NET Core MVC, you need to follow the below steps.
-
Right-click on the “Views” folder and then add a new folder with the name “Shared“.
-
Next, Right-click on the “Shared” folder and then select the “Add” – “New Item” option from the context menu which will open the Add New Item window.
-
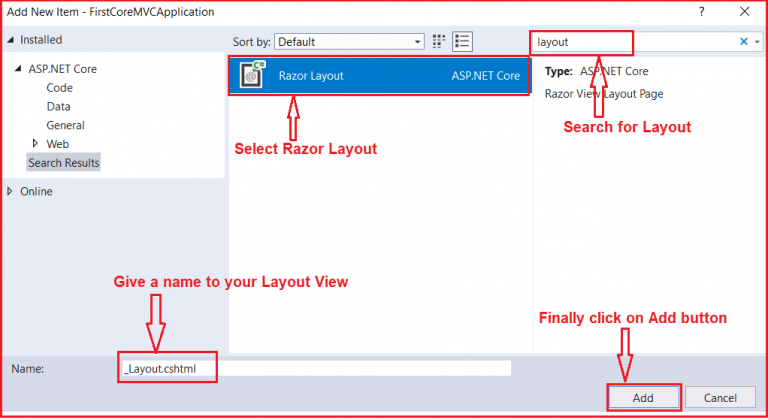
From the “Add New Item” window search for Layout and then select “Razor Layout”, give a meaning full name (_Layout.cshtml) to your layout view and finally click on the “Add” button as shown below which should add _Layout.cshtml file within the Shared folder.

Note: In this article, I am going to show you how to create and use a layout file and in our upcoming articles, I will show you how to use website header, footer, and navigation menus.
Understanding the _Layout.cshtml file:
Let us have a look at the auto-generated HTML code in the _Layout.cshtml file. The following HTML is auto-generated in the _Layout.cshtml file.
<!DOCTYPE html>
<html>
<head>
<meta name="viewport" content="width=device-width" />
<title>@ViewBag.Title</title>
</head>
<body>
<div>
@RenderBody()
</div>
</body>
</html>
As you can see in the above layout file, it contains the standard Html, head, title and body elements. As the above elements are present in the layout file, so you don’t have to repeat all the above elements in each and every view.
The View or Page-specific title is retrieved by using the @ViewBag.Title expression. For example, when “index.cshtml” view is rendered using this layout view, then the index.cshtml view will set the Title property on the ViewBag. This is then retrieved by the Layout view using the expression @ViewBag.Title and set as the value for the <title> tag.
The @RenderBody() specifies the location where the view or page-specific content is injected. For example, if “index.cshtml” view is rendered using this layout view, then index.cshtml view content is injected at the location.
Let us modify the _Layout.cshtml page as shown below to include the header, footer, left navigation menus and main content area section.
<!DOCTYPE html>
<html>
<head>
<meta name="viewport" content="width=device-width" />
<title>@ViewBag.Title</title>
</head>
<body>
<table border="1" style="width:800px; font-family:Arial">
<tr>
<td colspan="2" style="text-align:center">
<h3>Website Header</h3>
</td>
</tr>
<tr>
<td style="width:200px">
<h3>Left Navigation Menus</h3>
</td>
<td style="width:600px">
@RenderBody()
</td>
</tr>
<tr>
<td colspan="2" style="text-align:center; font-size:x-small">
<h3>Website Footer</h3>
</td>
</tr>
</table>
</body>
</html>
Modifying the Startup class:
Please modify the Startup class as shown below where we configure the required services for MVC.
using Microsoft.AspNetCore.Builder;
using Microsoft.AspNetCore.Hosting;
using Microsoft.Extensions.DependencyInjection;
namespace FirstCoreMVCApplication
{
public class Startup
{
public void ConfigureServices(IServiceCollection services)
{
services.AddMvc();
}
public void Configure(IApplicationBuilder app, IHostingEnvironment env)
{
app.UseMvcWithDefaultRoute();
}
}
}
Modifying the Home Controller:
Please modify the Home Controller as shown below.
using Microsoft.AspNetCore.Mvc;
namespace FirstCoreMVCApplication.Controllers
{
public class HomeController : Controller
{
public ViewResult Index()
{
return View();
}
public ViewResult Details()
{
return View();
}
}
}
As you can see here we have created two action methods i.e. Index and View.
Using Layout view in ASP.NET Core MVC Application:
Now we are going to create the Index and Details views using the Layout view. In order to render a view using the layout view (_Layout.cshtml), you need to set the Layout property.
Index.cshtml:
Please modify the Index view as shown below to use the layout view.
@{
ViewBag.Title = "Home Page";
Layout = "~/Views/Shared/_Layout.cshtml";
}
<h1>Home Page</h1>
Details.cshtml:
Please modify the Details view as shown below to use the layout view.
@{
ViewBag.Title = "Details Page";
Layout = "~/Views/Shared/_Layout.cshtml";
}
<h1>Details Page</h1>
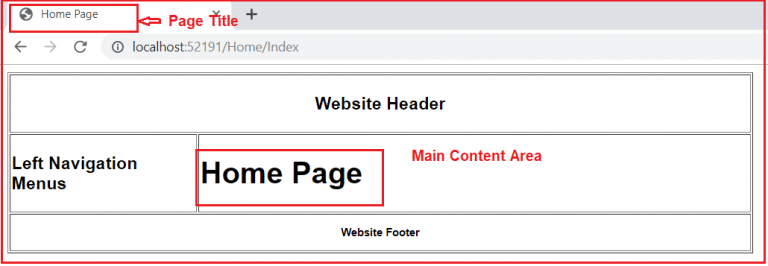
Now run the application and navigate to the Home/Index URL which should display the page as shown below.
If you don’t have a layout view for your website, then you need to repeat the required HTML for the above-mentioned sections in each and every view of your application. This is violating the DRY (Don’t Repeat Yourself) principle as we are repeating the same code in multiple views. As a result, it is very difficult to maintain the application. For example, if you have to remove or add a menu item from the list of navigation menus or even if you want to change the header or footer of your website then you need to do this in each and every view which is tedious, time-consuming as well as error-prone.
