European ASP.NET MVC 4 and MVC 5 Hosting

BLOG about ASP.NET MVC 3, ASP.NET MVC 4, and ASP.NET MVC 5 Hosting and Its Technology - Dedicated to European Windows Hosting Customer

ASP.NET MVC 5 Hosting - HostForLIFE.eu :: Friendly Errors In MVC 5

clock July 20, 2018 08:51 by author Peter

In this article, I will be explaining 3 different ways to handle exceptions and display a friendly error page to the end user. Friendly Error Pages are the pages that you design to show the end user when any kind of not handled exception happens in your application and your expected result is not achieved. So, instead of presenting your end user with technical information regarding the exception, you show him a friend page. Also, presenting your end user with technical information is not a security best practice.

So, let's see the three ways.

Method 1: Custom Exception Filter
Custom Exception Filter

It is a filter that is called every time an exception occurs in the applied methods.

Why would I use a custom exception filter?


Because with a custom exception filter, you can handle in a generic way every kind of exception thrown by your actions and/or controllers. You may use custom exception filters to log your exceptions.

Steps to achieve this:
Step 1

Create a new class named CustomExceptionFilter.
public class CustomExceptionFilter : FilterAttribute, IExceptionFilter   
{   
    public void OnException( ExceptionContext filterContext )   
    {   
        filterContext.Result = new RedirectResult( "Home/About" );   
        filterContext.ExceptionHandled = true;   
    }   
}   

What this custom exception does is to redirect to your About action in your Home Controller. Do not forget to set the ExceptionHandled equal to true; otherwise it will not take effect.

Step 2
Apply your custom exception filter to your controller/action.
public class HomeController : Controller 

    [CustomExceptionFilter] 
    public ActionResult Index() 
    { 
        throw new Exception(); 
        return View(); 
    } 
 
    public ActionResult About() 
    { 
        ViewBag.Message = "Your application thrown an exception"; 
 
        return View(); 
    } 
 
    public ActionResult Contact() 
    { 
        ViewBag.Message = "Your contact page."; 
        throw new Exception(); 
        return View(); 
    } 


You can see that the exception filter is applied only to your Index Action so if you access your Contact action, you will be able to see the non-handled exception page.

Method 2: Web.Config configuration
Why would I handle an exception by web.config configuration?

It is easy to configure and useful when you do not need to log or work on the exception.

Steps to achieve this:

Step 1
Include this in your web.config inside the system.web tag.
<customErrors defaultRedirect="Error.cshtml" mode="On"></customErrors> 

Step 2
Update your Controller.
public class HomeController : Controller 

    [HandleError] 
    public ActionResult Index() 
    { 
        throw new Exception(); 
        return View(); 
    } 
 
    public ActionResult About() 
    { 
        ViewBag.Message = "Your application description page."; 
 
        return View(); 
    } 
 
    public ActionResult Contact() 
    { 
        ViewBag.Message = "Your contact page."; 
        throw new Exception();
        return View(); 
    } 


Observation - Like the custom exception filter, you may choose if you want to handle the exceptions at the Controller or Action level. Also, here, the handled exception is applied only to your Index action, you may see the non-handled error in the Contact View.

Method 3: Global.Asax Application_error
What is the Application_error?

It is to override the global exception handler of the application.

Why would I handle an exception by global.asax Application_error?
You do not need to set the places that you would like to handle the errors like before where you had to set the actions and controllers to be handled. Here, every exception will hit and be handled.

Steps to Achieve this:

Step 1
Update  your global.asax.
protected void Application_Error( object sender, EventArgs e ) 
  { 
      Exception exception = Server.GetLastError(); 
      Server.ClearError(); 
      Response.Redirect( "/Home/About" ); 
  } 


Like the custom exception handlers, it is very important to ClearError() in the Server. What is done here is the redirection of non-handled exceptions to the About action in the Home Controller. Congratulation, you just learned three good ways of handling exceptions in your application and presenting friendly error pages to your end users.


ASP.NET MVC 5 Hosting - HostForLIFE.eu :: List Of Users With Roles In ASP.NET MVC Identity

clock July 13, 2018 11:21 by author Peter

In this article, we will learn how to list all users with Associated Roles in ASP.NET MVC 5 using Identity. ASP.NET MVC 5 does not come with an inbuilt feature to list users with associated roles by default. However ASP.NET MVC have inbuilt UserManager, SignManager and RoleManager to assist this.

We need this feature in each of our applications as users are to be maintained along with their associated roles. We can apply a number of ideas to do this. In this article, we will learn a very simple way to list users with their associated RoleName as in the figure below.

Step 1
Create a View Model as Users-in-Role_ViewModel
public class Users_in_Role_ViewModel 
    { 
        public string UserId { get; set; } 
        public string Username { get; set; } 
        public string Email { get; set; } 
        public string Role { get; set; } 
    } 


Step 2
Add a new method called UsersWithRoles inside ManageUsersController and add the following codes.
public ActionResult UsersWithRoles() 
        { 
            var usersWithRoles = (from user in context.Users 
                                  select new 
                                  { 
                                      UserId = user.Id,                                       
                                      Username = user.UserName, 
                                      Email = user.Email, 
                                      RoleNames = (from userRole in user.Roles 
                                                   join role in context.Roles on userRole.RoleId  
                                                   equals role.Id 
                                                   select role.Name).ToList() 
                                  }).ToList().Select(p => new Users_in_Role_ViewModel() 
  
                                  { 
                                      UserId = p.UserId, 
                                      Username = p.Username, 
                                      Email = p.Email, 
                                      Role = string.Join(",", p.RoleNames) 
                                  }); 
  
  
            return View(usersWithRoles); 
        } 


Note - context.Users represents the table AspNetUsers which has navigation property roles which represent the AspNetUserInRoles table.

Step 3
Now, let’s add a View of UsersWithRoles method of ManageUsersController.
@model IEnumerable<MVC5Demo.UI.ViewModels.Users_in_Role_ViewModel> 
@{ 
    ViewBag.Title = "Users With Roles"; 
    Layout = "~/Views/Shared/_Layout.cshtml"; 

  
<div class="panel panel-primary"> 
    <div class="panel-heading"> 
        <h3 class="box-title"> 
            <b>Users with Roles</b> 
        </h3> 
    </div> 
    <!-- /.box-header --> 
    <div class="panel-body"> 
        <table class="table table-hover table-bordered table-condensed" id="UsersWithRoles"> 
            <thead> 
                <tr> 
                    <td><b>Username</b></td> 
                    <td><b>Email</b></td> 
                    <td><b>Roles</b></td> 
                </tr> 
            </thead> 
            @foreach (var user in Model) 
            { 
                <tr> 
                    <td>@user.Username</td> 
                    <td>@user.Email</td> 
                    <td>@user.Role</td> 
                     
                </tr> 
            } 
        </table> 
    </div> 
  
    <div class="panel-footer"> 
        <p class="box-title"><b>Total Users till @String.Format("{0 : dddd, MMMM d, yyyy}", DateTime.Now)  : </b><span class="label label-primary">@Model.Count()</span></p> 
    </div> 
</div> 
  
  
@section scripts{ 
    <script> 
        $(function () { 
            $('#UsersWithRoles').DataTable({ 
                "paging": true, 
                "lengthChange": true, 
                "searching": true, 
                "ordering": true, 
                "info": true, 
                "autoWidth": true 
            }); 
        }); 
    </script> 


Now, the above method and View will return the users to their roles.

n


European ASP.NET MVC 5 Hosting - UK :: MVC Controllers with Visual Studio 2013 and ASP.NET MVC 5

clock August 6, 2014 09:14 by author Onit

Introduction

Before we start this article we will give you a quick reviews about MVC there are three parts to MVC.

Models: Part of the application that handles the application logic and contains classes representing data structure.

Views: Part of the application that handles the generation of HTML responses

Controllers: Part of the application that handles user interaction and incoming browser requests, retrieves model data and specify views

In Getting Started with Visual Studio 2013 and ASP.NET MVC 5 we created a new MVC application and took a look at some of the basics.

In this blog post we will take a look at Controllers and how they can be used

Controller in MVC

Adding a new controller The ASP.NET MVC framework maps URLs to classes that are referred to as controllers. Controllers process incoming requests, handles user input, interactions and executes appropriate application logic. A controller class typically calls a separate view component to generate the HTML mark-up for the request. The base class for all controllers is the ControllerBase class. The Controller class inherits from the ControllerBase and is the default implementation of a controller. In an MVC application, the Controller handles the following areas:

  1. Locating and validating the necessary action method.
  2. Getting any values used in the action method’s arguments.
  3. Handling any errors that occurs.
  4. Providing the deault WebFormViewEngine class for rendering views.

Using the solution we built in our previous post let’s add a new controller using these steps.

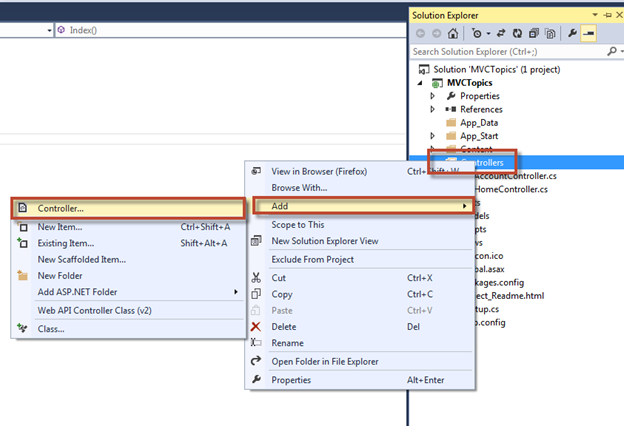
  • In the Solution explorer right click on the Controllers folder, select Add and then Controller as shown in the following screenshot.
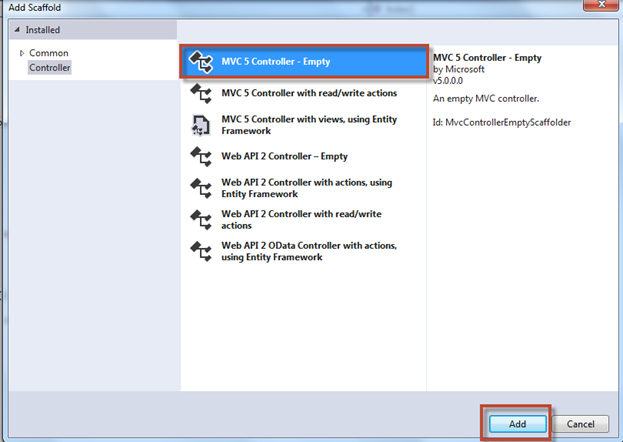
  • In the Add Scaffold box select MVC 5 Controller – Empty and then click Add as shown in the following screenshot.
  • In the Add Controller dialog box in the Controller name field enter TopicController and then select Add as shown in the following screenshot.

  • Validate in the Solution Explorer in the Controllers folder that you have the new TopicController.cs file, in the Views folder you should also have the Topic folder as shown in the following screenshot.
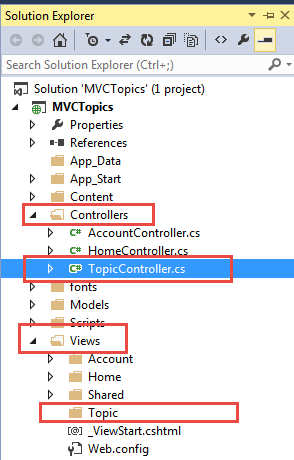
 

** Note! there is a folder in the Views, while it is not required Views and Controllers are usually tied together. When you name a new Controller with the suffix “Controller”, Visual Studio will create the View folder automatically
In the Project explorer make sure that you have the TopicController.cs selected and in the code window replace it with the following code.

using System.Web;
using System.Web.Mvc;
 
namespace MvcMovie.Controllers
{
    public class TopicController : Controller
    {
        //
        // GET: /Topic/
 
        public string Index()
        {
            return "This is the <b>default</b> action...";
        }
 
        //
        // GET: /Topic/Welcome/
 
        public string Welcome()
        {
            return "This is the Welcome action method...";
        }
    }
}

Accessing the Controller

If the traditional ASP.NET Web Form application have user interactions organized around pages, raising and handling events from these pages and their form controls, then MVC applications are organized around controllers and action methods. A controller contains actions methods that typically have a one-to-one mapping with user interactions. For example, entering a URL into a browser causes a request to the server. The MVC application uses routing rules defined in the Global.asax file to parse the URL and to determine the path of the controller. The controller then determine the appropriate action method to call to handle the request.

By default a web request in an MVC application is treated as a sub-path that includes the controller names followed by the action name. For example is a user enters the

URL:http://www.yourdomain.com/product/category/1

The sub path evaluated is product/category/1. The default routing rule will treat product as the prefix name of the controllers (which must end in Controller). It will treat Category as the name of the action. In this case the routing rule will invoke the category method of the product controller in order to process the request. By default the value of 5 in the URL will be passed to the Detail method as a parameter.

Take a look at how this works with our application.

  • Press F5 to start the application and validate that you see a similar URL as shown in the following screenshot

  • Append the URL of the application with the string /Topic and then refresh the screen as shown in the following screenshot

  • Append the URL of the application with the string /Topic/Welcome and then refresh as shown in the following screenshot


About HostForLIFE.eu

HostForLIFE.eu is European Windows Hosting Provider which focuses on Windows Platform only. We deliver on-demand hosting solutions including Shared hosting, Reseller Hosting, Cloud Hosting, Dedicated Servers, and IT as a Service for companies of all sizes.

We have offered the latest Windows 2016 Hosting, ASP.NET Core 2.2.1 Hosting, ASP.NET MVC 6 Hosting and SQL 2017 Hosting.


Tag cloud

Sign in