European ASP.NET MVC 4 and MVC 5 Hosting

BLOG about ASP.NET MVC 3, ASP.NET MVC 4, and ASP.NET MVC 5 Hosting and Its Technology - Dedicated to European Windows Hosting Customer

European ASP.NET MVC 5 Hosting - UK :: How to Use Post Redirect and Get Pattern

clock August 15, 2014 05:44 by author Onit

Note: This post has been updated to work with MVC 2 RTM. You can Use POCO,  but the workflow is what you should be mostly concerned about. 
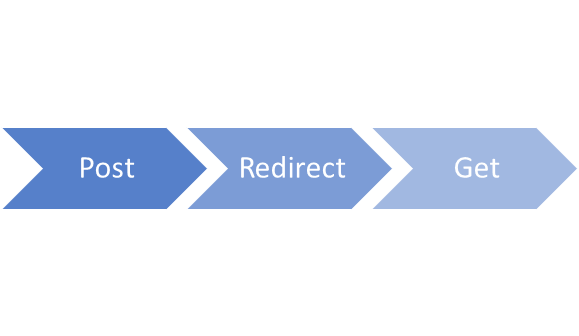
The ASP.NET MVC pattern tends to lead itself into a more simplified and "true" HTTP experience by re-introducing  patterns that have been lost, or at least, not followed in many years. One such pattern is the Post, Redirect, Get (PRG) pattern in which it is "to help avoid duplicate form submissions and allow web applications to behave more intuitively with browser bookmarks and the reload button".

A normal ASP.NET Web Form Lifecycle has the following pattern

  1. HTTP GET of "Create.aspx"
  2. HTTP POST of "Create.aspx"
  3. Validation Fails, "Create.aspx" is Re-Rendered
  4. HTTP POST of "Create.aspx"
  5. Item is created, "Create.aspx" is Re-Rendered with confirmation message

The major problems with this Postback pattern, is that hitting the Refresh button of your browser in steps 3 or 5 will re-post your submitted data. Step 5 is more of a problem as it could possibly re-submit that created information. Granted, there are steps that you can take to approach this problem, but this is how default ASP.NET Web Forms are treated.

Taking this same approach within ASP.NET MVC, can be achieved in the same manner by rendering a your "Create" view from your POST action. For example:

  1. HTTP GET of "/products/create", "Create" view is rendered
  2. HTTP POST to "/products/submit"
  3. Validation Fails, "Create" view is rendered
  4. HTTP POST to "/products/submit"
  5. Item is created, "Confirm" view is rendered

As you'll notice, the same problems we had with ASP.NET Web Forms exists with ASP.NET MVC. The really nice option, is that ASP.NET MVC gives you a lot more "freedom" of how the workflow is processed. If we strictly follow the PRG pattern within ASP.NET MVC, it would look something like

HTTP GET of "/products/create", "Create" view is rendered
HTTP POST to "/products/submit"
Validation Fails, redirect to "/products/create", "Create" view is rendered
HTTP POST to "/products/submit"
Item is created, redirect to "/products/confirm", "Confirm" view is rendered

As you'll notice, where we previously could have had issues in step 3 or 5 before, we no longer have issues. If a user presses the Refresh button in either of those steps, they'll not get the lovely "Would you like to resubmit the form data" confirmation as featured below - instead, the page just reloads.

To implement this, you'll need 1 controller, 3 action methods, and 2 views. Follow the steps below to achieve this pattern:

When you implement your Create action, you have to keep in mind that validation may fail and you may need to re-display the form. TempData is best suited for this scenario, and is implemented as such.


Next you'll implement your Submit action. This will perform some validation of the user input data, and if successful will save the info and redirect to the Confirm action. If it is not successful, we'll store the form data into the TempData and redirect to the action Create. This way we mimic maintaining the view's state even if it fails.
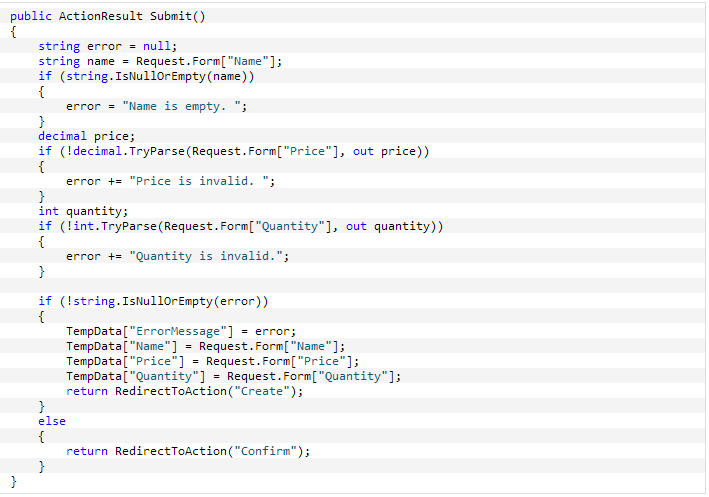


Something very interesting to note in the above example, is that even though I've pulled all values out of the form into local variables, should either Price or Quantity fail in parsing and I set the TempData to the local variables...I would have lost the user input. So, it's always a smart idea to retrieve the data from the form directly into the TempData. Finally, the Confirm action needs to be implemented.

public ActionResult Confirm()
  {
      return View();
  }

Now, it's time to create our views:

~/Views/Products/Create.aspx
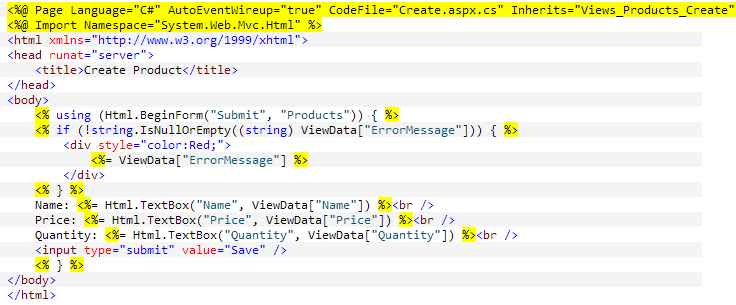
~/Views/Products/Confirm.aspx


And that's it. As you can see from the Create view, when writing our textboxes, we give them a default value from the ViewData.


European ASP.NET MVC 5 Hosting - UK :: MVC Controllers with Visual Studio 2013 and ASP.NET MVC 5

clock August 6, 2014 09:14 by author Onit

Introduction

Before we start this article we will give you a quick reviews about MVC there are three parts to MVC.

Models: Part of the application that handles the application logic and contains classes representing data structure.

Views: Part of the application that handles the generation of HTML responses

Controllers: Part of the application that handles user interaction and incoming browser requests, retrieves model data and specify views

In Getting Started with Visual Studio 2013 and ASP.NET MVC 5 we created a new MVC application and took a look at some of the basics.

In this blog post we will take a look at Controllers and how they can be used

Controller in MVC

Adding a new controller The ASP.NET MVC framework maps URLs to classes that are referred to as controllers. Controllers process incoming requests, handles user input, interactions and executes appropriate application logic. A controller class typically calls a separate view component to generate the HTML mark-up for the request. The base class for all controllers is the ControllerBase class. The Controller class inherits from the ControllerBase and is the default implementation of a controller. In an MVC application, the Controller handles the following areas:

  1. Locating and validating the necessary action method.
  2. Getting any values used in the action method’s arguments.
  3. Handling any errors that occurs.
  4. Providing the deault WebFormViewEngine class for rendering views.

Using the solution we built in our previous post let’s add a new controller using these steps.

  • In the Solution explorer right click on the Controllers folder, select Add and then Controller as shown in the following screenshot.

  • In the Add Scaffold box select MVC 5 Controller – Empty and then click Add as shown in the following screenshot.

  • In the Add Controller dialog box in the Controller name field enter TopicController and then select Add as shown in the following screenshot.

  • Validate in the Solution Explorer in the Controllers folder that you have the new TopicController.cs file, in the Views folder you should also have the Topic folder as shown in the following screenshot.


** Note! there is a folder in the Views, while it is not required Views and Controllers are usually tied together. When you name a new Controller with the suffix “Controller”, Visual Studio will create the View folder automatically
In the Project explorer make sure that you have the TopicController.cs selected and in the code window replace it with the following code.

using System.Web;
using System.Web.Mvc;
 
namespace MvcMovie.Controllers
{
    public class TopicController : Controller
    {
        //
        // GET: /Topic/
 
        public string Index()
        {
            return "This is the <b>default</b> action...";
        }
 
        //
        // GET: /Topic/Welcome/
 
        public string Welcome()
        {
            return "This is the Welcome action method...";
        }
    }
}

Accessing the Controller

If the traditional ASP.NET Web Form application have user interactions organized around pages, raising and handling events from these pages and their form controls, then MVC applications are organized around controllers and action methods. A controller contains actions methods that typically have a one-to-one mapping with user interactions. For example, entering a URL into a browser causes a request to the server. The MVC application uses routing rules defined in the Global.asax file to parse the URL and to determine the path of the controller. The controller then determine the appropriate action method to call to handle the request.

By default a web request in an MVC application is treated as a sub-path that includes the controller names followed by the action name. For example is a user enters the

URL:http://www.yourdomain.com/product/category/1

The sub path evaluated is product/category/1. The default routing rule will treat product as the prefix name of the controllers (which must end in Controller). It will treat Category as the name of the action. In this case the routing rule will invoke the category method of the product controller in order to process the request. By default the value of 5 in the URL will be passed to the Detail method as a parameter.

Take a look at how this works with our application.

  • Press F5 to start the application and validate that you see a similar URL as shown in the following screenshot

  • Append the URL of the application with the string /Topic and then refresh the screen as shown in the following screenshot

  • Append the URL of the application with the string /Topic/Welcome and then refresh as shown in the following screenshot


About HostForLIFE.eu

HostForLIFE.eu is European Windows Hosting Provider which focuses on Windows Platform only. We deliver on-demand hosting solutions including Shared hosting, Reseller Hosting, Cloud Hosting, Dedicated Servers, and IT as a Service for companies of all sizes.

We have offered the latest Windows 2016 Hosting, ASP.NET Core 2.2.1 Hosting, ASP.NET MVC 6 Hosting and SQL 2017 Hosting.


Tag cloud

Sign in