We will learn how to develop an ASP.NET Core MVC web application step by step in this tutorial. Web applications built with ASP.NET Core MVC are noted for their adaptability, scalability, and ability to meet a wide range of business requirements. By the end of this tutorial, you will have a firm grasp on the core principles and practical actions required to get started with your own ASP.NET Core MVC project.

What exactly is ASP.NET Core?
Microsoft's ASP.NET Core is an open-source, cross-platform framework for developing modern, cloud-based, and scalable online applications.
What are the benefits of using ASP.NET Core?
- ASP.NET Core is cross-platform, which means you can write and run applications on Windows, Linux, and macOS. Because of its adaptability, it is suited for a wide range of situations.
- High Performance: ASP.NET Core is built for speed and scalability. It employs asynchronous programming and supports real-time technologies such as WebSockets and SignalR.
- Open Source: Because ASP.NET Core is open source, you can view the source code and contribute to the community. It's being developed openly on GitHub, which encourages cooperation and improvement.
- ASP.NET Core emphasizes current development approaches such as dependency injection, integrated support for popular front-end frameworks such as Angular and React, and built-in support for RESTful APIs.
- Cross-platform Tools: ASP.NET Core comes with a set of cross-platform tools, including the .NET CLI, which simplifies development, testing, and deployment processes.
- Support for Microservices: ASP.NET Core is well-suited for microservices architecture, allowing you to build modular, independently deployable services that can scale individually.
- Integrated Security: ASP.NET Core provides built-in security features, such as identity and authentication, that help developers protect their applications against common threats.
- Extensible Middleware: Middleware in ASP.NET Core is highly customizable, allowing developers to add or remove components easily to tailor their application's behavior.
- Docker Support: ASP.NET Core has excellent support for Docker containers, making it straightforward to containerize your applications for easier deployment and scaling.
Let's get started with an ASP.NET Core MVC web application.
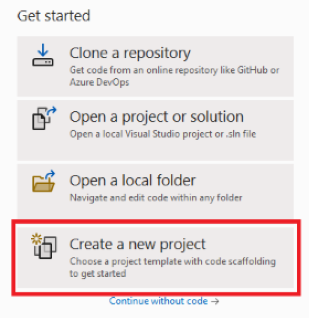
Step 1: Launch Visual Studio.
Launch Visual Studio (I'm using 2022).
When Visual Studio opens, in the image below, click on Create a New Project.
Step 2: Select a Project Template
All languages, All platforms, and All project kinds will be displayed. As seen in the figure below, I used the ASP.NET Core Web App (Model-View-Controller) Template.
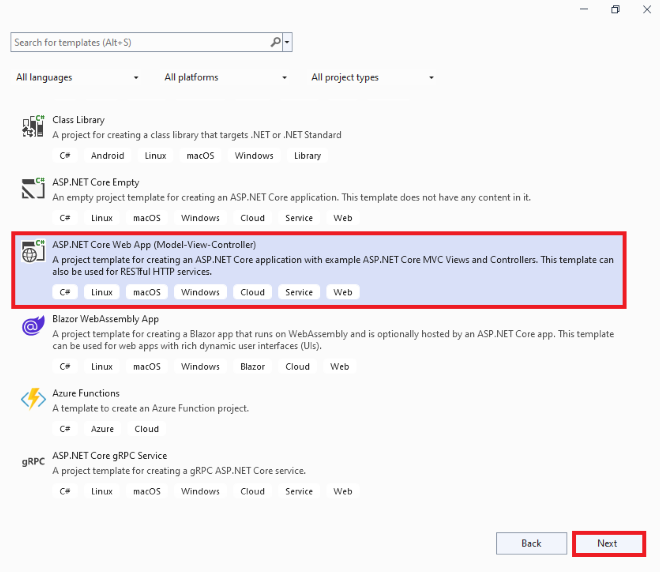
After selecting a project template, click Next.
Step 3: Establish the Project Name and Location
The following options are available in the project configuration window:,
- Project Name: You can name your project whatever you want.
- Location: Select where you want to save the project files on your machine's hard drive. I chose the Project/VS folder on the machine's E drive, which is presumably different on your PC.
- Solution Name: The solution name is auto-generated based on the project name, but you can alter it to something else.
In addition, there is a checkbox. If you checked it, the solution file (.sln) and project files will be saved in the same directory. Now, select the bare minimum of details for clarity, as illustrated in the image below.
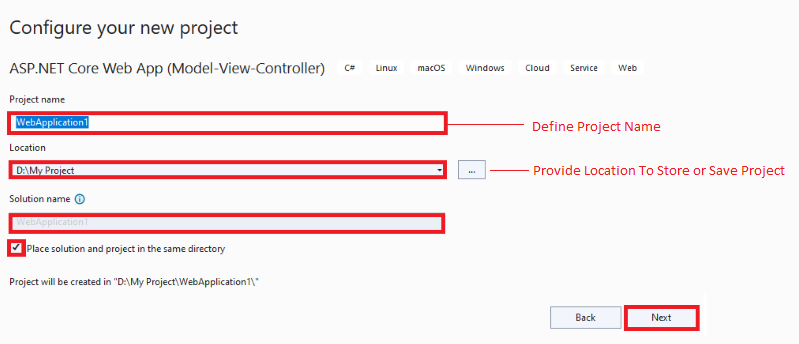
After defining the necessary details, click Next.
Step 4: Select a Target Framework
Choose the target framework.NET 6, which is the most recent, or choose according on your needs. Skip the rest of the details for clarity, as illustrated in the image below.
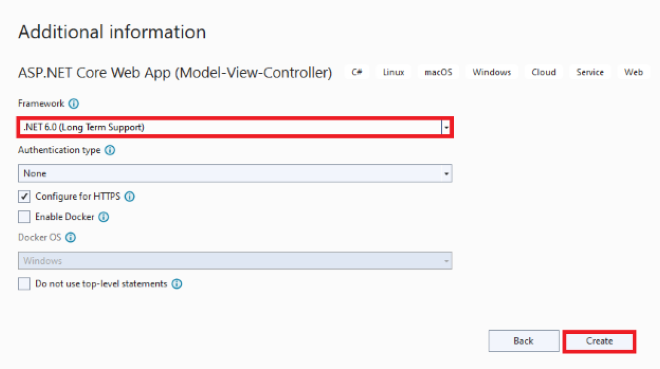
After providing the required details, click the Create button. It will create the ASP.NET Core MVC web application, as shown in step 5.
Step 5. Understanding ASP.NET Core MVC Folder Structure
The following is the default folder structure of the ASP.NET Core ASP.NET MVC application.
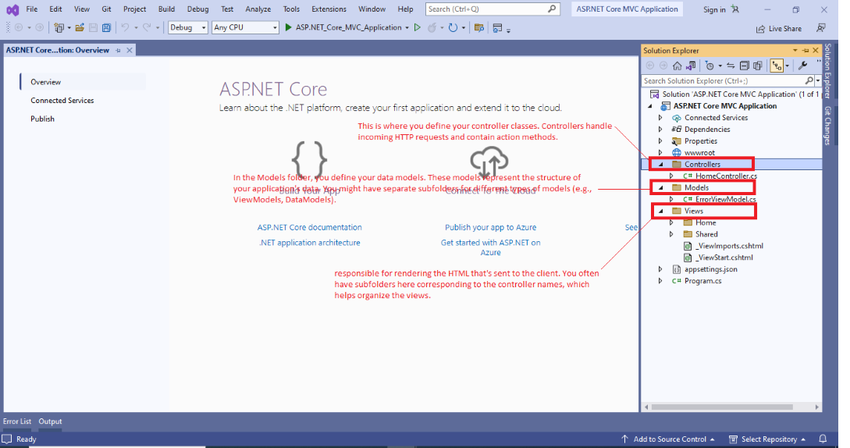
Let's understand the preceding project folder structure in brief.
In ASP.NET Core MVC, the project structure is organized to promote a clean and maintainable architecture. Here's a typical project structure for an ASP.NET Core MVC application.
- Controllers: This is where you define your controller classes. Controllers handle incoming HTTP requests and contain action methods.
- Models: In the Models folder, you define your data models. These models represent the structure of your application's data. You might have separate subfolders for different types of models (e.g., ViewModels, DataModels).
- Views: The Views folder is where you store your view files. These views are responsible for rendering the HTML that's sent to the client. You often have subfolders here corresponding to the controller names, which helps organize the views.
- wwwroot: This folder contains static files like CSS, JavaScript, and images that are directly accessible to the client.
- Startup.cs: This file contains the startup configuration for your application, including configuring services and middleware.
- appsettings.json: This JSON file is used to store configuration settings for your application, such as database connection strings.
- Program.cs: This is the entry point of your application. It contains the Main method that sets up the web host.
- wwwroot: This is where you place static files, such as CSS, JavaScript, and images, that are served directly to clients.
- Areas (optional): If you are using areas in your application to organize controllers and views, you will have a folder for each area.
- Data (optional): You can have a separate folder for data-related code, such as database context and migrations.
- Services (optional): You can create a folder for service classes that provide business logic and are used by your controllers.
- ViewComponents (optional): If you are using view components, you can organize them in this folder.
- Filters (optional): You may create custom action filters and store them in this folder.
- Extensions (optional): For extension methods and helper classes that can be reused throughout the application.
- Resources (optional): For storing localization resources if you are supporting multiple languages.
- Tests (optional): If you are writing unit tests, you can create a separate folder for your test projects.
- Properties (auto-generated): This folder may include the AssemblyInfo.cs file and other assembly-related information.
It's important to note that while this is a common structure, it's not set in stone, and you can adapt it to fit the specific requirements of your project. ASP.NET Core is flexible in this regard, allowing you to organize your code as you see fit while following best practices for maintainability and scalability.
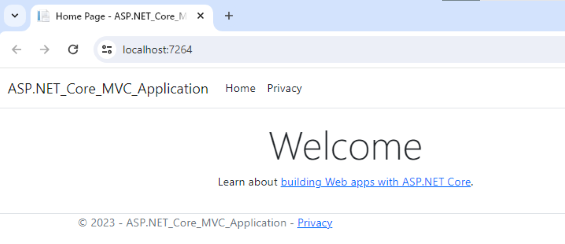
Step 6. Run the ASP.NET Core MVC Application
You can run the application with default contents or let open the Index.cshtml file and put some contents there. Now press F5 on the keyboard or use the run option from Visual Studio to run the application in the browser. After running the application, it will show in the browser, as shown in the following image.
I hope you learnt how to develop the ASP.NET Core MVC Web Application from the accompanying step-by-step tutorial.