In this tutorial, i will show you how to make a Star Rating in MVC Using AngularUI. You may have seen in many websites, that they ask for feedback in the form of rating stars. No problem -- it very easy to implement. Just follow the below steps to create a StarRating system in your Web Application.

Implementing StarRating in MVC using AngularUI
Create a Web Application using the MVC template (Here, I am using Visual studio 2015).
It is better (Recommended) to implement an Application in Visual studio 2015 because VS2015 shows intelligence for Angular JS. This feature is not present in the previous versions.
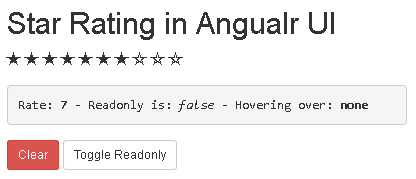
And here is the final output:
1. Add Controller and View
Add a controller and name it (Here, I named it HomeController).
Create an Index Action method and add view to it.
Now, add the script ,given below, and reference file to an Index page.
<script src="~/Scripts/angular.js"></script>
<script src="~/Scripts/angular-animate.js"></script>
<script src="~/Scripts/angular-ui/ui-bootstrap-tpls.js"></script>
<script src="~/Scripts/app.js"></script><!--This is application script we wrote-->
<link href="~/Content/bootstrap.css" rel="stylesheet" />
2. Add Angular Script file
Now, create another script file for Angular code to implement StarRating in the Application.
Replace the Java Script file, with the code, given below:
angular.module('ui.bootstrap.demo', ['ngAnimate', 'ui.bootstrap']);
angular.module('ui.bootstrap.demo').controller('RatingDemoCtrl', function ($scope) {
//These are properties of the Rating object
$scope.rate = 7; //gets or sets the rating value
$scope.max = 10; //displays number of icons(stars) to show in UI
$scope.isReadonly = false; //prevents the user interaction if set to true.
$scope.hoveringOver = function (value) {
$scope.overStar = value;
$scope.percent = 100 * (value / $scope.max);
};
//Below are the rating states
//These are array of objects defining properties for all icons.
//In default template below 'stateOn&stateOff' properties are used to specify icon's class.
$scope.ratingStates = [
{ stateOn: 'glyphicon-ok-sign', stateOff: 'glyphicon-ok-circle' },
{ stateOn: 'glyphicon-star', stateOff: 'glyphicon-star-empty' },
{ stateOn: 'glyphicon-heart', stateOff: 'glyphicon-ban-circle' },
{ stateOn: 'glyphicon-heart' },
{ stateOff: 'glyphicon-off' }
];
});
3. Create UI
Replace and add the code, given below, in the Index.cshtml page.
@{
Layout = null;
}
<h2>Star Rating in Angualr UI</h2>
<!doctype html>
<html ng-app="ui.bootstrap.demo">
<head>
<title>www.mitechdev.com</title>
<script src="~/Scripts/angular.js"></script>
<script src="~/Scripts/angular-animate.js"></script>
<script src="~/Scripts/angular-ui/ui-bootstrap-tpls.js"></script>
<script src="~/Scripts/app.js"></script><!--This is application script we wrote-->
<link href="~/Content/bootstrap.css" rel="stylesheet" />
</head>
<body style="margin-left:30px;">
<div ng-controller="RatingDemoCtrl">
<!--Angular element that shows rating images-->
<uib-rating ng-model="rate" max="max"
read-only="isReadonly"
on-hover="hoveringOver(value)"
on-leave="overStar = null"
titles="['one','two','three']"
aria-labelledby="default-rating">
</uib-rating>
<!--span element shows the percentage of select-->
<span class="label" ng-class="{'label-warning': percent<30, 'label-info': percent>=30 && percent<70, 'label-success': percent>=70}"
ng-show="overStar && !isReadonly">{{percent}}%</span>
<!--This element shows rating selected,Hovering and IS hovering or not(true/false)-->
<pre style="margin:15px 0;width:400px;">Rate: <b>{{rate}}</b> - Readonly is: <i>{{isReadonly}}</i> - Hovering over: <b>{{overStar || "none"}}</b></pre>
<!--button clears all the values in above <pre> tag-->
<button type="button" class="btn btn-sm btn-danger" ng-click="rate = 0" ng-disabled="isReadonly">Clear</button>
<!--this button toggles the selection of star rating-->
<button type="button" class="btn btn-sm btn-default" ng-click="isReadonly = ! isReadonly">Toggle Readonly</button>
<hr />
<div>Mitechdev.com Application-2016</div>
</div>
</body>
</html>
Here, we need to talk about some expressions used in <uib-rating> tag.
- on-hover: This expression is called, when the user places the mouse at the particular icon. In the above code hoveringOver() is called.
- on-leave: This expression is called when the user leaves the mouse at the particular icon.
- titles: Using this expression, we can assign an array of the titles to each icon.
HostForLIFE.eu ASP.NET MVC 6 Hosting
HostForLIFE.eu is European Windows Hosting Provider which focuses on Windows Platform only. We deliver on-demand hosting solutions including Shared hosting, Reseller Hosting, Cloud Hosting, Dedicated Servers, and IT as a Service for companies of all sizes. We have customers from around the globe, spread across every continent. We serve the hosting needs of the business and professional, government and nonprofit, entertainment and personal use market segments.