European ASP.NET MVC 4 and MVC 5 Hosting

BLOG about ASP.NET MVC 3, ASP.NET MVC 4, and ASP.NET MVC 5 Hosting and Its Technology - Dedicated to European Windows Hosting Customer

ASP.NET MVC 6 Hosting - HostForLIFE.eu :: ASP.NET MVC With Knockout.Js

clock November 21, 2024 07:36 by author Peter

Fundamentals of MVVM
Developers will soon find the MVVM design pattern in Silverlight and WPF necessary. Martin Fowler's Presentation Model, which gathers strength from MVC and MVP flexible structures, serves as the foundation for the MVVM architecture. The UI design patterns with Code-Behind are meant to be entirely or partially distinct from one another.
 
The three primary components of MVVM are Model, View, and ViewModel. When the View is totally ignorant of the model, ViewModel makes reference to it. This eliminates the developer's need to interact with the business logic interface.


The diagram above describes the situation in the best way. The Model may vary throughout the project. The View is unaware of this situation. The Model is isolated from the View. The ViewModel is a middle man for managing the binding and commands.
 
With Only jQuery on MVC
Let's talk about jQuery. jQuery has a strong binding mechanism that uses HTML tag ids, a CSS class and a HTML tag name. Values are pushed from the source object into the HTML elements, thus requiring a line of code for each mapping from the source value to the target element. It's much easier with KO. It lets you scale up in complexity without fear of introducing inconsistencies. jQuery is simple to bind with values and tags.
 
jQuery cannot serve us in the following ways:
Any source object changes will not reflected on HTML elements. (You can push values and call again.)
Any changes in the HTML elements won't be reflected on source objects.

Code:
    <h2>Using Jquery  
        Without Knockout</h2>  
    <span>StudentNumber:</span><span id="StudentNumber"></span>  
    <br />  
    <span>Surname:</span><input id="StudentSurName" />  
    <span>Name:</span><input id="StudentName" />  
    <script type="text/javascript">  
    $(document).ready(function() {  
        var student = {  
            Number: "A123456",  
            Surname: "Leon",  
            Name: "Alexander"  
        };  
        $("#StudentNumber").text(student.Number);  
        $("#StudentSurName").val(student.Surname);  
        $("#StudentName").val(student.Name);  
    });  
    </script>  

You can bind your values to HTML tags using the HTML tag's id and CSS classes. jQuery is an excellent low-level way to manipulate elements and event handlers on a web page. jQuery doesn't have a concept of an underlying data model. If you bind the values of any object like above, you will not observe any changes in the UI after any change of the Model. You must refresh web pages to observe View changes. On the other hand; if you change the HTML element's value then your model won't be fired.

What is knockout.js?

KO is not an alternative to jQuery or other js libraries (Prototype, MooTools). KO focuses on MVVM to manipulate the Model to the View from AJAX calls. KO manages between the ViewModel and View the automatic relation that is triggered by user interface calls.
 
Model: Business Logic.
View:   HTML/CSS. If you change the ViewModel's objects, the View will be effected automatically.
ViewModel: He is a middle man to observable connection Model and View because the Model doesn't have any knowledge of the View.
 
Observable and Binding: KO's focus is on the Data-Driven js concepts; in other words, any changes in the View will fire the model; also the model's changes will automatically fire the View's updates. KO is on the alert to communicate between them in both directions.

Code:
<h2>With Knockout</h2>  
<span>Student Number:</span><span data-bind="text: Number"></span>  
<br />  
<span>Surname:</span><input data-bind="value: Surname" />  
<span>Name:</span><input data-bind="value: Name" />  
<script type="text/javascript">  
var student = {  
    Number: "A123456",  
    Surname: "Leon
",  
    Name: "Alexander"  
}  
// Activates knockout.js  
ko.applyBindings(student);  
</script>  

The HTML tag binding is unable to observe the Data-Bind structure. KO concentrates on data-binding via the data-bind tag. But the preferred usage is the following. It is useful to control the View's changes for values of the Model's objects. Observable property is one of the most important things. MVVM needs to observe any changes in UI. KO will consider any changes to the View. Actually, when you edit one of those text boxes, it does update the underlying ViewModel data.

Update your ViewModel to make the Name and Surname properties observable using ko.observable:

<script type="text/javascript">  
var student = {  
    Number: ko.observable("A123456"),  
    Surname: ko.observable("Leon"),  
    Name: ko.observable("Alexander")  
}  
// Activates knockout.js  
ko.applyBindings(student);  
</script>  


Now re-run the application and edit the text boxes. This time you'll see not only that the underlying ViewModel data is being updated when you edit, but that all associated UI is updating in sync with it too.

Simple Usage Knockout on MVC
Real-World applications need to be fed from a database. So, the Model would be your application's stored data that would be implemented using a server-side technology. The View is always interested in the UI requests. The Viewmodel contains objects to manage any responses from the View. A programmer must be able to imagine how to generate a ViewModel, not only WPF but also data-driven HTML pages. Data-driven means that the implementation of the ViewModel uses JavaScript.
 
Sometimes, we don't need to implement the ViewModel with JavaScript. We can bind the server-side Model to the View. "@Html.Raw(Json.Encode(Model));" is an effective way to bind the Server-side Model to the View.

Model: public class Student {  
        public string Number {  
            get;  
            set;  
        }  
        public string Name {  
            get;  
            set;  
        }  
        public string Surname {  
            get;  
            set;  
        }  
    }  
    //Controller:  
      
    [HttpGet]  
    publicActionResult StudentMvcWithKnockout() {  
        Student student = new Student();  
        student.Number = "B123456";  
        student.Name = "Peter";  
        student.Surname = "Scott";  
        return View(student);  
    }  
    //View:  
      
    @using System.Web.Script.Serialization;  
    @model MvcAppWithJquery.Models.Student  
    @ {  
        ViewBag.Title = "StudentMvcWithKnockout";  
        Layout = "~/Views/Shared/_Layout.cshtml";  
    }  
    <h2>StudentMvcWithKnockout</h2> <  
    scriptsrc = "../../Scripts/knockout-2.1.0.js"  
    type = "text/javascript" > < /script> <  
    scriptsrc = "../../Scripts/knockout.mapping-latest.js"  
    type = "text/javascript" > < /script> <  
    p > Name: < strongdata - bind = "text: Name" > < /strong></p >  
        <p>SurName:<strongdata-bind="text: Surname"></strong></p> <  
        scripttype = "text/javascript" >  
        $(function() {  
            var model = @Html.Raw(Json.Encode(Model));  
            ko.applyBindings(model);  
        }); <  
    /script>  


By calling ko.mapping in the view, we can access JSON data. But we must pass the JSON data from the controller by "return Json(StudentList,JsonRequestBehavior.AllowGet);". So we need a number of collections on ViewModel. We call "ko.applyBindings(viewModel) - so" simply using:
$(document).ready(function () { ko.applyBindings(viewModel); });
 
The $.ajax and $.getJSON methods are appropriate to get the JSON data. (Controller/Action) You can find two methods in the source code.


Code:
    // Controller  
    public JsonResult GetStudents()  
    {  
    List<Student> StudentList = newList<Student>(){new Student(){ Number="A123456", Name="Alexander", Surname="Leon"},  
            new Student(){ Number="B123456", Name="Peter", Surname="Scott"},  
            new Student(){ Number="C123456", Name="Michael", Surname="Leroy"},  
            new Student(){ Number="D123456", Name="Frank", Surname="Mill"}};  
            return Json(StudentList,JsonRequestBehavior.AllowGet);  
            }  
            // View  
            <tbody data-bind="foreach: Students">  
                <tr style="border-bottom: 1px solid #000000;">  
                    <td>  
                        <span data-bind="text: Number"></span>  
                    </td>  
                    <td>  
                        <span data-bind="text: Name"></span>  
                    </td>  
                    <td>  
                        <span data-bind="text: Surname"></span>  
                    </td>  
                </tr>  
            </tbody>  
            </table>  
            </div>  
            </form>  
            <script type="text/javascript">  
            var AppViewModel = function() {  
                var self = this;  
                self.Students = ko.mapping.fromJS([]);  
                $.getJSON('/Student/GetStudents/', function(data) { ko.mapping.fromJS(data, {}, self.Students); });  
            }  
            $(document).ready(function() {  
                var viewModel = new AppViewModel();  
                ko.applyBindings(viewModel);  
            });  
            </script>  

Review of Codes
"self.Students = ko.mapping.fromJS([]);" is an important one because "mapping from What?" is necessary. Mapping is controlled by Js. Calling'/Student/GetStudents/' we can feed the ViewModel.
You should use "$.getJSON" and "$.ajax" to get the JSON data.
Using "ko.mapping.fromJS(data, {}, self.Students);" you can fill the "self.Students" ViewModel using data that is in the JSON format.

Summary
KO can help you implement it easier and improve maintainability. Model Changes are observed by the ViewModel and updated UI parts. KO is a simple way to connect the UI from the Data Model. You can charge data procedures on KO so other js events (Click, Mouseover, Grid etc.) can be developed by using jQuery. KO is a pure JavaScript library that works with any server and client-side technology. KO provides a way to use MVVM on MVC technology. KO provides a complimentary, high-level way to link a data model to a UI.


ASP.NET MVC Hosting - HostForLIFE :: The Pipeline and Architecture of MVC

clock November 11, 2024 07:09 by author Peter

MVC is merely a design pattern used to create applications; it is not a programming language. The MVC design pattern was first used for creating Graphical User Interface (GUI) programs, but it is now also widely used for constructing desktop, mobile, and web apps. This technique is used in many programming languages, but we'll talk about it in relation to ASP.NET.

Last week one of my friends asked this question: "What is the MVC Architecture & its Pipeline?" and I am dedicating this article to him. I hope he will like this.

What does MVC mean?
In ASP.NET, model-view-controller (MVC) is the name of a methodology or design pattern for efficiently relating the user interface to underlying data models.

Understanding MVC

Model
It is responsible for maintaining the data and behavior of the application or it can be called the Business Layer. The classes in Models have properties and methods that represent the application state and rules and are called Entity classes or Domain classes, as well as these are independent of the User Interface (UI).

Models also contain the following types of logic.

  • Business logic
  • Data access logic
  • Validation logic

Model classes are used to perform the validation logic and business rules on the data. These are not dependent on the UI so we can use these in different kinds of applications. Simply, these are Plain Old CLR Objects (POCOs).

What is POCO?

The classes that we create in the Model folder, are called POCOs. These classes contain only the state and behavior of the application and they don’t have the persistence logic of the application. That’s why these are called persistent ignorant objects. POCO class is,

public class Student
{
}


The main benefits of POCOs are really used when you start to use things like the repository pattern, forms, and dependency injection. In other words – when we create an ORM (let's say EF) that pulls back data from somewhere (DB, web service, etc.), then passes this data into objects (POCOs). Then if one day we decide to switch over to NHibernate from EF, we should not have to touch your POCOs at all, the only thing that should need to be changed is the ORM.

View

This layer represents the HTML markup that we display to the user. This can be called the Display Layer. View is the user interface in which we render the Model in the form of interaction. The Views folder contains the .cshtml or .vbhtml files which clearly shows that these files are the combination of HTML and C#/VB code. In the Views folder, for every Controller there is a single view folder and for each action method in the controller, there is a view in that view folder, having the same name as that of the controller and action method respectively. There is also a Shared folder in the Views folder which represents the existence of Layout and Master Page in ASP.NET MVC.

Controller

When the user interacts with the user interface; i.e. View, then an HTTP request is generated which is in the MVC architectural pattern, handled by the Controller. So we can say that the Controller’s responsibility is to handle the HTTP request. This layer can also handle the input to the database or fetch the data from the database records. So it can be called the Input layer.

The Controllers folder contains the classes that are responsible for handling HTTP requests. The name of the controller ends with the word Controller to differentiate it from other classes, for example, AccountController, and HomeController. Every controller inherits from the ControllerBase class which implements the IController interface which is coming from the System.Web.Mvc namespace. The IController interface's purpose is to execute some code when the request comes to the controller. The look and feel of the controller is like this.
using System.Web.Routing;

namespace System.Web.Mvc
{
    {
        void Execute(RequestContext requestContext);
    }
}


There is an Execute method in the IController class that gets executed when the request comes to the controller. This method takes an object of the RequestContext class, and this class encapsulates the information about the HTTP request that matches the defined route, with the help of HttpContext and RouteData properties. The look and feel of the RequestContext class is like this.
using System.Runtime.CompilerServices;
namespace System.Web.Routing
{
    // Encapsulates information about an HTTP request that matches a defined route.
    public class RequestContext
    {
        // Initializes a new instance of the System.Web.Routing.RequestContext class.
        public RequestContext();

        // Initializes a new instance of the System.Web.Routing.RequestContext class.
        // Parameters:
        // httpContext:
        // An object that contains information about the HTTP request.
        // routeData:
        // An object that contains information about route that matched the current
        // request.
        public RequestContext(HttpContextBase httpContext, RouteData routeData);

        // Summary:
        // Gets information about the HTTP request.
        // Returns:
        // An object that contains information about the HTTP request.
        public virtual HttpContextBase HttpContext
        {
            get;
            set;
        }

        // Summary:
        // Gets information about the requested route.
        // Returns:
        // An object that contains information about the requested route.
        public virtual RouteData RouteData
        {
            get;
            set;
        }
    }
}


The code is very self-explanatory with the help of comments.

How does this architecture work?
The workflow of MVC architecture is given below, and we can see the request-response flow of an MVC web application.

The figure is very self-explanatory and shows the workflow of MVC architecture. The client, which is the browser, sends a request to the server (internet information server) and the Server finds a Route specified by the browser in its URL and through Route. The request goes to a specific Controller and then the controller communicates with the Model to fetch/store any records. Views are populated with model properties, and the controller gives a response to the IIS7 server, as a result server shows the required page in the browser.

As we know, in MVC there are three layers that are interconnected to each other such as in the figure.
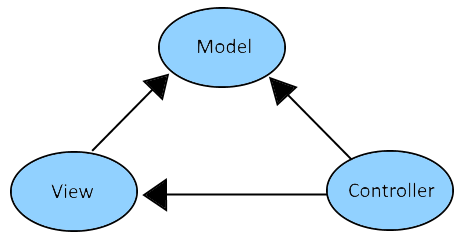
Here, in MVC there is complete separation in each layer, referred to as Separation of Concerns. Now, what exactly does Separation of Concerns mean?

What is the Separation of Concerns?
Separation of concerns (SoC) is a design principle for separating a computer program into distinct sections, such that each section addresses a separate concern. A concern is a set of information that affects the code of a computer program. (Wikipedia)

MVC implements the principle of SoC as it separates the Model, View, and Controller. Following is the table that depicts the implementation of SoC and Violation of SoC in ASP.NET MVC.

Implementation of SoC Violation of SoC
Views are only for displaying the HTML markup to the browser.

When we use business logic in View then it is a violation because its sole purpose is to display the page not to execute the logic.

@if (user.Role == "Admin") { }
else { }


Controllers are just to handle the incoming HTTP request.

When we use business logic in the Controller like when the controller executes the database logic to fetch/store the information in the database, it is a violation of single responsibility principle as well.

public ActionResult Index()
{
    if (ModelState.IsValid)
    {
        dbContext.Employees.Add(model);
    }
    return RedirectToAction("Saved");
}

Use the Service layer to implement this business logic in the web application.

Models contain classes of the domain or business.

When we use ViewBag and ViewData to pass the data from controller to view instead of using ViewModels to display data in view. ViewModels are classes that bind strongly typed views. Use the Repository pattern to access the data from the database.

public ActionResult Contact()
{
    ViewBag.Message = "Your contact page.";
    return View();
}

Characteristics of MVC
These are the main characteristics of ASP.NET MVC,

  • Enables clean separation of concerns (SoC).
  • Follows the design of the stateless nature of the web.
  • Provides Test Driven Development (TDD).
  • Easy integration with JavaScript frameworks.
  • Provides full control over the rendered HTML.
  • No ViewState and PostBack events

Pipeline in MVC
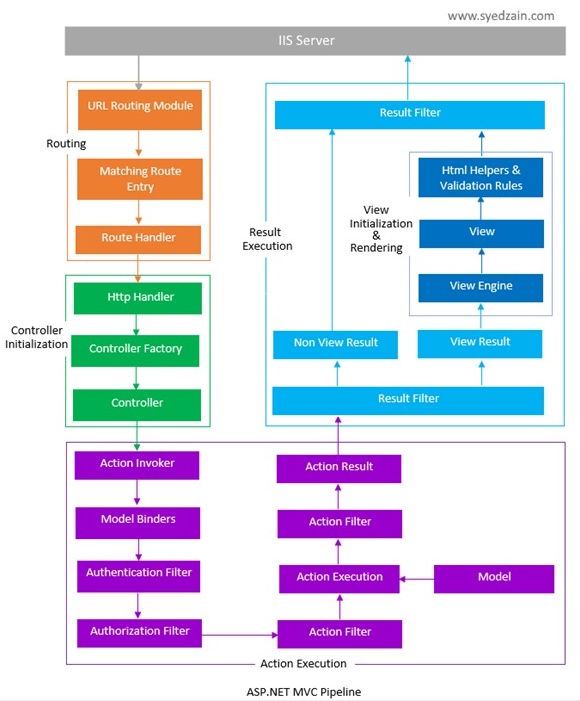
We can say that the pipeline of MVC contains the following processes.

  • Routing
  • Controller Initialization
  • Action Execution
  • Result Execution
  • View Initialization and Rendering


Let’s understand them one by one!

Routing

Routing is the first step in the ASP.NET MVC pipeline. In fact, it is a pattern-matching system that matches the incoming request to the registered URL patterns which reside in the Route Table.

Routing is a system in which URL patterns are matched with the URL patterns defined in the RouteTable by using the MapRoute method. The process of Routing comes into action when the application starts, firstly it registers the routes in the RouteTable. This registration of routes in the RouteTable is essential because it is the only thing that tells the Routing Engine how to treat the requested URL requests. The routes are registered in the RouteConfig class App_Start file of the application. Let's have a look at it.
public class RouteConfig
{
    public static void RegisterRoutes(RouteCollection routes)
    {
        routes.IgnoreRoute("{resource}.axd/{*pathInfo}");

        routes.MapRoute(
            name: "Default",
            url: "{controller}/{action}/{id}",
            defaults: new
            {
                controller = "Home",
                action = "Index",
                id = UrlParameter.Optional
            }
        );
    }
}

The Global. asax file looks like.
protected void Application_Start()
{
    // Some other code is removed for clarity.
    RouteConfig.RegisterRoutes(RouteTable.Routes);
}

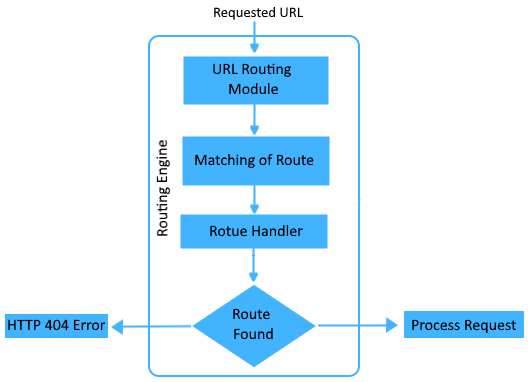
The Routing Engine is the module whose responsibility is to treat the HTTP request. When an HTTP request comes, the UrlRoutingModule starts matching the perfect URL pattern from the RouteTable, when found successfully, the Routing Engine forwards the request to RouteHandler.

In RouteHandler its interface IRouteHandler comes into action and calls its GetHttpHandler method. This method looks as below.
public interface IRouteHandler
{
    IHttpHandler GetHttpHandler(RequestContext requestContext);
}


After finding the route successfully, the ProcessRequest() method is invoked, as shown in the figure above, otherwise, user will receive an HTTP 404 error page.
Controller Initialization
While the ProcessRequest() method is invoked, it uses the IControllerFactory instance to create the controller for the URL request. The IContollerFactory is responsible to instantiate and return an appropriate controller and this created controller will become the subclass of the Controller base class.Then the Execute() method is invoked.
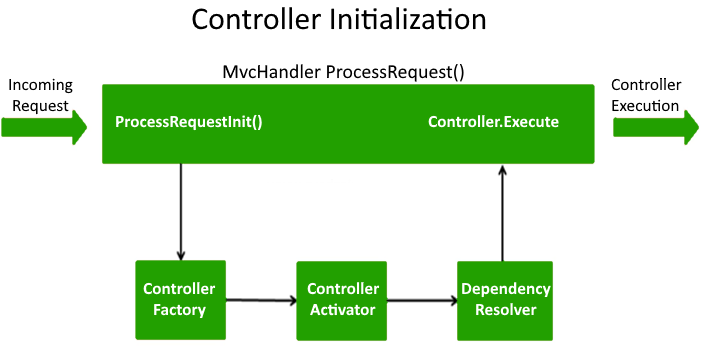
ProcessRequest() method looks like this.
protected internal virtual void ProcessRequest(HttpContextBase httpContext)
{
    SecurityUtil.ProcessInApplicationTrust(delegate
    {
        IController controller;
        IControllerFactory factory;
        this.ProcessRequestInit(httpContext, out controller, out factory);
        try
        {
            controller.Execute(this.RequestContext);
        }
        finally
        {
            factory.ReleaseController(controller);
        }
    });
}


Action Execution
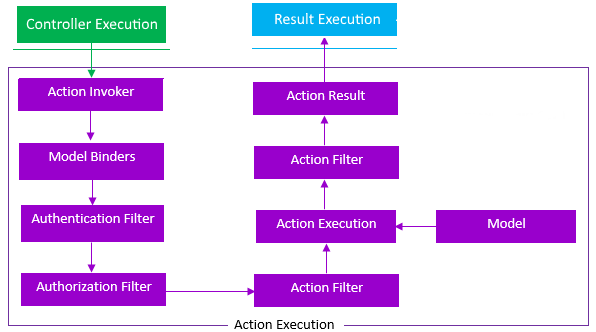
Action Execution starts with Action Invoker. So, after the initialization of controller, it has the information about the action method, this detail of the action method is passed to the controller’s InvokeAction() method. This InvokeAction() implements the interface IActionInvoler and hence the action is selected for invoking.

public virtual bool InvokeAction(ControllerContext controllerContext, string actionName)

After ActionInvoker, Model Binders come into action. Model binders are used to retrieve the data from the HTTP request and after taking data from it, it applies the validation, and data type conversion rules on that data. For example, it checks its validity by comparing its data type with the data type of action parameters, etc. Model Binders are present in the System.Web.Mvc.DefaultModelBinder namespace.

When Model Binders take data from the requested URL then it is time to apply restrictions on the use of that data. So for this purpose, we have an Authentication filter that comes into action and authenticates the user whether that user is valid or not. You can apply authentication by using the Authenticate attribute. This authentication is done with the help of the IAuthenticationFilter interface. So you can create your own by implementing it.

After authentication after checking it the user is valid or not, the Authorization Filter comes into action and checks the user access, which means who can use the data in which way. Authorization Filter applies to the authenticated user, it doesn’t apply to unauthenticated users. So authorization filter sets the user access for the authenticated user. You can use the authorization filter by applying the Authorize attribute at the top of the action method. And this authorization is done with the help of the IAuthorizationFilter interface. So you can implement it to create your own.

After collecting data from HTTP requests, and performing authorization on any authenticated user, now is the time to execute the action. So our Action Filters come into play. Action Filters execute with the help of the IActionFilter interface. This interface has two methods that are executed before and after the action is executed, named OnActionExecuting and OnActionExecuted respectively. I’ll post another article on “How can we create a custom action filter?”

After the execution of the Action, the ActionResult is generated. Hence the process of Action Execution is completed.

Result Execution
The “Result Execution” module executes after the execution of the module “Action Execution”, in this module Result Filters come into action and execute before and after the ActionResult is executed. Result Filters are also implemented by IResultFilter, so you can create your own result filters by implementing this interface.

As you saw in the action execution section, you have Action Result as a result. There are many types of Action Results such as ViewResult, PartialViewResult, RedirectToRoute, RedirectResult, JsonResult, ContentResult, and Empty Result. These types are all categorized into two main categories named as ViewResult and Non-ViewResult types.

ViewResult type: ViewResult is a type of result in which the View of MVC part uses means by which an HTML page is rendered.
NonViewResult type: NonViewResult is a type of result that deals with only data. Data may be in text format, JSON format, or binary format.

View Initialization and Rendering

View Engine takes the ViewResult type and renders it as a View and shows it by using IView. The IView interface looks like as below,
public interface IView
{
    void Render(ViewContext viewContext, TextWriter writer);
}

After rendering the View, it is time to make HTML Helpers that are used to write input files, create links, forms, and much more. These helpers are extension methods of the HTML helper class. Validation rules can also be applied, for example, view should use HtmlHelpers and render a form having client-side validations.
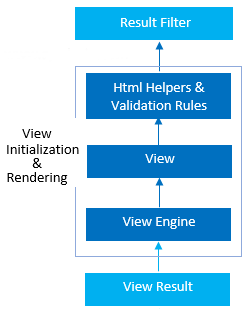

Hence this is the pipeline of MVC. We have discussed each part very thoroughly.

Conclusion

This article included the basic and foremost things to understand about MVC architectural pattern and its pipeline. If you have any query then feel free to contact me in the comments. Also give feedback, either positive or negative, it will help me to make my articles better and increase my enthusiasm to share my knowledge.


ASP.NET MVC Hosting - HostForLIFEASP.NET :: Dependency Injection & EF Migrations in ASP.NET MVC with Autofac

clock October 31, 2024 07:13 by author Peter

This post will demonstrate how to integrate Entity Framework for database operations, including migration setup, and use Autofac to create Dependency Injection (DI) in an ASP.NET MVC application. Code modularity, testability, and maintainability are all enhanced by this method.

Configuring Dependency Injection with Autofac
1. Install the Autofac packages first.
To install Autofac and its integration package for MVC, launch the Package Manager Console and execute the subsequent commands.

Install-Package Autofac
Install-Package Autofac.Mvc5

Step 2. Configure Autofac
Open Global.asax.cs and configure Autofac in the Application_Start method.
using Autofac;
using Autofac.Integration.Mvc;
using System.Reflection;
using System.Web.Mvc;
using System.Web.Optimization;
using System.Web.Routing;
using WebApplication2.Data;
using WebApplication2.IRepository;
using WebApplication2.Service;
namespace WebApplication2
{
    public class MvcApplication : System.Web.HttpApplication
    {
        protected void Application_Start()
        {
            var builder = new ContainerBuilder();
            // Register MVC controllers
            builder.RegisterControllers(Assembly.GetExecutingAssembly());
            // Register DbContext for DI
            builder.RegisterType<MyDbContext>().AsSelf().InstancePerRequest();
            // Register your services here
            builder.RegisterType<ProductService>().As<IProductService>();
            // Build the Autofac container
            var container = builder.Build();
            DependencyResolver.SetResolver(new AutofacDependencyResolver(container));
            // Regular MVC application start
            AreaRegistration.RegisterAllAreas();
            FilterConfig.RegisterGlobalFilters(GlobalFilters.Filters);
            RouteConfig.RegisterRoutes(RouteTable.Routes);
            BundleConfig.RegisterBundles(BundleTable.Bundles);
        }
    }
}


Implementing Entity Framework and Migrations

Step 1. Install Entity Framework
Run the following command in the Package Manager Console to install Entity Framework:
Install-Package EntityFramework

Step 2. Create MyDbContext

In the WebApplication2.Data namespace, create a class named MyDbContext to represent your database context:

Create Model Class for Product.
using System.ComponentModel.DataAnnotations;
namespace WebApplication2.Models
{
    public class Product
    {
        [Key]
        public int Id { get; set; }
        public string Name { get; set; }
        public decimal Price { get; set; }
    }
}

Step 2. Create MyDbContext

In the WebApplication2.Data namespace, create a class named MyDbContext to represent your database context:
using System.Data.Entity;
using WebApplication2.Models;
namespace WebApplication2.Data
{
    public class MyDbContext : DbContext
    {
        public MyDbContext() : base("SqlServerConnection")
        {

        }
        // Define your entities here
        public DbSet<Product> Products { get; set; }
    }
}

Step 3. Enable Migrations

In the Package Manager Console, run the following command to enable migrations.
Enable-Migrations

Step 4. Create Initial Migration
Create an initial migration based on your current model.
Add-Migration InitialCreate

Step 5. Update Database

Apply the migration to the database:
Update-Database

Step 6. Add Connection String

Add a connection string for MyDbContext in the Web.config file.
<?xml version="1.0" encoding="utf-8"?>
<!--
  For more information on how to configure your ASP.NET application, please visit
  https://go.microsoft.com/fwlink/?LinkId=301880
  -->
<configuration>
  <configSections>
    <!-- For more information on Entity Framework configuration, visit http://go.microsoft.com/fwlink/?LinkID=237468 -->
    <!-- For more information on Entity Framework configuration, visit http://go.microsoft.com/fwlink/?LinkID=237468 -->
    <section name="entityFramework" type="System.Data.Entity.Internal.ConfigFile.EntityFrameworkSection, EntityFramework, Version=6.0.0.0, Culture=neutral, PublicKeyToken=b77a5c561934e089" requirePermission="false" />
  </configSections>
  <connectionStrings>
    <add name="SqlServerConnection" connectionString="Server=MUD\SQLEXPRESS2022;Database=DIAndMigInNetFrameWord;User Id=sa;Password=123456;" providerName="System.Data.SqlClient" />
  </connectionStrings>
  <appSettings>
    <add key="webpages:Version" value="3.0.0.0" />
    <add key="webpages:Enabled" value="false" />
    <add key="ClientValidationEnabled" value="true" />
    <add key="UnobtrusiveJavaScriptEnabled" value="true" />
  </appSettings>
  <system.web>
    <compilation debug="true" targetFramework="4.8" />
    <httpRuntime targetFramework="4.8" />
  </system.web>
  <runtime>
    <assemblyBinding xmlns="urn:schemas-microsoft-com:asm.v1">
      <dependentAssembly>
        <assemblyIdentity name="Antlr3.Runtime" publicKeyToken="eb42632606e9261f" />
        <bindingRedirect oldVersion="0.0.0.0-3.5.0.2" newVersion="3.5.0.2" />
      </dependentAssembly>
      <dependentAssembly>
        <assemblyIdentity name="Microsoft.Web.Infrastructure" publicKeyToken="31bf3856ad364e35" />
        <bindingRedirect oldVersion="0.0.0.0-2.0.0.0" newVersion="2.0.0.0" />
      </dependentAssembly>
      <dependentAssembly>
        <assemblyIdentity name="Newtonsoft.Json" publicKeyToken="30ad4fe6b2a6aeed" />
        <bindingRedirect oldVersion="0.0.0.0-13.0.0.0" newVersion="13.0.0.0" />
      </dependentAssembly>
      <dependentAssembly>
        <assemblyIdentity name="System.Web.Optimization" publicKeyToken="31bf3856ad364e35" />
        <bindingRedirect oldVersion="1.0.0.0-1.1.0.0" newVersion="1.1.0.0" />
      </dependentAssembly>
      <dependentAssembly>
        <assemblyIdentity name="WebGrease" publicKeyToken="31bf3856ad364e35" />
        <bindingRedirect oldVersion="0.0.0.0-1.6.5135.21930" newVersion="1.6.5135.21930" />
      </dependentAssembly>
      <dependentAssembly>
        <assemblyIdentity name="System.Web.Helpers" publicKeyToken="31bf3856ad364e35" />
        <bindingRedirect oldVersion="1.0.0.0-3.0.0.0" newVersion="3.0.0.0" />
      </dependentAssembly>
      <dependentAssembly>
        <assemblyIdentity name="System.Web.WebPages" publicKeyToken="31bf3856ad364e35" />
        <bindingRedirect oldVersion="1.0.0.0-3.0.0.0" newVersion="3.0.0.0" />
      </dependentAssembly>
      <dependentAssembly>
        <assemblyIdentity name="System.Web.Mvc" publicKeyToken="31bf3856ad364e35" />
        <bindingRedirect oldVersion="0.0.0.0-5.2.9.0" newVersion="5.2.9.0" />
      </dependentAssembly>
      <dependentAssembly>
        <assemblyIdentity name="System.Runtime.CompilerServices.Unsafe" publicKeyToken="b03f5f7f11d50a3a" culture="neutral" />
        <bindingRedirect oldVersion="0.0.0.0-6.0.0.0" newVersion="6.0.0.0" />
      </dependentAssembly>
      <dependentAssembly>
        <assemblyIdentity name="System.Diagnostics.DiagnosticSource" publicKeyToken="cc7b13ffcd2ddd51" culture="neutral" />
        <bindingRedirect oldVersion="0.0.0.0-8.0.0.1" newVersion="8.0.0.1" />
      </dependentAssembly>
      <dependentAssembly>
        <assemblyIdentity name="Autofac" publicKeyToken="17863af14b0044da" culture="neutral" />
        <bindingRedirect oldVersion="0.0.0.0-8.1.1.0" newVersion="8.1.1.0" />
      </dependentAssembly>
      <dependentAssembly>
        <assemblyIdentity name="System.Threading.Tasks.Extensions" publicKeyToken="cc7b13ffcd2ddd51" culture="neutral" />
        <bindingRedirect oldVersion="0.0.0.0-4.2.0.1" newVersion="4.2.0.1" />
      </dependentAssembly>
      <dependentAssembly>
        <assemblyIdentity name="Microsoft.Bcl.AsyncInterfaces" publicKeyToken="cc7b13ffcd2ddd51" culture="neutral" />
        <bindingRedirect oldVersion="0.0.0.0-8.0.0.0" newVersion="8.0.0.0" />
      </dependentAssembly>
      <dependentAssembly>
        <assemblyIdentity name="System.Memory" publicKeyToken="cc7b13ffcd2ddd51" culture="neutral" />
        <bindingRedirect oldVersion="0.0.0.0-4.0.1.2" newVersion="4.0.1.2" />
      </dependentAssembly>
      <dependentAssembly>
        <assemblyIdentity name="System.ValueTuple" publicKeyToken="cc7b13ffcd2ddd51" culture="neutral" />
        <bindingRedirect oldVersion="0.0.0.0-4.0.3.0" newVersion="4.0.3.0" />
      </dependentAssembly>
      <dependentAssembly>
        <assemblyIdentity name="System.Buffers" publicKeyToken="cc7b13ffcd2ddd51" culture="neutral" />
        <bindingRedirect oldVersion="0.0.0.0-4.0.3.0" newVersion="4.0.3.0" />
      </dependentAssembly>
    </assemblyBinding>
  </runtime>
  <system.codedom>
    <compilers>
      <compiler language="c#;cs;csharp" extension=".cs" type="Microsoft.CodeDom.Providers.DotNetCompilerPlatform.CSharpCodeProvider, Microsoft.CodeDom.Providers.DotNetCompilerPlatform, Version=2.0.1.0, Culture=neutral, PublicKeyToken=31bf3856ad364e35" warningLevel="4" compilerOptions="/langversion:default /nowarn:1659;1699;1701" />
      <compiler language="vb;vbs;visualbasic;vbscript" extension=".vb" type="Microsoft.CodeDom.Providers.DotNetCompilerPlatform.VBCodeProvider, Microsoft.CodeDom.Providers.DotNetCompilerPlatform, Version=2.0.1.0, Culture=neutral, PublicKeyToken=31bf3856ad364e35" warningLevel="4" compilerOptions="/langversion:default /nowarn:41008 /define:_MYTYPE=&quot;Web&quot; /optionInfer+" />
    </compilers>
  </system.codedom>
  <entityFramework>
    <providers>
      <provider invariantName="System.Data.SqlClient" type="System.Data.Entity.SqlServer.SqlProviderServices, EntityFramework.SqlServer" />
      <!-- Removed SQLite and Npgsql providers -->
    </providers>
    <defaultConnectionFactory type="System.Data.Entity.Infrastructure.SqlConnectionFactory, EntityFramework" />
  </entityFramework>
  <system.data>
    <DbProviderFactories>
      <remove invariant="System.Data.SQLite.EF6" />
      <remove invariant="System.Data.SQLite" />
      <remove invariant="Npgsql" />
      <add name="SQL Server" invariant="System.Data.SqlClient" description=".NET Framework Data Provider for SQL Server" type="System.Data.SqlClient.SqlClientFactory, System.Data, Version=4.0.0.0, Culture=neutral, PublicKeyToken=b03f5f7f11d50a3a" />
    </DbProviderFactories>
  </system.data>
</configuration>


Creating the Service and Repository Layers

Step 1. Create IProductService Interface

In the WebApplication2.IRepository namespace defines an interface for the product service.
using System.Collections.Generic;
using WebApplication2.Models;
namespace WebApplication2.IRepository
{
    public interface IProductService
    {
        IEnumerable<Product> GetAllProducts();
        void AddProduct(Product product);
    }
}

Step 2. Implement ProductService
In the WebApplication2.Service namespace, implement the ProductService class.
using System.Collections.Generic;
using System.Linq;
using WebApplication2.Data;
using WebApplication2.IRepository;
using WebApplication2.Models;
namespace WebApplication2.Service
{
    public class ProductService : IProductService
    {
        private readonly MyDbContext _context;
        public ProductService(MyDbContext context)
        {
            _context = context;
        }
        public IEnumerable<Product> GetAllProducts()
        {
            return _context.Products.ToList();
        }
        public void AddProduct(Product product)
        {
            _context.Products.Add(product);
            _context.SaveChanges();
        }
    }
}


Step 3. Create the Product Model
In the WebApplication2.Data namespace, create a Product model class.
using System.ComponentModel.DataAnnotations;
namespace WebApplication2.Models
{
    public class Product
    {
        [Key]
        public int Id { get; set; }
        public string Name { get; set; }
        public decimal Price { get; set; }
    }
}


Creating the MVC Controller
Create a controller to handle requests related to products.

Step 1. Create ProductController

In the Controllers folder, create a ProductController
using System.Web.Mvc;
using WebApplication2.IRepository;
using WebApplication2.Models;
namespace WebApplication2.Controllers
{
    public class ProductController : Controller
    {
        private readonly IProductService _productService;
        public ProductController(IProductService productService)
        {
            _productService = productService;
        }
        public ActionResult Index()
        {
            var products = _productService.GetAllProducts();
            return View(products);
        }
        [HttpGet]
        public ActionResult Create()
        {
            return View();
        }
        [HttpPost]
        public ActionResult Create(Product product)
        {
            if (ModelState.IsValid)
            {
                _productService.AddProduct(product);
                return RedirectToAction("Index");
            }
            return View(product);
        }
    }
}


Step 2. Create the View
In the Views/Product folder, create a view named Index. cshtml.
@model IEnumerable<WebApplication2.Models.Product>
@{
    ViewBag.Title = "Index";
}
<h2>Index</h2>
<p>
    @Html.ActionLink("Create New", "Create")
</p>
<table class="table">
    <tr>
        <th>
            @Html.DisplayNameFor(model => model.Name)
        </th>
        <th>
            @Html.DisplayNameFor(model => model.Price)
        </th>
        <th></th>
    </tr>
@foreach (var item in Model) {
    <tr>
        <td>
            @Html.DisplayFor(modelItem => item.Name)
        </td>
        <td>
            @Html.DisplayFor(modelItem => item.Price)
        </td>
        <td>
            @Html.ActionLink("Edit", "Edit", new { id=item.Id }) |
            @Html.ActionLink("Details", "Details", new { id=item.Id }) |
            @Html.ActionLink("Delete", "Delete", new { id=item.Id })
        </td>
    </tr>
}
</table>


Step 3. Create the View

In the Views/Product folder, create a view named Create. cshtml.
@model WebApplication2.Models.Product
@{
    ViewBag.Title = "View";
}
<h2>View</h2>
@using (Html.BeginForm())
{
    @Html.AntiForgeryToken()

    <div class="form-horizontal">
        <h4>Product</h4>
        <hr />
        @Html.ValidationSummary(true, "", new { @class = "text-danger" })
        <div class="form-group">
            @Html.LabelFor(model => model.Name, htmlAttributes: new { @class = "control-label col-md-2" })
            <div class="col-md-10">
                @Html.EditorFor(model => model.Name, new { htmlAttributes = new { @class = "form-control" } })
                @Html.ValidationMessageFor(model => model.Name, "", new { @class = "text-danger" })
            </div>
        </div>
        <div class="form-group">
            @Html.LabelFor(model => model.Price, htmlAttributes: new { @class = "control-label col-md-2" })
            <div class="col-md-10">
                @Html.EditorFor(model => model.Price, new { htmlAttributes = new { @class = "form-control" } })
                @Html.ValidationMessageFor(model => model.Price, "", new { @class = "text-danger" })
            </div>
        </div>
        <div class="form-group">
            <div class="col-md-offset-2 col-md-10">
                <input type="submit" value="Create" class="btn btn-default" />
            </div>
        </div>
    </div>
}
<div>
    @Html.ActionLink("Back to List", "Index")
</div>
@section Scripts {
    @Scripts.Render("~/bundles/jqueryval")
}


Step 3. Create the View
Add the controller and Actions link in Layout Files.
<!DOCTYPE html>
<html>
<head>
    <meta charset="utf-8" />
    <meta name="viewport" content="width=device-width, initial-scale=1.0">
    <title>@ViewBag.Title - My ASP.NET Application</title>
    @Styles.Render("~/Content/css")
    @Scripts.Render("~/bundles/modernizr")
</head>
<body>
    <nav class="navbar navbar-expand-sm navbar-toggleable-sm navbar-dark bg-dark">
        <div class="container">
            @Html.ActionLink("Application name", "Index", "Home", new { area = "" }, new { @class = "navbar-brand" })
            <button type="button" class="navbar-toggler" data-bs-toggle="collapse" data-bs-target=".navbar-collapse" title="Toggle navigation" aria-controls="navbarSupportedContent"
                    aria-expanded="false" aria-label="Toggle navigation">
                <span class="navbar-toggler-icon"></span>
            </button>
            <div class="collapse navbar-collapse d-sm-inline-flex justify-content-between">
                <ul class="navbar-nav flex-grow-1">
                    <li>@Html.ActionLink("Home", "Index", "Home", new { area = "" }, new { @class = "nav-link" })</li>
                    <li>@Html.ActionLink("About", "About", "Home", new { area = "" }, new { @class = "nav-link" })</li>
                    <li>@Html.ActionLink("Contact", "Contact", "Home", new { area = "" }, new { @class = "nav-link" })</li>
                    <li>@Html.ActionLink("Product", "Index", "Product", new { area = "" }, new { @class = "nav-link" })</li>
                </ul>
            </div>
        </div>
    </nav>
    <div class="container body-content">
        @RenderBody()
        <hr />
        <footer>
            <p>&copy; @DateTime.Now.Year - My ASP.NET Application</p>
        </footer>
    </div>

    @Scripts.Render("~/bundles/jquery")
    @Scripts.Render("~/bundles/bootstrap")
    @RenderSection("scripts", required: false)
</body>
</html>


Database Creation
After doing all of this, just run the migration.

Create Initial Migration
After enabling migrations, generate the initial migration based on your current model:
Add-Migration InitialCreate

This command creates a migration class in the Migrations folder that defines the initial schema for your database based on the Product model and the MyDbContext.

Update Database
Now, apply the migration to the database with the following command.
Update-Database

This command will create the database and tables defined in your MyDbContext. If your connection string is set up correctly, the database will be created in your SQL Server instance.

Running the Application

  • Run the application in Visual Studio.
  • Navigate to http://localhost:8081/Product/Index
  • You should see the products displayed in a table.

Output


Conclusion
In this article, we successfully implemented Dependency Injection using Autofac and integrated Entity Framework for data access in an ASP.NET MVC application. This setup allows for better separation of concerns, making the application easier to maintain and test. By following these steps, you can extend this architecture to accommodate more complex business logic, additional services, and different data operations as needed. Happy coding!


ASP.NET MVC Hosting - HostForLIFE.eu :: Introduction to Model View Control (MVC) Pattern using C#

clock October 25, 2024 08:16 by author Peter

We may fully decouple our business and presentation application layers when we use the Model-View-Control (MVC) pattern in our development projects. Additionally, the presentation layer will be controlled by a totally separate object. As you'll see below, the MVC's provision of object/layer independence will facilitate code reuse and improve maintenance of our project.


Generally speaking, we aim to minimize object dependencies in our projects so that we can reuse the code we've spent so much time on and make modifications easier. We will use the MVC pattern and the broader idea of "programming to the interface, not the class" to achieve this.

Our mission, if we choose to accept it.

We have been commissioned to build an ACME 2000 Sports Car business object and our task is to create a simple Windows interface to (1) display the vehicle's current direction and speed, and (2) enable the end user to change direction, accelerate, and decelerate. And of course, there will be scope creep.

There are already rumors at ACME that if our project is successful, we will eventually need to develop a similar interface for the ACME 2 Pickup Truck and the ACME 1 Tricycle. As developers, we also know that the ACME management team will eventually say "Hey, this is really cool. Can we see it on the company's intranet?" With all of this in mind, we want to deliver a product that will be easily scalable so we can be sure to have food on our plates for some time.

So, coincidentally, we think "This is a perfect situation to use the MVC!!".

Our Architecture Overview

Ok, now we know that we want to use the MVC, we need to figure out what the heck it is. Through our research, we come up with the three parts of the MVC: The Model, Control, and View. In our system, the Model would be our car, the View would be the user interface, and the Control is what ties the two together.

To make any changes to the Model (our ACME 2000 sports car), we'll be using our Control. Our Control will make the request to the Model (our ACME 2000 sports car), and update our View, which is our user interface (UI). This seems simple enough, but here's the first problem we have to solve: What happens when the end user wants to make a change to our ACME 2000 sports car, such as going faster or turning? They are going to have to do it by requesting a change using the Control, through the View (our Windows form).


Now we are left with one last problem to solve. What if the View doesn't have the necessary information to display the current state of the Model? We're going to have to add one more arrow to our diagram.  The View will be able to request the Model's state in order to get what it needs to display the information about the state of the Model.

Model's state


Finally, our end user (our driver) will be interacting with our entire ACME Vehicle Control system through the View. If they want to request a change to the system, such as adding a bit of acceleration, the request will be initiated from the View and handled by the Control.

The Control will then ask the Model to change and make any necessary changes to the View. For example, if the ACME 2000 Sports Car has a "floor it" request from an unruly driver and is now traveling to fast to make a turn, the Control will know to disable the ability to turn in the View, thus preventing a catastrophic pileup in the middle of rush-hour (whew!).

The Model (the ACME 2000 Sports Car) will notify the View that its speed has increased and the View will update where appropriate.

So after all that, here's the overview of what we will be building.


Getting Started, Parts, Parts, Parts
Being developers who always think ahead, we want to be sure our system will have a long and prosperous life. This means being prepared for as many changes at ACME as possible. In order to do this we know to follow two golden rules. "keep your classes loosely coupled" and, in order to accomplish this. "program to the interface".

So we will make three interfaces (as you may have guessed, one for the Model, one for the View, and one for the Control).

After much research and laborious interviews with the folks at ACME, we find out more about the system specifications. We want to be sure that we can set the maximum speeds for traveling forward, backward, and turning. We also need to be able to speed up, slow down, and turn left and right. Our "dashboard" view must display the current speed and direction.

It's a tall order to implement all of these requirements, but we're sure we can handle it.

First, let's take care of some preliminary items. We'll need something to represent the direction and turn requests. We'll create two enumerables, AbsoluteDirection and RelativeDirection.
public enum AbsoluteDirection
{
    North = 0,
    East,
    South,
    West
}

public enum RelativeDirection
{
    Right,
    Left,
    Back
}

Next, let's tackle the Control interface. We know the Control has to pass requests to the Model, specifically: Accelerate, Decelerate, and Turn. We'll create an IVehicleControl interface with the appropriate methods.
public interface IVehicleControl
{
    void Accelerate(int paramAmount);
    void Decelerate(int paramAmount);
    void Turn(RelativeDirection paramDirection);
}

Now we'll put together the Model interface. We need to know the Vehicle's name, speed, maximum speed, maximum reverse speed, maximum turn speed, and direction. We also need methods to accelerate, decelerate, and turn.
public interface IVehicleModel
{
    string Name { get; set; }
    int Speed { get; set; }
    int MaxSpeed { get; }
    int MaxTurnSpeed { get; }
    int MaxReverseSpeed { get; }
    AbsoluteDirection Direction { get; set; }
    void Turn(RelativeDirection paramDirection);
    void Accelerate(int paramAmount);
    void Decelerate(int paramAmount);
}

Finally, we'll put together the View interface. We know the view should expose some functionality to the Control, such as enabling and disabling acceleration, deceleration, and turn requests.
public class IVehicleView
{
    void DisableAcceleration();
    void EnableAcceleration();
    void DisableDeceleration();
    void EnableDeceleration();
    void DisableTurning();
    void EnableTurning();
}

Now we have to make a few tweaks to our interfaces to allow them to interact. First of all, any Control should be aware of it's View and Model, so we'll add "SetModel" and "SetView" methods to our IvehicleControl interface.
public interface IVehicleControl
{
    void RequestAccelerate(int paramAmount);
    void RequestDecelerate(int paramAmount);
    void RequestTurn(RelativeDirection paramDirection);
    void SetModel(IVehicleModel paramAuto);
    void SetView(IVehicleView paramView);
}

The next part is a bit tricky. We want the View to be aware of changes in the Model. To do this we'll use a GOF design pattern "Observer".

To implement the Observer pattern, we need to add the following methods to the Model (which will be "observed" by the View): AddObserver, RemoveObserver, and NotifyObservers.
public interface IVehicleModel
{
    string Name { get; set; }
    int Speed { get; set; }
    int MaxSpeed { get; }
    int MaxTurnSpeed { get; }
    int MaxReverseSpeed { get; }
    AbsoluteDirection Direction { get; set; }
    void Turn(RelativeDirection paramDirection);
    void Accelerate(int paramAmount);
    void Decelerate(int paramAmount);
    void AddObserver(IVehicleView paramView);
    void RemoveObserver(IVehicleView paramView);
    void NotifyObservers();
}


And add the following method to the View (which will be "observing" the Model). What will happen is the Model will have a reference to the View. When the Model changes, it will call the NotifyObservers() method pass a reference to itself, and notify the View of a change by calling the Update() method of the View. (It will become clear as mud when we wire everything up later).
public class IVehicleView
{
    void DisableAcceleration();
    void EnableAcceleration();
    void DisableDeceleration();
    void EnableDeceleration();
    void DisableTurning();
    void EnableTurning();
    void Update(IVehicleModel paramModel);
}


So now we have our interfaces put together. We are only going to use references to these interfaces in the rest of our code to ensure we have loose coupling (which we know is a good thing). Any user interface that shows the state of a Vehicle will implement IVehicleView, all of our ACME automobiles will implement IVehicleModel, and we'll make controls for our ACME automobiles with ACME vehicle controls which will implement IVehicleControl.

Next, What things will have things in common?

We know all our vehicles should act the same, so we're going to create a common code base "skeleton" to handle their operation. This is going to be an abstract class because we don't want anyone driving around a skeleton (you can't make an instance of an abstract class). We'll call it Automobile. We'll use an ArrayList (from System. Collections) to keep track of all the interested Views (remember the Observer pattern?). We could have used a plain old array of IVehicleView references, but we're all getting fatigued at this point and want to get through this article. If you're interested, check out the implementation of the AddObserver, RemoveObserver, and NotifyObservers methods to get an idea of how the Observer pattern works by helping our IVehicleModel interact with the IVehicleView. Every time there is a change in speed or direction, the Automobile notifies all IVehicleViews.
public abstract class Automobile : IVehicleModel
{
    #region Declarations
    private ArrayList aList = new ArrayList();
    private int mintSpeed = 0;
    private int mintMaxSpeed = 0;
    private int mintMaxTurnSpeed = 0;
    private int mintMaxReverseSpeed = 0;
    private AbsoluteDirection mDirection = AbsoluteDirection.North;
    private string mstrName = "";
    #endregion
    #region Constructor
    public Automobile(int paramMaxSpeed, int paramMaxTurnSpeed, int paramMaxReverseSpeed, string paramName)
    {
        this.mintMaxSpeed = paramMaxSpeed;
        this.mintMaxTurnSpeed = paramMaxTurnSpeed;
        this.mintMaxReverseSpeed = paramMaxReverseSpeed;
        this.mstrName = paramName;
    }
    #endregion
    #region IVehicleModel Members
    public void AddObserver(IVehicleView paramView)
    {
        aList.Add(paramView);
    }
    public void RemoveObserver(IVehicleView paramView)
    {
        aList.Remove(paramView);
    }
    public void NotifyObservers()
    {
        foreach (IVehicleView view in aList)
        {
            view.Update(this);
        }
    }
    public string Name
    {
        get
        {
            return this.mstrName;
        }
        set
        {
            this.mstrName = value;
        }
    }
    public int Speed
    {
        get
        {
            return this.mintSpeed;
        }
    }
    public int MaxSpeed
    {
        get
        {
            return this.mintMaxSpeed;
        }
    }
    public int MaxTurnSpeed
    {
        get
        {
            return this.mintMaxTurnSpeed;
        }
    }
    public int MaxReverseSpeed
    {
        get
        {
            return this.mintMaxReverseSpeed;
        }
    }
    public AbsoluteDirection Direction
    {
        get
        {
            return this.mDirection;
        }
    }
    public void Turn(RelativeDirection paramDirection)
    {
        AbsoluteDirection newDirection;
        switch (paramDirection)
        {
            case RelativeDirection.Right:
                newDirection = (AbsoluteDirection)((int)(this.mDirection + 1) % 4);
                break;
            case RelativeDirection.Left:
                newDirection = (AbsoluteDirection)((int)(this.mDirection + 3) % 4);
                break;
            case RelativeDirection.Back:
                newDirection = (AbsoluteDirection)((int)(this.mDirection + 2) % 4);
                break;
            default:
                newDirection = AbsoluteDirection.North;
                break;
        }
        this.mDirection = newDirection;
        this.NotifyObservers();
    }
    public void Accelerate(int paramAmount)
    {
        this.mintSpeed += paramAmount;
        if (mintSpeed >= this.mintMaxSpeed) mintSpeed = mintMaxSpeed;
        this.NotifyObservers();
    }
    public void Decelerate(int paramAmount)
    {
        this.mintSpeed -= paramAmount;
        if (mintSpeed <= this.mintMaxReverseSpeed) mintSpeed = mintMaxReverseSpeed;
        this.NotifyObservers();
    }
    #endregion
}


Last but not least
Now that our "ACME Framework" is in place, we just have to set up our concrete classes and our interface. Let's take care of the last two classes first which will be our Control and our Model.

Here's our concrete AutomobileControl which implements the IVehicleControl interface. Our AutomobileControl will also set the View depending on the state of the Model (check out the SetView method which is called every time there is a request passed to the Model).

Notice, we just have references to the IVehicleModel (not the Automobile abstract class) to keep things loose and IVehicleView (not a specific View).
public class AutomobileControl : IVehicleControl
{
    private IVehicleModel Model;
    private IVehicleView View;
    public AutomobileControl(IVehicleModel paramModel, IVehicleView paramView)
    {
        this.Model = paramModel;
        this.View = paramView;
    }
    public AutomobileControl()
    {
    }
    #region IVehicleControl Members
    public void SetModel(IVehicleModel paramModel)
    {
        this.Model = paramModel;
    }
    public void SetView(IVehicleView paramView)
    {
        this.View = paramView;
    }
    public void RequestAccelerate(int paramAmount)
    {
        if (Model != null)
        {
            Model.Accelerate(paramAmount);
            if (View != null) SetView();
        }
    }
    public void RequestDecelerate(int paramAmount)
    {
        if (Model != null)
        {
            Model.Decelerate(paramAmount);
            if (View != null) SetView();
        }
    }
    public void RequestTurn(RelativeDirection paramDirection)
    {
        if (Model != null)
        {
            Model.Turn(paramDirection);
            if (View != null) SetView();
        }
    }
    #endregion
    public void SetView()
    {
        if (Model.Speed >= Model.MaxSpeed)
        {
            View.DisableAcceleration();
            View.EnableDeceleration();
        }
        else if (Model.Speed <= Model.MaxReverseSpeed)
        {
            View.DisableDeceleration();
            View.EnableAcceleration();
        }
        else
        {
            View.EnableAcceleration();
            View.EnableDeceleration();
        }
        if (Model.Speed >= Model.MaxTurnSpeed)
        {
            View.DisableTurning();
        }
        else
        {
            View.EnableTurning();
        }
    }
}

Here's our ACME200SportsCar class (which extends the Automobile abstract class which implements the IVehicleModel interface).
public class ACME2000SportsCar : Automobile
{
    public ACME2000SportsCar(string paramName) : base(250, 40, -20, paramName) { }
    public ACME2000SportsCar(string paramName, int paramMaxSpeed, int paramMaxTurnSpeed, int paramMaxReverseSpeed) :
        base(paramMaxSpeed, paramMaxTurnSpeed, paramMaxReverseSpeed, paramName)
    { }
}

And now for our View.
Now we have to create the last of our three ACME MVC components the View.
We'll create an AutoView user control and have it implement the IVehicleView interface. The AutoView component will have references to our control and model interfaces.
public class AutoView : System.Windows.Forms.UserControl, IVehicleView
{
    private IVehicleControl Control = new ACME.AutomobileControl();
    private IVehicleModel Model = new ACME.ACME2000SportsCar("Speedy");
}


We also need to wire everything up in the constructor for the UserControl.
public AutoView()
{
    // This call is required by the Windows.Forms Form Designer.
    InitializeComponent();
    WireUp(Control, Model);
}
public void WireUp(IVehicleControl paramControl, IVehicleModel paramModel)
{
    // If we're switching Models, don't keep watching the old one!
    if (Model != null)
    {
        Model.RemoveObserver(this);
    }
    Model = paramModel;
    Control = paramControl;
    Control.SetModel(Model);
    Control.SetView(this);
    Model.AddObserver(this);
}

Next, we'll add our buttons, a label to display the status of the ACME2000 Sports Car, and a status bar just for kicks and fill out the code for all the buttons.

private void btnAccelerate_Click(object sender, System.EventArgs e)
{
    Control.RequestAccelerate(int.Parse(this.txtAmount.Text));
}
private void btnDecelerate_Click(object sender, System.EventArgs e)
{
    Control.RequestDecelerate(int.Parse(this.txtAmount.Text));
}
private void btnLeft_Click(object sender, System.EventArgs e)
{
    Control.RequestTurn(RelativeDirection.Left);
}
private void btnRight_Click(object sender, System.EventArgs e)
{
    Control.RequestTurn(RelativeDirection.Right);
}

Add a method to update the interface
public void UpdateInterface(IVehicleModel auto)
{
    this.label1.Text = auto.Name + " heading " + auto.Direction.ToString() + " at speed: " + auto.Speed.ToString();
    this.pBar.Value = (auto.Speed > 0) ? auto.Speed * 100 / auto.MaxSpeed : auto.Speed * 100 / auto.MaxReverseSpeed;
}

Finally, we'll wire up the IVehicleView interface methods.
public void DisableAcceleration()
{
    this.btnAccelerate.Enabled = false;
}
public void EnableAcceleration()
{
    this.btnAccelerate.Enabled = true;
}
public void DisableDeceleration()
{
    this.btnDecelerate.Enabled = false;
}
public void EnableDeceleration()
{
    this.btnDecelerate.Enabled = true;
}
public void DisableTurning()
{
    this.btnRight.Enabled = this.btnLeft.Enabled = false;
}
public void EnableTurning()
{
    this.btnRight.Enabled = this.btnLeft.Enabled = true;
}
public void Update(IVehicleModel paramModel)
{
    this.UpdateInterface(paramModel);
}


And we're off. Now we can go for a test drive in the ACME2000 Sports Car. Everything is going as planned and then we run into an ACME executive who wants to drive a pickup truck instead of a sports car. Good thing we used the MVC! All we need to do is create a new ACMETruck class, wire it up, and we're in business.
public class ACME2000Truck : Automobile
{
    public ACME2000Truck(string paramName) : base(80, 25, -12, paramName) { }

    public ACME2000Truck(string paramName, int paramMaxSpeed, int paramMaxTurnSpeed, int paramMaxReverseSpeed) :
        base(paramMaxSpeed, paramMaxTurnSpeed, paramMaxReverseSpeed, paramName)
    { }
}


in the AutoView, we just have to build the truck and wire it up.
private void btnBuildNew_Click(object sender, System.EventArgs e)
{
    this.autoView1.WireUp(new ACME.AutomobileControl(), new ACME.ACME2000Truck(this.txtName.Text));
}


If we wanted a new Control that only allowed us to increase or decrease the speed by a maximum of 5mph, it's a snap! Create a SlowPokeControl (same as our AutoControl, but with limits on how much a Model will be requested to accelerate).
public void RequestAccelerate(int paramAmount)
{
    if (Model != null)
    {
        int amount = paramAmount;
        if (amount > 5) amount = 5;
        Model.Accelerate(amount);
        if (View != null) SetView();
    }
}
public void RequestDecelerate(int paramAmount)
{
    if (Model != null)
    {
        int amount = paramAmount;
        if (amount > 5) amount = 5;
        Model.Accelerate(amount);  // Typo fixed: should be Decelerate instead of Accelerate
        Model.Decelerate(amount);
        if (View != null) SetView();
    }
}


If we want to make our ACME2000 Truck a SlowPoke, we just wire it up in the AutoView.
private void btnBuildNew_Click(object sender, System.EventArgs e)
{
    this.autoView1.WireUp(new ACME.SlowPokeControl(), new ACME.ACME2000Truck(this.txtName.Text));
}


Finally, if we wanted a web-enabled interface, all we have to do is create a web project and on the UserControl implement the IVehicleView interface.

Conclusion

As you can see, using the MVC to help build code to control interfaces that are very loosely coupled makes life much easier when it comes to change requests. It also makes the impact of changes negligible and you can reuse your interfaces and abstract classes almost anywhere. There are a couple of places where we can build some more flexibility in our project, especially in terms of requesting changes to our Model's state, but that will have to wait for next time.


ASP.NET MVC Hosting - HostForLIFEASP.NET :: Repository Pattern With ASP.NET MVC And Entity Framework

clock October 18, 2024 08:20 by author Peter

An application's data access layer and business logic layer are separated by an abstraction layer that is created using the repository pattern. The business logic layer (BAL) receives data from the repository via direct communication with the data access layer (DAL). The primary benefit of employing a repository pattern is its ability to separate the business and data access logic, preventing modifications to one from having an immediate impact on the other.


I'll go over how to leverage repository patterns in EntityFramework-powered ASP.NET MVC today.

Step 1

  • Start Visual Studio 2013 or 2012.
  • Create a new project -> Web -> Visual Studio 2012.
  • Select ASP.NET MVC 4 Web Application.
  • Provide the Name and Location for the project and click Next.
  • Choose Basic template as the project template and click OK.


Step 2. Create an EmployeeContext.cs and Employee.cs entity class inside the Model folder for the database factory. You can create a database and table manually or if you use my approach it will create a database and table automatically when you run the application the first time because I have used here code first approach.

Employee.cs

using System;
using System.Collections.Generic;
using System.ComponentModel.DataAnnotations;
using System.ComponentModel.DataAnnotations.Schema;
using System.Linq;
using System.Web;

namespace RepositoryWithMVC.Models
{
    [Table("Employee")]
    public class Employee
    {
        [Key]
        public int EmployeeId
        {
            get;
            set;
        }

        [Display(Name = "Employee Name")]
        [Required(ErrorMessage = "Name is required")]
        public string EmployeeName
        {
            get;
            set;
        }

        [Display(Name = "Address")]
        [Required(ErrorMessage = "Address is required")]
        public string Address
        {
            get;
            set;
        }

        [Required(ErrorMessage = "Email Id is required")]
        public string EmailId
        {
            get;
            set;
        }
    }
}

EmployeeContext.cs
using System;
using System.Collections.Generic;
using System.Data.Entity;
using System.Linq;
using System.Web;

namespace RepositoryWithMVC.Models
{
    public class EmployeeContext : DbContext
    {
        public EmployeeContext() : base("DefaultConnection") {}

        public DbSet<Employee> Employees
        {
            get;
            set;
        }
    }
}

Web.Config
<connectionStrings>
    <add name="DefaultConnection"
         connectionString="data source=(local); database=Demodb; user id=sa; password=xyz;"
         providerName="System.Data.SqlClient" />
</connectionStrings>


Step 3. Create a folder with the name “Repository” inside your project. Add an interface and a class respectively IEmployeeRepository.cs and EmployeeRepository.cs.
IEmployeeRepository.cs
using RepositoryWithMVC.Models;
using System;
using System.Collections.Generic;
using System.Linq;
using System.Web;

namespace RepositoryWithMVC.Repository
{
    public interface IEmployeeRepository : IDisposable
    {
        IEnumerable<Employee> GetAllEmployee();
        Employee GetEmployeeById(int studentId);
        int AddEmployee(Employee employeeEntity);
        int UpdateEmployee(Employee employeeEntity);
        void DeleteEmployee(int employeeId);
    }
}

EmployeeRepository.cs
using RepositoryWithMVC.Models;
using System;
using System.Collections.Generic;
using System.Data;
using System.Linq;
using System.Web;

namespace RepositoryWithMVC.Repository
{
    public class EmployeeRepository : IEmployeeRepository
    {
        private readonly EmployeeContext _context;

        public EmployeeRepository(EmployeeContext context)
        {
            _context = context;
        }

        public IEnumerable<Employee> GetAllEmployee()
        {
            return _context.Employees.ToList();
        }

        public Employee GetEmployeeById(int studentId)
        {
            return _context.Employees.Find(studentId);
        }

        public int AddEmployee(Employee employeeEntity)
        {
            int result = -1;

            if (employeeEntity != null)
            {
                _context.Employees.Add(employeeEntity);
                _context.SaveChanges();
                result = employeeEntity.EmployeeId;
            }

            return result;
        }

        public int UpdateEmployee(Employee employeeEntity)
        {
            int result = -1;

            if (employeeEntity != null)
            {
                _context.Entry(employeeEntity).State = EntityState.Modified;
                _context.SaveChanges();
                result = employeeEntity.EmployeeId;
            }

            return result;
        }

        public void DeleteEmployee(int employeeId)
        {
            Employee employeeEntity = _context.Employees.Find(employeeId);
            _context.Employees.Remove(employeeEntity);
            _context.SaveChanges();
        }

        private bool disposed = false;

        protected virtual void Dispose(bool disposing)
        {
            if (!this.disposed)
            {
                if (disposing)
                {
                    _context.Dispose();
                }
            }
            this.disposed = true;
        }

        public void Dispose()
        {
            Dispose(true);
            GC.SuppressFinalize(this);
        }
    }
}


Step 4. Add an EmployeeController that directly interacts with the Repository.
using RepositoryWithMVC.Models;
using RepositoryWithMVC.Repository;
using System;
using System.Collections.Generic;
using System.Linq;
using System.Web;
using System.Web.Mvc;

namespace RepositoryWithMVC.Controllers
{
    public class EmployeeController : Controller
    {
        private IEmployeeRepository _employeeRepository;

        public EmployeeController()
        {
            _employeeRepository = new EmployeeRepository(new Models.EmployeeContext());
        }

        public EmployeeController(IEmployeeRepository employeeRepository)
        {
            _employeeRepository = employeeRepository;
        }

        public ActionResult Index()
        {
            var model = _employeeRepository.GetAllEmployee();
            return View(model);
        }

        public ActionResult AddEmployee()
        {
            if (TempData["Failed"] != null)
            {
                ViewBag.Failed = "Add Employee Failed";
            }
            return View();
        }

        [HttpPost]
        public ActionResult AddEmployee(Employee model)
        {
            if (ModelState.IsValid)
            {
                int result = _employeeRepository.AddEmployee(model);
                if (result > 0)
                {
                    return RedirectToAction("Index", "Employee");
                }
                else
                {
                    TempData["Failed"] = "Failed";
                    return RedirectToAction("AddEmployee", "Employee");
                }
            }
            return View();
        }

        public ActionResult EditEmployee(int employeeId)
        {
            if (TempData["Failed"] != null)
            {
                ViewBag.Failed = "Edit Employee Failed";
            }
            Employee model = _employeeRepository.GetEmployeeById(employeeId);
            return View(model);
        }

        [HttpPost]
        public ActionResult EditEmployee(Employee model)
        {
            if (ModelState.IsValid)
            {
                int result = _employeeRepository.UpdateEmployee(model);
                if (result > 0)
                {
                    return RedirectToAction("Index", "Employee");
                }
                else
                {
                    return RedirectToAction("Index", "Employee");
                }
            }
            return View();
        }

        public ActionResult DeleteEmployee(int employeeId)
        {
            Employee model = _employeeRepository.GetEmployeeById(employeeId);
            return View(model);
        }

        [HttpPost]
        public ActionResult DeleteEmployee(Employee model)
        {
            if (TempData["Failed"] != null)
            {
                ViewBag.Failed = "Delete Employee Failed";
            }
            _employeeRepository.DeleteEmployee(model.EmployeeId);
            return RedirectToAction("Index", "Employee");
        }
    }
}


Step 5. Create a View for the Controller action method like Index, EditEmployee, DeleteEmployee, etc.
Index.cshtml
@model IEnumerable<RepositoryWithMVC.Models.Employee>

@{
    ViewBag.Title = "Index";
}

<div align="center">
    <h3>Employee Management</h3>
    <span>
        <a href="@Url.Action("AddEmployee", "Employee")">Add Employee</a>
    </span>
    <br />
    <br />
    <table cellpadding="5" border="1">
        <tr style="background-color:#808080; color:white;">
            <td>Employee Id</td>
            <td>Name</td>
            <td>Address</td>
            <td>Email Id</td>
            <td>Action</td>
        </tr>
        @foreach (var emp in Model)
        {
            <tr>
                <td>@emp.EmployeeId</td>
                <td>@emp.EmployeeName</td>
                <td>@emp.Address</td>
                <td>@emp.EmailId</td>
                <td>
                    <a href="@Url.Action("EditEmployee", "Employee", new { EmployeeId = emp.EmployeeId })">Edit</a>
                    <a href="@Url.Action("DeleteEmployee", "Employee", new { EmployeeId = emp.EmployeeId })">Delete</a>
                </td>
            </tr>
        }
    </table>
</div>


AddEmployee.cshtml
@model RepositoryWithMVC.Models.Employee

@{
    ViewBag.Title = "AddEmployee";
}

<div align="center">
    <h3>Employee Management</h3>
    <br />
    <b>Add New Employee</b>
    <br />
    <br />

    @using (Html.BeginForm("AddEmployee", "Employee", FormMethod.Post))
    {
        <table>
            <tr>
                <td colspan="2">
                    @if (ViewBag.Failed != null)
                    {
                        <span style="color:red;">@ViewBag.Failed</span>
                    }
                </td>
            </tr>
            <tr>
                <td>
                    @Html.LabelFor(e => e.EmployeeName)
                </td>
                <td>
                    @Html.TextBoxFor(e => e.EmployeeName)
                    <br />
                    @Html.ValidationMessageFor(e => e.EmployeeName, null, new { style = "color:red;" })
                </td>
            </tr>
            <tr>
                <td>
                    @Html.LabelFor(e => e.Address)
                </td>
                <td>
                    @Html.TextBoxFor(e => e.Address)
                    <br />
                    @Html.ValidationMessageFor(e => e.Address, null, new { style = "color:red;" })
                </td>
            </tr>
            <tr>
                <td>
                    @Html.LabelFor(e => e.EmailId)
                </td>
                <td>
                    @Html.TextBoxFor(e => e.EmailId)
                    <br />
                    @Html.ValidationMessageFor(e => e.EmailId, null, new { style = "color:red;" })
                </td>
            </tr>
            <tr>
                <td colspan="2" align="center">
                    <br />
                    <input type="submit" value="Submit" />
                </td>
            </tr>
        </table>
    }
</div>


EditEmployee.cshtml
@model RepositoryWithMVC.Models.Employee

@{
    ViewBag.Title = "Edit Employee";
}

<div align="center">
    <h3>Employee Management</h3>
    <br />
    <b>Edit Employee</b>
    <br />
    <br />

    @using (Html.BeginForm("EditEmployee", "Employee", FormMethod.Post))
    {
        @Html.HiddenFor(e => e.EmployeeId)
        <table>
            <tr>
                <td colspan="2">
                    @if (ViewBag.Failed != null)
                    {
                        <span style="color:red;">@ViewBag.Failed</span>
                    }
                </td>
            </tr>
            <tr>
                <td>
                    @Html.LabelFor(e => e.EmployeeName)
                </td>
                <td>
                    @Html.TextBoxFor(e => e.EmployeeName)
                    <br />
                    @Html.ValidationMessageFor(e => e.EmployeeName, null, new { style = "color:red;" })
                </td>
            </tr>
            <tr>
                <td>
                    @Html.LabelFor(e => e.Address)
                </td>
                <td>
                    @Html.TextBoxFor(e => e.Address)
                    <br />
                    @Html.ValidationMessageFor(e => e.Address, null, new { style = "color:red;" })
                </td>
            </tr>
            <tr>
                <td>
                    @Html.LabelFor(e => e.EmailId)
                </td>
                <td>
                    @Html.TextBoxFor(e => e.EmailId)
                    <br />
                    @Html.ValidationMessageFor(e => e.EmailId, null, new { style = "color:red;" })
                </td>
            </tr>
            <tr>
                <td colspan="2" align="center">
                    <br />
                    <input type="submit" value="Update" />
                </td>
            </tr>
        </table>
    }
</div>


DeleteEmployee.cshtml
@model RepositoryWithMVC.Models.Employee

@{
    ViewBag.Title = "Delete Employee";
}

<div align="center">
    <h3>Employee Management</h3>
    <br />

    @using (Html.BeginForm("DeleteEmployee", "Employee", FormMethod.Post))
    {
        @Html.HiddenFor(e => e.EmployeeId)
        <table border="1" cellpadding="10">
            <tr>
                <td colspan="2" align="center">
                    <b>Delete Employee</b>
                    @if (ViewBag.Failed != null)
                    {
                        <span style="color:red;">@ViewBag.Failed</span>
                    }
                </td>
            </tr>
            <tr>
                <td>
                    @Html.LabelFor(e => e.EmployeeName)
                </td>
                <td>
                    @Html.TextBoxFor(e => e.EmployeeName, new { @readonly = "readonly" })
                </td>
            </tr>
            <tr>
                <td>
                    @Html.LabelFor(e => e.Address)
                </td>
                <td>
                    @Html.TextBoxFor(e => e.Address, new { @readonly = "readonly" })
                </td>
            </tr>
            <tr>
                <td>
                    @Html.LabelFor(e => e.EmailId)
                </td>
                <td>
                    @Html.TextBoxFor(e => e.EmailId, new { @readonly = "readonly" })
                </td>
            </tr>
            <tr>
                <td colspan="2" align="center">
                    <br />
                    <input type="submit" value="Delete" />
                </td>
            </tr>
        </table>
    }
</div>


Note. Change in RouteConfig.cs controller name from home to employee in default.

Thanks for reading this article, hope you enjoyed it.


ASP.NET MVC Hosting - HostForLIFE.eu :: Using SMTP to Send Emails in ASP.NET Core MVC

clock September 26, 2024 08:10 by author Peter

Assume you are creating a system for booking travel, and when a user books a car, two emails are sent.

  • Service email: Sent with information about the reservation to the firm.
  • Customer email: Submitted to the client as a reservation confirmation.

The use of the MailMessage and SmtpClient classes to do this is demonstrated in the C# code that follows.

This article explains how to combine the HTML form that is provided, the C# backend mail-sending code, and AJAX capability that uses jQuery to transfer form data to the server. I've included the necessary cshtml code that includes validation, Ajax integration, and captcha features.

Code Breakdown
CSHTML with AJAX Integration
<div class="booking_content">
    <h2>Reserve Your Ride Online</h2>
    <form action="" method="post" id="booking_form" novalidate="novalidate" class="row booking_form">
        <div class="col-md-6">
            <div class="form-group">
                <input type="text" class="form-control" name="name" placeholder="&#xe08a  Your Name">
                <label class="border_line"></label>
            </div>
        </div>
        <div class="col-md-6">
            <div class="form-group">
                <input type="text" class="form-control" name="subject" placeholder="&#xe06b  Subject">
                <label class="border_line"></label>
            </div>
        </div>
        <div class="col-md-6">
            <div class="form-group">
                <input type="text" class="form-control" name="email" placeholder="&#xe090  Your Email">
                <label class="border_line"></label>
            </div>
        </div>
        <div class="col-md-6">
            <div class="form-group">
                <input type="text" class="form-control" name="mobile" placeholder="&#xe090  Phone">
                <label class="border_line"></label>
            </div>
        </div>
        <div class="col-md-6">
            <div class="form-group">
                <input type="text" class="form-control" name="stratdestination" placeholder="&#xe01d  Start Destination">
                <label class="border_line"></label>
            </div>
        </div>
        <div class="col-md-6">
            <div class="form-group">
                <input type="text" class="form-control" name="endDestination" placeholder="&#xe01d  End Destination">
                <label class="border_line"></label>
            </div>
        </div>
        <div class="col-md-6">
            <div class="form-group">
                <input type="text" class="form-control date-input-css" name="timedate" placeholder="&#xe06b  Time and Date">
                <label class="border_line"></label>
            </div>
        </div>
        <div class="col-md-6">
            <div class="form-group">
                <select class="form-control" name="cartype">
                    <option>--Select Car Type--</option>
                    <option value="A/C Tata Indigo">A/C Tata Indigo</option>
                    <!-- Add other car types -->
                </select>
                <label class="border_line"></label>
            </div>
        </div>
        <div class="col-sm-6 col-md-6">
            <div class="form-group row">
                <label class="col-sm-4 col-md-3 control-label">
                    <div id="divGenerateRandomValues"></div>
                </label>
            </div>
        </div>
        <div class="col-sm-6 col-md-6">
            <div class="form-group row">
                <input type="text" id="textInput" class="form-control" placeholder="Enter Captcha" />
                <span class="errCap text-danger"></span>
            </div>
        </div>
        <div class="col-lg-12">
            <div class="form-group">
                <button type="submit" value="submit" class="btn slider_btn dark_hover btnBookNow" id="btnSubmit">Book Now</button>
            </div>
        </div>
    </form>
</div>

<!-- Modal -->
<div class="modal fade sccmodl" id="sccmodl" tabindex="1" role="dialog" aria-labelledby="exampleModalLabel" aria-hidden="true" data-backdrop="static" data-keyboard="false">
    <div class="modal-dialog modal-dialog-centered" role="document">
        <div class="modal-content">
            <div class="modal-header">
                <h5>Booking Information</h5>
                <button type="button" class="close No" data-dismiss="modal" aria-label="Close">
                    <span aria-hidden="true">&times;</span>
                </button>
            </div>
            <div class="modal-body">
                <h6 class="indxmsg"></h6>
            </div>
            <div class="modal-footer">
                <input type="button" class="btn btn-info btn-sm btnOk" value="Ok" />
            </div>
        </div>
    </div>
</div>


@section Scripts {
    <script type="text/javascript">
        var iNumber = Math.floor(1000 + Math.random() * 9000);

        $(document).ready(function () {
            $("#btnSubmit").prop("disabled", true);
            $("#divGenerateRandomValues").html("<input id='txtNewInput' value='" + iNumber + "' disabled/>");

            // Validate Captcha
            $("#btnSubmit").click(function (e) {
                e.preventDefault();
                if ($("#textInput").val() != iNumber) {
                    $('.errCap').text('Invalid Captcha !');
                } else {
                    $('.errCap').text('');
                    submitForm();
                }
            });

            var wrongInput = function () {
                return $("#textInput").val() != iNumber;
            };

            $("#textInput").bind('input', function () {
                $("#btnSubmit").prop('disabled', wrongInput);
            });
        });

        function submitForm() {
            $('#booking_form').validate({
                rules: {
                    name: { required: true, minlength: 2 },
                    subject: { required: true, minlength: 4 },
                    email: { required: true, email: true },
                    mobile: { required: true, minlength: 10, maxlength: 10, number: true },
                    stratdestination: { required: true, minlength: 2 },
                    endDestination: { required: true, minlength: 2 },
                    timedate: { required: true },
                    cartype: { required: true }
                },
                messages: {
                    name: { required: "Enter your name", minlength: "At least 2 characters" },
                    subject: { required: "Enter a subject", minlength: "At least 4 characters" },
                    email: { required: "Enter a valid email" },
                    mobile: { required: "Enter a valid phone number", minlength: "10 characters" },
                    stratdestination: { required: "Enter a start destination" },
                    endDestination: { required: "Enter an end destination" },
                    timedate: { required: "Select a date" },
                    cartype: { required: "Select a car type" }
                },
                submitHandler: function (form) {
                    $.ajax({
                        type: "POST",
                        url: "/Home/SendMail",
                        data: $(form).serialize(),
                        success: function (response) {
                            $('#sccmodl').modal('show');
                            $('.indxmsg').html(response);
                        },
                        error: function () {
                            alert("Error in sending the form.");
                        }
                    });
                }
            });
        }
    </script>
}


1. SendMail Action
Here’s the main controller action that handles the sending of the emails.
[HttpPost]
public ActionResult SendMail(string name, string email, string mobile, string subject, string timedate, string stratdestination, string endDestination, string cartype)
{
    try
    {
        // Create mail messages
        MailMessage mail = new MailMessage();
        MailMessage forCustomer = new MailMessage();
        SmtpClient smtpClient = new SmtpClient("mail.prakash.in", 587);

        // Configure SMTP client
        smtpClient.UseDefaultCredentials = false;
        smtpClient.Credentials = new NetworkCredential("[email protected]", "Bmbn0Dn26g6i~kybW");
        smtpClient.EnableSsl = false;

        // Configure mail for service
        mail.To.Add("[email protected]");
        mail.Bcc.Add("[email protected]");
        mail.From = new MailAddress("[email protected]", "Company Name");
        mail.Subject = subject;
        mail.Body = GenerateServiceMailBody(name, email, mobile, subject, timedate, stratdestination, endDestination, cartype);
        mail.IsBodyHtml = true;

        // Configure mail for customer
        forCustomer.To.Add(email);
        forCustomer.From = new MailAddress("[email protected]", "Company Name");
        forCustomer.Subject = subject;
        forCustomer.Body = GenerateCustomerMailBody(name);
        forCustomer.IsBodyHtml = true;

        // Send emails
        smtpClient.Send(mail);
        smtpClient.Send(forCustomer);

        return Json("Mail sent successfully! Please check your mail.");
    }
    catch (SmtpException smtpEx)
    {
        // Log detailed SMTP exception
        return Json($"SMTP Error: {smtpEx.Message}");
    }
    catch (Exception ex)
    {
        // Log general exception
        return Json($"Error: {ex.Message}");
    }
}


Explanation
SMTP Configuration: The SMTP client is configured using the SmtpClient class. In this case, it uses the mail.prakash.in the SMTP server on port 587, and the credentials for the email account are provided.
smtpClient.UseDefaultCredentials = false;
smtpClient.Credentials = new NetworkCredential("[email protected]", "Bmb~kybW");
smtpClient.EnableSsl = false;


Sending Emails to Multiple Recipients
Two separate emails are created.

  • The first email is sent to the company (service email) with the customer's booking details.
  • The second email is a confirmation sent to the customer.


Both emails are sent using smtpClient.Send(mail).

2. HTML Email Templates

HTML-formatted emails are used to send user-friendly content. Here, we generate two different types of email bodies: one for the service and one for the customer.

Service Email Template
private string GenerateServiceMailBody(string name, string email, string mobile, string subject, string timedate, string stratdestination, string endDestination, string cartype)
{
    return "<table cellspacing='0'>" +
        "<tr><td colspan='2'>Your contact person details:<br/></td></tr>" +
        "<tr><td colspan='2'><b><br/> Name: " + name + " <br/> Email: " + email + " <br/> Mobile: " + mobile + "  <br/> Subject: " + subject + "  <br/> Booking Date: " + timedate + " <br/> Start Destination: " + stratdestination + " <br/> End Destination: " + endDestination + " <br/> Booking Car: " + cartype + "  </b></td></tr>" +
        "<tr><td colspan='2'><br/>Please contact above person as soon as possible.<br />Thanks!</td></tr>" +
        "</table>";
}


Customer Email Template
private string GenerateCustomerMailBody(string name)
{
    return "<table cellspacing='0'>" +
        "<tr><td colspan='2'>Hello ,<br/></td></tr>" +
        "<tr><td colspan='2'><b><br/>  " + name + "    </b></td></tr>" +
        "<tr><td colspan='2'><br/>Thanks for your email. </td></tr>" +
        "<tr><td colspan='2'><br/>Please connect with us. </td></tr>" +
        "</table>";
}

The email sent to the customer confirms that their booking has been received and includes a personalized greeting.

3. Error Handling

Error handling is an essential aspect when dealing with external services like SMTP. Two exception blocks are used:

  • SmtpException: Catches issues related to SMTP (e.g., wrong credentials, SMTP server down).
  • Exception: A general catch block for any other issues that may arise.


catch (SmtpException smtpEx)
{
    return Json($"SMTP Error: {smtpEx.Message}");
}
catch (Exception ex)
{
    return Json($"Error: {ex.Message}");
}

Conclusion
This approach enables sending structured HTML emails from an ASP.NET MVC application using MailMessage and SmtpClient. You can easily customize the email templates, manage multiple recipients, and handle errors effectively.

When working with sensitive information like email credentials, it’s essential to avoid hardcoding them in the source code. Instead, store these values securely in a configuration file, like web.config, or use environment variables for improved security.

By following this structure, you can seamlessly add email functionality to your MVC applications and provide a smooth experience for both service providers and customers.


ASP.NET MVC Hosting - HostForLIFE.eu :: Full Upload and Download of Files in ASP.NET Core MVC

clock September 2, 2024 08:15 by author Peter

A strong framework that enables creating web apps quick and simple is ASP.NET Core MVC. Users must upload and download files to and from the server in numerous real-world situations. In this post, we'll create a basic ASP.NET Core MVC application with file upload and download capabilities.


1. Establishing the Project
Start by using Visual Studio or the.NET CLI to build a new ASP.NET Core MVC project.

Making Use of CLI

dotnet new mvc -n FileUploadDownloadApp
cd FileUploadDownloadApp


Using Visual Studio

  • Open Visual Studio and create a new project.
  • Select "ASP.NET Core Web App (Model-View-Controller)".
  • Name it FileUploadDownloadApp.

2. Creating the Model
The next step is to create a model that represents the file to be uploaded. We will store the uploaded file in an IFormFile object.
public class FileUploadViewModel
{
    public IFormFile File { get; set; }
}


The IFormFile interface represents the uploaded file in the HTTP request.

3. Creating the Controller
The controller handles user requests to upload and download files. Create a new FileController with actions for file upload, file listing, and file download.

using Microsoft.AspNetCore.Mvc;
using System.IO;
using System.Threading.Tasks;
using FileUploadDownloadApp.Models;
using Microsoft.AspNetCore.Hosting;

public class FileController : Controller
{
    private readonly IWebHostEnvironment _environment;
    public FileController(IWebHostEnvironment environment)
    {
        _environment = environment;
    }
    // GET: File/Upload
    public IActionResult Upload()
    {
        return View();
    }
    // POST: File/Upload
    [HttpPost]
    public async Task<IActionResult> Upload(FileUploadViewModel model)
    {
        if (model.File != null && model.File.Length > 0)
        {
            // Define the upload folder
            string uploadPath = Path.Combine(_environment.WebRootPath, "uploads");
            // Create the folder if it doesn't exist
            if (!Directory.Exists(uploadPath))
            {
                Directory.CreateDirectory(uploadPath);
            }
            // Generate the file path
            string filePath = Path.Combine(uploadPath, model.File.FileName);
            // Save the file to the specified location
            using (var stream = new FileStream(filePath, FileMode.Create))
            {
                await model.File.CopyToAsync(stream);
            }
            ViewBag.Message = "File uploaded successfully!";
        }
        return View();
    }
    // GET: File/ListFiles
    public IActionResult ListFiles()
    {
        string uploadPath = Path.Combine(_environment.WebRootPath, "uploads");
        if (!Directory.Exists(uploadPath))
        {
            return View(new List<string>());
        }
        var files = Directory.GetFiles(uploadPath).Select(Path.GetFileName).ToList();
        return View(files);
    }
    // GET: File/Download?filename=example.txt
    public IActionResult Download(string filename)
    {
        if (string.IsNullOrEmpty(filename))
        {
            return Content("Filename is not provided.");
        }
        string filePath = Path.Combine(_environment.WebRootPath, "uploads", filename);
        if (!System.IO.File.Exists(filePath))
        {
            return Content("File not found.");
        }
        byte[] fileBytes = System.IO.File.ReadAllBytes(filePath);
        return File(fileBytes, "application/octet-stream", filename);
    }
}

Breakdown

  • Upload: Saves uploaded files to the /uploads directory in wwwroot.
  • ListFiles: Displays a list of uploaded files.
  • Download: Allows downloading files from the server by providing the file name as a query parameter.


4. Creating Views
Upload View (Upload. cshtml)
@model FileUploadViewModel
<h2>Upload File</h2>
<form asp-action="Upload" enctype="multipart/form-data" method="post">
    <div class="form-group">
        <input type="file" asp-for="File" class="form-control" />
    </div>
    <button type="submit" class="btn btn-primary">Upload</button>
</form>
@if (ViewBag.Message != null)
{
    <p>@ViewBag.Message</p>
}


List Files View (ListFiles.cshtml)
@model List<string>
<h2>Uploaded Files</h2>
<table class="table">
    <thead>
        <tr>
            <th>File Name</th>
            <th>Download</th>
        </tr>
    </thead>
    <tbody>
    @foreach (var file in Model)
    {
        <tr>
            <td>@file</td>
            <td>
                <a asp-action="Download" asp-route-filename="@file" class="btn btn-success">Download</a>
            </td>
        </tr>
    }
    </tbody>
</table>

5. Navigation in Layout
To make file upload and download pages easily accessible, add links to these views in the main layout file (_Layout. cshtml).
<!DOCTYPE html>
<html lang="en">
<head>
    <meta charset="utf-8" />
    <meta name="viewport" content="width=device-width, initial-scale=1.0" />
    <title>@ViewData["Title"] - FileUploadDownloadApp</title>
    <link rel="stylesheet" href="~/lib/bootstrap/dist/css/bootstrap.min.css" />
    <link rel="stylesheet" href="~/css/site.css" asp-append-version="true" />
    <link rel="stylesheet" href="~/FileUploadDownloadApp.styles.css" asp-append-version="true" />
</head>
<body>
    <header>
        <nav class="navbar navbar-expand-sm navbar-toggleable-sm navbar-light bg-white border-bottom box-shadow mb-3">
            <div class="container">
                <a class="navbar-brand" asp-area="" asp-page="/Index">FileUploadDownloadApp</a>
                <button class="navbar-toggler" type="button" data-bs-toggle="collapse" data-bs-target=".navbar-collapse" aria-controls="navbarSupportedContent"
                        aria-expanded="false" aria-label="Toggle navigation">
                    <span class="navbar-toggler-icon"></span>
                </button>
                <div class="navbar-collapse collapse d-sm-inline-flex justify-content-between">
                    <ul class="navbar-nav flex-grow-1">
                        <li class="nav-item">
                            <a class="nav-link text-dark" asp-area="" asp-page="/Index">Home</a>
                        </li>
                        <li class="nav-item">
                            <a class="nav-link text-dark" asp-controller="Home" asp-action="Upload">Upload File</a>
                        </li>
                        <li class="nav-item">
                            <a class="nav-link text-dark" asp-controller="Home" asp-action="ListFiles">List Files</a>
                        </li>
                    </ul>
                </div>
            </div>
        </nav>
    </header>
    <div class="container">
        <main role="main" class="pb-3">
            @RenderBody()
        </main>
    </div>

    <footer class="border-top footer text-muted">
        <div class="container">
            &copy; 2024 - FileUploadDownloadApp - <a asp-area="" asp-page="/Privacy">Privacy</a>
        </div>
    </footer>

    <script src="~/lib/jquery/dist/jquery.min.js"></script>
    <script src="~/lib/bootstrap/dist/js/bootstrap.bundle.min.js"></script>
    <script src="~/js/site.js" asp-append-version="true"></script>

    @await RenderSectionAsync("Scripts", required: false)
</body>
</html>


6. Running and Testing the Application
Once you've added the controller, views, and navigation links, run the application.

  • Upload Files: Navigate to /File/Upload to upload files.
  • List Files: After uploading, go to /File/ListFiles to see all uploaded files.
  • Download Files: Click the "Download" button to download the files.

7. Security and Best Practices
When implementing file upload and download functionality, security should be a top priority.File Size Limitations: Enforce limits on file size to prevent large files from overwhelming the server.services.Configure<FormOptions>(options => options.MultipartBodyLengthLimit = 10485760); // 10MBValidate File Types: Only allow certain file types by checking the file extension or MIME type.var allowedExtensions = new[] { ".jpg", ".png", ".pdf" };
var extension = Path.GetExtension(model.File.FileName);
if (!allowedExtensions.Contains(extension))
{
    ModelState.AddModelError("File", "Unsupported file type.");
}

Sanitize File Names: Remove any unwanted characters from file names before saving them.var safeFileName = Path.GetFileNameWithoutInvalidChars(model.File.FileName);Limit Upload Folder Access: Restrict access to the upload folder to prevent unauthorized access. Only allow authenticated users to download files if necessary.

8. Output


Conclusion
In order to manage file upload and download, we constructed a straightforward ASP.NET Core MVC application in this tutorial. To keep the application safe, we went over the fundamentals of building models, controllers, and views as well as security recommended practices. By incorporating features like progress bars, database storage for file information, or even Azure blob storage integration for managing larger files in cloud environments, you may further develop the application with this knowledge.


ASP.NET MVC Hosting - HostForLIFE.eu :: How to Mapping with Conditional Display in a ASP.NET MVC Application?

clock August 27, 2024 07:47 by author Peter

Keeping resumes organized across several job vacancies is essential in the recruitment business. This blog post explores the effective mapping of resumes to various job listings within a.NET MVC application. We'll go over the structure of the database, the reasoning needed to link resumes to job IDs, and the procedures to make sure that resumes associated with closed jobs are removed from consideration for open positions.

With the help of this guide, you will be able to optimize your job and resume management process in.NET MVC, regardless of whether you're creating a recruiting portal or improving existing HR administration system.

Here's how to approach your.NET MVC project to meet the requirements.

1. Database Design

  • Job Table
    • JobID (Primary Key)
    • JobStatus (e.g., Active, Closed)
  • Resume Table
    • ResumeID (Primary Key)
    • Other resume details.
  • JobResumeMapping Table
    • JobID (Foreign Key to Job Table)
    • ResumeID (Foreign Key to Resume Table)
    • MappingID (Primary Key for the table)

2. Mapping Resumes to Different Job IDs
You would create or update records in the JobResumeMapping table to map resumes to different jobs.
Example method to map a resume to a job.

public void MapResumeToJob(int jobId, int resumeId)
{
    using (var context = new YourDbContext())
    {
        var mapping = new JobResumeMapping
        {
            JobID = jobId,
            ResumeID = resumeId
        };
        context.JobResumeMappings.Add(mapping);
        context.SaveChanges();
    }
}

3. Preventing Resume from Showing in Other Jobs once the Job is closed
You should filter out resumes mapped to closed jobs.
Example of how to do it in a query.

    var openJobsWithResumes = context.JobResumeMappings
                                      .Where(jrm => jrm.Job.JobStatus == "Active")
                                      .Include(jrm => jrm.Resume)
                                      .ToList();


Alternatively, you can use a method to update the status of the job and remove the mapping.
public void CloseJob(int jobId)
{
    using (var context = new YourDbContext())
    {
        var job = context.Jobs.Find(jobId);
        if (job != null)
        {
            job.JobStatus = "Closed";
            context.SaveChanges();
        }
    }
}


4. Ensure UI Logic
In your view, only show resumes linked to jobs that are not closed.

@foreach (var job in Model.Jobs)
{
    if (job.JobStatus == "Active")
    {
        // Display resumes mapped to this job
    }
}

5. Additional Considerations
To preserve referential integrity, you could also choose to use update operations or cascade deletes. The mappings must to be updated or eliminated in the event that a job is deleted.

6. Business Logic in the Controller

Make sure the logic for closing jobs and filtering resumes is handled by your controller methods.
Your demands for matching resumes to various jobs should be met by this configuration, which also makes sure that resumes linked to closed jobs are removed from consideration for open positions.


ASP.NET MVC Hosting - HostForLIFE.eu :: Managing Large Session States in ASP.NET MVC

clock August 20, 2024 07:10 by author Peter

It is crucial to adhere to recommended practices when working with big session states in ASP.NET MVC in order to guarantee optimum speed and scalability. The following are suggested best practices.


Minimize Session Data

Only keep the most important information in the session state. Steer clear of storing bulky items or intricate data structures that can needlessly expand the session size.

// Instead of storing a large object in the session
public IActionResult ActionName()
{
    var largeObject = GetLargeObject(); // Assuming this returns a large object
    HttpContext.Session.SetObject("LargeObject", largeObject); // Avoid storing large objects

    // Store only the essential data
    HttpContext.Session.SetString("UserName", "csharpcorner");
    HttpContext.Session.SetInt32("Age", 25);

    return View();
}

Use Serializable Objects
Ensure that the objects you store in the session state are serializable. This means that the objects can be converted to a stream of bytes for storage and later deserialized when needed.

[Serializable]
public class UserData
{
    public string Name { get; set; }
    public int Age { get; set; }
}

public IActionResult ActionName()
{
    var userData = new UserData
    {
        Name = "Hostforlife",
        Age = 25
    };

    HttpContext.Session.SetObject("UserData", userData);

    return View();
}


Implement Session State Compression
ASP.NET provides built-in support for compressing session data before storing it. This can significantly reduce the size of the session state. You can enable compression in the web.config.
<system.web>
  <sessionState mode="InProc" compressionEnabled="true" />
</system.web>


Use a Distributed Cache
Instead of storing large session data on the server, consider using a distributed cache like Redis or Memcached. These caching solutions can store session data more efficiently and provide better scalability for web farm scenarios.

Install the necessary NuGet packages (e.g., Microsoft.Extensions.Caching.Redis) and configure the distributed cache in the Startup.cs
public void ConfigureServices(IServiceCollection services)
{
    services.AddDistributedRedisCache(options =>
    {
        options.Configuration = "localhost:6379"; // Redis server connection string
    });

    // Other service configurations
}

Then, use the distributed cache in your controller actions.
public IActionResult CacheAction(IDistributedCache cache)
{
    var userData = new UserData
    {
        Name = "Hostforlife",
        Age = 25
    };

    cache.SetString("UserData", JsonConvert.SerializeObject(userData));

    // Retrieve the cached data

    return View();
}


Implement Session State Expiration
Set appropriate expiration times for session data to ensure that stale data is removed from the session state. This can help reduce the overall size of the session state.
public void ConfigureServices(IServiceCollection services)
{
    services.AddSession(options =>
    {
        options.IdleTimeout = TimeSpan.FromMinutes(30); // Session will expire after 30 minutes of inactivity
    });

    // Other service configurations
}

Use Asynchronous Session State
ASP.NET provides an asynchronous session state option that can improve performance by allowing other requests to be processed while waiting for session state operations to complete.
public async Task<IActionResult> AsyncAction()
{
    await HttpContext.Session.LoadAsync();

    // Perform session state operations asynchronously
    HttpContext.Session.SetString("UserName", "Hostforlife");

    return View();
}


Implement Caching Strategies
Implement caching strategies to reduce the need for storing large amounts of data in the session state. For example, you can cache frequently accessed data in memory or use a distributed cache.

Conclusion

In order to manage file upload and download, we constructed a straightforward ASP.NET Core MVC application in this tutorial. To keep the application safe, we went over the fundamentals of building models, controllers, and views as well as security recommended practices.


ASP.NET MVC Hosting - HostForLIFE.eu :: Understanding MVC in ASP.NET Core

clock August 13, 2024 09:22 by author Peter

Model-View-Controller (MVC) is a design pattern that has been widely used in software engineering for creating well-structured and maintainable applications. In the context of .NET Core, MVC provides a robust framework for building web applications, separating concerns between the data (model), the user interface (view), and the business logic (controller).

This article will delve into what MVC is, how it works in .NET Core, and how you can build a simple MVC application.

What is MVC?
MVC stands for Model-View-Controller, a pattern that divides an application into three interconnected components.

Model

  • Represents the data and the business logic of the application.
  • Directly manages the data, logic, and rules of the application.
  • In .NET Core, the model can be an entity class that represents data in the database.

View

  • Represents the presentation layer of the application.
  • Responsible for displaying the data provided by the model in a user-friendly format.
  • Views in .NET Core are typically Razor files (.cshtml) that generate HTML dynamically.

Controller

  • Acts as an intermediary between the Model and the View.
  • Handles user input, processes it using the model, and returns the appropriate view.
  • In .NET Core, controllers are classes that inherit from the Controller and contain action methods.

How does MVC Work in .NET Core?
When a user interacts with an MVC application, the flow of control follows these steps.

User Request: The user sends a request, such as clicking a link or submitting a form.
Controller Action: The request is routed to a controller action method. The controller processes the request, interacts with the model if necessary, and selects a view to render.
View Rendering: The view receives the data from the controller and generates the HTML to be displayed to the user.
Response: The HTML generated by the view is sent back to the user's browser, where it is rendered.

Creating a Simple MVC Application in .NET Core
Let's walk through creating a simple MVC application in .NET Core.

Step 1. Setting Up the Project

You can start by creating a new MVC project in .NET Core using Visual Studio or the .NET CLI.
dotnet new mvc -n MvcDemoApp

This command creates a new MVC project named MvcDemoApp.

Step 2. Understanding the Project Structure
In an MVC project, you'll find three main folders.

  • Models: Contains the classes that represent the application's data and business logic.
  • Views: Contains the .cshtml files that define the HTML structure of the application.
  • Controllers: Contains the controller classes that manage the flow of the application.

Step 3. Creating a Model
Let's create a simple model that represents a product.
namespace MvcDemoApp.Models
{
    public class Product
    {
        public int Id { get; set; }
        public string Name { get; set; }
        public decimal Price { get; set; }
    }
}
Step 4. Creating a ControllerNext, create a controller to handle requests related to products.
using Microsoft.AspNetCore.Mvc;
using MvcDemoApp.Models;

namespace MvcDemoApp.Controllers
{
    public class ProductsController : Controller
    {
        public IActionResult Index()
        {
            var products = new List<Product>
            {
                new Product { Id = 1, Name = "Laptop", Price = 1200 },
                new Product { Id = 2, Name = "Smartphone", Price = 800 }
            };

            return View(products);
        }
    }
}
The Index action method returns a list of products to the view.
Step 5. Creating a View
Finally, create a view to display the list of products. Add an Index.cshtml file under Views/Products.@model IEnumerable<MvcDemoApp.Models.Product>

<h2>Product List</h2>

<table class="table">
    <thead>
        <tr>
            <th>Name</th>
            <th>Price</th>
        </tr>
    </thead>
    <tbody>
        @foreach (var product in Model)
        {
            <tr>
                <td>@product.Name</td>
                <td>@product.Price</td>
            </tr>
        }
    </tbody>
</table>

This view displays the product data in an HTML table.

Step 6. Running the Application
Benefits of Using MVC

  • Separation of Concerns: MVC promotes a clear separation between the application's concerns, making it easier to manage and scale.
  • Reusability: The separation of concerns allows for more reusable code components.
  • Testability: The MVC pattern enhances the testability of your application by decoupling the components.

Conclusion
The MVC pattern in .NET Core provides a clean and organized way to develop web applications by separating the application into three core components: Model, View, and Controller. This separation makes your application more manageable, scalable, and testable. By following the steps outlined in this article, you can start building your own MVC applications in .NET Core and take advantage of the powerful features it offers.


About HostForLIFE.eu

HostForLIFE.eu is European Windows Hosting Provider which focuses on Windows Platform only. We deliver on-demand hosting solutions including Shared hosting, Reseller Hosting, Cloud Hosting, Dedicated Servers, and IT as a Service for companies of all sizes.

We have offered the latest Windows 2016 Hosting, ASP.NET Core 2.2.1 Hosting, ASP.NET MVC 6 Hosting and SQL 2017 Hosting.


Tag cloud

Sign in