The Onion Architecture term was coined by Jeffrey Palermo in 2008. This architecture provides a better way to build applications for better testability, maintainability, and dependability on the infrastructures like databases and services. This architecture's main aim is to address the challenges faced with 3-tier architecture or n-tier architecture and to provide a solution for common problems, like coupling and separation of concerns. There are two types of coupling - tight coupling and loose coupling.
Tight Coupling
When a class is dependent on a concrete dependency, it is said to be tightly coupled to that class. A tightly coupled object is dependent on another object; that means changing one object in a tightly coupled application, often requires changes to a number of other objects. It is not difficult when an application is small but in an enterprise-level application, it is too difficult to make the changes.
Loose Coupling
It means two objects are independent and an object can use another object without being dependent on it. It is a design goal that seeks to reduce the interdependencies among components of a system with the goal of reducing the risk that changes in one component will require changes in any other component.
Advantages of Onion Architecture
There are several advantages of the Onion Architecture, as listed below.

- It provides better maintainability as all the codes depend on layers or the center.
- It provides better testability as the unit test can be created for separate layers without an effect of other modules of the application.
- It develops a loosely coupled application as the outer layer of the application always communicates with the inner layer via interfaces.
- Any concrete implantation would be provided to the application at run time
- Domain entities are core and center part. It can have access to both the database and UI layers.
- The internal layers never depend on the external layer. The code that may have changed should be part of an external layer.
Why Onion Architecture
There are several traditional architectures, like 3-tier architecture and n-tier architecture, all having their own pros and cons. All these traditional architectures have some fundamental issues, such as - tight coupling and separation of concerns. The Model-View-Controller is the most commonly used web application architecture, these days. It solves the problem of separation of concern as there is a separation between UI, business logic, and data access logic. The View is used to design the user interface. The Model is used to pass the data between View and Controller on which the business logic performs any operations. The Controller is used to handle the web request by action methods and returns View accordingly. Hence, it solves the problem of separation of concern while the Controller is still used to database access logic. In essence, MVC solves the separation of concern issue but the tight coupling issue still remains.
On the other hand, Onion Architecture addresses both the separation of concern and tight coupling issues. The overall philosophy of the Onion Architecture is to keep the business logic, data access logic, and model in the middle of the application and push the dependencies as far outward as possible means all coupling towards to center.
Onion Architecture Layers
This architecture relies heavily on the Dependency Inversion Principle. The UI communicates to business logic through interfaces. It has four layers, as shown in figure 1.
- Domain Entities Layer
- Repository Layer
- Service Layer
- UI (Web/Unit Test) Layer
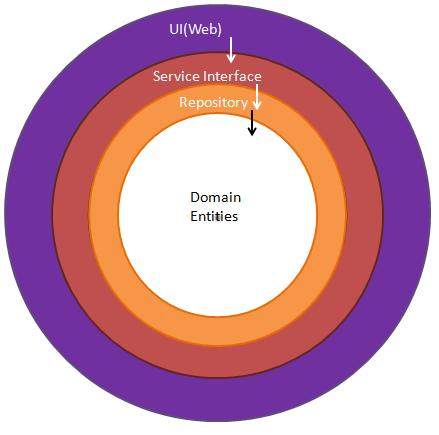
These layers are towards to center. The center part is the Domain entities that represent the business and behavior objects. These layers can vary but the domain entities layer is always part of the center. The other layer defines more behavior of an object. Let’s see each layer one by one.
Domain Entities Layer
It is the center part of the architecture. It holds all application domain objects. If an application is developed with the ORM entity framework then this layer holds POCO classes (Code First) or Edmx (Database First) with entities. These domain entities don't have any dependencies.
Repository Layer
The layer is intended to create an abstraction layer between the Domain entities layer and the Business Logic layer of an application. It is a data access pattern that prompts a more loosely coupled approach to data access. We create a generic repository, which queries the data source for the data, maps the data from the data source to a business entity, and persists changes in the business entity to the data source.
Service Layer
The layer holds interfaces which are used to communicate between the UI layer and repository layer. It holds business logic for an entity so it’s called the business logic layer as well.
UI Layer
It’s the most external layer. It could be the web application, Web API, or Unit Test project. This layer has an implementation of the Dependency Inversion Principle so that the application builds a loosely coupled application. It communicates to the internal layer via interfaces.
Onion Architecture Project Structure
To implement the Onion architecture, we develop an ASP.NET Core application. This application performs CRUD operations on entities. The application holds four projects as per figure 2. Each project represents a layer in onion architecture.
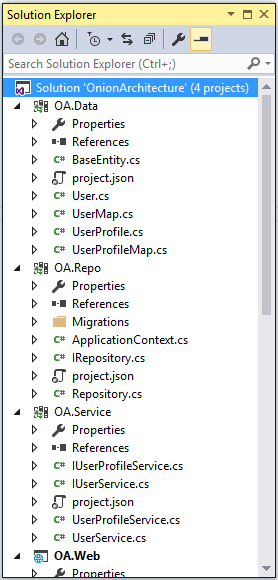
There are four projects in which three are class library projects and one is a web application project. Let’s see each project mapping with onion architecture layers.
OA.Data
It is a class library project. It holds POCO classes along with configuration classes. It represents the Domain Entities layer of the onion architecture. These classes are used to create database tables. It’s a core and central part of the application.
OA.Repo
It is a second class library project. It holds a generic repository class with its interface implementation. It also holds a DbContext class. The Entity Framework Code First data access approach needs to create a data access context class that inherits from the DbContext class. This project represents the Repository layer of the onion architecture.
OA.Service
It is a third class library project. It holds business logic and interfaces. These interfaces communicate between UI and data access logic. As it communicates via interfaces, it builds applications that are loosely coupled. This project represents the Service layer of the onion architecture.
OA.Web
It is an ASP.NET Core Web application in this sample but it could be a Unit Test or Web API project. It is the most external part of an application by which the end-user can interact with the application. It builds loosely coupled applications with in-built dependency injection in ASP.NET Core. It represents the UI layer of the onion architecture.
Implement Onion Architecture
To implement the Onion Architecture in the ASP.NET Core application, create four projects as described in the above section. These four projects represent four layers of the onion architecture. Let’s see each one by one.
Domain Entities Layer
The Entities Domain layer is a core and central part of the architecture. So first, we create "OA.Data" project to implement this layer. This project holds POCO class and fluent API configuration for this POCO classes.
There is an unsupported issue of EF Core 1.0.0-preview2-final with "NETStandard.Library": "1.6.0". Thus, we have changed the target framework to netstandard1.6 > netcoreapp1.0. We modify the project.json file of OA.Data project to implement the Entity Framework Core in this class library project. Thus, the code snippet, mentioned below, is used for the project.json file after modification.
{
"dependencies": {
"Microsoft.EntityFrameworkCore.SqlServer": "1.0.0",
"Microsoft.EntityFrameworkCore.Tools": "1.0.0-preview2-final"
},
"frameworks": {
"netcoreapp1.0": {
"imports": [ "dotnet5.6", "portable-net45+win8" ]
}
},
"tools": {
"Microsoft.EntityFrameworkCore.Tools": "1.0.0-preview2-final"
},
"version": "1.0.0-*"
}
This Application uses the Entity Framework Code First approach, so the project OA.Data contains entities that are required in the application's database. The OA.Data project holds three entities, one is the BaseEntity class that has common properties that will be inherited by each entity. The code snippet, mentioned below is the BaseEntity class.
using System;
using System.Collections.Generic;
using System.Linq;
using System.Threading.Tasks;
namespace OA.Data
{
public class BaseEntity
{
public Int64 Id { get; set; }
public DateTime AddedDate { get; set; }
public DateTime ModifiedDate { get; set; }
public string IPAddress { get; set; }
}
}
There are two more entities, one is User and the another one is UserProfile. Both entities have a one to one relationship, as shown below.
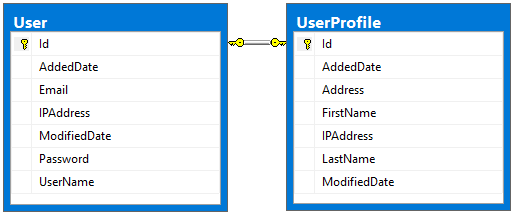
Now, we create an User entity, which is inherited from BaseEntity class. The code snippet, mentioned below is for the User entity.
namespace OA.Data
{
public class User:BaseEntity
{
public string UserName { get; set; }
public string Email { get; set; }
public string Password { get; set; }
public virtual UserProfile UserProfile { get; set; }
}
}
Now, we define the configuration for the User entity that will be used when the database table will be created by the entity. The following is a code snippet for the User mapping entity (UserMap.cs).
using Microsoft.EntityFrameworkCore.Metadata.Builders;
namespace OA.Data
{
public class UserMap
{
public UserMap(EntityTypeBuilder<User> entityBuilder)
{
entityBuilder.HasKey(t => t.Id);
entityBuilder.Property(t => t.Email).IsRequired();
entityBuilder.Property(t => t.Password).IsRequired();
entityBuilder.Property(t => t.Email).IsRequired();
entityBuilder.HasOne(t => t.UserProfile).WithOne(u => u.User).HasForeignKey<UserProfile>(x => x.Id);
}
}
}
Now, we create a UserProfile entity, which inherits from the BaseEntity class. The code snippet, mentioned below is for the UserProfile entity.
namespace OA.Data
{
public class UserProfile:BaseEntity
{
public string FirstName { get; set; }
public string LastName { get; set; }
public string Address { get; set; }
public virtual User User { get; set; }
}
}
Now, we define the configuration for the UserProfile entity that will be used when the database table will be created by the entity. The code snippet is mentioned below for the UserProfile mapping entity (UserProfileMap.cs).
using Microsoft.EntityFrameworkCore.Metadata.Builders;
namespace OA.Data
{
public class UserProfileMap
{
public UserProfileMap(EntityTypeBuilder<UserProfile> entityBuilder)
{
entityBuilder.HasKey(t => t.Id);
entityBuilder.Property(t => t.FirstName).IsRequired();
entityBuilder.Property(t => t.LastName).IsRequired();
entityBuilder.Property(t => t.Address);
}
}
}
Repository Layer
Now we create a second layer of the onion architecture which is a repository layer. To build this layer, we create one more class library project named OA.Repo. This project holds both repository and data, context classes.
The OA.Repo project contains DataContext. The ADO.NET Entity Framework Code First data access approach needs to create a data access context class that inherits from the DbContext class, so we create a context class ApplicationContext (ApplicationContext.cs).
In this class, we override the OnModelCreating() method. This method is called when the model for a context class (ApplicationContext) has been initialized, but before the model has been locked down and used to initialize the context such that the model can be further configured before it is locked down. The following is the code snippet for the context class.
using Microsoft.EntityFrameworkCore;
using OA.Data;
namespace OA.Repo
{
public class ApplicationContext : DbContext
{
public ApplicationContext(DbContextOptions<ApplicationContext> options) : base(options)
{
}
protected override void OnModelCreating(ModelBuilder modelBuilder)
{
base.OnModelCreating(modelBuilder);
new UserMap(modelBuilder.Entity<User>());
new UserProfileMap(modelBuilder.Entity<UserProfile>());
}
}
}
The DbContext must have an instance of DbContextOptions in order to execute. We will use dependency injection, so we pass options via constructor dependency injection. ASP.NET Core is designed from the ground to support and leverage dependency injection. Thus, we create generic repository interface for the entity operations, so that we can develop loosely coupled application. The code snippet, mentioned below is for the IRepository interface.
using OA.Data;
using System.Collections.Generic;
namespace OA.Repo
{
public interface IRepository<T> where T : BaseEntity
{
IEnumerable<T> GetAll();
T Get(long id);
void Insert(T entity);
void Update(T entity);
void Delete(T entity);
void Remove(T entity);
void SaveChanges();
}
}
Now, let's create a repository class to perform database operations on the entity, which implements IRepository. This repository contains a parameterized constructor with a parameter as Context, so when we create an instance of the repository, we pass a context so that the entity has the same context. The code snippet is mentioned below for the Repository class under OA.Repo project.
using Microsoft.EntityFrameworkCore;
using OA.Data;
using System;
using System.Collections.Generic;
using System.Linq;
namespace OA.Repo
{
public class Repository<T> : IRepository<T> where T : BaseEntity
{
private readonly ApplicationContext context;
private DbSet<T> entities;
string errorMessage = string.Empty;
public Repository(ApplicationContext context)
{
this.context = context;
entities = context.Set<T>();
}
public IEnumerable<T> GetAll()
{
return entities.AsEnumerable();
}
public T Get(long id)
{
return entities.SingleOrDefault(s => s.Id == id);
}
public void Insert(T entity)
{
if (entity == null)
{
throw new ArgumentNullException("entity");
}
entities.Add(entity);
context.SaveChanges();
}
public void Update(T entity)
{
if (entity == null)
{
throw new ArgumentNullException("entity");
}
context.SaveChanges();
}
public void Delete(T entity)
{
if (entity == null)
{
throw new ArgumentNullException("entity");
}
entities.Remove(entity);
context.SaveChanges();
}
public void Remove(T entity)
{
if (entity == null)
{
throw new ArgumentNullException("entity");
}
entities.Remove(entity);
}
public void SaveChanges()
{
context.SaveChanges();
}
}
}
We developed entity and context which are required to create a database but we will come back to this after creating the two more projects.
Service Layer
Now we create the third layer of the onion architecture which is a service layer. To build this layer, we create one more class library project named OA.Service. This project holds interfaces and classes which have an implementation of interfaces. This layer is intended to build loosely coupled applications. This layer communicates to both Web applications and repository projects.
We create an interface named IUserService. This interface holds all methods signature which accesses by external layer for the User entity. The following code snippet is for the same (IUserService.cs).
using OA.Data;
using System.Collections.Generic;
namespace OA.Service
{
public interface IUserService
{
IEnumerable<User> GetUsers();
User GetUser(long id);
void InsertUser(User user);
void UpdateUser(User user);
void DeleteUser(long id);
}
}
Now, this IUserService interface implements on a class named UserService. This UserService class holds all the operations for User entity. The following code snippet is for the same(UserService.cs).
using OA.Data;
using OA.Repo;
using System.Collections.Generic;
namespace OA.Service
{
public class UserService:IUserService
{
private IRepository<User> userRepository;
private IRepository<UserProfile> userProfileRepository;
public UserService(IRepository<User> userRepository, IRepository<UserProfile> userProfileRepository)
{
this.userRepository = userRepository;
this.userProfileRepository = userProfileRepository;
}
public IEnumerable<User> GetUsers()
{
return userRepository.GetAll();
}
public User GetUser(long id)
{
return userRepository.Get(id);
}
public void InsertUser(User user)
{
userRepository.Insert(user);
}
public void UpdateUser(User user)
{
userRepository.Update(user);
}
public void DeleteUser(long id)
{
UserProfile userProfile = userProfileRepository.Get(id);
userProfileRepository.Remove(userProfile);
User user = GetUser(id);
userRepository.Remove(user);
userRepository.SaveChanges();
}
}
}
We create one more interface named IUserProfileService. This interface holds method signature which is accessed by the external layer for the UserProfile entity. The following code snippet is for the same (IUserProfileService.cs).
using OA.Data;
namespace OA.Service
{
public interface IUserProfileService
{
UserProfile GetUserProfile(long id);
}
}
Now, this IUserProfileService interface implements on a class named UserProfileService. This UserProfileService class holds the operation for UserProfile entity. The following code snippet is for the same(UserProfileService.cs).
using OA.Data;
using OA.Repo;
namespace OA.Service
{
public class UserProfileService: IUserProfileService
{
private IRepository<UserProfile> userProfileRepository;
public UserProfileService(IRepository<UserProfile> userProfileRepository)
{
this.userProfileRepository = userProfileRepository;
}
public UserProfile GetUserProfile(long id)
{
return userProfileRepository.Get(id);
}
}
}
UI Layer
Now, we create the external layer of the onion architecture which is a UI layer. The end-user interacts with the application by this layer. To build this layer, we create an ASP.NET Core MVC web application named OA.Web. This layer communicates with service layer projects. This project contains the user interface for both user and user profile entities database operations and the controller to do these operations.
As the concept of dependency injection is central to the ASP.NET Core application, we register context, repository, and service to the dependency injection during the application start up. Thus, we register these as a Service in the ConfigureServices method in the StartUp class as per the following code snippet.
public void ConfigureServices(IServiceCollection services)
{
services.AddMvc();
services.AddDbContext<ApplicationContext>(options => options.UseSqlServer(Configuration.GetConnectionString("DefaultConnection")));
services.AddScoped(typeof(IRepository<>), typeof(Repository<>));
services.AddTransient<IUserService, UserService>();
services.AddTransient<IUserProfileService, UserProfileService>();
}
Here, the DefaultConnection is connection string which defined in appsettings.json file as per following code snippet.
{
"ConnectionStrings": {
"DefaultConnection": "Data Source=DESKTOP-RG33QHE;Initial Catalog=OADb;User ID=sa; Password=***"
},
"Logging": {
"IncludeScopes": false,
"LogLevel": {
"Default": "Debug",
"System": "Information",
"Microsoft": "Information"
}
}
}
Now, we have configured settings to create a database, so we have time to create a database, using migration. We must choose the OA.Repo project in the Package Manager console during the performance of the steps, mentioned below.
- Tools -> NuGet Package Manager -> Package Manager Console
- Run PM> Add-Migration MyFirstMigration to scaffold a migration to create the initial set of tables for our model. If we receive an error stating the term `add-migration' is not recognized as the name of a cmdlet, then close and reopen Visual Studio.
- Run PM> Update-Database to apply the new migration to the database. Because our database doesn't exist yet, it will be created for us before the migration is applied.
Create Application User Interface
Now, we proceed to the controller. We create a controller named UserController under the Controllers folder of the application. It has all ActionResult methods for the end-user interface of operations. We create both IUserService and IUserProfile interface instances; then we inject these in the controller's constructor to get its object. The following is a partial code snippet for the UserController in which service interfaces are injected, using constructor dependency injection.
using System;
using System.Collections.Generic;
using System.Linq;
using Microsoft.AspNetCore.Mvc;
using OA.Service;
using OA.Web.Models;
using OA.Data;
using Microsoft.AspNetCore.Http;
namespace OA.Web.Controllers
{
public class UserController : Controller
{
private readonly IUserService userService;
private readonly IUserProfileService userProfileService;
public UserController(IUserService userService, IUserProfileService userProfileService)
{
this.userService = userService;
this.userProfileService = userProfileService;
}
}
}
We can notice that Controller takes both IUserService and IUserProfileService as a constructor parameters. The ASP.NET Core dependency injection will take care of passing an instance of these services into UserController. The controller is developed to handle operations requests for both User and UserProfile entities. Now, let's develop the user interface for the User Listing, Add User, Edit User and Delete User. Let's see each one by one.
User List View
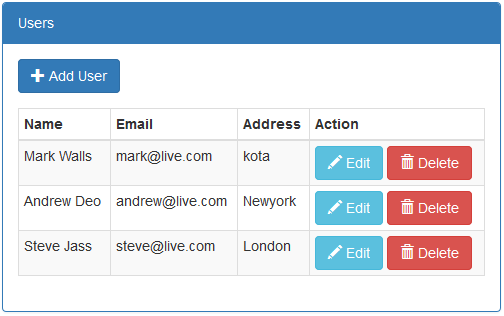
This is the first view when the application is accessed or the entry point of the application is executed. It shows the author listing as in Figure 4. The user data is displayed in a tabular format and on this view, it has linked to add a new user, edit a user and delete a user.
To pass data from controller to view, create named UserViewModel view model, as per the code snippet, mentioned below. This view model is also used for adding or editing a user.
using Microsoft.AspNetCore.Mvc;
using System;
using System.ComponentModel.DataAnnotations;
namespace OA.Web.Models
{
public class UserViewModel
{
[HiddenInput]
public Int64 Id { get; set; }
[Display(Name = "First Name")]
public string FirstName { get; set; }
[Display(Name = "Last Name")]
public string LastName { get; set; }
public string Name { get; set; }
public string Address { get; set; }
[Display(Name = "User Name")]
public string UserName { get; set; }
public string Email { get; set; }
public string Password { get; set; }
[Display(Name = "Added Date")]
public DateTime AddedDate { get; set; }
}
}
Now, we create action method, which returns an index view with the data. The code snippet of Index action method in UserController is mentioned below.
[HttpGet]
public IActionResult Index()
{
List<UserViewModel> model = new List<UserViewModel>();
userService.GetUsers().ToList().ForEach(u =>
{
UserProfile userProfile = userProfileService.GetUserProfile(u.Id);
UserViewModel user = new UserViewModel
{
Id = u.Id,
Name = $"{userProfile.FirstName} {userProfile.LastName}",
Email = u.Email,
Address = userProfile.Address
};
model.Add(user);
});
return View(model);
}
Now, we create an index view, as per the code snippet, mentioned below under the User folder of views.
@model IEnumerable<UserViewModel>
@using OA.Web.Models
@using OA.Web.Code
<div class="top-buffer"></div>
<div class="panel panel-primary">
<div class="panel-heading panel-head">Users</div>
<div class="panel-body">
<div class="btn-group">
<a id="createEditUserModal" data-toggle="modal" asp-action="AddUser" data-target="#modal-action-user" class="btn btn-primary">
<i class="glyphicon glyphicon-plus"></i> Add User
</a>
</div>
<div class="top-buffer"></div>
<table class="table table-bordered table-striped table-condensed">
<thead>
<tr>
<th>Name</th>
<th>Email</th>
<th>Address</th>
<th>Action</th>
</tr>
</thead>
<tbody>
@foreach (var item in Model)
{
<tr>
<td>@Html.DisplayFor(modelItem => item.Name)</td>
<td>@Html.DisplayFor(modelItem => item.Email)</td>
<td>@Html.DisplayFor(modelItem => item.Address)</td>
<td>
<a id="editUserModal" data-toggle="modal" asp-action="EditUser" asp-route-id="@item.Id" data-target="#modal-action-user"
class="btn btn-info">
<i class="glyphicon glyphicon-pencil"></i> Edit
</a>
<a id="deleteUserModal" data-toggle="modal" asp-action="DeleteUser" asp-route-id="@item.Id" data-target="#modal-action-user" class="btn btn-danger">
<i class="glyphicon glyphicon-trash"></i> Delete
</a>
</td>
</tr>
}
</tbody>
</table>
</div>
</div>
@Html.Partial("_Modal", new BootstrapModel { ID = "modal-action-user", AreaLabeledId = "modal-action-user-label", Size = ModalSize.Large })
@section scripts
{
<script src="~/js/user-index.js" asp-append-version="true"></script>
}
It shows all forms in the Bootstrap model popup so create the user - index.js file as per the following code snippet.
(function ($) {
function User() {
var $this = this;
function initilizeModel() {
$("#modal-action-user").on('loaded.bs.modal', function (e) {
}).on('hidden.bs.modal', function (e) {
$(this).removeData('bs.modal');
});
}
$this.init = function () {
initilizeModel();
}
}
$(function () {
var self = new User();
self.init();
})
}(jQuery))
When the application runs and calls the index() action method from UserController with a HttpGet request, it gets all the users listed in the UI, as shown in Figure 4.
Add User
To pass the data from UI to the controller to add a user, use the same view model named UserViewModel. The AuthorController has an action method named AddUser which returns the view to add a user. The code snippet mentioned below is for the same action method for both GET and Post requests.
[HttpGet]
public ActionResult AddUser()
{
UserViewModel model = new UserViewModel();
return PartialView("_AddUser", model);
}
[HttpPost]
public ActionResult AddUser(UserViewModel model)
{
User userEntity = new User
{
UserName = model.UserName,
Email = model.Email,
Password = model.Password,
AddedDate = DateTime.UtcNow,
ModifiedDate = DateTime.UtcNow,
IPAddress = Request.HttpContext.Connection.RemoteIpAddress.ToString(),
UserProfile = new UserProfile
{
FirstName = model.FirstName,
LastName = model.LastName,
Address = model.Address,
AddedDate = DateTime.UtcNow,
ModifiedDate = DateTime.UtcNow,
IPAddress = Request.HttpContext.Connection.RemoteIpAddress.ToString()
}
};
userService.InsertUser(userEntity);
if (userEntity.Id > 0)
{
return RedirectToAction("index");
}
return View(model);
}
The GET request for the AddUser action method returns _AddUser partial view; the code snippet follows under the User folder of views.
@model UserViewModel
@using OA.Web.Models
<form asp-action="AddUser" role="form">
@await Html.PartialAsync("_ModalHeader", new ModalHeader { Heading = "Add User" })
<div class="modal-body form-horizontal">
<div class="row">
<div class="col-lg-6">
<div class="form-group">
<label asp-for="FirstName" class="col-lg-3 col-sm-3 control-label"></label>
<div class="col-lg-6">
<input asp-for="FirstName" class="form-control" />
</div>
</div>
<div class="form-group">
<label asp-for="LastName" class="col-lg-3 col-sm-3 control-label"></label>
<div class="col-lg-6">
<input asp-for="LastName" class="form-control" />
</div>
</div>
<div class="form-group">
<label asp-for="Email" class="col-lg-3 col-sm-3 control-label"></label>
<div class="col-lg-6">
<input asp-for="Email" class="form-control" />
</div>
</div>
</div>
<div class="col-lg-6">
<div class="form-group">
<label asp-for="UserName" class="col-lg-3 col-sm-3 control-label"></label>
<div class="col-lg-6">
<input asp-for="UserName" class="form-control" />
</div>
</div>
<div class="form-group">
<label asp-for="Password" class="col-lg-3 col-sm-3 control-label"></label>
<div class="col-lg-6">
<input type="password" asp-for="Password" class="form-control" />
</div>
</div>
<div class="form-group">
<label asp-for="Address" class="col-lg-3 col-sm-3 control-label"></label>
<div class="col-lg-6">
<input asp-for="Address" class="form-control" />
</div>
</div>
</div>
</div>
</div>
@await Html.PartialAsync("_ModalFooter", new ModalFooter { })
</form>
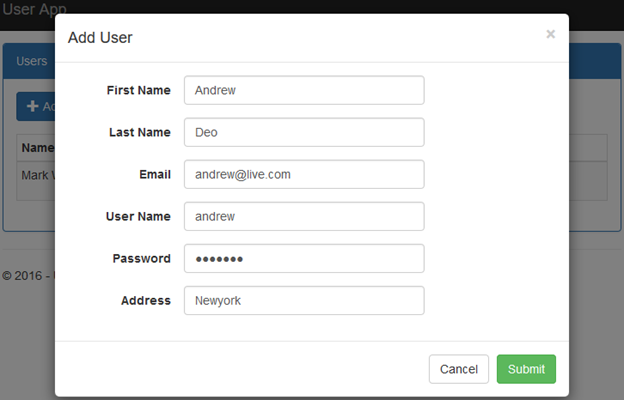
When the application runs and you click on the Add User button, it makes a GET request for the AddUser() action; add a user screen, as shown in Figure 5.
Edit User
To pass the data from UI to a controller to edit a user, use same view model named UserViewModel. The UserController has an action method named EditUser, which returns the view to edit a user. The code snippet mentioned below is for the same action method for both GET and Post requests.
public ActionResult EditUser(int? id)
{
UserViewModel model = new UserViewModel();
if (id.HasValue && id != 0)
{
User userEntity = userService.GetUser(id.Value);
UserProfile userProfileEntity = userProfileService.GetUserProfile(id.Value);
model.FirstName = userProfileEntity.FirstName;
model.LastName = userProfileEntity.LastName;
model.Address = userProfileEntity.Address;
model.Email = userEntity.Email;
}
return PartialView("_EditUser", model);
}
[HttpPost]
public ActionResult EditUser(UserViewModel model)
{
User userEntity = userService.GetUser(model.Id);
userEntity.Email = model.Email;
userEntity.ModifiedDate = DateTime.UtcNow;
userEntity.IPAddress = Request.HttpContext.Connection.RemoteIpAddress.ToString();
UserProfile userProfileEntity = userProfileService.GetUserProfile(model.Id);
userProfileEntity.FirstName = model.FirstName;
userProfileEntity.LastName = model.LastName;
userProfileEntity.Address = model.Address;
userProfileEntity.ModifiedDate = DateTime.UtcNow;
userProfileEntity.IPAddress = Request.HttpContext.Connection.RemoteIpAddress.ToString();
userEntity.UserProfile = userProfileEntity;
userService.UpdateUser(userEntity);
if (userEntity.Id > 0)
{
return RedirectToAction("index");
}
return View(model);
}
The GET request for the EditUser action method returns _EditUser partial view, where code snippet follows under the User folder of views.
@model UserViewModel
@using OA.Web.Models
<form asp-action="EditUser" role="form">
@await Html.PartialAsync("_ModalHeader", new ModalHeader { Heading = "Edit User" })
<div class="modal-body form-horizontal">
<div class="row">
<input asp-for="Id" />
<div class="form-group">
<label asp-for="FirstName" class="col-lg-3 col-sm-3 control-label"></label>
<div class="col-lg-6">
<input asp-for="FirstName" class="form-control" />
</div>
</div>
<div class="form-group">
<label asp-for="LastName" class="col-lg-3 col-sm-3 control-label"></label>
<div class="col-lg-6">
<input asp-for="LastName" class="form-control" />
</div>
</div>
<div class="form-group">
<label asp-for="Email" class="col-lg-3 col-sm-3 control-label"></label>
<div class="col-lg-6">
<input asp-for="Email" class="form-control" />
</div>
</div>
<div class="form-group">
<label asp-for="Address" class="col-lg-3 col-sm-3 control-label"></label>
<div class="col-lg-6">
<input asp-for="Address" class="form-control" />
</div>
</div>
</div>
</div>
@await Html.PartialAsync("_ModalFooter", new ModalFooter { })
</form>
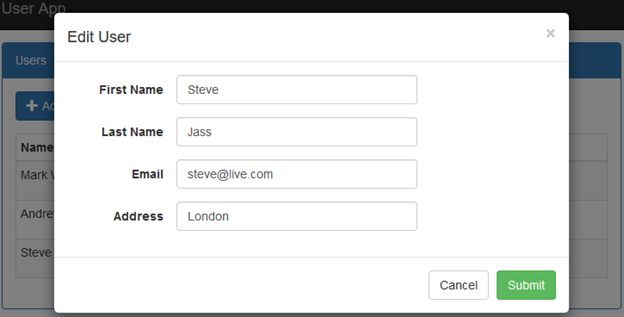
When the application runs and you click on the Edit button in the User listing, it makes a GET request for the EditUser() action, then the edit user screen is shown in Figure 6.
Delete User
The UserController has an action method named DeleteUser, which returns view to delete a user. The code snippet mentioned below is for the same action method for both GET and Post requests.
[HttpGet]
public PartialViewResult DeleteUser(int id)
{
UserProfile userProfile = userProfileService.GetUserProfile(id);
string name = $"{userProfile.FirstName} {userProfile.LastName}";
return PartialView("_DeleteUser", name);
}
[HttpPost]
public ActionResult DeleteUser(long id, FormCollection form)
{
userService.DeleteUser(id);
return RedirectToAction("Index");
}
The GET request for the DeleteUser action method returns _DeleteUser partial View. The code snippet mentioned below is under the User folder of Views.
@using OA.Web.Models
<form asp-action="DeleteUser" role="form">
@Html.Partial("_ModalHeader", new ModalHeader { Heading = "Delete User" })
<div class="modal-body form-horizontal">
Are you want to delete @Model?
</div>
@Html.Partial("_ModalFooter", new ModalFooter { SubmitButtonText = "Delete" })
</form>
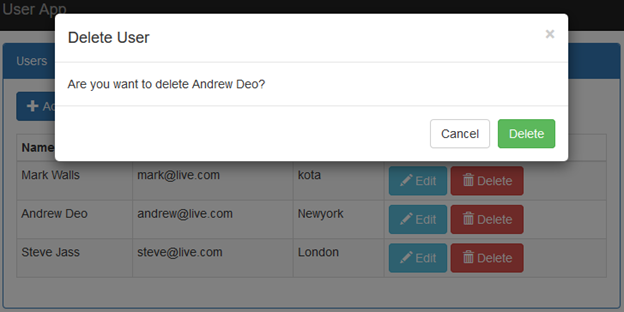
When the application runs and the user clicks on the "Delete" button in the user listing, it makes a GET request for the
DeleteUser() action, then the delete user screen is shown, as below.
Conclusion
This article introduced Onion Architecture in ASP.NET Core, using Entity Framework Core with the "code first" development approach. It’s widely accepted architecture these days. We used Bootstrap, CSS, and JavaScript for the user interface design in this application.