European ASP.NET MVC 4 and MVC 5 Hosting

BLOG about ASP.NET MVC 3, ASP.NET MVC 4, and ASP.NET MVC 5 Hosting and Its Technology - Dedicated to European Windows Hosting Customer

ASP.NET MVC 6 Hosting - HostForLIFE.eu :: HTML Helpers In ASP.NET MVC

clock September 18, 2026 12:31 by author Peter

HTML Assistance
HTML Controls are made by creating HTML markup using HTML Helpers. A method that returns an HTML string is called HTML Helper. HTML Helpers come in three different varieties:

Inline HTML Helpers: These are created by the @helper tag of Razor Syntax. These Helpers can be reused only on the same view.
Built-In HTML Helpers: These HTML Helpers are extension methods on the HtmlHelper class. These are categorized in to three parts:

  • Standard HTML Helpers: These helpers are used to create the most common types of HTML elements.
  • Strongly Typed HTML Helpers: The HTML is generated through Model Class Properties. These helpers work on lambda expression.
  • Templated HTML Helpers: These helpers defines what HTML elements are required to render based on properties of our Model class.

Custom HTML Helpers: You can also create your own custom helper methods by creating an extension method on the HtmlHelper class or by creating static methods within a utility class.

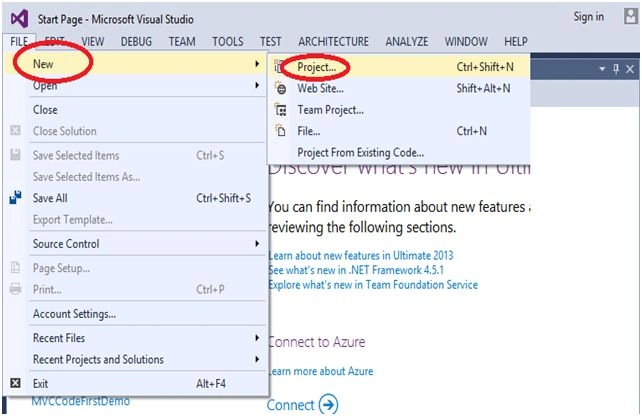
Step 1: Open the Visual Studio and select the “File” menu, New, then Project.
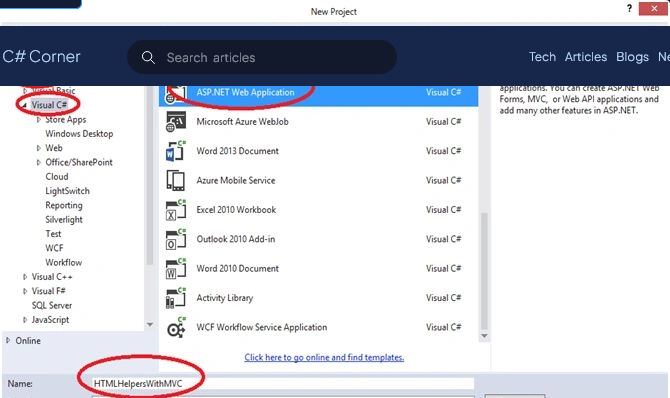
In the following figure select “Templates”, Visual C#, ASP.NET Web Application, and here I gave the name of project as “HTMLHelpersWithMVC.”
You can give the project name as you wish.
And then click on “OK” button.
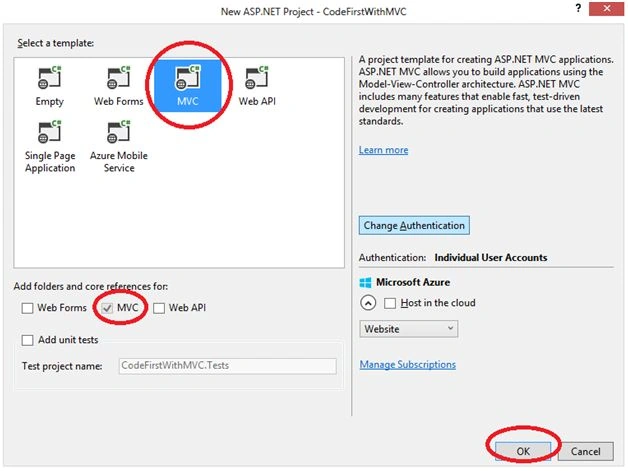
In the following figure as you can see the default MVC will be selected, select MVC and then click “OK” button.
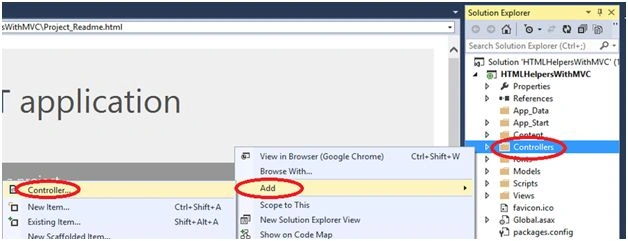
First, I want to create a Controller, so right click on "Controllers" folder and click on “Add”, then click on to Controller, to add a Controller.
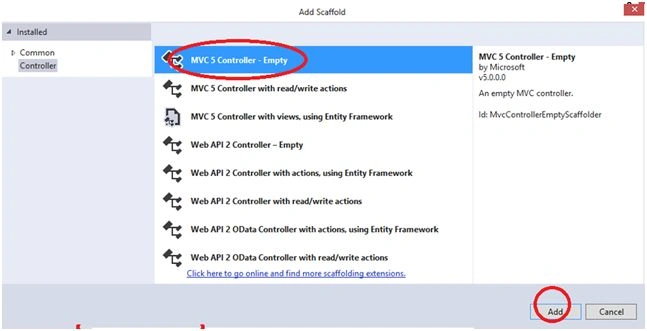
Select the MVC 5 Controller - Empty.
Click on to the “Add” button to add a Controller.
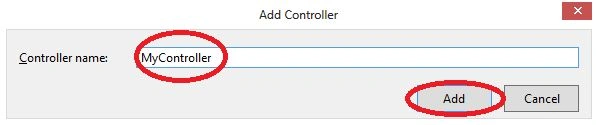
Here I gave the “MyController” name to my Controller.
Click on to the “Add” button.
You can give the Controller name as you wish.
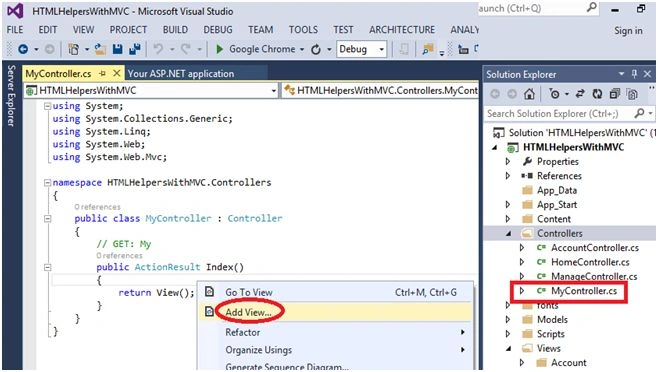
In the “MyController”, right click near return view(); to add a view.
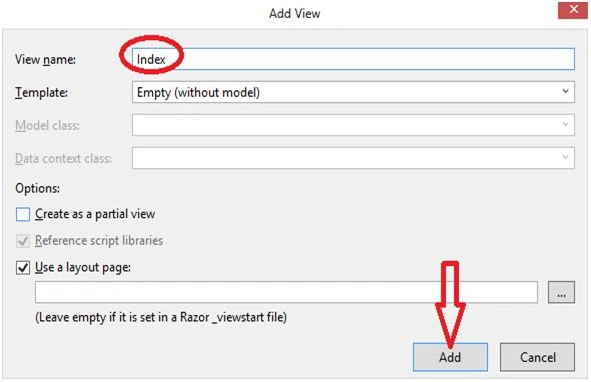
In the following figure, the view name is by default Index, and Templates name is by default Empty (without model).
Click on “Add” button to add a view.
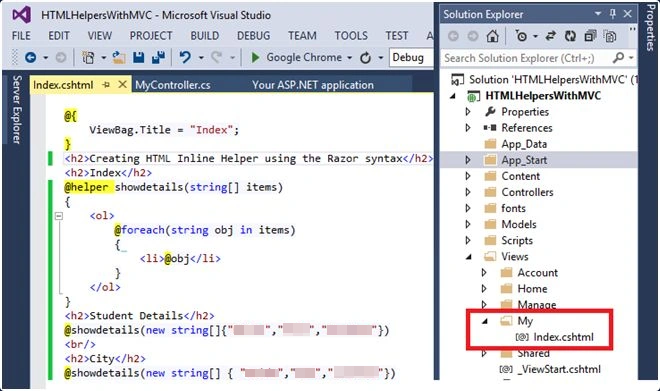
Here is the first of all we have taken in the Inline HTML Helpers example, where we can show the items in Inline format.
Now I’m going to create Built-In Type HTML Helpers:
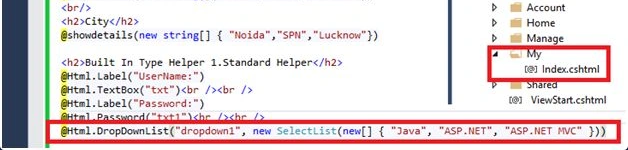
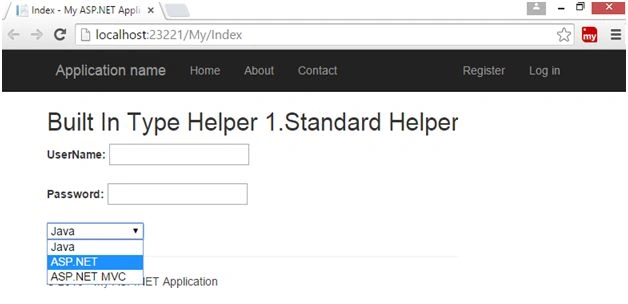
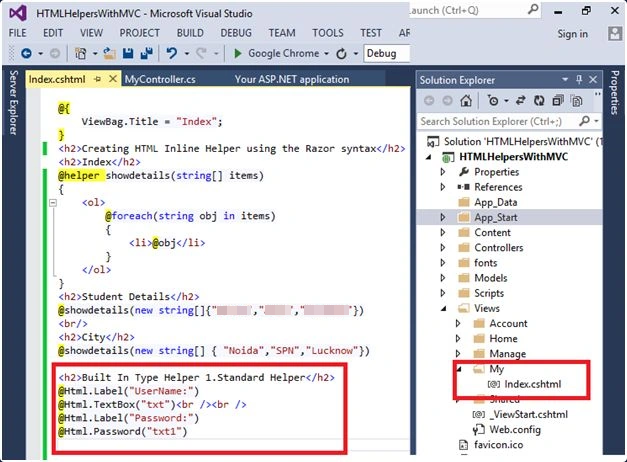
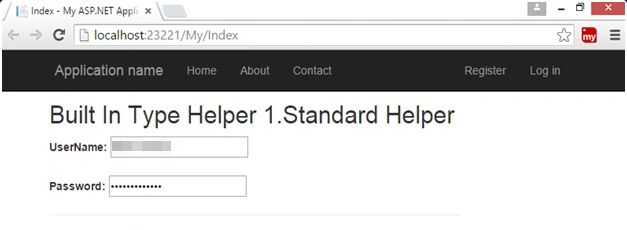
Firstly, I’m using the Standard HTML Helpers like HTML text boxes, Password, Dropdown list, etc.
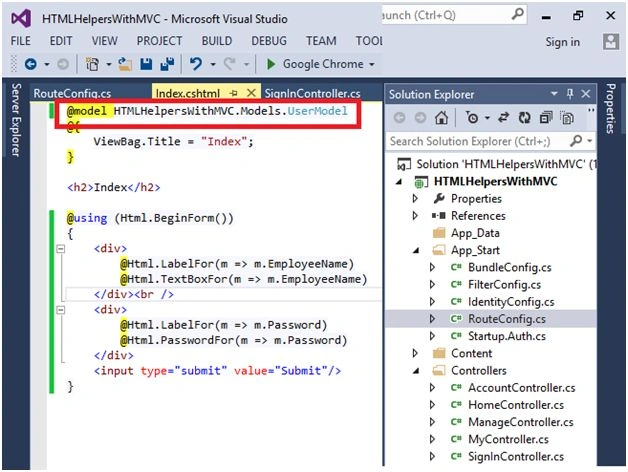
Now I’m going to create Strongly Typed HTML Helpers-
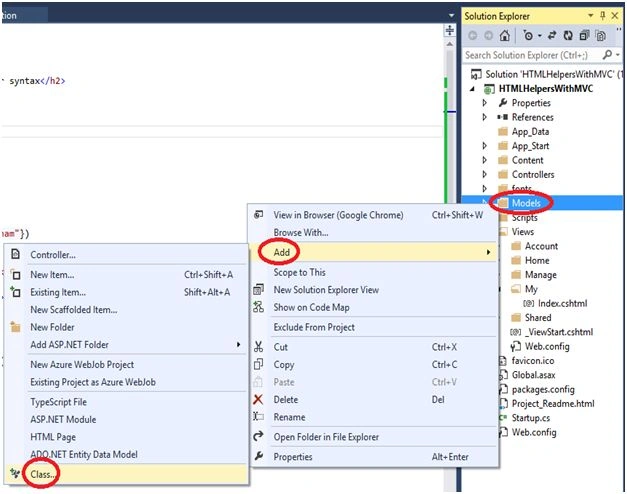
For this I need to create a Model using a Model folder, right click on to Models folder, click on “Add” button and add a class.

Select the class name and give the name of this class “UserModel”.
Click on to the “Add” button.
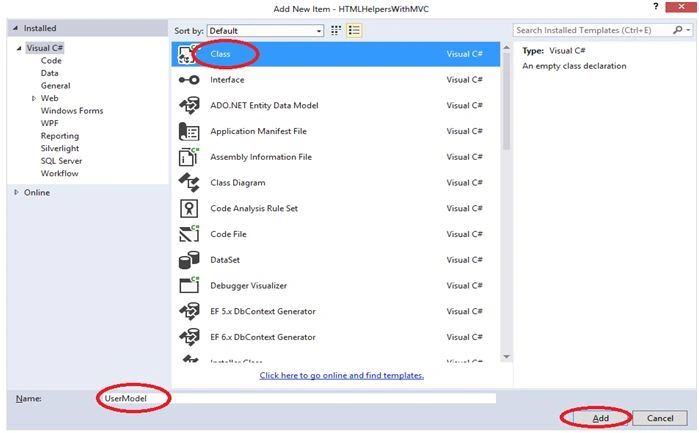
In the Model Class, we have to create two properties, EmployeeName and Password.

In the Model Class, we have to create two properties, EmployeeName and Password.
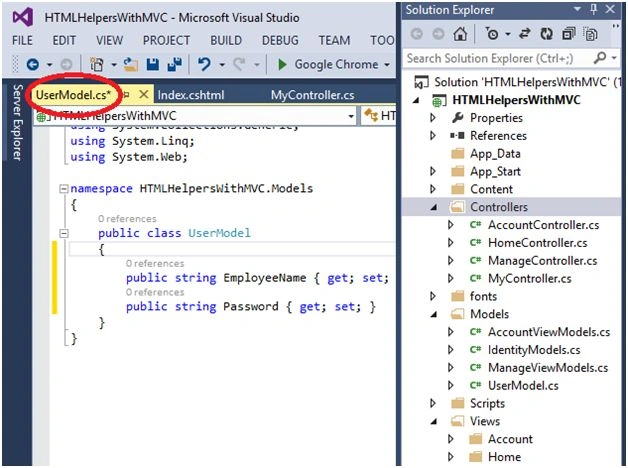
To demonstrate, I want to add a new Controller, so right click on the Controllers folder and click on Add. Click on Controller to add a new Controller.
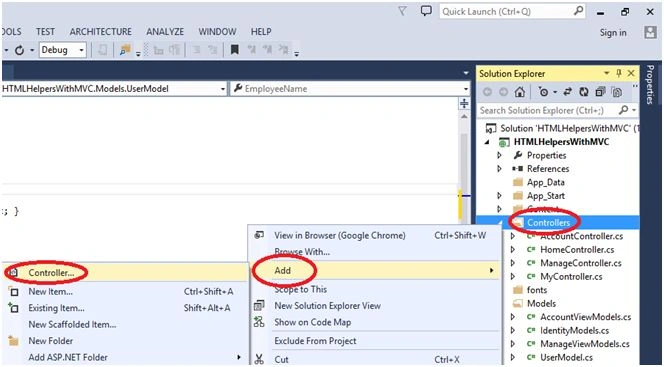
Select the MVC 5 Controller - Empty.
Click on “Add” button to add a Controller.
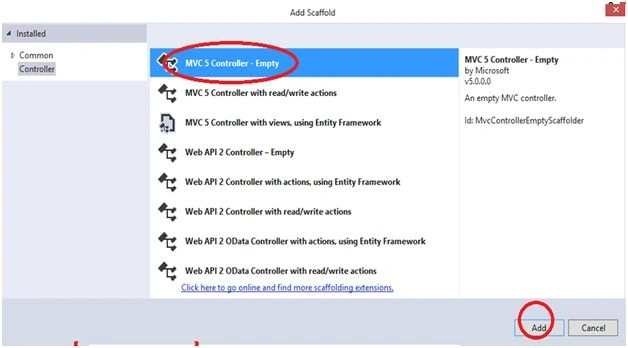
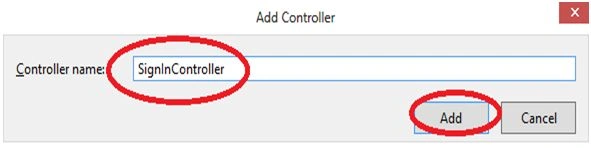
So give the Controller name “SignInController”.
Click on “Add” button.
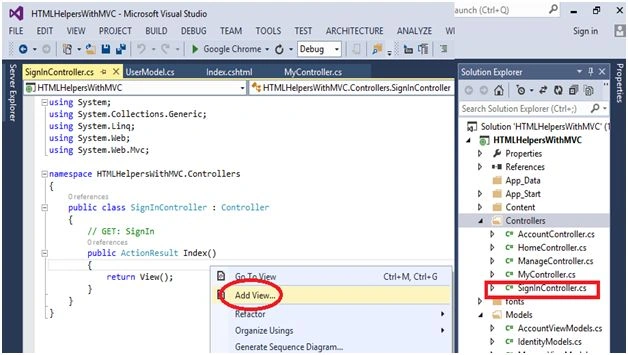
Here we need to create a particular view, right click near return view(); and click “Add View”.

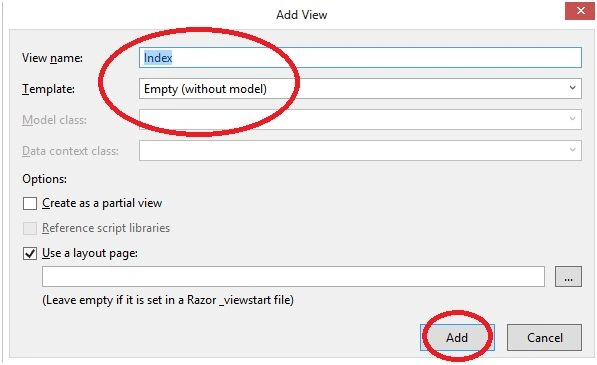
The View name by default is Index and Template name by default is Empty.
Click on Add button.
 

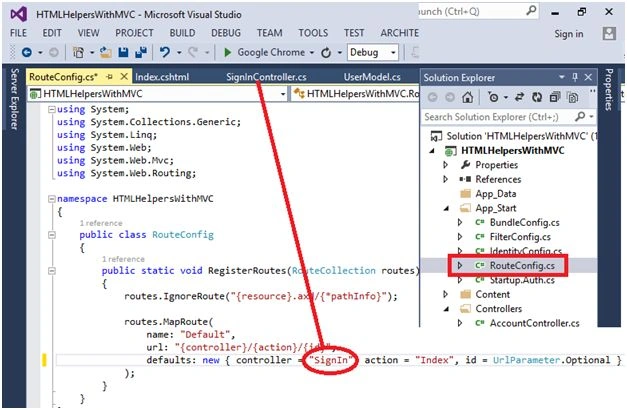
In the RouteConfig.cs, change the Controller name, write the “SignIn”.
Now run the Project, press F5 key to run the project.

Now I’m going to create Templated HTML Helpers-
In MyController.cs, right click near return view(); to add a view.
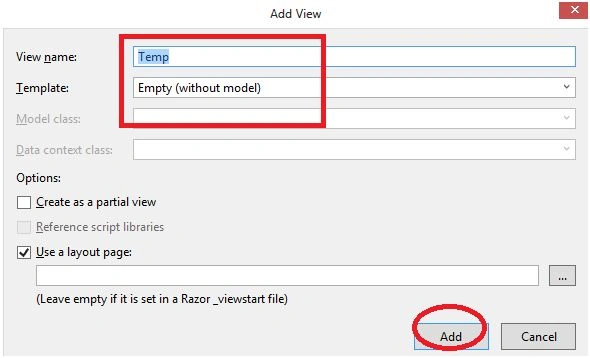
The View Name is by default “Temp” and Template Name is by default Empty.
Click on to the “Add” button.
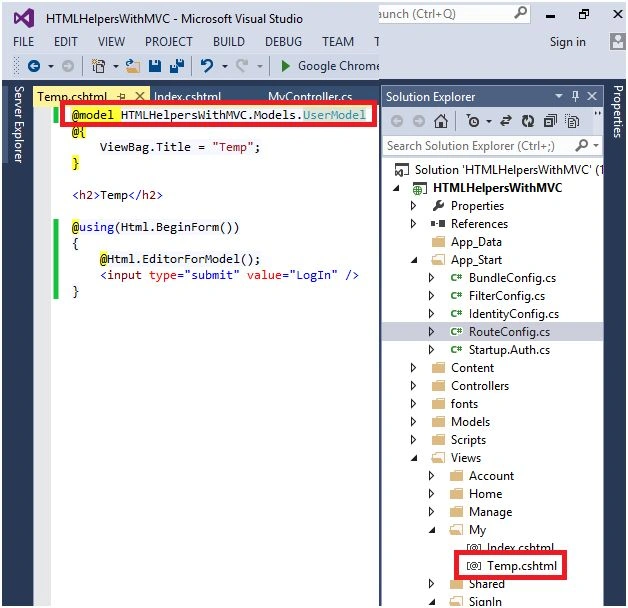
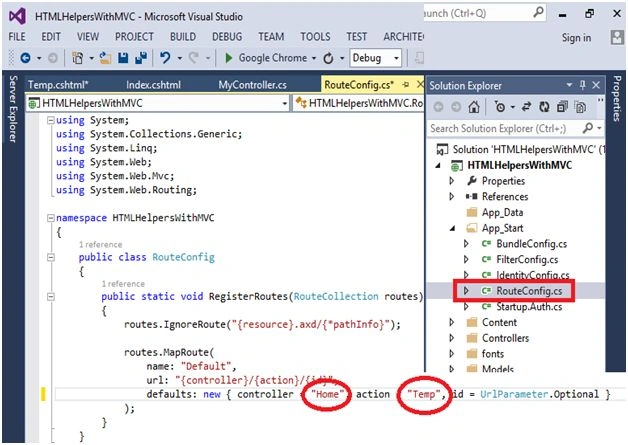
Change the Controller and action name according to the View and Controller name in the RouteConfig.cs file.

Now I’m going to create Custom HTML Helpers:
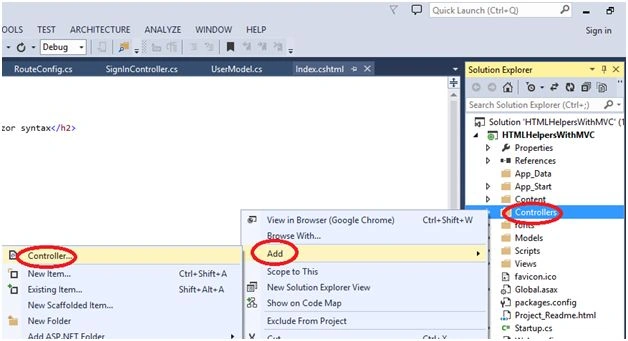
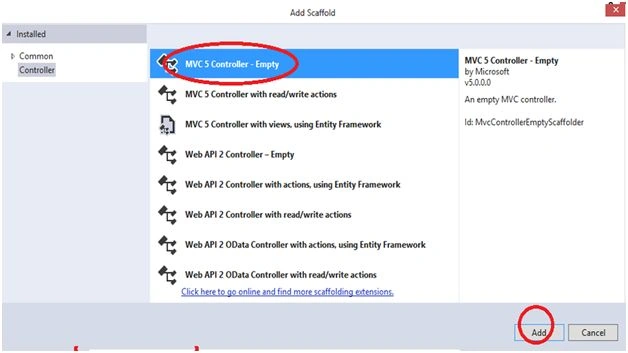
First of all we need to create a Controller, so right click on Controllers folder, select “Add” and then Controller to add a Controller.

Select the MVC 5 Controller - Empty.
Click on “Add” button to add a Controller.

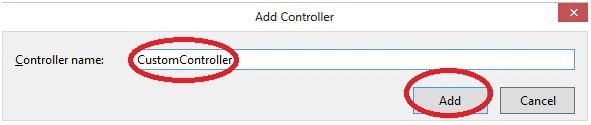
So give the Controller name “CustomController”.
Click on “Add” button.
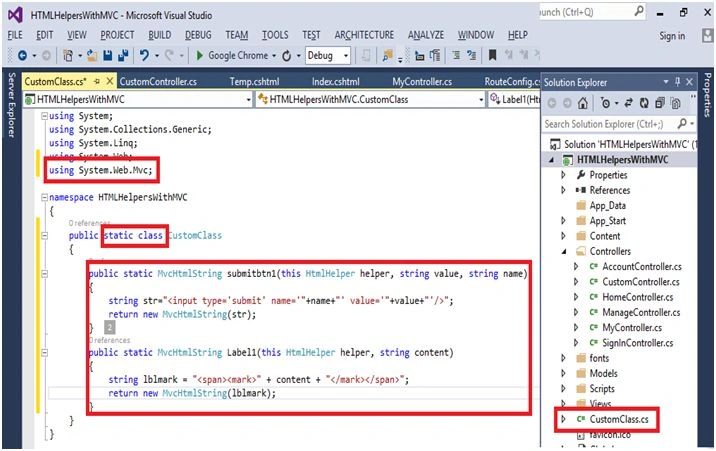
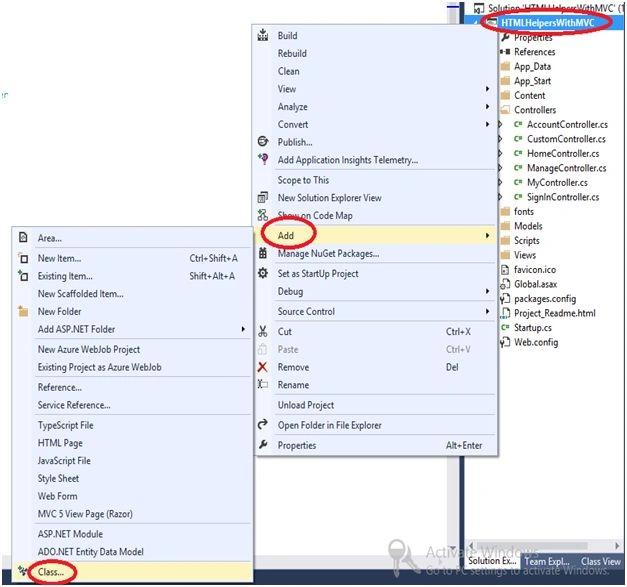
Now we need to create a class.
Right click on to the Project and choose “Add” and then click on “class” to add a Class.

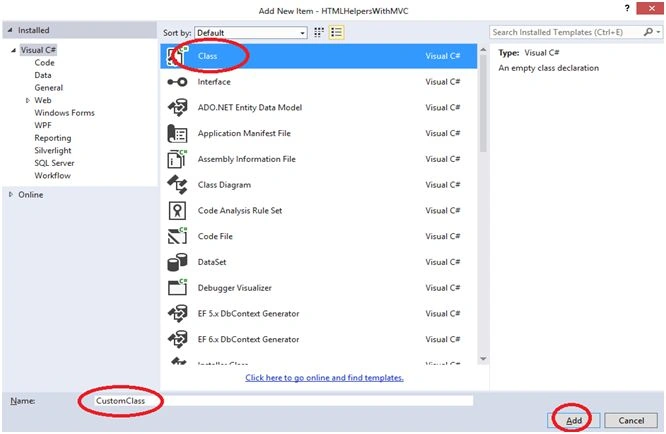
Select the Class and give the “CustomClass” name of the class. 
Click on to the “Add” button.
In the “CustomController.cs”, we need to add a View, so right click near view and click on “Add View”. 
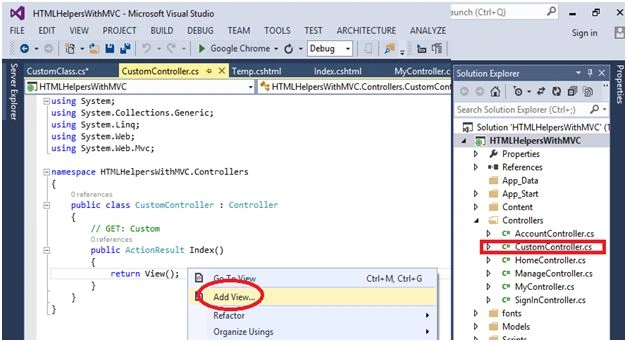

Click on the “Add” button.
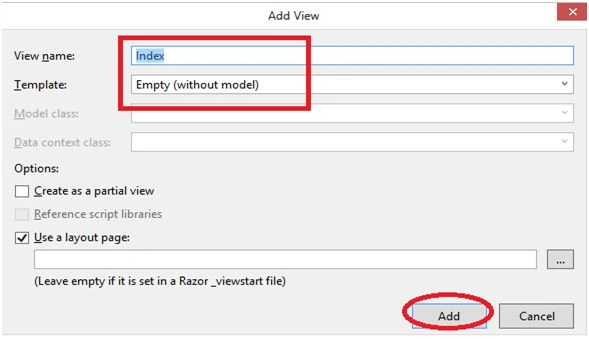
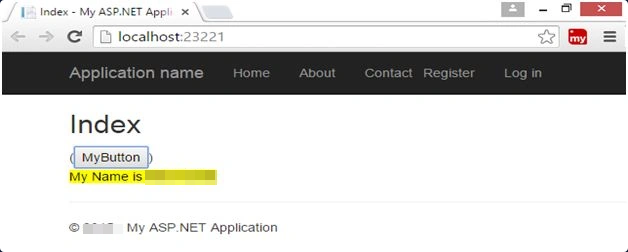
In the view page take a button and a Label.
In the RouteConfig.cs, change the name of Controller and action.
Run the project by pressing F5.
The final output is here.


ASP.NET MVC Hosting - HostForLIFE.eu :: Minification and Bundling in.NET Core MVC

clock September 14, 2026 11:23 by author Peter

In this post, we'll discuss how to include bundling into our current.NET CORE MVC web application. First, you must click on the extension menu to add the Bundler and Minifier extensions to your project, as seen below.


Please restart Visual Studio after adding an extension to ensure it loads.

Now we will add a bundleconfig.json file in our project root by adding JSON file by choosing the add new items option.
[{  
    "outputFileName": "wwwroot/js/site.min.js",  
    "inputFiles": ["wwwroot/lib/jquery/dist/jquery.js", "wwwroot/datatables/js/jquery.dataTables.js", "wwwroot/datatables/js/dataTables.bootstrap.js", "wwwroot/datatables/js/dataTables.bootstrap4.js", "wwwroot/datatables/js/dataTables.dataTables.js", "wwwroot/datatables/js/dataTables.foundation.js", "wwwroot/datatables/js/dataTables.jqueryui.js", "wwwroot/datatables/js/dataTables.material.js", "wwwroot/datatables/js/dataTables.semanticui.js", "wwwroot/datatables/js/dataTables.uikit.js", "wwwroot/datatables/js/datatables-buttons/js/dataTables.buttons.js", "wwwroot/datatables/js/datatables-buttons/js/buttons.colVis.js", "wwwroot/datatables/js/datatables-buttons/js/buttons.flash.js", "wwwroot/datatables/js/datatables-buttons/js/buttons.html5.js", "wwwroot/datatables/js/datatables-buttons/js/buttons.print.js"],  
    "minify": {  
        "enabled": true,  
        "renameLocals": true  
    }  
}, {  
    "outputFileName": "wwwroot/js/site.min.css",  
    "inputFiles": ["wwwroot/datatables/css/jquery.dataTables.css", "wwwroot/datatables/css/dataTables.bootstrap.css", "wwwroot/datatables/css/dataTables.bootstrap4.css", "wwwroot/datatables/css/dataTables.foundation.css", "wwwroot/datatables/css/dataTables.jqueryui.css", "wwwroot/datatables/css/dataTables.material.css", "wwwroot/datatables/css/dataTables.semanticui.css", "wwwroot/datatables/css/dataTables.uikit.css", "wwwroot/datatables/css/buttons.dataTables.min.css"],  
    "minify": {  
        "enabled": true,  
        "renameLocals": true  
    }  
}]  

As you have observed there are many files registered here so now we will add all these files to our wwwroot folder by adding client-side library after right-clicking on wwwroot folder.

Datatables-buttons folder is added separately by using the same procedure. Now let's minify and make the bundle as one file by following below process shown in screen shot.
Open task runner explorer by right-clicking on bundleconfig.json.

In Task runner right-click or double click on update all files; after doing this your output file mentioned in bundleconfig,json will be created in a mentioned path as shown below.

Output will be a file created like this if not please reload your project once.


Add CSS and JS file to your .cshtml page or _layout page.
<script src="~/js/site.min.js" asp-append-version="true"></script>    
 <link href="~/js/site.min.css" rel="stylesheet" asp-append-version="true" />    

That's it now run your page.

Summary
Bundling and Minification helps us to make our script and CSS minified and use that in a bundle.
Hope this helps, and Happy Coding.


ASP.NET MVC Hosting - HostForLIFE.eu :: CRUD Functions in an MVC.NET Core Project

clock September 9, 2026 11:45 by author Peter

CRUD stands for Create, Read, Update, and Delete. These four operations form the foundation of many data-driven web applications. In this article, we will build a simple ASP.NET Core MVC application that performs CRUD operations for a Students entity. We will create the project, define the model, configure the application, create a controller, and test the CRUD endpoints.

The example uses an in-memory collection to keep the implementation simple and focused on understanding the CRUD flow. A SQL Server or another database can be introduced later when persistent data storage is required.

Prerequisites
Before we begin, ensure you have the following:

  • Visual Studio 2022 or later.
  • .NET SDK.
  • Basic knowledge of C# and ASP.NET Core MVC.
  • Basic understanding of HTTP methods such as GET, POST, PUT, and DELETE.

Step 1: Setting Up the ASP.NET Core Project

  • Open Visual Studio.
  • Select Create a new project.
  • Search for ASP.NET Core Web API.
  • Select the ASP.NET Core Web API template and click Next.
  • Configure the project name and location.
  • Select the required .NET version.
  • Keep the default OpenAPI support enabled if you want to test the API through Swagger.
  • Click Create.

For this example, the project is named:
CRUDOperationAPI

Although the original example refers to an MVC project, the supplied StudentsController inherits from ControllerBase and uses [ApiController], which makes it an ASP.NET Core Web API controller. Therefore, this implementation follows the Web API approach.

Step 2: Configure the Project

For a basic CRUD API, the default project configuration is sufficient.

A typical Program.cs file looks like this:
var builder = WebApplication.CreateBuilder(args);

builder.Services.AddControllers();

builder.Services.AddEndpointsApiExplorer();
builder.Services.AddSwaggerGen();

var app = builder.Build();

if (app.Environment.IsDevelopment())
{
    app.UseSwagger();
    app.UseSwaggerUI();
}

app.UseHttpsRedirection();

app.UseAuthorization();

app.MapControllers();

app.Run();


Here:

  • AddControllers() registers controller support.
  • AddEndpointsApiExplorer() enables API endpoint discovery.
  • AddSwaggerGen() generates OpenAPI documentation.
  • UseSwagger() and UseSwaggerUI() provide a browser-based interface for testing the API.
  • MapControllers() maps controller routes.

Step 3: Create the Student Model
Create a Models folder in the project.
Inside the folder, create a Students.cs class:
namespace CRUDOperationAPI.Models
{
    public class Students
    {
        public int Id { get; set; }

        public string Name { get; set; } = string.Empty;

        public int Age { get; set; }

        public string Address { get; set; } = string.Empty;
    }
}

This class represents the data that our CRUD API will manage.

The properties are:

Property

Description

Id

Unique identifier for the student

Name

Student's name

Age

Student's age

Address

Student's address

Step 4: Create the Students Controller
Create a StudentsController.cs file inside the Controllers folder.

The controller will expose endpoints for all four CRUD operations.
using CRUDOperationAPI.Models;
using Microsoft.AspNetCore.Mvc;

namespace CRUDOperationAPI.Controllers
{
    [Route("api/[controller]")]
    [ApiController]
    public class StudentsController : ControllerBase
    {
        private static readonly List<Students> students = new()
        {
            new Students
            {
                Id = 1,
                Name = "Capt. Peter",
                Age = 24,
                Address = "London"
            },
            new Students
            {
                Id = 2,
                Name = "Capt. Scott",
                Age = 24,
                Address = "Leeds"
            }
        };

        [HttpGet]
        public ActionResult<List<Students>> GetAllStudents()
        {
            return Ok(students);
        }

        [HttpGet("{id}")]
        public ActionResult<Students> GetStudentById(int id)
        {
            var student = students.FirstOrDefault(s => s.Id == id);

            if (student == null)
            {
                return NotFound();
            }

            return Ok(student);
        }

        [HttpPost]
        public ActionResult<Students> CreateStudent([FromBody] Students student)
        {
            student.Id = students.Count == 0
                ? 1
                : students.Max(s => s.Id) + 1;

            students.Add(student);

            return CreatedAtAction(
                nameof(GetStudentById),
                new { id = student.Id },
                student);
        }

        [HttpPut("{id}")]
        public ActionResult UpdateStudent(
            int id,
            [FromBody] Students updatedStudent)
        {
            var student = students.FirstOrDefault(s => s.Id == id);

            if (student == null)
            {
                return NotFound();
            }

            student.Name = updatedStudent.Name;
            student.Age = updatedStudent.Age;
            student.Address = updatedStudent.Address;

            return NoContent();
        }

        [HttpDelete("{id}")]
        public ActionResult DeleteStudent(int id)
        {
            var student = students.FirstOrDefault(s => s.Id == id);

            if (student == null)
            {
                return NotFound();
            }

            students.Remove(student);

            return NoContent();
        }
    }
}


The controller uses a static List<Students> as temporary storage. This means the data exists only while the application is running.

Step 5: Understand the CRUD Endpoints

The controller exposes five HTTP endpoints.

HTTP Method

Endpoint

Operation

GET

/api/students

Get all students

GET

/api/students/{id}

Get a student by ID

POST

/api/students

Create a student

PUT

/api/students/{id}

Update a student

DELETE

/api/students/{id}

Delete a student

These endpoints represent the standard CRUD workflow.

Step 6: Test the Read Operation
Run the application using F5 or the Start button in Visual Studio. If Swagger is enabled, the application will open the Swagger interface.

Expand:
GET /api/Students

Click Try it out, followed by Execute.

The response will contain the existing students:
[
  {
    "id": 1,
    "name": "Capt. Tim",
    "age": 24,
    "address": "Liverpool"
  },
  {
    "id": 2,
    "name": "Capt. Scott",
    "age": 24,
    "address": "Leeds"
  }
]

This demonstrates the Read operation.

Step 7: Get a Student by ID

To retrieve a specific student, use:
GET /api/Students/1

The API searches the collection for a matching ID.
var student = students.FirstOrDefault(s => s.Id == id);

if (student == null)
{
    return NotFound();
}

return Ok(student);


For ID 1, the response is:
{
  "id": 1,
  "name": "Capt. Tim",
  "age": 24,
  "address": "Liverpool"
}


If the requested student does not exist, the API returns an HTTP 404 Not Found response.

Step 8: Create a New Student
To create a student, use:
POST /api/Students

Send the following JSON request body:
{
  "name": "David",
  "age": 22,
  "address": "London"
}


The controller assigns a new ID and adds the student to the collection.
student.Id = students.Count == 0
    ? 1
    : students.Max(s => s.Id) + 1;

students.Add(student);


The API returns 201 Created along with the newly created resource.

Example response:
{
  "id": 3,
  "name": "David",
  "age": 22,
  "address": "London"
}

This demonstrates the Create operation.

Step 9: Update a Student

To update an existing student, use:
PUT /api/Students/3

Send the updated data:
{
  "name": "Peter",
  "age": 23,
  "address": "London"
}

The controller finds the student and updates its properties.
student.Name = updatedStudent.Name;
student.Age = updatedStudent.Age;
student.Address = updatedStudent.Address;

If the operation succeeds, the API returns:
204 No Content

This demonstrates the Update operation.

Step 10: Delete a Student

To delete a student, use:
DELETE /api/Students/3

The controller finds the student and removes it from the collection.
students.Remove(student);

If the deletion succeeds, the API returns:
204 No Content

If the student does not exist, the API returns:
404 Not Found

This demonstrates the Delete operation.

Step 11: Validate the CRUD Flow

The complete CRUD flow can now be tested as follows:
Create
  |
  v
POST /api/Students
  |
  v
Read
  |
  v
GET /api/Students
  |
  v
Update
  |
  v
PUT /api/Students/{id}
  |
  v
Read Updated Data
  |
  v
GET /api/Students/{id}
  |
  v
Delete
  |
  v
DELETE /api/Students/{id}


This provides a simple end-to-end test of the API.

Step 12: Customize the Controller

You may want to customize the controller logic according to your application's requirements.

For example, validation can be added before creating a student:
[HttpPost]
public ActionResult<Students> CreateStudent([FromBody] Students student)
{
    if (string.IsNullOrWhiteSpace(student.Name))
    {
        return BadRequest("Student name is required.");
    }

    if (student.Age <= 0)
    {
        return BadRequest("Age must be greater than zero.");
    }

    student.Id = students.Count == 0
        ? 1
        : students.Max(s => s.Id) + 1;

    students.Add(student);

    return CreatedAtAction(
        nameof(GetStudentById),
        new { id = student.Id },
        student);
}


This prevents invalid data from being added to the collection.

For a production application, validation would generally be implemented using model validation attributes or a dedicated validation approach rather than keeping all validation logic directly inside controller actions.
Step 13: Move from In-Memory Data to SQL Server

The example uses an in-memory list so that the CRUD concepts can be demonstrated without introducing database configuration.

For a real application, the data would normally be stored in a database such as SQL Server.

A common architecture would be:

Client
   |
   v
ASP.NET Core Controller
   |
   v
Service Layer
   |
   v
Repository / Data Access
   |
   v
SQL Server

Entity Framework Core can be used to connect the ASP.NET Core application to SQL Server.

For example, the required packages can be installed using the .NET CLI:
dotnet add package Microsoft.EntityFrameworkCore.SqlServer
dotnet add package Microsoft.EntityFrameworkCore.Tools


The exact package versions should match the .NET and Entity Framework Core versions used by the project.

Once a database is introduced, the static list can be replaced with an DbContext and database queries.

Why the Original Package Configuration Needs Attention?

The original implementation listed packages such as:
Microsoft.ASPNetCore
Microsoft.SqlServer
Microsoft.Data.SqlClient


These are not the appropriate set of packages for the MVC/API CRUD implementation shown in the article.

If SQL Server is being used with Entity Framework Core, the application should use the appropriate Entity Framework Core SQL Server provider, such as:
Microsoft.EntityFrameworkCore.SqlServer

Microsoft.Data.SqlClient is the SQL Server ADO.NET provider and is useful when directly working with SQL Server through ADO.NET, but it does not replace the Entity Framework Core SQL Server provider.
MVC Views vs Web API Controllers

There is an important distinction between the two approaches.

An ASP.NET Core MVC application commonly uses:
Controller
    |
    v
Razor Views
    |
    v
HTML UI

A Web API application commonly uses:
Client
    |
    v
API Controller
    |
    v
JSON Response


The supplied StudentsController uses:
[ApiController]
public class StudentsController : ControllerBase


Therefore, it is a Web API controller rather than an MVC controller that returns Razor Views.
If the goal is to create an MVC application with Create, Edit, Details, and Delete pages, the controller would instead work with Razor Views and a database context.

Common Mistakes to Avoid
Mixing MVC and Web API Terminology

An MVC controller and an API controller serve different purposes. Make sure the project template, controller base class, routes, and expected output match the application's architecture.

Assuming In-Memory Data Is Persistent
The static list is only temporary storage. Restarting the application resets the data.

Not Validating Input
APIs should validate incoming data before storing or processing it.

Exposing Internal Exception Details
Production APIs should avoid returning sensitive exception information directly to clients.

Using Manual ID Generation in Production
The example generates IDs from the current collection because it uses an in-memory list. A database should normally be responsible for generating unique primary keys.

Conclusion
CRUD operations are fundamental to most data-driven applications. ASP.NET Core provides a straightforward way to implement Create, Read, Update, and Delete operations through HTTP endpoints. In this example, we created a students model and implemented GET, POST, PUT, and DELETE operations using an ASP.NET Core Web API controller. We also tested the endpoints and reviewed how the same application can be extended with SQL Server and Entity Framework Core for persistent data storage.

The example is intentionally simple so that the CRUD workflow is easy to understand. In a production application, the next steps would typically include database persistence, model validation, authentication and authorization, service and repository layers, logging, error handling, and automated testing.


ASP.NET MVC Hosting - HostForLIFE.eu :: URL Creation Fundamentals In MVC

clock September 2, 2026 11:41 by author Peter

Let's start with MVC foundations. There are two ways to create a URL in the MVC framework: ActionLink and Raw HTML. In this tutorial, we will examine several methods of building URLs in MVC as well as other essential ideas of MVC.

Question - Which approach is best for URL creation?
Answer
Action LInk in the background queries the routing engine whenever the URL associated with the given controllers ACTION. Sometimes we do have Custom URLs associated with an action, and we require to change that URL in future. For this scenario actionLink will pick up the latest URL, you don't need to make any changes.

On the other hand, if you are using raw HTML, you need to update your links when URLs changed.

As a good programmer, we should always avoid changing URLs as URLs are the public contract of your app and can be referenced by other apps, and many times users bookmark the URLs. If you change them, all these bookmarks and references will be broken.

In the end, the decision is up to the programmer's choice, no hard and fast rule here.

Again, the simplest way is using raw HTML

1: Raw HTML
Example,
<a href = "Courses/Index"> View Course</a>

2: ActionLink
Below is the example of using ActionLink for URL creation.
@HTML.ActionLink("View Courses","Index","Courses")

If the targeted action needs a parameter we can make use of an anonymous object to pass the parameter values.
@HTML.ActionLink("View Courses","Index","Courses", new {id = 1})

This will generate a link as - courses/index/1

This method doesn't generate the link for a reason, we need to pass another argument to ActionLink. This argument can be null or an anonymous object to render any additional HTML attribute.
@HTML.ActionLink("View Courses","Index","Courses", new {id = 1}, null)

Type Helper Method
ViewResult View()
PartialViewResult PartialView()
RedirectResult Redirect()
ContentResult Content()
JsonResult Json()
RedirectToRouteResult RedirectToAction()
FileResult File()
HttpNotFoundResult HttpNotFound()
EmptyResult  

Passing Data to views in MVC
We should avoid passing data using ViewData and ViewBag as these methods are fragile and need a lot of casting which makes code ugly. Instead, we can pass model or viewModel directly to view.
return View(Course);

Razor Views
@if(condition)
{
    // c# or HTML code
}

@foreach(...)
{
}

We can render a class or any attribute conditionally as follows,
@{
    var className=Model.Movies.Count >3 ? "Popular" : null;
}
<h2 class = "@className">...</h2>


Partial View
@Html.Partial("_NavBar")

Types of Routing in MVC
1. Convention based Routing
Here we can specify the routing in RouteConfig.cs file and mention the Controller, action which needs to be invoked using mapRoute method of routes collection.

2. Attribute based Routing
Here we can apply route by decorating the action method with the Route keyword followed by the path.

Authentication in MVC
Use [authorize] keyword. Apply it to action, controller or globally (in FilterConfig.cs)
Enabling Social Login in MVC

Step 1
Enable SSL: Select project, press F4, set SSL enabled to true.

Step 2

Copy SSL URL, select the project, go to properties, in the Web tab, set startup URL.

Step 3
Apply RequireSSL filter globally in FilterConfig.cs file.

Step 4

Register your app with external authentication providers to get secret key/secret. In AppStart.cs/Startup.Auth.cs, add corresponding providers and your key/secret.

Summary
In this article, we explored different ways of URL creation in MVC and different fundamental concepts of MVC. I hope you liked the article. Until Next Time - Happy Learning.


About HostForLIFE.eu

HostForLIFE.eu is European Windows Hosting Provider which focuses on Windows Platform only. We deliver on-demand hosting solutions including Shared hosting, Reseller Hosting, Cloud Hosting, Dedicated Servers, and IT as a Service for companies of all sizes.

We have offered the latest Windows 2016 Hosting, ASP.NET Core 2.2.1 Hosting, ASP.NET MVC 6 Hosting and SQL 2017 Hosting.


Month List

Tag cloud

Sign in