European ASP.NET MVC 4 and MVC 5 Hosting

BLOG about ASP.NET MVC 3, ASP.NET MVC 4, and ASP.NET MVC 5 Hosting and Its Technology - Dedicated to European Windows Hosting Customer

ASP.NET MVC Hosting - HostForLIFE.eu :: URL Routing Of ASP.NET MVC And ASP.NET Web Forms

clock August 18, 2026 13:47 by author Peter

Important Points Regarding ASP.NET MVC
The program ASP.NET MVC is open-source. The ASP.NET MVC is a web application framework developed by Microsoft, which implements the model–view–controller pattern. Partial Views in ASP.NET MVC allow for code reuse. Views and logic are stored independently in ASP.NET MVC. Razor is the default syntax used by ASP.NET MVC.HTML aids are available in ASP.NET MVC.ASP.NET MVC adheres to the MVC (approach, View, Controller) pattern-based development approach and is lightweight. View state is not supported by ASP.NET MVC.


Key Notes To ASP.NET Web Form
ASP.NET Web Form is not Open Source.ASP.NET Web Form follows a traditional event-driven development model.ASP.NET Web Form has server controls.ASP.NET Web Form supports view state for state management at client side.ASP.NET Web Form follows Web Forms Syntax.In ASP.NET Web Form, Web Forms(ASPX) i.e. views are tightly coupled to Code behind(ASPX.CS) i.e. logic. ASP.NET Web Form has User Controls for code re-usability.

Url Path Note Of ASP.NET MVC
ASP.NET MVC has route-based URLs which means URLs are divided into controllers and actions and moreover it is based on controller not on physical files.

Url Path Note Of ASP.NET Web Form
ASP.NET Web Form has file-based URLs means file name exist in the URLs must have its physical existence.

Description
Here I built one ASP.NET MVC and ASP.NET web form application.That will show you what the URL Path Concept Between ASP.NET MVC and ASP.NET Web Forms.
 
Steps to be followed For ASP.NET MVC

Step 1
Create a Mvc Project named "MvcWeb".

Step 2
Create class file in Models Folder named "Student.cs".

Code Ref
    using System;  
    using System.Collections.Generic;  
    using System.Linq;  
    using System.Web;  
    using System.ComponentModel.DataAnnotations;  
      
    namespace MvcWeb.Models  
    {  
        public class Student  
        {  
            [Display(Name = "Name")]  
            public string StudentName { get; set; }  
        }  
    } 

Code Description
Add one variable or entity named "StudentName". To display the result in the page associate with label htmlhelper.
public string StudentName { get; set; } 

We can control the display of data in a view using display attributes that are found in System.ComponentModel.DataAnnotations namespace.
    [Display(Name = "Name")]  

Step 3

Create a controller class file named "HomeController.cs".

Code Ref
    using System;  
    using System.Collections.Generic;  
    using System.Linq;  
    using System.Web;  
    using System.Web.Mvc;  
    using MvcWeb.Models;  
      
    namespace MvcWeb.Controllers  
    {  
        public class HomeController : Controller  
        {  
            //  
            // GET: /Home/  
      
            public ActionResult HFL()  
            {  
                return View();  
            }  
      
        }  
    } 

Code Description
Here I created one controller action method named "HFL()". Add the namespace reference on Model class that is,
    using MvcWeb.Models;  

Step 4
Create one view named "HFL.cshtml" in Views/Home Folder as the same name in controller action method.

Code Ref
    @model MvcWeb.Models.Student  
    @{  
        ViewBag.Title = "Satyaprakash";  
    }  
    <h2 style="background-color: Yellow; color: Blue; text-align: center; font-style: oblique">  
        Satyaprakash's Mvc Path Concept</h2>  
    <fieldset>  
        <legend style="font-family: Arial Black; color: blue">Student Name</legend>  
        @Html.LabelFor(m => m.StudentName, "Satyaprakash Samantaray")  
    </fieldset>  
      
      
    <footer>    
          <p style="background-color: Yellow; font-weight: bold; color:blue; text-align: center; font-style: oblique">© @DateTime.Now.ToLocalTime()</p> @*Add Date Time*@    
    </footer> 


Code Description
Here I added namespace in view to access properties of student model class file. 
    @model MvcWeb.Models.Student 

LabelFor helper method is a strongly typed extension method. It generates a html label element for the model object property specified using a lambda expression. LabelFor() method Signature: MvcHtmlString LabelFor(<Expression<Func<TModel,TValue>> expression) .
    @Html.LabelFor(m => m.StudentName, "Peter") 

We have specified the StudentName property of Student model using lambda expression in the LabelFor() method. So, it generates <label> and sets label text to the same as StudentName property name. Here labelfor htmlhelper will show the name "Satyaprakash Samantaray". 
 
Step 5
Set as start page In mvc.

Go to this file path "MvcWeb\App_Start\RouteConfig.cs". Open the file called "RouteConfig.cs".

Code Ref
    using System;  
    using System.Collections.Generic;  
    using System.Linq;  
    using System.Web;  
    using System.Web.Mvc;  
    using System.Web.Routing;  
      
    namespace MvcWeb  
    {  
        public class RouteConfig  
        {  
            public static void RegisterRoutes(RouteCollection routes)  
            {  
                routes.IgnoreRoute("{resource}.axd/{*pathInfo}");  
      
                routes.MapRoute(  
                    name: "Default",  
                    url: "{controller}/{action}/{id}",  
                    defaults: new { controller = "Home", action = "HFL", id = UrlParameter.Optional }  
                );  
            }  
        }  
    } 


Code Description
So here I set start page :
    defaults: new { controller = "Home", action = "HFL", id = UrlParameter.Optional } 

 At page load time the controller Home and action method name HFL of home controller will be loaded.

OUTPUT OF MVC URL
http://localhost:1064/home/HFL

Steps to be followed For ASP.NET Webform

Step1
Create a ASP.NET Webform Project named "AspxWeb".

Step2
Create a new folder named "Home".

Step3
Then add webform named "HFL.aspx".

Code ref of HFL.aspx
    <%@ Page Language="C#" AutoEventWireup="true" CodeBehind="HFL.aspx.cs" Inherits="AspxWeb.Home.HFL" %>  
      
    <!DOCTYPE html PUBLIC "-//W3C//DTD XHTML 1.0 Transitional//EN" "http://www.w3.org/TR/xhtml1/DTD/xhtml1-transitional.dtd">  
    <html xmlns="http://www.w3.org/1999/xhtml">  
    <head runat="server">  
        <title>Satyaprakash</title>  
    </head>  
    <body>  
        <form id="form1" runat="server">  
        <div>  
            <h2 style="background-color: Yellow; color: Blue; text-align: center; font-style: oblique">  
                Peter's Webform Path Concept</h2>  
            <fieldset>  
                <legend style="font-family: Arial Black; color: blue">Student Name</legend>  
                <asp:Label ID="Peterlbl" runat="server" Text="Label"></asp:Label>  
            </fieldset>  
        </div>  
        </form>  
    </body>  
    <footer>      
            <p style="background-color: Yellow; font-weight: bold; color:blue; text-align: center; font-style: oblique">©<script>document.write(new Date().toDateString()); </script></p>      
        </footer>  
    </html> 

Code Description
Here I added label server control named "Peterlbl" .
    <asp:Label ID="
Peterlbl" runat="server" Text="Label"></asp:Label> 

Code ref of HFL.aspx.cs
    using System;  
    using System.Collections.Generic;  
    using System.Linq;  
    using System.Web;  
    using System.Web.UI;  
    using System.Web.UI.WebControls;  
      
    namespace AspxWeb.Home  
    {  
        public partial class HFL : System.Web.UI.Page  
        {  
            protected void Page_Load(object sender, EventArgs e)  
            {  
                Satyalbl.Text = "Peter";  
            }  
        }  
    } 


Code Description

In the page_load() event I added label control id with associate result which will show in webpage during load time.

Step4
Set start page follow below image .

Here the Home is the name of the folder and HFL.aspx name of the webform inside the Home folder.

Notes
In MVC , URL is mapped to a controller action method. Where as in web forms application, the URL is mapped to a physical file.

Module Summary

  • What is ASP.NET MVC.
  • What is ASP.NET Webform.
  • The url path concept between ASP.NET MVC and ASP.NET Web Forms.
  • Set start page in ASP.NET MVC and ASP.NET Web Forms.


ASP.NET MVC Hosting - HostForLIFE.eu :: Consuming WCF Service in MVC Application Using Entity Framework

clock August 13, 2026 14:15 by author Peter

This article includes a step by step tutorial to learn WCF using MVC in Visual Studio. We are also using the Entity Framework (.edmx model) for database operations. This scenario targets the user of Entity Framework Model's first approach that consumes WCF service which is consumed in MVC applications for CRUD operations.

Note :
Make sure that Entity Framework is already installed with Visual Studio. Otherwise, install it using NuGet Packages.
Create a table in your database with the name of "UserDetail", as the following.

Step 1. Crate a blank solution
Open Visual Studio.
File - New - Project…
Select "Other project Type" in the left pane and choose "Blank Solution."
Type the name of the Solution "MvcWcfEF";

Step 2. Creating an WCF Application
Right click on the MvcWcfEF solution in Solution Explorer and go to Add  New Project.

Select WCF Service Application Library and type the name as WcfServiceApp.
Click on OK.

Step 3. Creating a service for CRUD operation
Right click on the WcfServiceApp project and select Add - New Item.
Choose Web option from left pane and select "WCF Service".
Type the name as "MyService.svc" and click on Add button.

Step 4. Creating an Entity Framework Model
Right click on the WcfServiceApp project and select Add - New Item.
Choose Data option from left pane and select "ADO.NET Entity data model".
Type the name as "EntityModel.edmx" and click on Add button, same as in the following images.


Select your database and type the name of connection settings in web.config as "TestDBEntities".

Step 5. Write a service for CRUD operation
Open MyService.csv page from WcfService application and write the following code:
        using System;  
        using System.Collections.Generic;  
        using System.Data;  
        using System.Linq;  
        using System.Runtime.Serialization;  
        using System.ServiceModel;  
        using System.Text;  
          
        namespace WcfServiceApp  
        {  
            // NOTE: You can use the "Rename" command on the "Refactor" menu to change the class name "MyService" in code, svc and config file together.  
            // NOTE: In order to launch WCF Test Client for testing this service, please select MyService.svc or MyService.svc.cs at the Solution Explorer and start debugging.  
            public class MyService : IMyService  
            {  
                public void DoWork()  
                {  
                }  
          
                public List<UserDetail> GetAllUser()  
                {  
                    List<UserDetail> userlst = new List<UserDetail>();  
                    TestDBEntities tstDb = new TestDBEntities();  
                    var lstUsr = from k in tstDb.UserDetails select k;  
                    foreach (var item in lstUsr)  
                    {  
                        UserDetail usr = new UserDetail();  
                        usr.Id = item.Id;  
                        usr.Name = item.Name;  
                        usr.Email = item.Email;  
                        userlst.Add(usr);  
          
                    }  
          
                    return userlst;  
                }  


                public UserDetail GetAllUserById(int id)  
                {  
          
                    TestDBEntities tstDb = new TestDBEntities();  
                    var lstUsr = from k in tstDb.UserDetails where k.Id==id select k;  
                    UserDetail usr = new UserDetail();  
                    foreach (var item in lstUsr)  
                    {  
          
                        usr.Id = item.Id;  
                        usr.Name = item.Name;  
                        usr.Email = item.Email;  
          
          
                    }  
          
                    return usr;  
                }  
          
                public int DeleteUserById(int Id)  
                {  
          
                    TestDBEntities tstDb = new TestDBEntities();  
                    UserDetail usrdtl = new UserDetail();  
                    usrdtl.Id = Id;  
                    tstDb.Entry(usrdtl).State = EntityState.Deleted;  
                    int Retval = tstDb.SaveChanges();  
                    return Retval;  
                }  
          
                public int AddUser(string Name, string Email)  
                {  
                    TestDBEntities tstDb = new TestDBEntities();  
                    UserDetail usrdtl = new UserDetail();  
                    usrdtl.Name = Name;  
                    usrdtl.Email = Email;  
                    tstDb.UserDetails.Add(usrdtl);  
                    int Retval = tstDb.SaveChanges();  
                    return Retval;  
                }  
              public int UpdateUser(int Id,string Name, string Email)  
                {  
                    TestDBEntities tstDb = new TestDBEntities();  
                    UserDetail usrdtl = new UserDetail();  
                    usrdtl.Id = Id;  
                    usrdtl.Name = Name;  
                    usrdtl.Email = Email;  
                    tstDb.Entry(usrdtl).State = EntityState.Modified;  
                     
                    int Retval = tstDb.SaveChanges();  
                    return Retval;  
                }  
                 
            }  
        }  


Now, Open IMyService and write the "ServiceContract" and "DatatContract", as follows.
using System;  
    using System.Collections.Generic;  
    using System.Linq;  
    using System.Runtime.Serialization;  
    using System.ServiceModel;  
    using System.Text;  
      
    namespace WcfServiceApp  
    {  
        // NOTE: You can use the "Rename" command on the "Refactor" menu to change the interface name "IMyService" in both code and config file together.  
        [ServiceContract]  
        public interface IMyService  
        {  
            [OperationContract]  
           List<UserDetail> GetAllUser();  
            [OperationContract]  
            int AddUser(string Name, string Email);  
            [OperationContract]  
            UserDetail GetAllUserById(int id);  
      
            [OperationContract]  
            int UpdateUser(int Id, string Name, string Email);  
      
            [OperationContract]  
            int DeleteUserById(int Id);  
        }  
      
      
        [DataContract]  
        public class UserDetails  
        {  
            [DataMember]  
            public int Id { get; set; }  
            [DataMember]  
            public string Name { get; set; }  
            [DataMember]  
            public string Email { get; set; }  
          
          
        }  
    }  

Service has been completed. Now, build the service.

  • Press F5 to run the Service.
  • Copy the Service URL, as shown in following image (localhost:1034/MyService.svc), for creating the reference.

Step 6. Creating an MVC Application

  • Now, right click on the "MvcWcfEF " solution in Solution Explorer, again.
  • Select e New  Project…
  • Select ASP.NET MVC3/4 Web Application.
  • Enter the name of application as "MvcApp".
  • Click on OK.

Adding a Project Priority and setting the reference

  • Right click on the MvcApp and click on add service reference as in he image below.
  • Paste the Copied Service URL in the given address and press Go button.
  • All the services will display, as in the folowing picture. Just give the Namespace as "ServiceRefernce1" and click on OK button.

Since WCF service application and MVC application both are in the same solution, we have to build the Service first and then the MVC application in order to consume the service in MVC application. Do the following for that,
Right Click on the MvcWcfEF Solution in Solution Explorer and click on properties.
Check the "Multiple Startup Project " and set the application priority for WCF and MVC application (WCF service should be first and MVC afterwards), as in the following image.

Create a Model

Right click on Model folder and click on Class. Write the class name as "User" and create the following properties.

    using System;  
    using System.Collections.Generic;  
    using System.Linq;  
    using System.Web;  
      
    namespace MvcApp.Models  
    {  
        public class User  
        {  
      
             
                public int Id { get; set; }  
                 
                public string Name { get; set; }  
                 
                public string Email { get; set; }  
      
        }  
    }  

Create a Controller

Right click on the Controller folder and click on add controller. Give the name of controller as "HomeController" and write the following action for CRUD operation.
    using System;  
    using System.Collections.Generic;  
    using System.Linq;  
    using System.Web;  
    using System.Web.Mvc;  
    using MvcApp.Models;  
      
      
    namespace MvcApp.Controllers  
    {  
        public class HomeController : Controller  
        {  
            //  
            // GET: /Home/  
            ServiceReference1.MyServiceClient ur = new ServiceReference1.MyServiceClient();  
            public ActionResult Index()  
            {  
                List<User> lstRecord = new List<User>();  
                 
                var lst = ur.GetAllUser();  
      
                foreach (var item in lst)  
                {  
                    User usr = new User();  
                    usr.Id = item.Id;  
                    usr.Name = item.Name;  
                    usr.Email = item.Email;  
                    lstRecord.Add(usr);  
                  
                }  
      
      
                return View(lstRecord);  
            }  
      
      
            public ActionResult Add()  
            {  
      
                return View();  
            }  
            [HttpPost]  
            public ActionResult Add(User mdl)  
            {  
      
                User usr= new User();  
                usr.Name=mdl.Name;  
                usr.Email=mdl.Email;  
                ur.AddUser(usr.Name,usr.Email);  
                return RedirectToAction("Index", "Home");  
                
            }  
            public ActionResult Delete(int id)  
            {  
                int retval = ur.DeleteUserById(id);  
                if (retval > 0)  
                {  
                    return RedirectToAction("Index", "Home");  
                }  
      
                return View();  
            }  
      
            public ActionResult Edit(int id)  
             {  
                var lst = ur.GetAllUserById(id);  
                  User usr = new User();  
                  usr.Id = lst.Id;  
                  usr.Name = lst.Name;  
                  usr.Email = lst.Email;  
                  return View(usr);  
      
            }  
            [HttpPost]  
            public ActionResult Edit(User mdl)  
            {  
                User usr = new User();  
                usr.Id = mdl.Id;  
                usr.Name = mdl.Name;  
                usr.Email = mdl.Email;  
      
      
                int Retval = ur.UpdateUser(usr.Id, usr.Name, usr.Email);  
                if (Retval > 0)  
                {  
                    return RedirectToAction("Index", "Home");  
                }  
                return View();  
            }  
        }  
    }  

Creating a View
Creating a view is very simple. Just right click on All action of the controller and click on Add View. The following is the code for all views (Index, Add, Edit). 
Index.cshtml
    @model IEnumerable<MvcApp.Models.User>  
      
    @{  
        ViewBag.Title = "Index";  
    }  
      
      
    @using (Html.BeginForm()){  
        <div>  
            <h2>User Details</h2>  
             @Html.ActionLink("Add User", "Add", "")  
        </div>  
        <div>  
             <table >  
                <tr style="background-color: #FFFACD; text-align:center">  
                    <th style="text-align:left">  
                        Name  
                    </th>  
                    <th style="text-align:left">  
                       Email  
                    </th>  
                    <th style="text-align:left">  
                        Manage  
                    </th>  
                </tr>  
      
                @{  
                    foreach (var item in Model)  
                    {  
                    <tr style="background-color: #FFFFF0">  
                        <td>  
                            @item.Name  
                        </td>  
                        <td>  
                            @item.Email  
                        </td>  
                         
                        <td>  
                            @Html.ActionLink("Edit", "Edit", new { id = @item.Id }) /@Html.ActionLink("Delete", "Delete", new {[email protected] })   
                             
                        </td>  
                         
                    </tr>  
                    }  
                }  
      
            </table>  
      
        </div>  
         
      
    }  


Add.cshtml
    @model MvcApp.Models.User  
      
    @{  
        ViewBag.Title = "Add";  
    }  
      
    <h2>Add New User</h2>  
      
    @using (Html.BeginForm()) {   
      
    <div style="text-align:center">  
      
        <table>  
            <tr>  
                <td>  
                    Name :   
                </td>  
                <td>   
                    @Html.TextBoxFor(m=>m.Name)  
                </td>  
            </tr>  
      
             <tr>  
                <td>  
                    Email :   
                </td>  
                <td>   
                    @Html.TextBoxFor(m=>m.Email)  
                </td>  
            </tr>  
             <tr>  
                <td>  
                    Email :   
                </td>  
                <td>   
                   <input type="submit" value="Submit" />  
                </td>  
            </tr>  
        </table>  
      
    </div>    
    }  


Edit.cshtml
    @model MvcApp.Models.User  
      
    @{  
        ViewBag.Title = "Edit";  
    }  
      
    <h2>Edit User</h2>  
      
    @using (Html.BeginForm()) {   
      
    <div style="text-align:center">  
      
        <table>  
            <tr>  
                <td>  
                    Name :   
                </td>  
                <td>   
                    @Html.TextBoxFor(m=>m.Name)  
                </td>  
            </tr>  
      
             <tr>  
                <td>  
                    Email :   
                </td>  
                <td>   
                    @Html.TextBoxFor(m=>m.Email)  
                </td>  
            </tr>  
             <tr>  
                <td>  
                       
                </td>  
                <td>   
                   <input type="submit" value="Update" />  
                </td>  
            </tr>  
        </table>  
      
    </div>  
    }  

Now, press F5 to run the Application


ASP.NET MVC Hosting - HostForLIFE.eu :: Different Ways Of Rendering Partial View In MVC

clock August 5, 2026 13:52 by author Peter

There are 5 different way of rendering a partial view.

  • Partial
  • Render partial
  • Action
  • Render action
  • JQuery load function

When to use a partial view?

  • To break up large markup files into smaller components.
  • To reduce the duplication of common markup content across markup files.
  • Partial views shouldn't be used to maintain common layout elements. Common layout elements should be specified in the _Layout.cshtml files.

Difference between RenderPartial and Partial
Partial
The partial method returns an MvcHtmlString object. Basically, it stringifies the HTML content in the location where it was specified.

RenderPartial
The RenderPartial method will not actually return any values or strings and instead, it will write the Partial View that is requested to the Response Stream through response.write internally.
 
Difference between RenderAction and Action
RenderAction

The RenderAction method renders the result directly to the response which means it is more efficient if the action returns a large amount of HTML.

Action
Action method returns a string with the result.
 
Let's see this via an example. 

Step 1
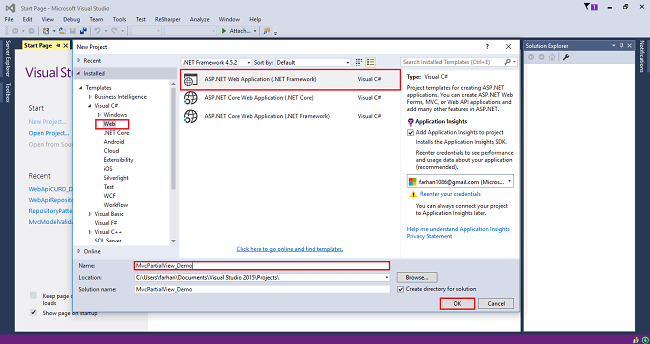
Open Visual Studio 2015 or an IDE of your choice and create a new project.

Step 2
Choose web application project and give an appropriate name to your project.
Step 3
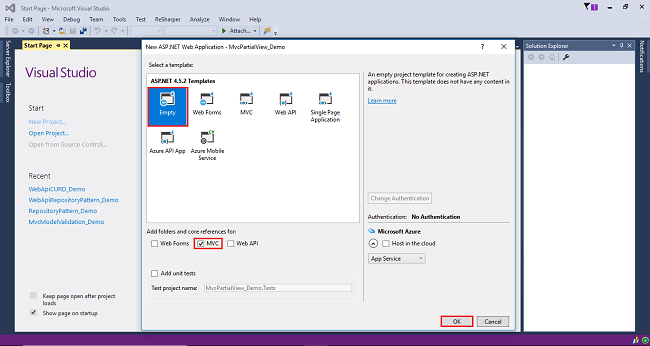
Select empty template, check on MVC checkbox below, and click OK.
Step 4
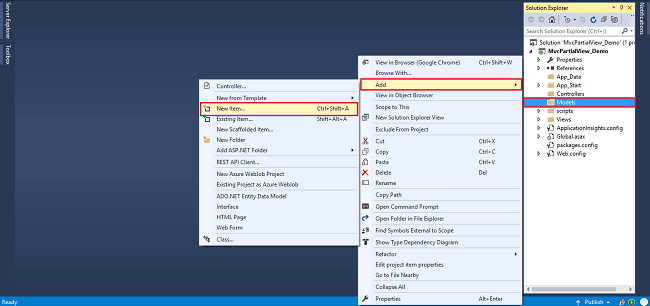
Right click on the Models folder and add a database model. Add Entity Framework now. For that, right-click on Models folder, select Add, then select "New Item".
You will get a window; from there, select Data from the left panel and choose ADO.NET Entity Data Model, give it the name EmployeeModel (this name is not mandatory, you can give any name) and click "Add".
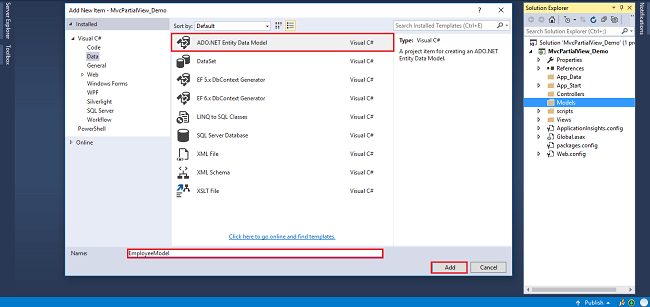
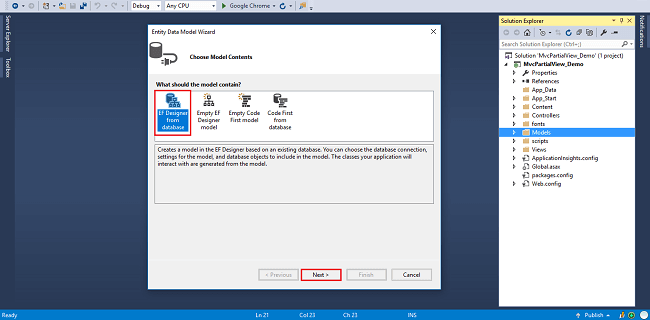
After you click on "Add a window", the wizard will open. Choose EF Designer from the database and click "Next".
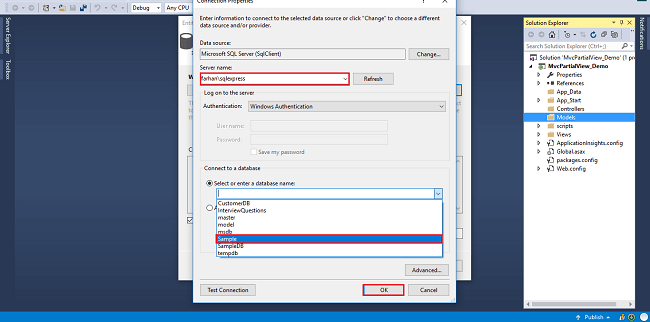
After clicking on "Next", a window will appear. Choose "New Connection". Another window will appear. Add your server name - if it is local, then enter dot (.). Choose your database and click "OK".
The connection will be added. If you wish, save the connection name as you want. You can change the name of your connection below. It will save the connection in the web config. Now, click "Next"
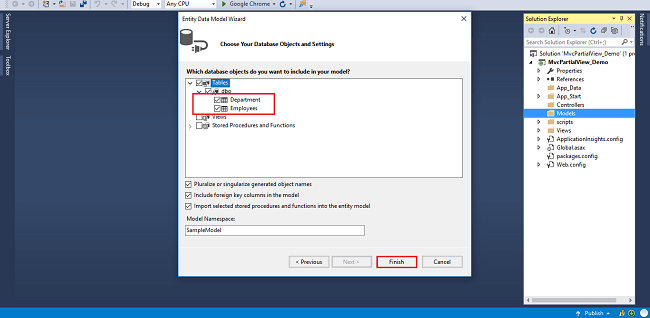
After clicking on NEXT, another window will appear. Choose the database table name as shown in the below screenshot and click "Finish".
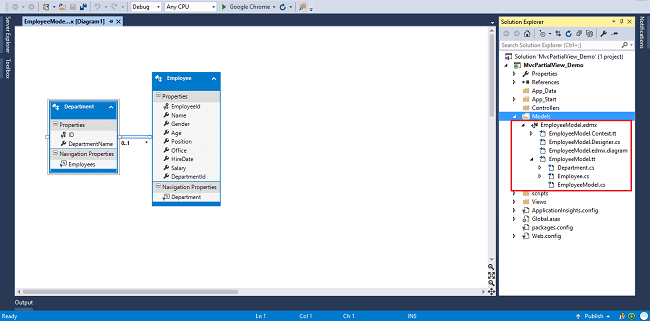

Entity Framework gets added and the respective class gets generated under the Models folder.

Step 5
Right click on controllers folder add a controller.
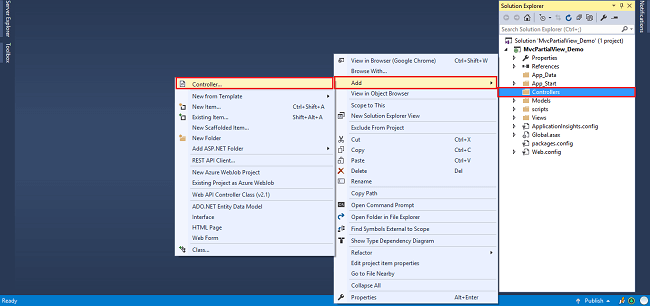
A window will appear. Choose MVC5 Controller-Empty and click "Add".
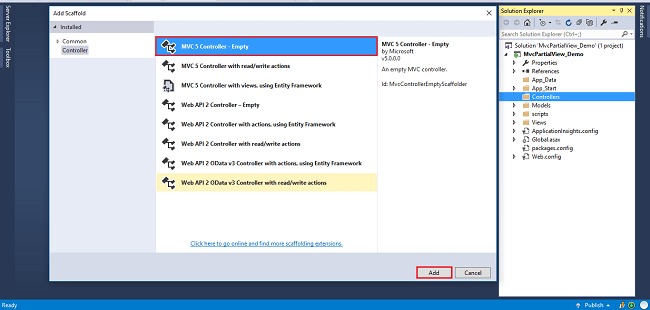
After clicking on "Add", another window will appear with DefaultController. Change the name to HomeController and click "Add". The HomeController will be added under the Controllers folder. Don’t change the Controller suffix for all controllers, change only the highlight, and instead of Default, just change Home;

Complete code for Home Controller
    using System;  
    using System.Collections.Generic;  
    using System.Linq;  
    using System.Web;  
    using System.Web.Mvc;  
    using MvcPartialView_Demo.Models;  
       
    namespace MvcPartialView_Demo.Controllers  
    {  
        public class HomeController : Controller  
        {  
            private readonly EmployeeContext _dbContext=new EmployeeContext();  
       
            public ActionResult Index()  
            {  
                var employee = _dbContext.Employees.ToList();  
                return View(employee);  
            }  
       
            public PartialViewResult Employee()  
            {  
                return PartialView("_employee");  
            }  
        }  
    }  

Step 6

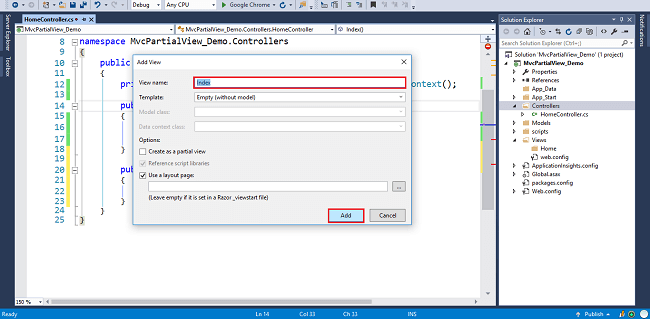
Right-click on Index method in HomeController. The "Add View" window will appear with default index name checked (use a Layout page), and click on "Add.

Html.Partial
    @{  
        ViewBag.Title = "Index";  
    }  
       
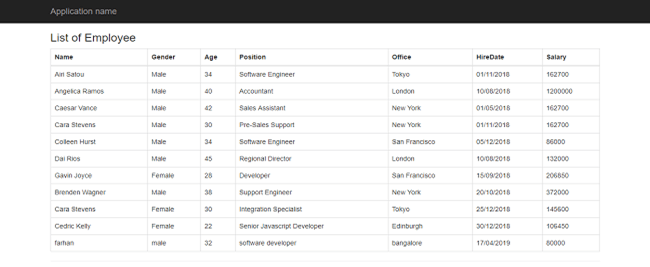
    <h3>List of Employee</h3>  
    @Html.Partial("_employee")  


Html.RenderPartial
    @{  
        ViewBag.Title = "Index";  
    }  
       
    <h3>List of Employee</h3>  
    @{  
        Html.RenderPartial("_employee");  
    }  


Html.Action
    @{  
        ViewBag.Title = "Index";  
    }  
       
    <h3>List of Employee</h3>  
    @{  
        @Html.Action("Employee")  
    }  

Html.RenderAction
    @{  
        ViewBag.Title = "Index";  
    }  
       
    <h3>List of Employee</h3>  
    @{  
        Html.RenderAction("Employee");  
    }  


JQuery load function 
    @{  
        ViewBag.Title = "Index";  
    }  
    <script src="~/Scripts/jquery-3.3.1.min.js"></script>  
    <h3>List of employee</h3>  
    <div id="partialView">  
    </div>  
    <script type="text/javascript">  
        $(document).ready(function() {  
            $("#partialView").load('@Url.Content("/Home/Employee")');  
        });  
    </script>  

Step 7
Right-click on the "Shared" folder index views folder add a view name it _employee checked on create as a partial view, and click on "Add".
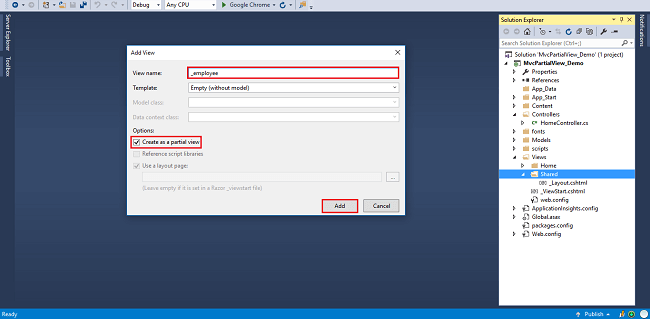
Code for partial view
    @model IEnumerable<MvcPartialView_Demo.Models.Employee>  
       
    <table class="table table-bordered">  
        <thead>  
        <tr>  
            <th>@Html.DisplayNameFor(m=>m.Name)</th>  
            <th>@Html.DisplayNameFor(m=>m.Gender)</th>  
            <th>@Html.DisplayNameFor(m=>m.Age)</th>  
            <th>@Html.DisplayNameFor(m=>m.Position)</th>  
            <th>@Html.DisplayNameFor(m=>m.Office)</th>  
            <th>@Html.DisplayNameFor(m=>m.HireDate)</th>  
            <th>@Html.DisplayNameFor(m=>m.Salary)</th>  
        </tr>  
        </thead>  
        <tbody>  
        @foreach (var emp in Model)  
        {  
            <tr>  
                <td>@emp.Name</td>  
                <td>@emp.Gender</td>  
                <td>@emp.Age</td>  
                <td>@emp.Position</td>  
                <td>@emp.Office</td>  
                <td>  
                    @if (emp.HireDate != null)  
                    {  
                        @emp.HireDate.Value.ToString("dd/MM/yyyy")  
                    }  
                </td>  
                <td>@emp.Salary</td>  
            </tr>  
        }  
        </tbody>  
    </table>  

Step 8
Build and run your project by pressing CTRL+F5.


About HostForLIFE.eu

HostForLIFE.eu is European Windows Hosting Provider which focuses on Windows Platform only. We deliver on-demand hosting solutions including Shared hosting, Reseller Hosting, Cloud Hosting, Dedicated Servers, and IT as a Service for companies of all sizes.

We have offered the latest Windows 2016 Hosting, ASP.NET Core 2.2.1 Hosting, ASP.NET MVC 6 Hosting and SQL 2017 Hosting.


Tag cloud

Sign in